相比与mybatis只做增强,不做修改
MyBatis-Plus学习笔记
一,是什么
MyBatis-Plus是一个mybatis的增强工具
特性:
无侵入:在mybatis的基础上只做增强不做改变。
损耗小:启动时就会注入基本的curd,性能基本损耗,直接面向对象操作
强大的curd操作:内置通过Mapper,通用service,仅仅通过少量配置即可实现单表大部分crud操作,强大的条件构造器,满足各类需求
支持lambda形式调用:通过lambda表达式,方便的编写各类条件查询,无需担心字段写错
支持主键自动生成:支持多达四种主键策略
内置代码生成器:采用代码或者maven插件可快速生成mapper,model,service,controller层代码,支持模板引擎
内置分页插件:基于mybatis物理分页,开发者无需关心具体操作,配置好插件后,写分页等同于普通的list操作
分页插件支持多种数据库:支持MySQL,Oracle,DB2,hsql等多种数据库
等等
更多的可以去官网查看:
https://baomidou.com/
二,入门案例
1.建库建表
# 建库建表
CREATE DATABASE `LBB`
USE `LBB`;
CREATE TABLE `user` (
`id` BIGINT(20) NOT NULL COMMENT '主键ID',
`name` VARCHAR(30) DEFAULT NULL COMMENT '姓名',
`age` INT(11) DEFAULT NULL COMMENT '年龄',
`email` VARCHAR(50) DEFAULT NULL COMMENT '邮箱',
PRIMARY KEY (`id`)
) ENGINE=INNODB DEFAULT CHARSET=utf8;
# 插入数据
INSERT INTO USER (id, NAME, age, email) VALUES
(1, 'Jone', 18, '[email protected]'),
(2, 'Jack', 19, '[email protected]'),
(3, 'Tom', 20, '[email protected]'),
(4, 'Lucy', 21, '[email protected]'),
(5, 'bob', 22, '[email protected]');
2.创建spring Boot工程
1.利用初始化创建并引入依赖
<dependencies>
        <!--springboot-->
        <dependency>
            <groupId>org.springframework.boot</groupId>
            <artifactId>spring-boot-starter</artifactId>
        </dependency>
        <!--spring bootTest-->
        <dependency>
            <groupId>org.springframework.boot</groupId>
            <artifactId>spring-boot-starter-test</artifactId>
            <scope>test</scope>
        </dependency>
        <!--mybatis -plus 依赖-->
        <dependency>
            <groupId>com.baomidou</groupId>
            <artifactId>mybatis-plus-boot-starter</artifactId>
            <version>3.3.1</version>
        </dependency>
        <!--Lombok依赖,另外还需要下载Lombok插件-->
        <dependency>
            <groupId>org.projectlombok</groupId>
            <artifactId>lombok</artifactId>
            <optional>true</optional>
        </dependency>
        <!--MySQL连接驱动-->
        <dependency>
            <groupId>mysql</groupId>
            <artifactId>mysql-connector-java</artifactId>
            <scope>runtime</scope>
        </dependency>
    </dependencies>
2.配置application.yml
spring:
# 配置数据源信息
datasource:
# 配置数据源类型
type: com.zaxxer.hikari.HikariDataSource
# 配置连接数据库信息
driver-class-name: com.mysql.cj.jdbc.Driver
url: jdbc:mysql://localhost:3306/lbb?characterEncoding=utf-
8&useSSL=false
username: root
password: 021806
注意:
spring boot 2.0(内置jdbc5驱动),驱动类使用:driver-class-name: com.mysql.jdbc.Driver
spring boot 2.1及以上(内置jdbc8驱动),驱动类使用:
driver-class-name: com.mysql.cj.jdbc.Driver
否则运行测试用例的时候会有 WARN 信息
2、连接地址url
MySQL5.7版本的url:
jdbc:mysql://localhost:3306/mybatis_plus?characterEncoding=utf-8&useSSL=false
MySQL8.0版本的url:
jdbc:mysql://localhost:3306/mybatis_plus?
serverTimezone=GMT%2B8&characterEncoding=utf-8&useSSL=false
否则运行测试用例报告如下错误:
java.sql.SQLException: The server time zone value ‘Öйú±ê׼ʱ¼ä’ is unrecognized or
represents more
3.配置相关包及类
1.主类设置包扫描
@SpringBootApplication
@MapperScan("com.li.mptest.mapper")//扫描mapper包
public class MpTestApplication {


    public static void main(String[] args) {


        SpringApplication.run(MpTestApplication.class, args);
    }

}
2.设置实体类
@Data   //lombok 注解
public class User {


    private Long id;
    private String name;
    private Integer age;
    private String email;
}
3.添加mapper
public interface UserMapper extends BaseMapper<User> {


}
BaseMapper是MyBatis-Plus提供的模板mapper,其中包含了基本的CRUD方法,泛型为操作的
实体类型
4.测试
@SpringBootTest
class MpTestApplicationTests {


    @Autowired
    private UserMapper userMapper;


    @Test
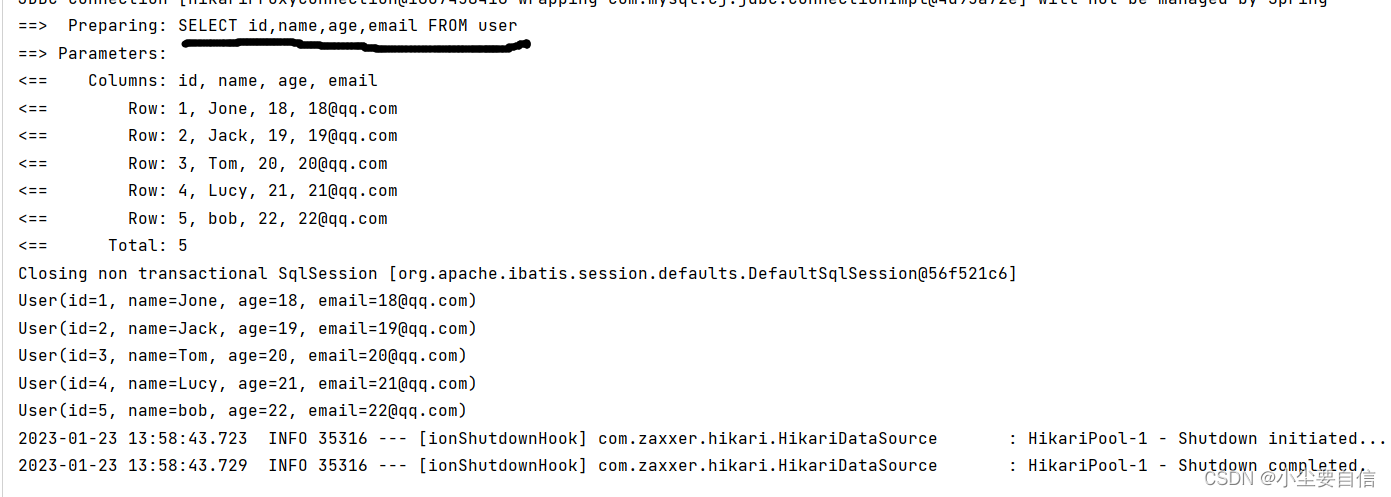
    void contextLoads() {


        //selectList()根据MP内置的条件构造器查询一个list集合,null表示没有条件,即查询所有
        userMapper.selectList(null).forEach(System.out::println);
    }

}

三,基本的curd
为了方便的查看,底层执行的语句,可以通过配置日志来查看
# 配置MyBatis日志
mybatis-plus:
configuration:
log-impl: org.apache.ibatis.logging.stdout.StdOutImpl

1.BaseMapper
官方给的basemapper里面封装了简单的方法,
public interface BaseMapper<T> extends Mapper<T> {


    /**
     * 插入一条记录
     *
     * @param entity 实体对象
     */
    int insert(T entity);

    /**
     * 根据 ID 删除
     *
     * @param id 主键ID
     */
    int deleteById(Serializable id);

    /**
     * 根据 columnMap 条件,删除记录
     *
     * @param columnMap 表字段 map 对象
     */
    int deleteByMap(@Param(Constants.COLUMN_MAP) Map<String, Object> columnMap);

    /**
     * 根据 entity 条件,删除记录
     *
     * @param wrapper 实体对象封装操作类(可以为 null)
     */
    int delete(@Param(Constants.WRAPPER) Wrapper<T> wrapper);

    /**
     * 删除(根据ID 批量删除)
     *
     * @param idList 主键ID列表(不能为 null 以及 empty)
     */
    int deleteBatchIds(@Param(Constants.COLLECTION) Collection<? extends Serializable> idList);

    /**
     * 根据 ID 修改
     *
     * @param entity 实体对象
     */
    int updateById(@Param(Constants.ENTITY) T entity);

    /**
     * 根据 whereEntity 条件,更新记录
     *
     * @param entity        实体对象 (set 条件值,可以为 null)
     * @param updateWrapper 实体对象封装操作类(可以为 null,里面的 entity 用于生成 where 语句)
     */
    int update(@Param(Constants.ENTITY) T entity, @Param(Constants.WRAPPER) Wrapper<T> updateWrapper);

    /**
     * 根据 ID 查询
     *
     * @param id 主键ID
     */
    T selectById(Serializable id);

    /**
     * 查询(根据ID 批量查询)
     *
     * @param idList 主键ID列表(不能为 null 以及 empty)
     */
    List<T> selectBatchIds(@Param(Constants.COLLECTION) Collection<? extends Serializable> idList);

    /**
     * 查询(根据 columnMap 条件)
     *
     * @param columnMap 表字段 map 对象
     */
    List<T> selectByMap(@Param(Constants.COLUMN_MAP) Map<String, Object> columnMap);

    /**
     * 根据 entity 条件,查询一条记录
     *
     * @param queryWrapper 实体对象封装操作类(可以为 null)
     */
    T selectOne(@Param(Constants.WRAPPER) Wrapper<T> queryWrapper);

    /**
     * 根据 Wrapper 条件,查询总记录数
     *
     * @param queryWrapper 实体对象封装操作类(可以为 null)
     */
    Integer selectCount(@Param(Constants.WRAPPER) Wrapper<T> queryWrapper);

    /**
     * 根据 entity 条件,查询全部记录
     *
     * @param queryWrapper 实体对象封装操作类(可以为 null)
     */
    List<T> selectList(@Param(Constants.WRAPPER) Wrapper<T> queryWrapper);

    /**
     * 根据 Wrapper 条件,查询全部记录
     *
     * @param queryWrapper 实体对象封装操作类(可以为 null)
     */
    List<Map<String, Object>> selectMaps(@Param(Constants.WRAPPER) Wrapper<T> queryWrapper);

    /**
     * 根据 Wrapper 条件,查询全部记录
     * <p>注意: 只返回第一个字段的值</p>
     *
     * @param queryWrapper 实体对象封装操作类(可以为 null)
     */
    List<Object> selectObjs(@Param(Constants.WRAPPER) Wrapper<T> queryWrapper);

    /**
     * 根据 entity 条件,查询全部记录(并翻页)
     *
     * @param page         分页查询条件(可以为 RowBounds.DEFAULT)
     * @param queryWrapper 实体对象封装操作类(可以为 null)
     */
    <E extends IPage<T>> E selectPage(E page, @Param(Constants.WRAPPER) Wrapper<T> queryWrapper);

    /**
     * 根据 Wrapper 条件,查询全部记录(并翻页)
     *
     * @param page         分页查询条件
     * @param queryWrapper 实体对象封装操作类
     */
    <E extends IPage<Map<String, Object>>> E selectMapsPage(E page, @Param(Constants.WRAPPER) Wrapper<T> queryWrapper);
}
通过观察BaseMapper中的方法,大多方法中都有Wrapper类型的形参,此为条件构造器,可针
对于SQL语句设置不同的条件,若没有条件,则可以为该形参赋值null,即查询(删除/修改)所
有数据,关于Wrapper文章后面会详细介绍
2.通用Service
通用 Service CRUD 封装IService接口,进一步封装 CRUD 采用 get 查询单行 remove 删
除 list 查询集合 page 分页 前缀命名方式区分 Mapper 层避免混淆,
泛型 T 为任意实体对象
如果存在自定义通用 Service 方法的可能,可以创建自己的 IBaseService 继承
Mybatis-Plus 提供的基类
官网地址:
https://baomidou.com/pages/49cc81/#service-crud-%E6%8E%A5%E5%8F%A3
MyBatis-Plus中有一个接口 IService和其实现类 ServiceImpl,封装了常见的业务层逻辑
关于如何使用:简单举个例子:
查询总记录数
1.创建service接口和实现类

public interface UserService extends IService<User> {


}
@Service
public class UserServiceImpl extends ServiceImpl<UserMapper, User> implements
        UserService
{


}
2.测试
@Autowired
   UserService userService;
    @Test
    public void testGetCount(){


        long count = userService.count();
        System.out.println("总记录数:" + count);
    }

四.常用注解
1.@TableName
在使用MyBatis-Plus实现基本的CRUD时,我们无需指定要操作的表,只需在Mapper接口继承BaseMapper时,设置了泛型(User),由BaseMapper的泛型决定,即实体类型决定,且默认操作的表名和实体类型的类名一致
如果不一致就用到@TableName注解
@Data   //lombok 注解
@TableName("t_user") //在数据库中表名为t_user
public class User {


    private Long id;
    private String name;
    private Integer age;
    private String email;
}
当然如果要去除大量表的前缀,可以设置全局变量
ybatis-plus:
configuration:
# 配置MyBatis日志
log-impl: org.apache.ibatis.logging.stdout.StdOutImpl
global-config:
db-config:
# 配置MyBatis-Plus操作表的默认前缀
table-prefix: t_
2.@TableId
MyBatis-Plus在实现CRUD时,会默认将id作为主键列,并在插入数据时,默认基于雪花算法的策略生成id,若实体类和表中表示主键的不是id,而是其他字段,例如uid,MyBatis-Plus识别不出就会抛出异常,Field ‘uid’ doesn’t have a default value,说明MyBatis-Plus没有将uid作为主键
在实体类中uid属性上通过@TableId将其标识为主键,即可成功执行SQL语句
value属性
@Data   //lombok 注解
@TableName("t_user") //在数据库中表名为t_user
public class User {


    @TableId("uid")
    private Long uid;
    private String name;
    private Integer age;
    private String email;
}
type属性
用来设置主键的生成策略,默认时雪花算法
常见类型
| 值 | 含义 |
|---|---|
| idType.ASSIGN_ID | 基于雪花算法的策略生成数据id,与数据库id是否设置自增无关 |
| IdType.AUTO | 使用数据库的自增策略,注意,该类型请确保数据库设置了id自增,否则无效 |
当然也可以通过全局变量设置
mybatis-plus:
configuration:
# 配置MyBatis日志
log-impl: org.apache.ibatis.logging.stdout.StdOutImpl
global-config:
db-config:
# 配置MyBatis-Plus操作表的默认前缀
table-prefix: t_
# 配置MyBatis-Plus的主键策略
id-type: auto
3@TableField
MyBatis-Plus在执行SQL语句时,要保证实体类中的属性名和表中的字段名一致,如果实体类中的属性名和字段名不一致的情况,
若实体类中的属性使用的是驼峰命名风格,而表中的字段使用的是下划线命名风格例如实体类属userName,表中字段user_name此时MyBatis-Plus会自动将下划线命名风格转化为驼峰命名风格相当于在MyBatis中配置
例如实体类属性name,表中字段username
此时需要在实体类属性上使用@TableField(“username”)设置属性所对应的字段名
@Data   //lombok 注解
@TableName("t_user") //在数据库中表名为t_user
public class User {


    @TableId("uid")
    private Long uid;
    @TableField("username")
    private String name;
    private Integer age;
    private String email;
}
4.@TableLogic
逻辑删除
物理删除:真实删除,将对应数据从数据库中删除,之后查询不到此条被删除的数据
逻辑删除:假删除,将对应数据中代表是否被删除字段的状态修改为“被删除状态”,之后在数据库
中仍旧能看到此条数据记录
使用场景:可以进行数据恢复
在数据库表中首先添加字段表示逻辑删除

测试删除功能,真正执行的是修改,当再次查询时,被逻辑删除的数据默认不会被查询
UPDATE t_user SET is_deleted=1 WHERE id=? AND is_deleted=0
五,分页插件
1.>添加配置类
@Configuration
@MapperScan("com.li.mptest.mapper") //可以将主类中的注解移到此处
public class MybatisPlusConfig {


    @Bean
    public MybatisPlusInterceptor mybatisPlusInterceptor() {


        MybatisPlusInterceptor interceptor = new MybatisPlusInterceptor();
        interceptor.addInnerInterceptor(new
                PaginationInnerInterceptor(DbType.MYSQL));
        return interceptor;
    }
}
2.测试
public void testPage(){


//设置分页参数
        Page<User> page = new Page<>(1, 5);
        userMapper.selectPage(page, null);
//获取分页数据
        List<User> list = page.getRecords();
        list.forEach(System.out::println);
        System.out.println("当前页:"+page.getCurrent());
        System.out.println("每页显示的条数:"+page.getSize());
        System.out.println("总记录数:"+page.getTotal());
        System.out.println("总页数:"+page.getPages());
        System.out.println("是否有上一页:"+page.hasPrevious());
        System.out.println("是否有下一页:"+page.hasNext());
        }
六,代码生成器
1、引入依赖
<dependency>
            <groupId>com.baomidou</groupId>
            <artifactId>mybatis-plus-generator</artifactId>
            <version>3.5.1</version>
        </dependency>
        <dependency>
            <groupId>org.freemarker</groupId>
            <artifactId>freemarker</artifactId>
            <version>2.3.31</version>
        </dependency>
2、快速生成
public class FastAutoGeneratorTest {


    public static void main(String[] args) {


        FastAutoGenerator.create("jdbc:mysql://127.0.0.1:3306/lbb?characterEncoding=utf-8&userSSL=false","root", "021806")
                        .globalConfig(builder -> {


                            builder.author("lbb") // 设置作者
//.enableSwagger() // 开启 swagger 模式
                                    .fileOverride() // 覆盖已生成文件
                                    .outputDir("D://mybatis_plus"); // 指定输出目录
                        })
                        .packageConfig(builder -> {


                            builder.parent("com.li") // 设置父包名
                                    .moduleName("mybatisplus") // 设置父包模块名
                                    .pathInfo(Collections.singletonMap(OutputFile.mapperXml, "D://mybatis_plus"));
// 设置mapperXml生成路径
                        })
                        .strategyConfig(builder -> {


                            builder.addInclude("t_user") // 设置需要生成的表名
                                    .addTablePrefix("t_", "c_"); // 设置过滤表前缀
                        })
                        .templateEngine(new FreemarkerTemplateEngine()) // 使用Freemarker引擎模板,默认的是Velocity引擎模板
                        .execute();
    }
}