HTMLElement.getBoundingClientRect
Element.getBoundingClientRect()
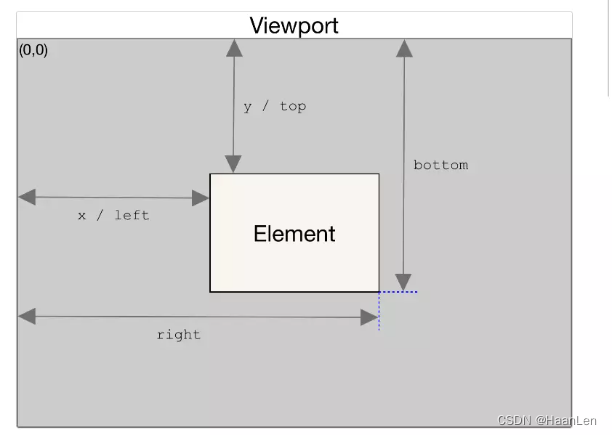
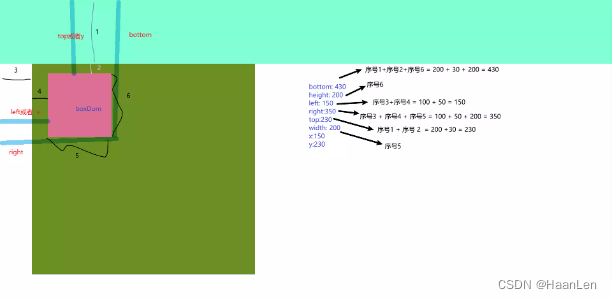
返回值是一个DOMRect对象,是包含整个元素的最小矩形(包括 padding 和 border-width)。该对象使用left、top、right、bottom、x、y、width 和 height这几个以像素为单位的只读属性描述整个矩形的位置和大小。除了 width 和 height 以外的属性是相对于视图窗口的左上角来计算的。
该方法返回的 DOMRect 对象中的 width 和 height 属性是包含了 padding 和 border-width 的,而不仅仅是内容部分的宽度和高度。
在标准盒子模型中,这两个属性值分别与元素的 width/height + padding + border-width 相等。
而如果是 box-sizing: border-box,两个属性则直接与元素的 width 或 height 相等。
通过getBoundingClientRect获取的属性值是不计算滚动偏移量的,是相对浏览器可视区域而言的。
.box {


  background-color: palevioletred;
  height: 200px;
  width: 200px;
}

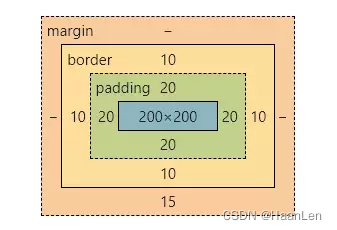
.box {


  background-color: palevioletred;
  height: 200px;
  width: 200px;
  padding: 20px;
  border: 10px solid green;
}
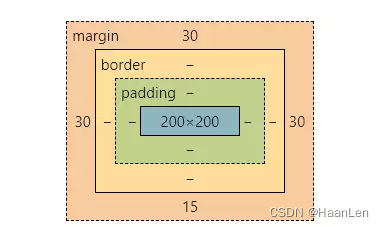
.box {


  background-color: palevioletred;
  height: 200px;
  width: 200px;
  margin: 30px;
}

    <div className="App">
      <div className='state_box'></div>
      <div className='parent_box' id='parent_box'>
          <div className='box' id='box'>
          </div>
      </div>
    </div>
.state_box {
height: 200px;
background-color: aquamarine;
}
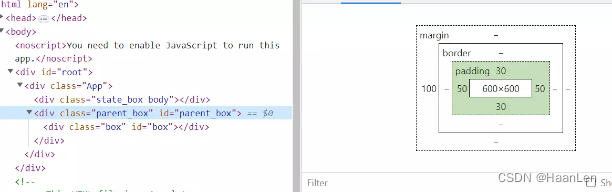
.parent_box {
height: 600px;
width: 600px;
background-color: olivedrab;
margin-left: 100px;
padding: 30px 50px;
}
.box {
height: 200px;
width: 200px;
background-color: palevioletred;
}
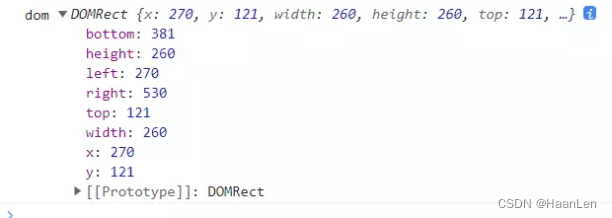
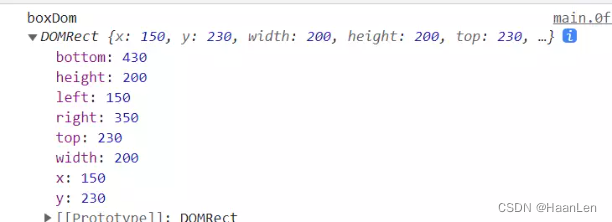
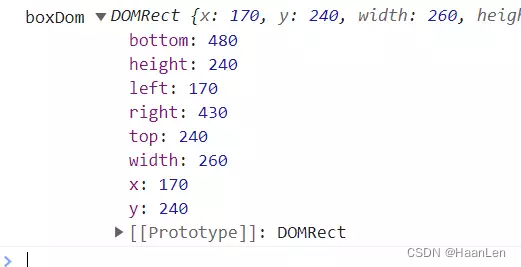
const boxDom = document.getElementById('box')

console.log('boxDom',boxDom?.getBoundingClientRect());
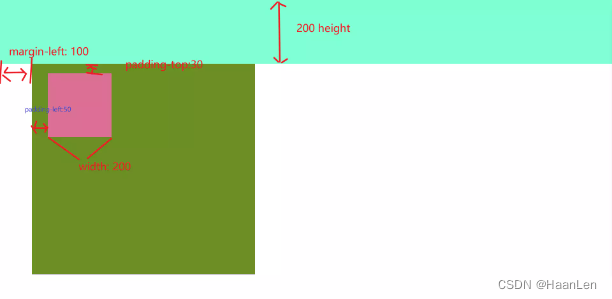
box增加padding,border,margin后
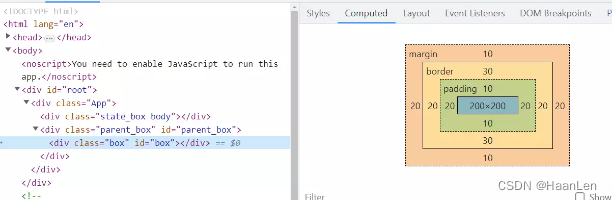
.state_box {


  height: 200px;
  background-color: aquamarine;
}
.parent_box {


  height: 600px;
  width: 600px;
  background-color: olivedrab;
  margin-left: 100px;
  padding: 30px 50px;
}
.box {


  height: 200px;
  width: 200px;
  background-color: palevioletred;
  border: 10px solid orange;
  padding: 10px 20px;
  margin: 10px 20px;
}
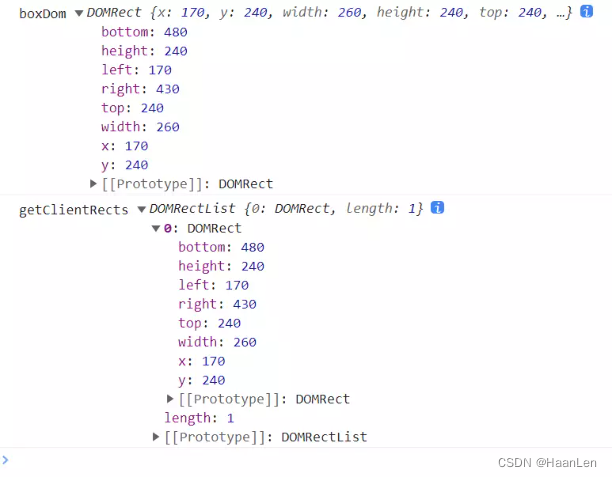
const boxDom = document.getElementById('box')

console.log('boxDom',boxDom?.getBoundingClientRect());
console.log('getClientRects',boxDom?.getClientRects() );
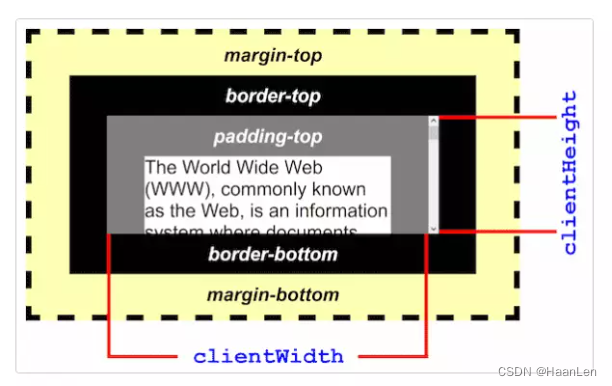
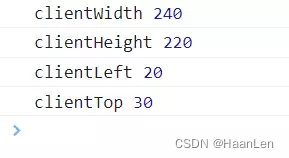
HTMLElement.clientWidth
只读属性 Element.clientWidth 对于内联元素以及没有 CSS 样式的元素为 0;否则,它是元素内部的宽度(以像素为单位)。该属性包括内边距(padding),但不包括边框(border)、外边距(margin)和垂直滚动条(如果存在)。
该属性值会被四舍五入为一个整数。如果你需要一个小数值,可使用 element.getBoundingClientRect()。
    <div className="App">
      <div className='state_box'></div>
      <div className='parent_box' id='parent_box'>
          <div className='box' id='box'>
          </div>
      </div>
    </div>
.state_box {


  height: 200px;
  background-color: aquamarine;
}
.parent_box {


  height: 600px;
  width: 600px;
  background-color: olivedrab;
  margin-left: 100px;
  padding: 30px 50px;
}
.box {


  height: 200px;
  width: 200px;
  background-color: palevioletred;
  border: 10px solid orange;
  padding: 10px 20px;
  margin: 10px 20px;
}
const boxDom = document.getElementById('box')
console.log('clientWidth',boxDom?.clientWidth);
console.log('clientHeight',boxDom?.clientHeight);

console.log('clientLeft',boxDom?.clientLeft);
console.log('clientTop',boxDom?.clientTop);

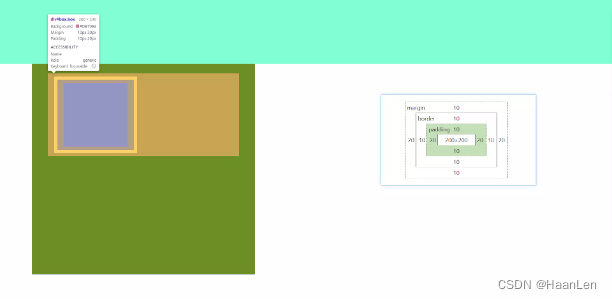
clientLeft: element左边框的宽度即border-left
clientTop: element上边框的宽度即border-top

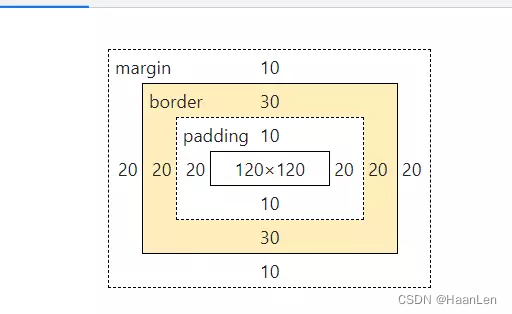
修改border测试
.box {


  height: 200px;
  width: 200px;
  background-color: palevioletred;
  border-top: 30px solid orange;
  border-bottom: 30px solid orange;
  border-left: 20px solid orange;
  border-right: 20px solid orange;
  padding: 10px 20px;
  margin: 10px 20px;
}

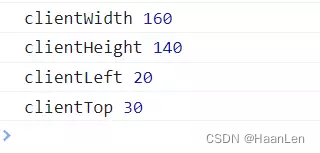
当box改为box-sizing: border-box;
.box {


  height: 200px;
  width: 200px;
  background-color: palevioletred;
  border-top: 30px solid orange;
  border-bottom: 30px solid orange;
  border-left: 20px solid orange;
  border-right: 20px solid orange;
  padding: 10px 20px;
  margin: 10px 20px;
  box-sizing: border-box;
}
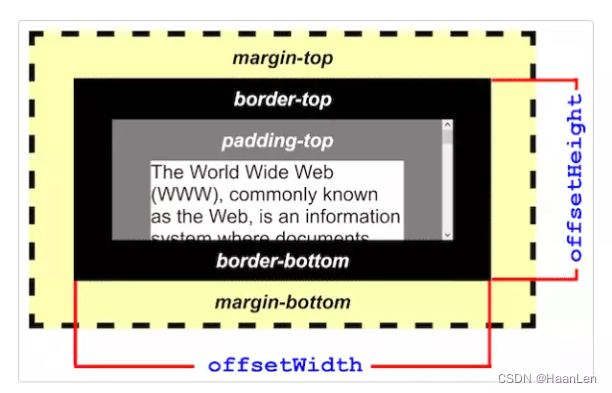
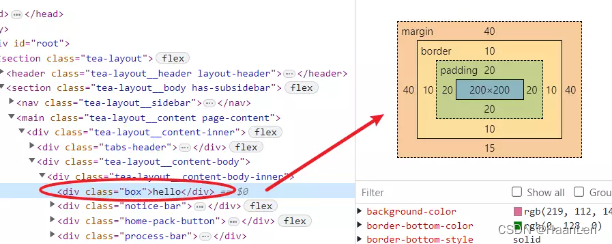
HTMLElement.offsetWidth
HTMLElement.offsetWidth
HTMLElement.offsetWidth 是一个只读属性,返回一个元素的布局宽度。一个典型的offsetWidth 是测量包含元素的边框 (border)、水平线上的内边距 (padding)、竖直方向滚动条 (scrollbar)(如果存在的话)、以及 CSS 设置的宽度 (width) 的值。
查询:https://developer.mozilla.org/zh-CN/docs/Web/API/HTMLElement/offsetWidth
const computeItem = (text, last, paddingRight = 10) => {


  let width = 0;
  const span = document.createElement('span');
  span.innerText = text;
  if (!last) {


    // 非最后一个元素,padding-right设置10px
    span.style.paddingRight = `${

      paddingRight}px`;
  }
  span.className = 'getTextWidth';
  document.querySelector('body')?.appendChild(span);
  span.style.display = 'inline-block';
  width = document.querySelector('.getTextWidth')?.offsetWidth;
  // 移除元素
  document.querySelector('.getTextWidth')?.remove();

  console.log('text-width', width);
  return width;
};
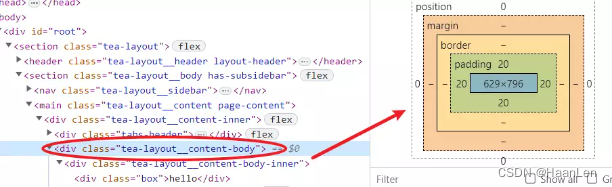
HTMLElement.offsetLeft
HTMLElement.offsetLeft 是一个只读属性,返回当前元素左上角相对于 HTMLElement.offsetParent 节点的左边界偏移的像素值。
HTMLElement.offsetTop
TMLElement.offsetTop 为只读属性,它返回当前元素相对于其 offsetParent 元素的顶部内边距的距离。
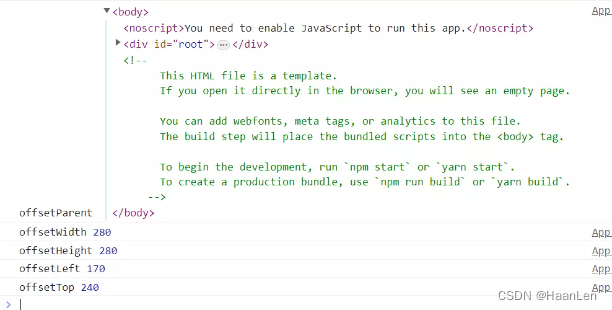
HTMLElement.offsetParent
HTMLElement.offsetParent 是一个只读属性,返回一个指向最近的(指包含层级上的最近)包含该元素的定位元素或者最近的 table, td, th, body 元素。当元素的 style.display 设置为 “none” 时,offsetParent 返回 null。
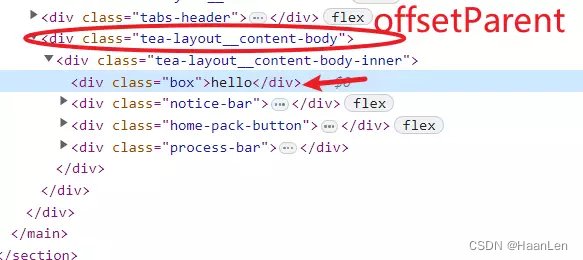
    const dom = document.querySelector('.box');
    console.log('offsetParent', dom?.offsetParent);

    console.log('offsetLeft', dom?.offsetLeft);//offsetLeft 60
offsetdemo
scrollTop
判断元素是否滚动到底
scrollTop是一个非整数,而scrollHeight和clientHeight是四舍五入的,因此确定滚动区域是否滚动到底的唯一方法是查看滚动量是否足够接近某个阈值:
Math.abs(element.scrollHeight - element.clientHeight - element.scrollTop) < 1
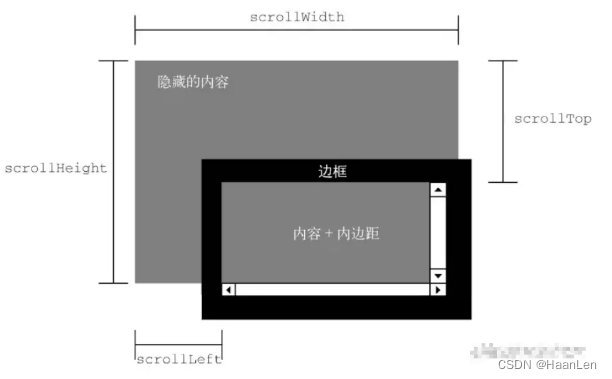
scrollWidth
Element.scrollWidth 这个只读属性是元素内容宽度的一种度量,包括由于 overflow 溢出而在屏幕上不可见的内容。
scrollWidth值等于元素在不使用水平滚动条的情况下适合视口中的所有内容所需的最小宽度。宽度的测量方式与clientWidth相同:它包含元素的内边距,但不包括边框,外边距或垂直滚动条(如果存在)。它还可以包括伪元素的宽度,例如::before或::after。如果元素的内容可以适合而不需要水平滚动条,则其scrollWidth等于clientWidth
.state_box {


  height: 200px;
  background-color: aquamarine;
}
.parent_box {


  height: 600px;
  width: 600px;
  background-color: olivedrab;
  margin-left: 100px;
  padding: 30px 50px;
  overflow: auto;
}
.box {


  height: 200px;
  width: 1000px;
  background-color: palevioletred;
  border-top: 30px solid orange;
  border-bottom: 30px solid orange;
  border-left: 20px solid orange;
  border-right: 20px solid orange;
  padding: 10px 20px;
  margin: 10px 20px;
}
    const boxDom = document.getElementById('box')
    console.log('clientWidth',boxDom?.clientWidth);
    console.log('clientHeight',boxDom?.clientHeight);

    console.log('scrollWidth',boxDom?.scrollWidth);
    console.log('scrollHeight',boxDom?.scrollHeight);

    console.log('scrollLeft',boxDom?.scrollLeft);
    console.log('offsetTop',boxDom?.scrollTop);
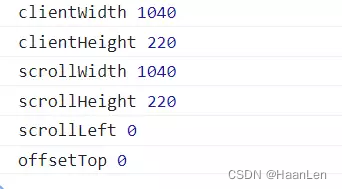
父元素会出现滚动条
  useEffect(() => {


    const boxDom = document.getElementById('box')

    console.log('clientWidth', boxDom?.clientWidth);
    console.log('clientHeight', boxDom?.clientHeight);

    console.log('scrollWidth', boxDom?.scrollWidth);
    console.log('scrollHeight', boxDom?.scrollHeight);

    console.log('scrollLeft', boxDom?.scrollLeft);
    console.log('offsetTop', boxDom?.scrollTop);

    // 监听滚动事件

    window.addEventListener('scroll', (e) => {


      console.log('e',e);
      console.log('------------------');

      const boxDom = document.getElementById('parent_box')

      console.log('clientWidth', boxDom?.clientWidth);
      console.log('clientHeight', boxDom?.clientHeight);

      console.log('scrollWidth', boxDom?.scrollWidth);
      console.log('scrollHeight', boxDom?.scrollHeight);

      console.log('scrollLeft', boxDom?.scrollLeft);
      console.log('offsetTop', boxDom?.scrollTop);
      console.log('------------------');

    }, true)
  }, [])

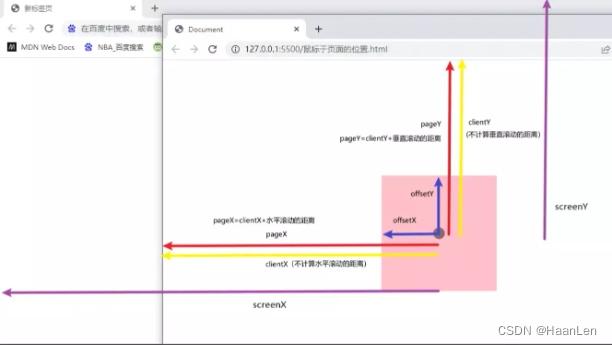
事件鼠标pageX,pageY,clientX,clientY,screenY,screenX
电脑屏幕左上角 screenX:鼠标点击位置相对于电脑屏幕左上角的水平偏移量 screenY:鼠标点击位置相对于电脑屏幕左上角的垂直偏移量
e.screenX
浏览器内容区域左上角 clientX:鼠标点击位置相对于浏览器可视区域的水平偏移量(不会计算水平滚动的距离) clientY:鼠标点击位置相对于浏览器可视区域的垂直偏移量(不会计算垂直滚动条的距离)
e.clientX
网页的左上角 pageX:鼠标点击位置相对于网页左上角的水平偏移量,也就是clientX加上水平滚动条的距离 pageY:鼠标点击位置相对于网页左上角的垂直平偏移量,也就是clientY加上垂直滚动条的距离
e.pageX
offsetX:鼠标点击位置相对于触发事件对象的水平距离 offsetY:鼠标点击位置相对于触发事件对象的垂直距离
e.nativeEvent.offsetX
<div className="box" onClick={(e) => {
  console.log('e', e);
}}
>
  hello
</div>
e.nativeEvent.layerX
e.nativeEvent.layerY
HTMLElement.outerText
HTMLElement.outerText是一个非标准的属性。作为一个获得器,它返回与HTMLElement.innerText一致的值。
demo
一个box,分为左侧和右侧。
- 左侧标签长度和右侧标签长度总值小于box长度,全部显示
- 左侧标签长度+右侧标签长度 大于 box长度
- 当左侧大于总长度一半时,左侧超出长度显示…

 const leftList = ['hello world', 'this is pencil', '大熊猫', '平摊TER', 'this is pencil', '大熊猫', '平摊TER', 'this is pencil', '大熊猫', '平摊TER'];
  const rightList = ['阳光 沙滩', 'this is pencil', '大熊猫'];
- 当右侧大于总长度一半时,右侧超出显示长度显示…

const leftList = ['hello world', 'this is pencil', '大熊猫', '平摊TER'];
const rightList = ['阳光 沙滩', 'this is pencil', '大熊猫', '平摊TER', '阳光 沙滩', 'this is pencil', '大熊猫', '平摊TER'];
- 当两者都超出总长度一半时,左侧和右侧分别显示…

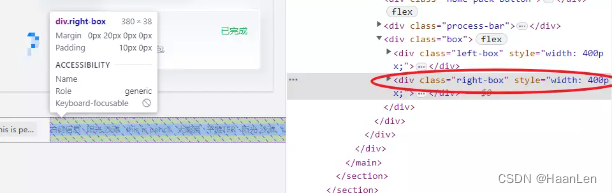
const leftList = ['hello world', 'this is pencil', '大熊猫', '平摊TER', 'this is pencil', '大熊猫', '平摊TER'];
const rightList = ['阳光 沙滩', 'this is pencil', '大熊猫', '平摊TER', '阳光 沙滩', 'this is pencil', '大熊猫', '平摊TER'];
计算一个dom元素的长度demo
  const leftList = ['hello world', 'this is pencil', '大熊猫', '平摊TER'];
  const rightList = ['阳光 沙滩', 'this is pencil', '大熊猫', '平摊TER', '阳光 沙滩', 'this is pencil', '大熊猫', '平摊TER'];
  const leftRef = useRef(null);
  const rightRef = useRef(null);

  const [leftWidth, setLeftWidth] = useState<number | undefined>(undefined);
  const [rightWidth, setRightWidth] = useState<number | undefined>(undefined);

  useEffect(() => {


    console.log('leftRef', leftRef);
    console.log('leftRef', leftRef?.current?.clientWidth);
    console.log('rightRef', rightRef);
    console.log('rightRef', rightRef?.current?.clientWidth);

    // 20代表右侧margin-right, 59代码标题width
    // eslint-disable-next-line max-len
    const leftBoxWidth = leftList?.reduce((sum, text, i, arr) => sum + computeItem(text, i === arr?.length - 1), 0) + 20 + 58;
    // eslint-disable-next-line max-len
    const rightBoxWidth = rightList?.reduce((sum, text, i, arr) => sum + computeItem(text,  i === arr?.length - 1), 0) + 20 + 58;
    console.log('leftBoxWidth', leftBoxWidth);
    console.log('leftBoxWidth', rightBoxWidth);
    // 给左右盒子设置 width

    // 当两者之和超出box宽度时,需要设置width进行...隐藏
    if (leftBoxWidth + rightBoxWidth > 800) {


      if (leftBoxWidth >= 400 && rightBoxWidth >= 400) {


        setLeftWidth(400);
        setRightWidth(400);
      }
      if (leftBoxWidth > 400 && rightBoxWidth < 400) {


        setLeftWidth(800 - rightBoxWidth);
        setRightWidth(rightBoxWidth);
      }
      if (leftBoxWidth < 400 && rightBoxWidth > 400) {


        setLeftWidth(leftBoxWidth);

        setRightWidth(800 - leftBoxWidth);
      }
    } else {


      setLeftWidth(undefined);
      setRightWidth(undefined);
    }
  }, []);
<div className="box">
  <div className="left-box" ref={leftRef} style={
        {
         width: leftWidth }}>
    <span className="title">左侧信息</span>
    {
      leftList?.map((v, i) => (
        <span key={i} className="item">{v}</span>
      ))
    }
  </div>
  <div className="right-box" ref={rightRef}  style={
        {
         width: rightWidth }}>
    <span className="title">右侧信息</span>
    {
      rightList?.map((v, i) => (
        <span className="item" key={i}>{v}</span>
      ))
    }
  </div>
</div>
.box {


  margin-top: 40px;
  width: 800px;
  border: 1px solid #888;
  display: flex;
  .title {


    padding-right: 10px;
  }

  .left-box {


    margin-right: 20px;
    padding-bottom: 10px;
    padding-top: 10px;
    // 超出不换行
    overflow: hidden;
    white-space: nowrap;
    text-overflow: ellipsis;
    box-sizing: border-box;


    .item {


      margin-right: 10px;
      background-color: #e7e7e7;
      padding-top: 4px;
      padding-bottom: 4px;

      &:last-child {


        margin-right: 0px;
      }
    }
  }

  .right-box {


    box-sizing: border-box;
    padding-bottom: 10px;
    padding-top: 10px;
    margin-right: 20px;
    // 超出不换行
    overflow: hidden;
    white-space: nowrap;
    text-overflow: ellipsis;
    .item {


      margin-right: 10px;
      background-color: #e7e7e7;
      padding-top: 4px;
      padding-bottom: 4px;
      &:last-child {


        margin-right: 0px;
      }
    }

  }
}
window.devicePixelRatio  = 1 //屏幕分辨率1920,浏览器缩放比例100%
window.devicePixelRatio  = 1.5 //屏幕分辨率1920,浏览器缩放比例150%
window.devicePixelRatio由笔记本电脑屏幕的缩放设置决定的
- 像素 屏幕中最小的色块,每个色块称之为一个像素(Pixel)
- 分辨率 分辨率=屏幕水平方向的像素点数 * 屏幕垂直方向的像素点数;
window.devicePixelRatio = 显示设备CSS像素分辨率 / 显示设备物理像素分辨率
显示设备宽度物理像素值= window.screen.width * window.devicePixelRatio;
react监听scroll事件无效
  useEffect(() => {


    // 监听滚动事件
    window.addEventListener('scroll', (e) => {


      console.log('e',e);
    })
  }, [])  ```

解决是addEventListener事件添加第3个参数设置true即可

```js
  useEffect(() => {


    // 监听滚动事件
    window.addEventListener('scroll', (e) => {


      console.log('e',e);

    }, true)
  }, [])
!!!部分
图源网络