文章目录
一、数据绑定技术简介
数据绑定 是 通用的编程技术 , 主要作用是 关联 应用的 UI 界面 与 数据模型 ,
在各个平台都有该技术的应用 , 如 Android , Angular , React 等框架中都使用了 数据绑定技术 ;
数据绑定 DataBinding 将 数据模型 Model 与 用户界面 View 进行绑定 ;
- 用户界面 修改 数据时 , 会自动更新到 数据模型 中 ;
- 数据模型 中的数据 改变时 , 用户界面 中 的数据会自动更新 ;
数据绑定 可以 使代码 更加简洁 , 容易理解 , 提高工程的性能和可维护性 ;
二、Android 中的 DataBinding 数据绑定技术
Android 中的 DataBinding 组件 可以将 Layout 布局文件中的 UI 组件 与 数据模型 Model 进行绑定 ;
- 当 用户 通过 UI 组件 修改数据时 , 会将数据自动更新到 数据模型 中 ;
- 数据模型 中的数据 改变时 , 会自动更新到 UI 组件 中 ;
使用 DataBinding 可以在 Android 的布局文件 中 , 承担部分 Activity 组件的工作 , 减少传统方式用法的 耦合度 ;
如 : 想要将 数据设置到 TextView 中 , 需要 先在 Activity 中 调用 Activity#findViewById 查找该组件 , 然后 调用 TextView#setText 设置数据 ;
DataBinding 的意义 :
- 减少了 冗余代码 , 如 findViewById 这一类的代码 ;
- 降低了 Activity 组件页面 与 Layout 布局 的 耦合度 , 数据可以直接设置到布局组件中 , 不需要在 Activity 中开发代码进行设置 ;
三、Android 中的 DataBinding 代码示例
1、build.gradle 构建脚本 - 启动数据绑定
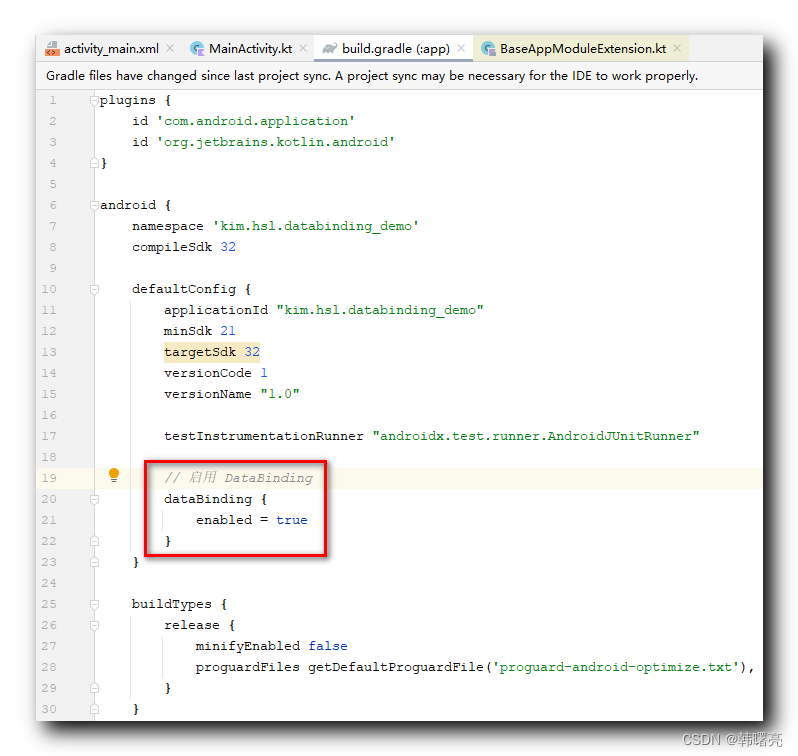
在 Module 内的 build.gradle 构建脚本 中 ,
" android / defaultConfig " 配置块中 , 配置如下内容 , 启用 DataBinding ;
        // 启用 DataBinding
        dataBinding {


            enabled = true
        }
完整代码 :
plugins {


    id 'com.android.application'
    id 'org.jetbrains.kotlin.android'
}

android {


    namespace 'kim.hsl.databinding_demo'
    compileSdk 32

    defaultConfig {


        applicationId "kim.hsl.databinding_demo"
        minSdk 21
        targetSdk 32
        versionCode 1
        versionName "1.0"

        testInstrumentationRunner "androidx.test.runner.AndroidJUnitRunner"

        // 启用 DataBinding
        dataBinding {


            enabled = true
        }
    }

    buildTypes {


        release {


            minifyEnabled false
            proguardFiles getDefaultProguardFile('proguard-android-optimize.txt'), 'proguard-rules.pro'
        }
    }
    compileOptions {


        sourceCompatibility JavaVersion.VERSION_1_8
        targetCompatibility JavaVersion.VERSION_1_8
    }
    kotlinOptions {


        jvmTarget = '1.8'
    }
}

dependencies {


    implementation 'androidx.core:core-ktx:1.7.0'
    implementation 'androidx.appcompat:appcompat:1.4.1'
    implementation 'com.google.android.material:material:1.5.0'
    implementation 'androidx.constraintlayout:constraintlayout:2.1.3'
    testImplementation 'junit:junit:4.13.2'
    androidTestImplementation 'androidx.test.ext:junit:1.1.3'
    androidTestImplementation 'androidx.test.espresso:espresso-core:3.4.0'
}
在 build.gradle 构建脚本 中 , 设置 dataBinding { enabled = true } 后 , 第一时间点击右上角的 Sync Now 同步代码 , 才能将 DataBinding 已开启的信息设置到应用中 ;

2、定义数据类
定义 普通的 Kotlin 数据类型 , 其中封装了 var name: String 和 var age: Int 两个变量 ;
package kim.hsl.databinding_demo

class Student(var name: String, var age: Int)
之后会将该类作为数据模型 , 通过 DataBinding 设置到 布局文件中 ;
3、布局文件转换
在 build.gradle 构建脚本中 , 设置 dataBinding { enabled = true } 后 , 第一时间点击右上角的 Sync Now 同步代码 , 否则下面无法进行布局转换 ;
在布局文件中 , 将鼠标放在左上角第一个字符位置 , 按下 " Alt + 回车 " 组合键 ,
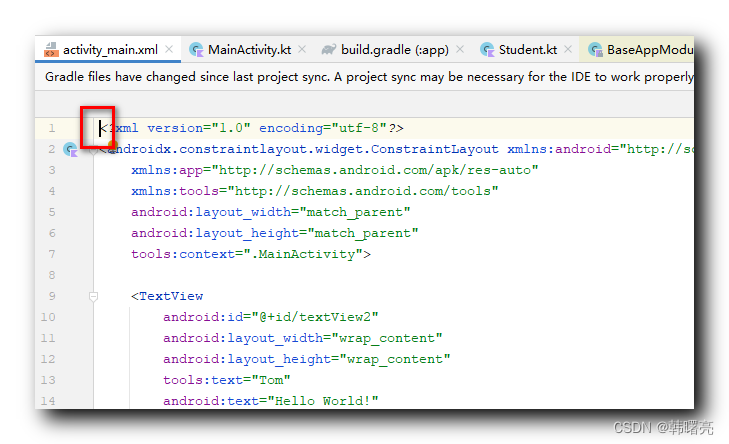
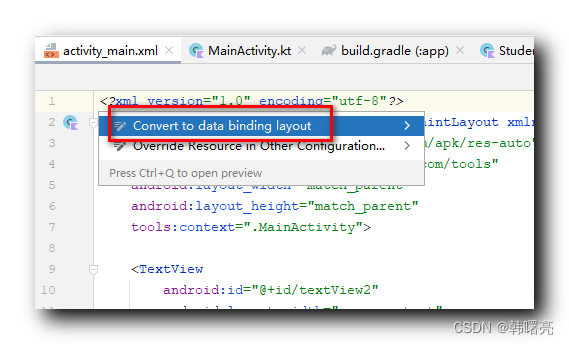
按下 " Alt + 回车 " 组合键 , 会弹出下面的菜单 , 有 " Convert to data binding layout " 选项 , 选择该选项 , 就可以将布局文件切换成 DataBinding 布局文件 ;
如果没有该选项 , 说明在 build.gradle 构建脚本中 设置了 dataBinding { enabled = true } 后 没有同步代码 ;
转换为 DataBinding 布局前的结构 :
<?xml version="1.0" encoding="utf-8"?>
<androidx.constraintlayout.widget.ConstraintLayout
    xmlns:android="http://schemas.android.com/apk/res/android"
    xmlns:app="http://schemas.android.com/apk/res-auto"
    xmlns:tools="http://schemas.android.com/tools"
    android:layout_width="match_parent"
    android:layout_height="match_parent"
    tools:context=".MainActivity">

</androidx.constraintlayout.widget.ConstraintLayout>
转换为 DataBinding 布局后的结构 :
<?xml version="1.0" encoding="utf-8"?>
<layout xmlns:android="http://schemas.android.com/apk/res/android"
    xmlns:app="http://schemas.android.com/apk/res-auto"
    xmlns:tools="http://schemas.android.com/tools">

    <data>

    </data>

    <androidx.constraintlayout.widget.ConstraintLayout
        android:layout_width="match_parent"
        android:layout_height="match_parent"
        tools:context=".MainActivity">
    </androidx.constraintlayout.widget.ConstraintLayout>
</layout>
在 data 标签中 , 设置数据类型信息 :
    <data>
        <variable
            name="student"
            type="kim.hsl.databinding_demo.Student" />
    </data>
在 布局文件 中 , 为组件设置 tools:text 属性 , 该属性只能在 Design 视图中查看 , 方便开发调试 , 不会显示在最终的应用中 ;
在布局文件中 , 使用 @{student.变量名} 获取该数据类型对象的成员 , 并设置到布局组件中 ;
        <TextView
            android:id="@+id/textView2"
            android:layout_width="wrap_content"
            android:layout_height="wrap_content"
            tools:text="Tom"
            android:text="@{student.name}"
            app:layout_constraintBottom_toBottomOf="parent"
            app:layout_constraintEnd_toEndOf="parent"
            app:layout_constraintStart_toStartOf="parent"
            app:layout_constraintTop_toTopOf="parent"
            app:layout_constraintVertical_bias="0.4" />
特别注意 , 如果字段的类型是 int 类型 , 如 student.age , 设置到 android:text 属性时 , 需要将其转换为 String 类型 ;
完整代码示例 :
<?xml version="1.0" encoding="utf-8"?>
<layout xmlns:android="http://schemas.android.com/apk/res/android"
    xmlns:app="http://schemas.android.com/apk/res-auto"
    xmlns:tools="http://schemas.android.com/tools">

    <data>
        <variable
            name="student"
            type="kim.hsl.databinding_demo.Student" />
    </data>

    <androidx.constraintlayout.widget.ConstraintLayout
        android:layout_width="match_parent"
        android:layout_height="match_parent"
        tools:context=".MainActivity">

        <TextView
            android:id="@+id/textView2"
            android:layout_width="wrap_content"
            android:layout_height="wrap_content"
            tools:text="Tom"
            android:text="@{student.name}"
            app:layout_constraintBottom_toBottomOf="parent"
            app:layout_constraintEnd_toEndOf="parent"
            app:layout_constraintStart_toStartOf="parent"
            app:layout_constraintTop_toTopOf="parent"
            app:layout_constraintVertical_bias="0.4" />

        <TextView
            android:id="@+id/textView"
            android:layout_width="wrap_content"
            android:layout_height="wrap_content"
            tools:text="18"
            android:text="@{String.valueOf(student.age)}"
            app:layout_constraintBottom_toBottomOf="parent"
            app:layout_constraintEnd_toEndOf="parent"
            app:layout_constraintHorizontal_bias="0.498"
            app:layout_constraintStart_toStartOf="parent"
            app:layout_constraintTop_toBottomOf="@+id/textView2"
            app:layout_constraintVertical_bias="0.2" />

    </androidx.constraintlayout.widget.ConstraintLayout>
</layout>
4、Activity 组件设置数据绑定布局和数据
在 Activity 中 , 调用 DataBindingUtil.setContentView 函数 , 设置布局文件 , 获得一个 ActivityMainBinding 对象 ;
调用 ActivityMainBinding # setStudent 即可设置数据类型对象 ;
完整代码示例 :
package kim.hsl.databinding_demo

import androidx.appcompat.app.AppCompatActivity
import android.os.Bundle
import androidx.databinding.DataBindingUtil
import kim.hsl.databinding_demo.databinding.ActivityMainBinding

class MainActivity : AppCompatActivity() {


    override fun onCreate(savedInstanceState: Bundle?) {


        super.onCreate(savedInstanceState)

        // 设置布局文件
        // 布局文件是 activity_main.xml
        // 该类名称生成规则是 布局文件名称 + Binding
        var activityMainBinding: ActivityMainBinding =
            DataBindingUtil.setContentView(this, R.layout.activity_main)

        // 为布局 设置 数据
        activityMainBinding.student = Student("Jerry", 13)
    }
}
5、显示效果
在 UI 界面中 , 成功显示了 Student 对象的 name 和 age 字段值 ;
