目录
1 一、实验过程
1.1 实验目的
通过这个课程项目大,期望达到以下目的:
- 1.了解如何对深度学习的图像数据集进行预处理操作。
- 2.熟络深度学习训练模型的步骤流程、pytorch的使用。
- 3.学习ResNet-50网络模型思想、网络架构和代码实现。
- 4.学习深度学习中的图像分类任务。
1.2 实验简介
这个项目名称为“搭建卷积神经网络进行图像分类”,要求针对提供的场景图片数据集进行模型的训练,并对测试集进行场景类别的预测。 这个项目提供了 6700 张场景图像,包括了67种不同的场景。数据集存在曝光度差异、分辨率不同等多种干扰,具有一定的挑战性。 实验采用经典的ResNet50模型。
1.3 数据集的介绍
数据集包括 6700 张已经分割好的场景图像。其中 67 * 80 张作为训练集,其余 67 * 20张作为测试集。场景图像包括了机场场景、办公室场景、居家场景等67种场景,数据样本丰富。要求根据场景图像,设计一种卷积神经网络模型,自动判断场景。数据集包含如下内容:

1.train.csv - 训练集,其中包括两列,第一列id是人脸图像的编号,即对应的文件名,第二列label是性别标签,0表示男性,1表示女性
2.test.csv - 训练集,其中包括两列,第一列id是人脸图像的编号,即对应的文件名,第二列label是性别标签,0表示男性,1表示女性
3.train文件夹 - 所有的训练图像,扩展名为jpg,其命名与train.csv中的id命名一致
4.test文件夹 - 所有的测试图像,扩展名为jpg,其命名与test.csv中的id命名一致
1.4 一、LeNet5网络模型
手写字体识别模型LeNet5诞生于1994年,是最早的卷积神经网络之一。LeNet5通过巧妙的设计,利用卷积、参数共享、池化等操作提取特征,避免了大量的计算成本,最后再使用全连接神经网络进行分类识别,这个网络也是最近大量神经网络架构的起点。
LeNet5 的架构基于这样的观点:(尤其是)图像的特征分布在整张图像上,以及带有可学习参数的卷积是一种用少量参数在多个位置上提取相似特征的有效方式。这和将每个像素用作一个大型多层神经网络的单独输入相反。LeNet5 阐述了那些像素不应该被使用在第一层,因为图像具有很强的空间相关性,而使用图像中独立的像素作为不同的输入特征则利用不到这些相关性。 Lenet5特征能够总结为如下几点:
- (1)卷积神经网络使用三个层作为一个系列:卷积、池化、非线性
- (2)使用卷积提取空间特征
- (3)使用映射到空间均值下采样
- (4)双曲线(tanh)或s型(sigmoid)形式的非线性
- (5)多层神经网络(MLP)作为最后的分类器
- (6)层与层之间的稀疏链接矩阵避免大的计算成本
模型架构图如下:
1.5 二、AlexNet网络模型
2012年,ImageNet比赛冠军的model–Alexnet,可以说是LeNet的一种更深更宽的版本。AlexNet包含了6亿3000万个连接,6000万个参数和65万个神经元,拥有5个卷积层,其中3个卷积层后面连接了最大池化层,最后还有3个全连接层。AlextNet以显著的优势赢得了ILSVRC比赛的冠军,top-5的错误率从之前的25.8%降低至16.4。
AlexNet网络结构相对简单,使用了8层卷积神经网络,前5层是卷积层,剩下的3层是全连接层。
具体如下所示: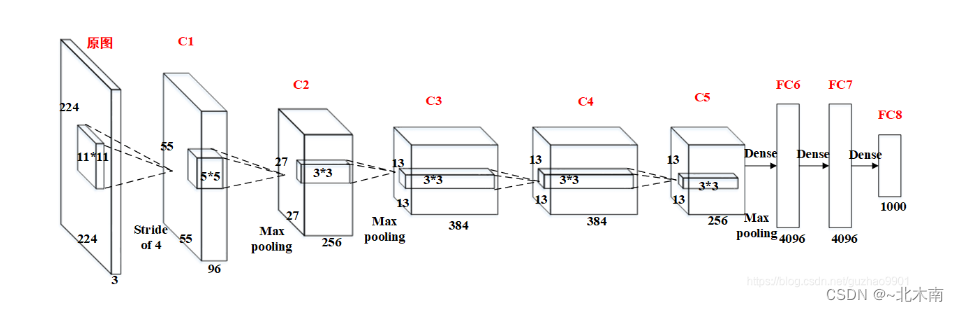
1.6 三、ResNet50(残差网络)网络模型
深度残差网络(Deep residual network, ResNet)的提出是CNN图像史上的一件里程碑事件。ResNet的作者何恺明也因此摘得CVPR2016最佳论文奖,当然何博士的成就远不止于此,感兴趣的也可以去搜一下他后来的辉煌战绩。下面简单讲述ResNet的理论及实现。
- 残差学习 深度网络的退化问题至少说明深度网络不容易训练。但是我们考虑这样一个事实:现在你有一个浅层网络,你想通过向上堆积新层来建立深层网络,一个极端情况是这些增加的层什么也不学习,仅仅复制浅层网络的特征,即这样新层是恒等映射(Identity mapping)。在这种情况下,深层网络应该至少和浅层网络性能一样,也不应该出现退化现象。
这个有趣的假设让何博士灵感爆发,他提出了残差学习来解决退化问题。对于一个堆积层结构(几层堆积而成)。对于一个堆积层结构(几层堆积而成)当输入为 x时其学习到的特征记为F(x), 现在再加一条分支,直接跳到堆积层的输出,则此时最终输出H(x) = F(x) + x
如下图

这种跳跃连接就叫做shortcut connection(类似电路中的短路)。具体原理这边不展开叙说,感兴趣的可以去看原论文。上面这种两层结构的叫BasicBlock,一般适用于ResNet18和ResNet34,而ResNet50以后都使用下面这种三层的残差结构叫Bottleneck。

- ResNet50具体结构 可以看到,50层的网络有五个部分组成,从STAGE2开始,每层都有多个有残差块,并且每个残差块具有3个卷积层。

二、实验代码
导入实验所需要的库
import os
import math
import random
import collections
import numpy as np
import pandas as pd
import matplotlib.pyplot as plt

import torch
from torch import nn
from PIL import Image
import torch.optim as optim
from tqdm.notebook import tqdm
from torchvision import transforms
from torch.utils.data import Dataset
from torch.utils.data import DataLoader

import warnings
warnings.filterwarnings("ignore")

# cpu or gpu
device = torch.device("cuda:0" if torch.cuda.is_available() else "cpu")
print("Using {} device".format(device))
参数配置
#coding:utf8

class DefaultConfig(object):
    # 这里写默认初始化参数
    lr = 1e-5                # 学习率
    momentum = 0.5           # 如果是SGD优化器会用到动量
    num_classes = 67          # 类别个数
    image_size = 224         # 图像大小
    root_dir = '/kaggle/input/indoor-scenes-cvpr-2019/indoorCVPR_09/Images/' # 数据集的根目录
    batch_size = 64          # 批数据量
    train_size = 5360       # 训练集个数
    test_size = 1340         # 测试集个数
    epoches = 10              # 训练轮数
    class_dict = {}          # 类别字典


    def parse(self, kwargs):
        '''
        根据字典kwargs,更新参数
        '''
        # 如果类属性不存在 kwargs 中的属性, 则向类添加该属性
        print('user config ----- not exist attribute')
        for k, v in kwargs.items():
            if not hasattr(self, k):  # 如果不存在改配置,抛出警告
                print(k, " ---> ", v)
                warn_test = "warning: opt has not attribute【{}】".format(k)
                warnings.warn(warn_test)
            setattr(self, k, v)  # 添加、更改、设置属性

        print('user config ----- already exist attribute')
        for k, v in self.__class__.__dict__.items():
            if not k.startswith('__'):
                print(k, " ---> ", getattr(self, k))  # 获取属性值
                pass

# 测试
opt =DefaultConfig()
config = {"data":"22-12-6", "momentum":0.1}  # 添加data属性,更改momentum属性
opt.parse(config)
opt.momentum

'''
user config ----- not exist attribute
data  --->  22-12-6
user config ----- already exist attribute
lr  --->  1e-05
momentum  --->  0.1
num_classes  --->  67
image_size  --->  224
root_dir  --->  /kaggle/input/indoor-scenes-cvpr-2019/indoorCVPR_09/Images/
batch_size  --->  64
train_size  --->  5360
test_size  --->  1340
epoches  --->  10
class_dict  --->  {}
parse  --->  <bound method DefaultConfig.parse of <__main__.DefaultConfig object at 0x7f34fab84150>>
'''
数据预处理
# 生成类别字典
def class_name_dict(root_dir):
    dir_list = os.listdir(root_dir)
    class_num = 0
    for img_dir in dir_list:
        opt.class_dict[str(img_dir)] = class_num
        class_num += 1

class_name_dict(opt.root_dir)
opt.class_dict

'''
{'meeting_room': 0,
 'grocerystore': 1,
 'trainstation': 2,
 'mall': 3,
 'bar': 4,
 'auditorium': 5,
 'laboratorywet': 6,
 'florist': 7,
 'closet': 8,
 'livingroom': 9,
 'pantry': 10,
 'airport_inside': 11,
 'prisoncell': 12,
 'locker_room': 13,
 'elevator': 14,
 'dentaloffice': 15,
 'laundromat': 16,
 'fastfood_restaurant': 17,
 'casino': 18,
 'dining_room': 19,
 'kindergarden': 20,
 'concert_hall': 21,
 'waitingroom': 22,
 'bathroom': 23,
 'corridor': 24,
 'bedroom': 25,
 'hairsalon': 26,
 'kitchen': 27,
 'tv_studio': 28,
 'artstudio': 29,
 'library': 30,
 'inside_bus': 31,
 'restaurant_kitchen': 32,
 'inside_subway': 33,
 'buffet': 34,
 'bookstore': 35,
 'museum': 36,
 'lobby': 37,
 'gameroom': 38,
 'shoeshop': 39,
 'garage': 40,
 'poolinside': 41,
 'clothingstore': 42,
 'deli': 43,
 'subway': 44,
 'jewelleryshop': 45,
 'stairscase': 46,
 'toystore': 47,
 'classroom': 48,
 'restaurant': 49,
 'nursery': 50,
 'bakery': 51,
 'bowling': 52,
 'office': 53,
 'operating_room': 54,
 'warehouse': 55,
 'studiomusic': 56,
 'church_inside': 57,
 'computerroom': 58,
 'cloister': 59,
 'greenhouse': 60,
 'winecellar': 61,
 'gym': 62,
 'videostore': 63,
 'hospitalroom': 64,
 'children_room': 65,
 'movietheater': 66}
'''
重新DataSet
class MyData(Dataset):

    def __init__(self, file_name, transform=None, type_data=""):
        img_list_path = []
        label_list = []
        if file_name and os.path.exists(file_name):
            try:
                with open(file_name) as f:  # 使用with读文件
                    file = f.readlines()  # 返回list列表
                    count = len(file)
                    for path in file:
#                         print(path)
                        path = path.rstrip()  # 删除换行符
                        label = path.split(r"/")[0]
#                         print(path.split(r"/"))
                        label = opt.class_dict.get(label)  # 从字典列表中匹配标签
                        img_path = os.path.join(opt.root_dir, path)  # 生成图片路径
                        img_list_path.append(img_path)
                        label_list.append(label)
#                         print(img_path)
#                         print(label)
                    f.close()
            except IOError as err:
                print(err)
        else:
            print("%s is not a validate file." % file_name)
        self.img_list_path = img_list_path
        self.label_list = label_list
        self.transform = transform
        self.type_data = type_data
        self.dict_count = {}   # 统计每个类别的数量,字典类型
        self.class_num()


    def __getitem__(self, idx):
        path = self.img_list_path[idx]
        label = self.label_list[idx]
        image = Image.open(path)
        if(image.mode!='RGB'):
            image = image.convert("RGB")
        if self.transform is not None:
            image = self.transform(image)
        return image,label

    def __len__(self):
        return len(self.img_list_path)


    def class_num(self):
        '''统计每个类别的样本数'''
        for c in opt.class_dict.values():
            self.dict_count[c] = self.label_list.count(c)
        print(self.type_data + '总样本数:', len(self.label_list), "各类别数:", self.dict_count)


if __name__ == "__main__":
    test = MyData('/kaggle/input/indoor-scenes-cvpr-2019/TestImages.txt', None, "测试集")

加载数据转为DataLoader函数
# 训练数据的transforms
train_transform = transforms.Compose([
    transforms.Resize(opt.image_size),
    transforms.RandomVerticalFlip(),  # 随机垂直翻转
    transforms.RandomHorizontalFlip(),  # 水平转换
    transforms.ToTensor(),              # 转换为张量类型
    #将图像的像素值归一化到[-1,1]之间
    transforms.Normalize([0.485, 0.456, 0.406], [0.229, 0.224, 0.225])
])

# 测试数据的transforms
test_transform = transforms.Compose([
        transforms.Resize((opt.image_size, opt.image_size)),
        transforms.ToTensor(),
        transforms.Normalize([0.485, 0.456, 0.406], [0.229, 0.224, 0.225])
    ])


train_dataset = MyData('/kaggle/input/indoor-scenes-cvpr-2019/TrainImages.txt', test_transform, "训练集")
test_dataset = MyData('/kaggle/input/indoor-scenes-cvpr-2019/TestImages.txt', test_transform, "测试集")


train_loader = DataLoader(train_dataset, opt.batch_size, shuffle=True)
test_loader = DataLoader(test_dataset, opt.batch_size, shuffle=True)

train_loader.__len__(), test_loader.__len__()
可视化一批训练数据
plt.figure(figsize=(16,4))
for data in train_loader:
    print(data[1])
    for i in range(data[0].shape[0]):
#         print(data[0][i].shape)
        plt.subplot(4, 16, i+1)
        plt.imshow(data[0][i].reshape((3,opt.image_size,opt.image_size))[0, :, :], cmap=plt.cm.gray)
        plt.title(data[1][i].item(), size=9)
        plt.axis("off")
        plt.subplots_adjust(wspace=0.5)
    break
data[0][0].shape
构建模型
'''Resnet50'''

class Bottleneck(nn.Module):
    expansion = 4

    def __init__(self, inplanes, planes, stride=1, downsample=None):
        super(Bottleneck, self).__init__()
        self.conv1 = nn.Conv2d(inplanes, planes, kernel_size=1, bias=False)
        self.bn1 = nn.BatchNorm2d(planes)
        self.conv2 = nn.Conv2d(planes, planes, kernel_size=3, stride=stride,
                               padding=1, bias=False)
        self.bn2 = nn.BatchNorm2d(planes)
        self.conv3 = nn.Conv2d(planes, planes * self.expansion, kernel_size=1, bias=False)
        self.bn3 = nn.BatchNorm2d(planes * self.expansion)
        self.relu = nn.ReLU(inplace=True)
        self.downsample = downsample
        self.stride = stride

    def forward(self, x):
        residual = x

        out = self.conv1(x)
        out = self.bn1(out)
        out = self.relu(out)

        out = self.conv2(out)
        out = self.bn2(out)
        out = self.relu(out)

        out = self.conv3(out)
        out = self.bn3(out)

        if self.downsample is not None:
            residual = self.downsample(x)

        out += residual
        out = self.relu(out)
        return out

class ResNet(nn.Module):

    def __init__(self, block, layers, num_classes=1000):
        self.inplanes = 64
        super(ResNet, self).__init__()
        self.conv1 = nn.Conv2d(3, 64, kernel_size=7, stride=2, padding=3,
                               bias=False)
        self.bn1 = nn.BatchNorm2d(64)
        self.relu = nn.ReLU(inplace=True)
        self.maxpool = nn.MaxPool2d(kernel_size=3, stride=2, padding=1)
        self.layer1 = self._make_layer(block, 64, layers[0])
        self.layer2 = self._make_layer(block, 128, layers[1], stride=2)
        self.layer3 = self._make_layer(block, 256, layers[2], stride=2)
        self.layer4 = self._make_layer(block, 512, layers[3], stride=2)
        self.avgpool = nn.AvgPool2d(kernel_size=7, stride=1, padding=0)
        self.fc = nn.Linear(512 * block.expansion, num_classes)

        for m in self.modules():
            if isinstance(m, nn.Conv2d):
                nn.init.kaiming_normal_(m.weight, mode='fan_out', nonlinearity='relu')
            elif isinstance(m, nn.BatchNorm2d):
                nn.init.constant_(m.weight, 1)
                nn.init.constant_(m.bias, 0)

    def _make_layer(self, block, planes, blocks, stride=1):
        downsample = None
        if stride != 1 or self.inplanes != planes * block.expansion:
            downsample = nn.Sequential(
                nn.Conv2d(self.inplanes, planes * block.expansion,
                          kernel_size=1, stride=stride, bias=False),
                nn.BatchNorm2d(planes * block.expansion),
            )

        layers = []
        layers.append(block(self.inplanes, planes, stride, downsample))
        self.inplanes = planes * block.expansion
        for i in range(1, blocks):
            layers.append(block(self.inplanes, planes))

        return nn.Sequential(*layers)

    def forward(self, x):
        record = dict()
        x = self.conv1(x)
        x = self.bn1(x)
        x = self.relu(x)
        record["maxpool"] = x
        x = self.maxpool(x)
        x = self.layer1(x)
        record["layer1"] = x
        x = self.layer2(x)
        record["layer2"] = x
        x = self.layer3(x)
        record["layer3"] = x
        x = self.layer4(x)
        record["layer4"] = x
        x = self.avgpool(x)
        x = x.view(x.size(0), -1)
        record["avgpool"] = x
        x = self.fc(x)
        return x


def resnet50(pretrained=False, **kwargs):
    """Constructs a ResNet-50 model.
    Args:
        pretrained (bool): If True, returns a model pre-trained on ImageNet
    """
    model = ResNet(Bottleneck, [3, 4, 6, 3], **kwargs)
    return model

# 测试
model = resnet50(False, num_classes=67)
input = torch.ones((1,3,224,224))
output = model(input)
print(output)
'''AlexNet模型代码'''
class AlexNet(nn.Module):
def __init__(self, num_classes, times=7):
super(AlexNet, self).__init__()
# 卷积层
self.conv = nn.Sequential(
nn.Conv2d(3, 96, 11, 1),
nn.BatchNorm2d(96),
nn.ReLU(inplace=True),
nn.MaxPool2d(3, 2),
# 减小卷积窗口,使用填充为2来使得输入与输出的高和宽一致,
# 且增大输出通道数
nn.Conv2d(96, 256, 5, 1, 2),
nn.BatchNorm2d(256),
nn.ReLU(inplace=True),
nn.MaxPool2d(3, 2),
# 连续3个卷积层,且使用更小的卷积窗口。除了最后的卷积层外,
# 进一步增大了输出通道数。
# 前两个卷积层后不使用池化层来减小输入的高和宽
nn.Conv2d(256, 384, 3, 1, 1),
nn.BatchNorm2d(384),
nn.ReLU(inplace=True),
nn.Conv2d(384, 384, 3, 1, 1),
nn.BatchNorm2d(384),
nn.ReLU(inplace=True),
nn.Conv2d(384, 256, 3, 1, 1),
nn.BatchNorm2d(256),
nn.ReLU(inplace=True),
nn.MaxPool2d(3, 2)
)
# 这里全连接层的输出个数比LeNet中的大数倍。使用丢弃层来缓解过拟合
self.fc = nn.Sequential(
nn.Linear(256*(4*times-3)*(4*times-3), 2048),
nn.ReLU(inplace=True),
nn.Dropout(0.5),
nn.Linear(2048, 256),
nn.ReLU(inplace=True),
nn.Dropout(0.5),
nn.Linear(256, num_classes) # 自定义的类别数
)
def forward(self, img):
output = self.conv(img)
# print(output.shape) # 查看尺寸大小
# 在第一个全连接层与卷积层连接的位置,需要将特征图拉成一个一维向量
output = output.view(img.size(0), -1)
output = self.fc(output)
# 经过softmax处理转为概率输出
return output
if __name__ == "__main__":
inputs = torch.ones((1,3,224, 224))
net = AlexNet(67)
output = net(inputs)
print(output)'''LeNet5模型代码'''
class LeNet5(nn.Module):
def __init__(self, num_classes, times=7):
super(LeNet5, self).__init__()
self.convnet = nn.Sequential(
# 输入大小为3*32*32,输出大小为28*28,输入通道为1,输出为6,卷积核为5
nn.Conv2d(in_channels=3, out_channels=6, kernel_size=5),
nn.BatchNorm2d(6),
# 使用ReLU激活函数
nn.ReLU(inplace=True),
# 使用平均池化层
nn.AvgPool2d(kernel_size=2, stride=2),
nn.Conv2d(in_channels=6, out_channels=16, kernel_size=5),
nn.BatchNorm2d(16),
nn.ReLU(inplace=True),
nn.AvgPool2d(kernel_size=2, stride=2),
nn.Conv2d(in_channels=16, out_channels=120, kernel_size=5),
nn.BatchNorm2d(120),
nn.ReLU(inplace=True),
)
self.fc = nn.Sequential(
nn.Linear(120*(8*(times-1)+1)*(8*(times-1)+1), 256), # ***因为要修改输入图像的尺寸***
nn.ReLU(inplace=True),
nn.Dropout(0.5),
nn.Linear(256, num_classes)
)
# 定义网络的前向运算
def forward(self, img):
output = self.convnet(img)
# print(output.shape) # 查看尺寸大小
# 在第一个全连接层与卷积层连接的位置
# 需要将特征图拉成一个一维向量
output = output.view(img.size(0), -1)
output = self.fc(output)
return output
if __name__ == "__main__":
inputs = torch.ones((1,3,224, 224))
net = LeNet5(67)
output = net(inputs)
print(output, inputs.shape)搭建训练函数
"""
    train() 训练模型
        *model_name: 需要训练模型名称
        *model: 需要训练的模型
        *optimizer: 优化器
        *criterion: 损失函数
        *train_loader: 训练数据集
        *epoches: 训练轮数

        return: 每轮的loss, acc列表
"""
def train(model_name, model, train_loader, optimizer='Adam', epochs=3):
    # optimizer优化器
    if optimizer=="Adam":
        optimizer = optim.Adam(model.parameters(), lr=opt.lr)
    elif optimizer=="SGD":
        optimizer = optim.SGD(model.parameters(), lr=opt.lr)


    # criterion损失函数
    criterion = nn.CrossEntropyLoss()

    train_loss = []
    train_acc = []
    best_acc = 0.0

    print("--------------------------{}-----------------------------".format(model_name))
    for epoch in tqdm(range(epochs)):
        epoch_loss = 0.0        # 记录每一轮的总损失
        epoch_accuracy_num = 0  # 记录每一轮正确预测的样本数
        epoch_sample_num = 0    # 记录每一轮的样本数
        step = 0                # 记录批次步骤
        # 训练步骤开始
        model.train()
        for imgs, targets in train_loader:
            step += 1
            if step%10==0: print('.', end='')

            optimizer.zero_grad()                           # 清空历史梯度
            outputs = model(imgs.to(device))                # 输入数据
            loss = criterion(outputs, targets.to(device))   # 计算损失值
            loss.backward()                                 # 神经网络反向传播
            optimizer.step()

            epoch_loss += loss.item()     # 累加损失值
            outputs_ = outputs.argmax(1)  # 输出转为最大概率的下标
            epoch_accuracy_num += (targets.to(device) == outputs_).sum()  # 累加该批次正确预测的个数
            epoch_sample_num += targets.size(0)

        epoch_acc = epoch_accuracy_num/epoch_sample_num
        train_loss.append(epoch_loss)
        train_acc.append(epoch_acc)

        flag = str(epoch+1) if epoch >= 9 else '0' + str(epoch+1)
#         print("第{}轮结果:训练集上:loss:{} —— acc:{} ".format(flag, '%.5f'%epoch_loss, '%.5f'%epoch_acc), end='')


        if epoch_acc > best_acc:
            best_acc = epoch_acc
            torch.save(model.state_dict(), "/kaggle/working/{}_best.pth".format(model_name))
            print("第{}轮结果:训练集上:loss:{} —— acc:{}   new best!!!".format(flag, '%.5f'%epoch_loss, '%.5f'%epoch_acc))
        else:
            print("第{}轮结果:训练集上:loss:{} —— acc:{}".format(flag, '%.5f'%epoch_loss, '%.5f'%epoch_acc))


    torch.save(model.state_dict(), "/kaggle/working/{}_last.pth".format(model_name))
    print("保存成功!!!")

    return train_loss, train_acc
搭建测试函数
"""
    test()函数
        *model_name: 测试的模型名称
        *model: 测试的模型
        *test_loader: 测试数据集
        *criterion: 损失函数

        return: 返回测试的loss、acc
"""
def test(model_name, model, test_loader):
    # criterion损失函数
    criterion = nn.CrossEntropyLoss()

    best_parameter = torch.load("/kaggle/working/{}_best.pth".format(model_name))
    model.load_state_dict(best_parameter)

    test_loss = 0.0
    test_sample_num = 0
    test_accuracy_num = 0
    test_acc = 0.0

    # 测试步骤开始
    model.eval()
    with torch.no_grad():
        print("----------------{}测试开始------------------".format(model_name))
        test_bar = tqdm(test_loader)
        for imgs, targets in test_bar:
            outputs = model(imgs.to(device))
            loss = criterion(outputs, targets.to(device))
            test_loss += loss.item()

            outputs_ = outputs.argmax(1)
            test_accuracy_num += (outputs_ == targets.to(device)).sum()
            test_sample_num += targets.size(0)
            # break

    test_acc = test_accuracy_num/test_sample_num
    print("{}测试结果 loss:{} —— acc:{}".format(model_name, test_loss, test_acc))
    return test_loss, test_acc
实例化模型开始训练
opt.epoches = 10
opt.optimizer = "Adam"
opt.lr = 1e-4
opt.batch_size = 64

# 存储训练数据
nets_val_loss = []
nets_val_acc = []

# 实例化模型 列表
leNet5 = LeNet5(67).to(device)
alexNet = AlexNet(67).to(device)
resNet50 = resnet50(False, num_classes=67).to(device)

train_nets = [leNet5, alexNet, resNet50]
nets_name = ['leNet5', 'alexNet', 'resNet50']

print("参数明细:epoches-->{}, optimizer-->{}, criterion-->{}, lr-->{}, batchsize-->{}, img_size-->{}".format(
    opt.epoches, opt.optimizer, 'CrossEntropyLoss', opt.lr, opt.batch_size, opt.image_size))

for i in range(len(train_nets)):
    train_loss, train_acc = train(nets_name[i], train_nets[i], train_loader, optimizer=opt.optimizer, epochs=opt.epoches)
    nets_val_loss.append(train_loss)
    nets_val_acc.append(train_acc)
plt.rcParams['font.sans-serif']=['SimHei']   # 用来正常显示中文标签
plt.rcParams['axes.unicode_minus'] = False  # 用来正常显示负号

def train_visualize(loss_data, acc_data, nets_name):
    plt.figure(figsize=(16,5))
    plt.subplot(1,2,1)
    for loss in loss_data:
        plt.plot(range(opt.epoches), loss)
        plt.title("Loss")
        plt.xlabel("epoches", fontsize=15)
        plt.ylabel("loss", fontsize=15)
    plt.legend(nets_name, fontsize=11)

    plt.subplot(1,2,2)
    for acc in acc_data:
        plt.plot(range(opt.epoches), acc)
        plt.title("accuracy")
        plt.xlabel("epochs", fontsize=15)
        plt.ylabel("accuracy", fontsize=15)
    plt.legend(nets_name, fontsize=11)


nets_val_acc_ = []
for i in nets_val_acc:
    acc = []
    for j in i:
        acc.append(j.cpu())
    nets_val_acc_.append(acc)

train_visualize(nets_val_loss, nets_val_acc_, nets_name)
# nets_val_loss, nets_val_acc 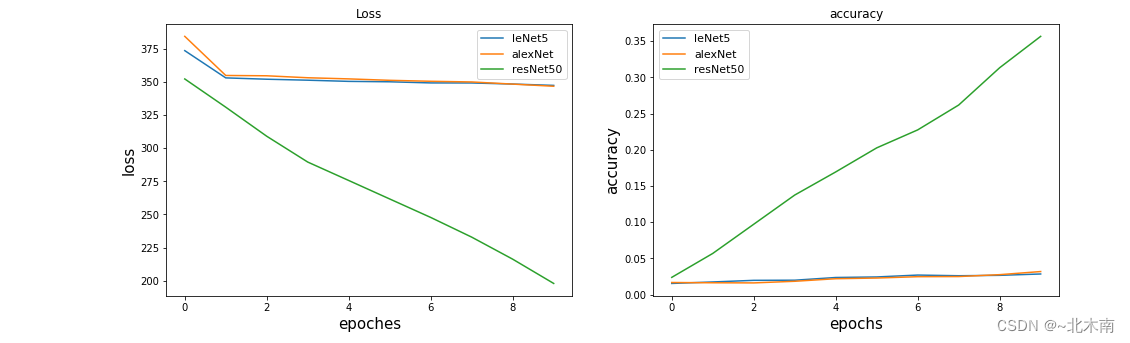
开始测试
# 实例化模型 列表
leNet5_ = LeNet5(67).to(device)
alexNet_ = AlexNet(67).to(device)
resNet50_ = resnet50(False, num_classes=67).to(device)


# 存储测试数据
nets_test_loss = []
nets_test_acc = []

test_nets = [leNet5_, alexNet_, resNet50_]
nets_name = ['leNet5', 'alexNet', 'resNet50']
# 需要和训练时定义的相同,因为与文件路径直接关联

opt.is_lstm = 0
print("参数明细:epoches-->{}, optimizer-->{}, criterion-->{}, lr-->{}, batchsize-->{}, img_size-->{}".format(
    opt.epoches, opt.optimizer, 'CrossEntropyLoss', opt.lr, opt.batch_size, opt.image_size))
for i in range(len(test_nets)):
    if nets_name[i] == 'lstmNet':
        opt.is_lstm = 1
    test_loss, test_acc = test(nets_name[i], test_nets[i], test_loader)
    nets_test_loss.append(test_loss)
    nets_test_acc.append(test_acc)
    opt.is_lstm = 0
def test_visualize(loss_data, acc_data, nets_name):
    plt.figure(figsize=(16, 5))
    plt.subplot(1,2,1)
    plt.bar(nets_name, loss_data)
    plt.title("test_loss", fontsize=20)
    plt.xlabel("model", fontsize=15)
    plt.ylabel("loss", fontsize=20)
    for a,b in zip(nets_name, loss_data):   #柱子上的数字显示
        plt.text(a,b,'%.2f'%b, ha='center', fontsize=18)

    plt.subplot(1,2,2)
    plt.bar(nets_name, acc_data)
    plt.title("test_acc", fontsize=20)
    plt.xlabel("model", fontsize=15)
    plt.ylabel("acc", fontsize=20)
    for a,b in zip(nets_name, acc_data):   #柱子上的数字显示
        plt.text(a,b,'%.2f'%b, ha='center', fontsize=18)


nets_test_acc_ = []
for i in nets_test_acc:
    nets_test_acc_.append(i.cpu())

test_visualize(nets_test_loss, nets_test_acc_, nets_name)
# nets_test_loss, nets_test_acc 
结果:效果非常差,很不理想,可能是哪一步出错了,如果有懂的大佬给指正一下,谢谢!!