1. jsx父子传值
父组件:
<template>
  <div>
    <child :title="title" :setTitle="setTitle" />
  </div>
</template>

<script>
import {

       ref } from 'vue'
// 如果你用的是.jsx或.tsx,则引入时,扩展名不要写
import child from './components/child'
export default {


  components: {

       child },
  setup() {


    let title = ref('测试')

    const setTitle = titleStr => (title.value = titleStr)

    return {

       title, setTitle }
  }
}
</script>

<style lang="scss" scoped></style>
子组件:
// const Child = props => {
//   return (
//     <div>
//       <h3>jsx -- {props.title}</h3>
//       <button onClick={() => props.setTitle(Date.now() + '')}>jsx</button>
//     </div>
//   )
// }

// 解构写法
const Child = ({ title, setTitle }) => {
  return (
    <div>
      <h3>jsx -- {title}</h3>
      <button onClick={() => setTitle(Date.now() + '')}>jsx</button>
      {/* <button onClick={() => changeTitle(setTitle)}>jsx</button> */}
    </div>
  )
}

export default Child
2. provide和inject
我们想要在组件内实现很方便的通信,却又想要与外界隔绝,这时候就需要用到 provide/inject。
父组件:
<template>
  <div>
    <child />
  </div>
</template>

<script>
import {

       ref, provide } from 'vue'
import child from './components/child.vue'
export default {


  components: {

       child },
  setup() {


    let title = ref('测试')

    // 在祖先组件中发布了一个数据
    // 如果你发布的数据它是一个响应式对象,则provide它就是一个响应式,如果是一个普通值和对象,则不是响应式

    provide('title', title)

    // 这种方式可以将会使发布的数据变为普通对象,无法响应
    // provide('title', title.value)

    return {

       title }
  }
}
</script>

<style lang="scss" scoped></style>
子组件:
<template>
  <div>
    <h3>{

   { title }}</h3>
    <button @click="title = 1323">+++++</button>
  </div>
</template>

<script>
import {

       inject } from 'vue'
export default {


  setup() {


    let title = inject('title')

    console.log(title)

    return {

       title }
  }
}
</script>

<style lang="scss" scoped></style>
3. v-memo指令
只要 v-memo 的依赖项没有发生改变,那它的子元素就不会重新渲染,这是一种优化手段。
<template>
  <div>
    <!-- v-memo它依赖项没有发生改变,则它子元素不会重新渲染,优化 -->
    <!-- <div v-memo="[names.length]"> -->
    <div v-memo="[num]">
      <ul v-for="item of names" :key="item">
        <li> {

   { item }}</li>
      </ul>
    </div>
    <button @click="addNames">++++</button>
  </div>
</template>

<script>
import {

       ref, watch } from 'vue'
export default {


  setup() {


    let num = ref(0)
    let names = ref(['乐乐', '英子', '小森', '亮亮'])
    // 这里只是让names变量发生了变化,而v-memo的依赖项为num,所以这时候视图并不会重新渲染
    const addNames = () => names.value.push(Date.now())

    watch(
      // 只要names属性发生了变化,就修改num的值
      names,
      n => {


        num.value = n.length
      },
      {

       deep: true, immediate: true }
    )

    return {

       num, names, addNames }
  }
}
</script>

<style lang="scss" scoped>

</style>
4. Teleport内置组件
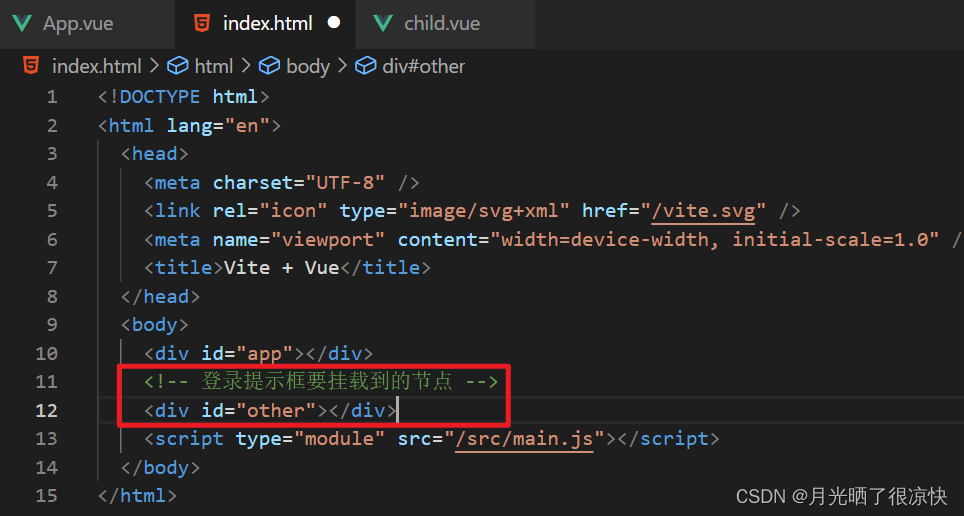
<Teleport> 是一个内置组件,它可以将一个组件内部的一部分模板“传送”到该组件的 DOM 结构外层的位置去。
举个例子,当我们利用 v-if 显示和隐藏某些元素的时候,可能会导致整个页面(当前 app 节点) html 结构的变化,从而导致元素样式的变化,这时候我们就可以将这个元素挂载到其他节点中去,于是就可以使用 Teleport 来包裹元素实现。
首先我们在根目录的 index.html 中添加一个新的挂载点:
父组件:
<template>
  <div>
    <button @click="isShow = !isShow">点击显示</button>
    <Teleport to="#other">
      <div v-if="isShow" class="modal">
        <h3>提示框</h3>
        <div>欢迎登录页面</div>
      </div>
    </Teleport>
  </div>
</template>

<script>
import {

       ref } from 'vue'
export default {


  setup() {


    let isShow = ref(false)

    return {

       isShow }
  }
}
</script>

<style lang="scss" scoped></style>
5. KeepAlive缓存组件
<KeepAlive> 是一个内置组件,它的功能是在多个组件间动态切换时缓存被移除的组件实例。
<template>
  <div>
    <button @click="cmp = 'child1'">child1</button>
    <button @click="cmp = 'child2'">child2</button>

    <!-- 只缓存 child2 中的内容 -->
    <!-- <KeepAlive :include="['child1']"> -->

    <!-- 如果是字符串,则一定不能有多余空格,多个以逗号隔开 -->
    <!-- <KeepAlive include="child1"> -->

    <!-- 使用正则匹配 -->
    <KeepAlive :include="/child/">
      <component :is="cmp"></component>
    </KeepAlive>
  </div>
</template>

<script>
import {

       ref } from 'vue'
import child1 from './components/child1.vue'
import child2 from './components/child2.vue'
export default {


  components: {


    child1,
    child2
  },
  setup() {


    let cmp = ref('child1')
    return {

       cmp }
  }
}
</script>

<style lang="scss" scoped></style>
6. transition过渡组件
利用过渡组件实现元素的显示与隐藏:
<template>
  <div>
    <button @click="isShow = !isShow">点击显示</button>
    <!-- 样式前缀,以v-开头 -->
    <Transition name="v">
      <div v-if="isShow" class="modal">
        <h3>提示框</h3>
        <div>欢迎登录页面</div>
      </div>
    </Transition>
  </div>
</template>

<script>
import {

       ref } from 'vue'

export default {


  setup() {


    let isShow = ref(false)

    return {

       isShow }
  }
}
</script>

<style lang="scss" scoped>
// enter 进场
// leave 出场

/* 在进场和退场的过程中,进行透明度的变化 */
.v-enter-active,
.v-leave-active {


  transition: opacity 0.6s ease;
}

/* 进场开始和退场的结束 */
.v-enter-from,
.v-leave-to {


  opacity: 0;
}
</style>
利用过渡组件和动态组件实现在组件间的切换:
<template>
  <div>
    <button @click="activeComponent = 'child1'">child1</button>
    <button @click="activeComponent = 'child2'">child2</button>
    <!-- 模式:先进入后退出 -->
    <!-- <Transition name="v" mode="in-out"> -->
    <!-- 模式:先退出后进入 -->
    <Transition name="v" mode="out-in">
      <component :is="activeComponent"></component>
    </Transition>
  </div>
</template>

<script>
import {

       ref } from 'vue'
import child1 from './components/child1.vue'
import child2 from './components/child2.vue'

export default {


  components: {


    child1,
    child2
  },
  setup() {


    let isShow = ref(true)
    let activeComponent = ref('child1')

    return {

       isShow, activeComponent }
  }
}
</script>

<style lang="scss" scoped>
// enter 进场
// leave 出场

/* 在进场和退场的过程中,进行透明度的变化 */
.v-enter-active,
.v-leave-active {


  transition: opacity 0.3s ease;
}

/* 进场开始和退场的结束 */
.v-enter-from,
.v-leave-to {


  opacity: 0;
}
</style>