前言
本文主要对使用docker-machine过程中的报错解决方案进行汇总记录。
报错
[root@iZhp33j6fklnmhbf0lz2obZ ~]# docker-machine create --driver virtualbox default
Running pre-create checks...
Error with pre-create check: "We support Virtualbox starting with version 5. Your VirtualBox install is \"WARNING: The vboxdrv kernel module is not loaded. Either there is no module\\n         available for the current kernel (5.19.2-1.el8.elrepo.x86_64) or it failed to
\\n         load. Please recompile the kernel module and install it by\\n\\n           sudo /sbin/vboxconfig\\n\\n         You will not be able to start VMs until this problem is fixed.\\n6.1.36r152435\". Please upgrade at https://www.virtualbox.org"
解决
跟着报错提示走,重新编译内核
sudo /sbin/vboxconfig
[root@iZhp33j6fklnmhbf0lz2obZ ~]# /sbin/vboxconfig
vboxdrv.sh: Stopping VirtualBox services.
vboxdrv.sh: Starting VirtualBox services.
vboxdrv.sh: Building VirtualBox kernel modules.
This system is currently not set up to build kernel modules.
Please install the Linux kernel "header" files matching the current kernel
for adding new hardware support to the system.
The distribution packages containing the headers are probably:
    kernel-devel kernel-devel-5.19.2-1.el8.elrepo.x86_64

There were problems setting up VirtualBox.  To re-start the set-up process, run
  /sbin/vboxconfig
as root.  If your system is using EFI Secure Boot you may need to sign the
kernel modules (vboxdrv, vboxnetflt, vboxnetadp, vboxpci) before you can load
them. Please see your Linux system's documentation for more information.
1.安装kernel-devel
提示安装kernel-devel,进入下面网站下载对应版本
本文对应版本
https://centos.pkgs.org/8/elrepo-kernel-x86_64/kernel-ml-devel-5.19.2-1.el8.elrepo.x86_64.rpm.html
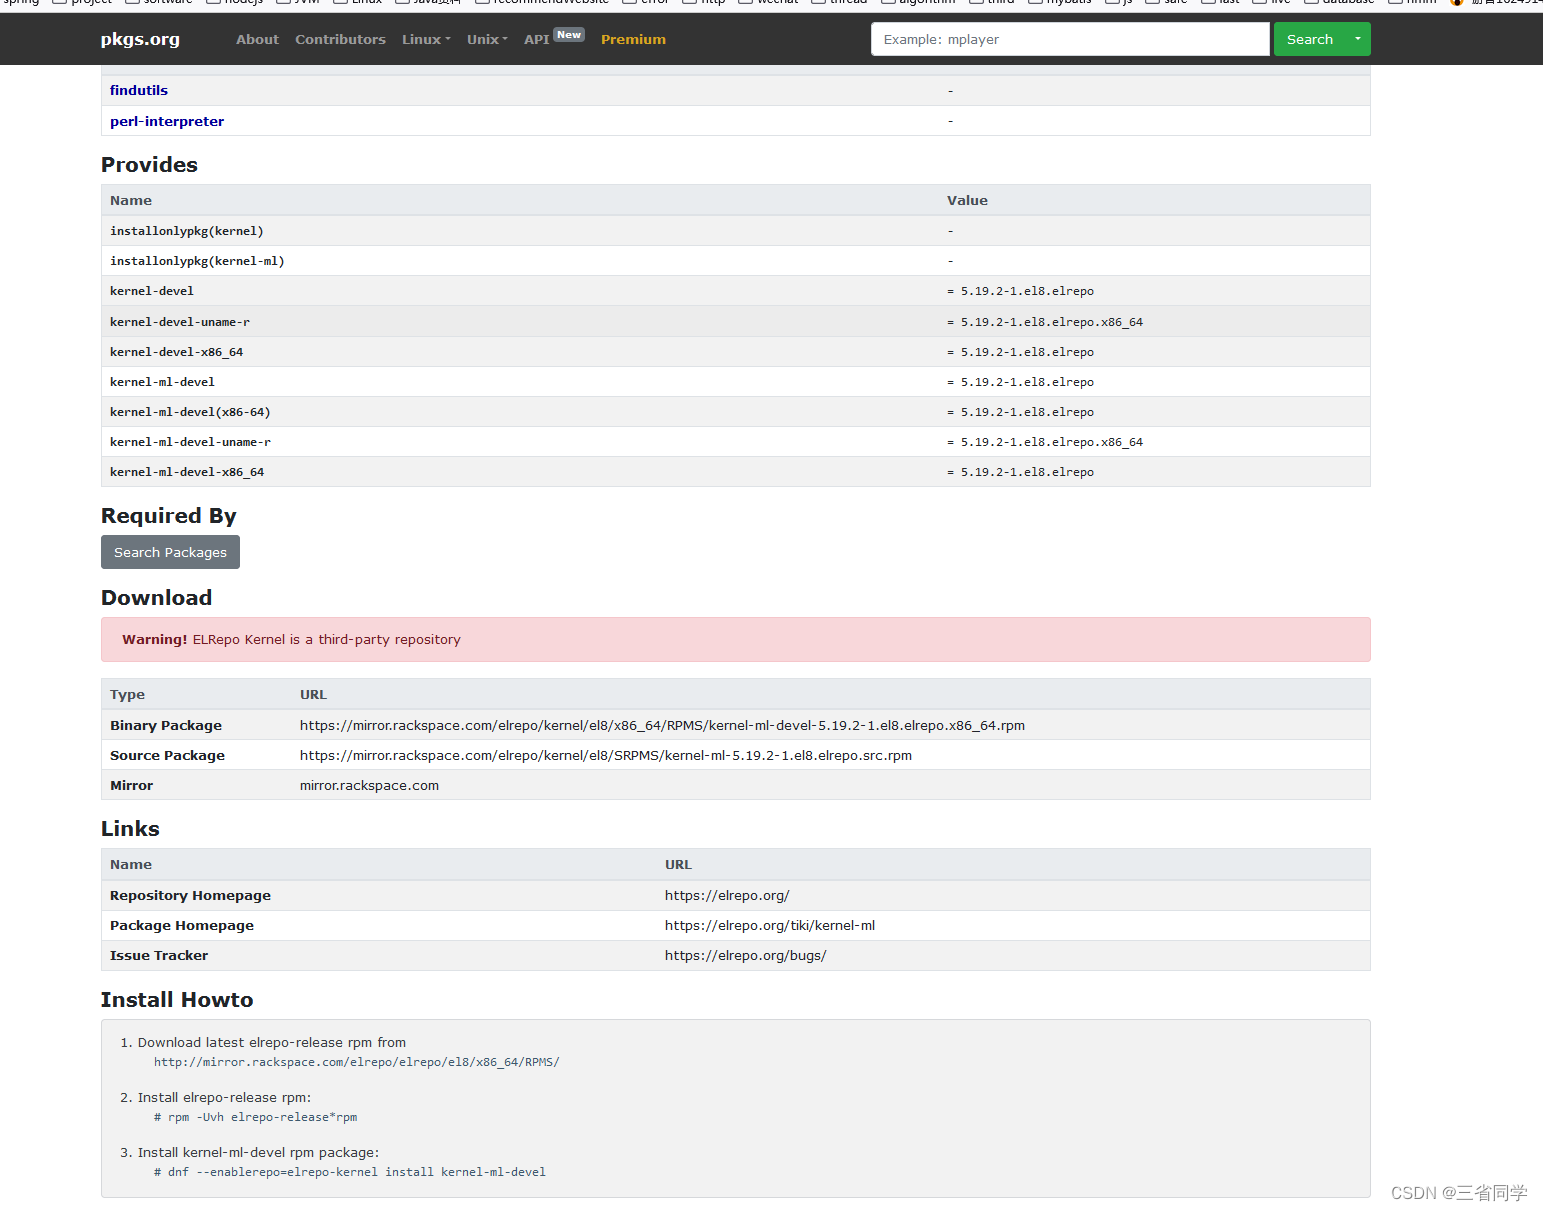
dnf --enablerepo=elrepo-kernel install kernel-ml-devel
[root@iZhp33j6fklnmhbf0lz2obZ ~]# dnf --enablerepo=elrepo-kernel install kernel-ml-devel
/usr/lib/python3.6/site-packages/OpenSSL/crypto.py:12: CryptographyDeprecationWarning: Python 3.6 is no longer supported by the Python core team. Therefore, support for it is deprecated in cryptography and will be removed in a future release.
  from cryptography import x509

Invalid configuration value: failovermethod=priority in /etc/yum.repos.d/CentOS-epel.repo; Configuration: OptionBinding with id "failovermethod" does not exist
Last metadata expiration check: 0:48:02 ago on Fri 19 Aug 2022 01:33:06 PM CST.
Dependencies resolved.
==============================================================================================================================================================================================================================================================================
 Package                                                            Architecture                                              Version                                                                  Repository                                                        Size
==============================================================================================================================================================================================================================================================================
Installing:
 kernel-ml-devel                                                    x86_64                                                    5.19.2-1.el8.elrepo                                                      elrepo-kernel                                                     14 M

Transaction Summary
==============================================================================================================================================================================================================================================================================
Install  1 Package

Total download size: 14 M
Installed size: 56 M
Is this ok [y/N]: y
Downloading Packages:
kernel-ml-devel-5.19.2-1.el8.elrepo.x86_64.rpm                                                                                                                                                                                                 14 kB/s |  14 MB     16:55
------------------------------------------------------------------------------------------------------------------------------------------------------------------------------------------------------------------------------------------------------------------------------
Total                                                                                                                                                                                                                                          14 kB/s |  14 MB     16:58
Running transaction check
Transaction check succeeded.
Running transaction test
Transaction test succeeded.
Running transaction
  Preparing        :                                                                                                                                                                                                                                                      1/1
  Installing       : kernel-ml-devel-5.19.2-1.el8.elrepo.x86_64                                                                                                                                                                                                           1/1
  Running scriptlet: kernel-ml-devel-5.19.2-1.el8.elrepo.x86_64                                                                                                                                                                                                           1/1
  Verifying        : kernel-ml-devel-5.19.2-1.el8.elrepo.x86_64                                                                                                                                                                                                           1/1

Installed:
  kernel-ml-devel-5.19.2-1.el8.elrepo.x86_64

Complete!
2.编译内核
[root@iZhp33j6fklnmhbf0lz2obZ ~]# /sbin/vboxconfig
vboxdrv.sh: Stopping VirtualBox services.
vboxdrv.sh: Starting VirtualBox services.
vboxdrv.sh: Building VirtualBox kernel modules.
完美解决。

3.再次启动
[root@iZhp33j6fklnmhbf0lz2obZ ~]# docker-machine create --driver virtualbox default
Running pre-create checks...
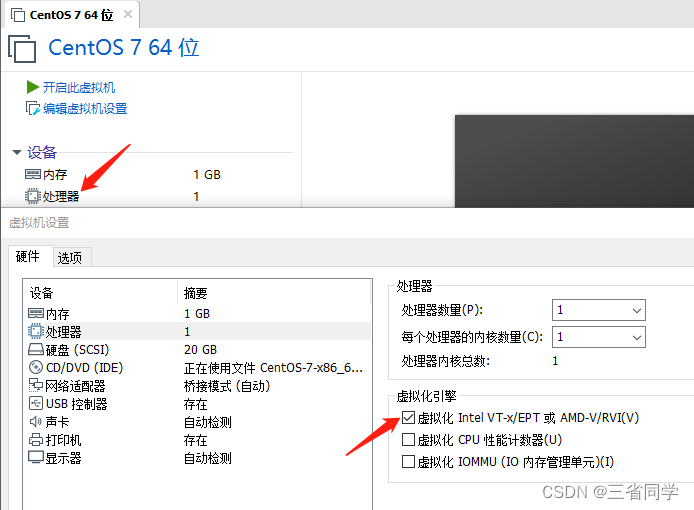
Error with pre-create check: "This computer doesn't have VT-X/AMD-v enabled. Enabling it in the BIOS is mandatory"
好了,没报以前的错误。

出现了小意外,原因是 vm 未开启硬件虚拟化,添加 --virtualbox-no-vtx-check 参数禁止 vtx 检查
agin
[root@iZhp33j6fklnmhbf0lz2obZ ~]# docker-machine create --driver virtualbox --virtualbox-no-vtx-check test5
Running pre-create checks...
(test5) No default Boot2Docker ISO found locally, downloading the latest release...
(test5) Latest release for github.com/boot2docker/boot2docker is v19.03.12
(test5) Downloading /root/.docker/machine/cache/boot2docker.iso from https://github.com/boot2docker/boot2docker/releases/download/v19.03.12/boot2docker.iso...
如果需要用到vtx:
注:阿里云服务器已虚拟化过,不能二次虚拟
相关错误
1、Error with pre-create check: “VBoxManage not found. Make sure VirtualBox is installed and VBoxManage is in the path”
解决:
(1).在/etc/yum.repos.d/目录下新建virtualbox.repo并写入如下内容
扫描二维码关注公众号,回复:
14517143 查看本文章

[virtualbox]
name=Oracle Linux / RHEL / CentOS-$releasever / $basearch - VirtualBox
baseurl=http://download.virtualbox.org/virtualbox/rpm/el/$releasever/$basearch
enabled=1
gpgcheck=1
repo_gpgcheck=1
gpgkey=https://www.virtualbox.org/download/oracle_vbox.asc
(2).更新yum缓存
yum clean all

yum makecache
(3).安装virtualbox
yum install VirtualBox-6.2
2、boot2docker.iso下载通过github慢问题解决
国外地址
安装Toolbox用国内的镜像相当的快
注:
Boot2Docker 是一个轻量级的 Linux 发行版,专门用于运行 Docker 容器。它完全从 RAM 运行,大约 45MB的下载和快速启动。
Boot2Docker 已正式弃用且未维护。建议用户从 Boot2Docker 过渡到 Docker Desktop(尤其是使用支持Windows 10 Home 的新 WSL2 后端)。
安装后文件含有boot2docker.iso可使用
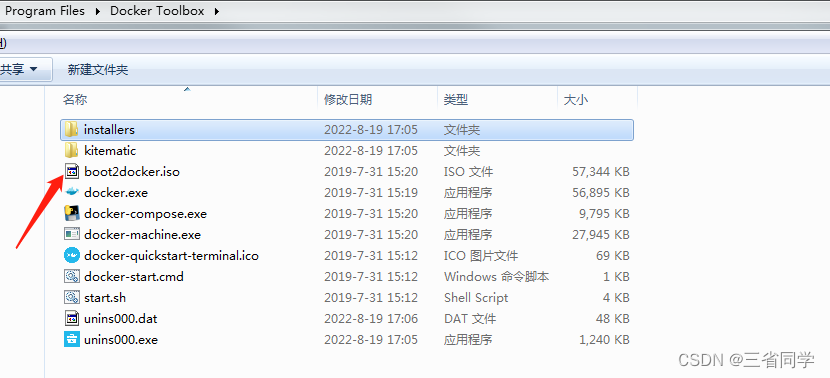
–virtualbox-boot2docker-url 可以指定本地镜像
docker-machine create default -d virtualbox --virtualbox-boot2docker-url=/home/machine/boot2docker.iso
3、Error creating machine: Error in driver during machine creation
Error creating machine: Error in driver during machine creation: Error setting up host only network on machine start: /usr/bin/VBoxManage hostonlyif ipconfig vboxnet3 --ip 192.168.99.1 --netmask 255.255.255.0 failed:
VBoxManage: error: Code E_ACCESSDENIED (0x80070005) - Access denied (extended info not available)
VBoxManage: error: Context: "EnableStaticIPConfig(Bstr(pszIp).raw(), Bstr(pszNetmask).raw())" at line 242 of file VBoxManageHostonly.cpp
- docker-machine ls 的所有计算机
- 用 docker-machine rm -y 删除它们
- 用 VBoxManage list hostonlyifs 查找所有 host-only 以太网适配器
- 用 VBoxManage hostonlyif remove 逐个删除它们
- 创建 /etc/vbox 文件夹
- 写入文件 echo “* 0.0.0.0/0 ::/0” > /etc/vbox/networks.conf

点赞 收藏 关注