目录
生命周期完整版案例
全局事件总线案例
消息订阅与发布案例
第一部分:生命周期完整版案例
<!DOCTYPE html>
<html>
<head>
<meta charset="utf-8">
<title></title>
<script type="text/javascript" src="js/vue.js"></script>
</head>
<body>
<div id="root">
计算器:{ {num}}<br>
<button @click="btn">点击累加</button>
</div>
<script type="text/javascript">
// Vue.config.productionTip = false;
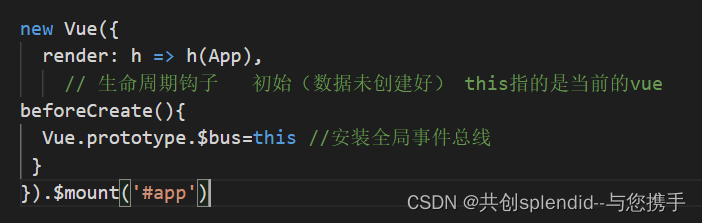
const vm = new Vue({
el:'#root',
data:{
num:0
},
// 这里是方法 添加点击事件即可累加
methods:{
btn(){
this.num++
}
},
// data event 创建之前的调用 但未创建
beforeCreate() {
// 打印出来的数据是 beforeCreate 后面是undefined
console.log('beforeCreate',this.num)
},
//已创建时期 但未挂载
created() {
// 打印出来的数据是 created 后面是0 一直是0
console.log('created',this.num)
},
// 生命周期 钩子
mounted() {
//打印出来的数据是mounted 打印出来的是一组正在变更的数据
console.log('mounted',this.num)
//第一步
this.num++
//debugger用来断点
// debugger;
setInterval(()=>{
this.num++
},1000)
}
})
</script>
</body>
</html>
<!DOCTYPE html>
<html>
<head>
<meta charset="utf-8">
<title></title>
<script src="js/vue.js"></script>
</head>
<body>
<div id="root">
计算器:{ {num}}<br>
<button @click="btn">累加数据</button>
<button @click="sky">数据销毁</button>
</div>
<script type="text/javascript">
new Vue({
el:'#root',
data(){
return{
num:0
}
},
methods:{
btn(){
this.num++
},
sky(){
this.$destroy()
}
},
// 载入前(完成了data和el数据初始化)完成了挂载数据
beforeMount() {
console.log('beforeMount',this.num)
},
// 完成数据更新之前,data数据发生变化 view视图未发生变化 数据销毁前 dom值依旧存在 通常在这里善后:清除计时器、清除非指令绑定的事件等等…’)。
beforeUpdate(){
// 当点击累加时 累加的数据会根据点击进行更新数据
console.log('beforeUpdate',this.num)
},
updated() {
console.log('updated',this.num)
},
// 当点击销毁时 就会保留当前的this数据 不会再更新数据
beforeDestroy(){
console.log('beforeDestroy',this.num)
},
destroyed(){
//这里只会保留this数据,不会再存留其它数据,该部分是数据已经销毁 this指的是当前末尾执行的this值
console.log('destroyed',this.num)
}
})
</script>
</body>
</html>
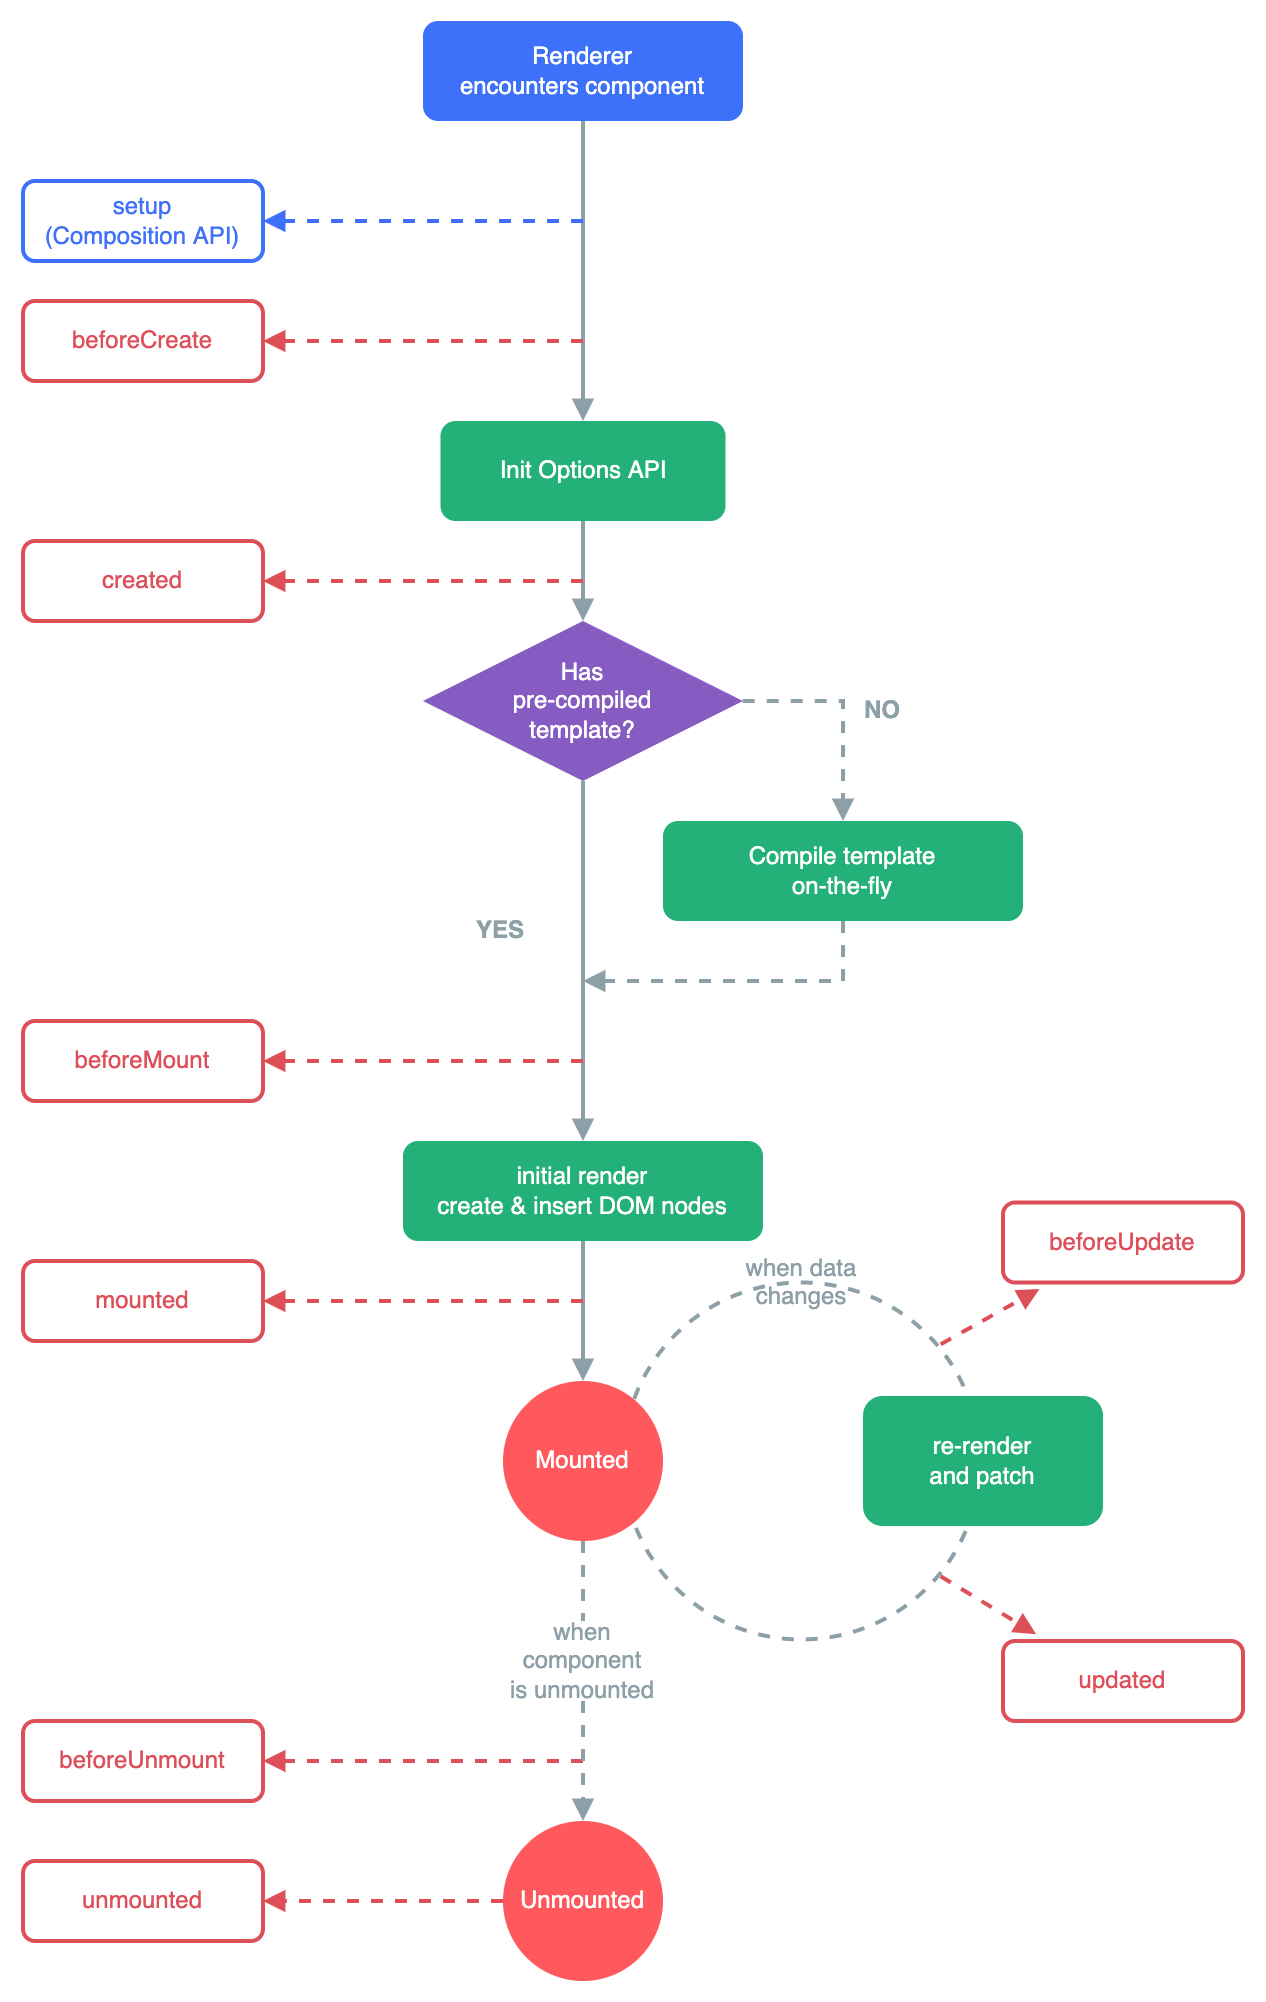
生命周期图例:
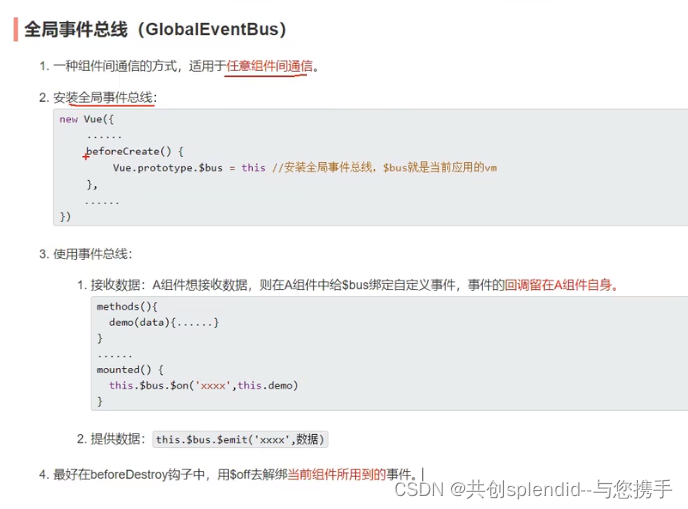
第二部分:全局事件总线案例
子组件一:
<template>
<div class="text">
<h2>学生姓名:{ { name }}</h2>
<h2>学生性别:{ { sex }}</h2>
<button @click="sendstudent">点击事件</button>
</div>
</template>
<script>
export default {
name: "MyStudent",
data() {
return {
name: "张三",
sex: "男",
}
},
//添加点击事件 方法 通过$emit传出数据给兄弟组件MySchool(外部main.js组件 需要引入全局的数据)
methods:{
sendstudent() {
this.$bus.$emit('Hello',this.name)
}
}
};
</script>
<style scoped>
.text{
background-color:pink;
width:100%;
height:150px;
padding:40px;
margin-top:50px;
}
</style>
子组件二:
<template>
<div class="table">
<h2>学校名称:{ { name }}</h2>
<h2>学校地址:{ { address }}</h2>
</div>
</template>
<script>
export default {
name: 'MySchool',
data(){
return {
name:'尚硅谷',
address:'北京',
}
},
// 生命周期钩子接收者
mounted(){
// 第一个数据是函数名 第二个是传进来的数据 (外部main.js组件 需要引入全局的数据)
this.$bus.$on('Hello',(data)=>{
console.log('我是school组件,收到了数据',data)
})
},
//处理过后的数据进行解绑 解绑的是函数的名称
beforeDestroy(){
this.$bus.$off('Hello')
}
}
</script>
<style scoped>
.table{
background-color:rgb(0, 217, 255);
width:100%;
height:150px;
padding:40px;
}
</style>
main.js文件
父组件:
<template>
<div class="app">
<h1>{ {msg}}</h1>
<MySchool></MySchool>
<MyStudent></MyStudent>
</div>
</template>
<script>
import MySchool from './components/MySchool.vue'
import MyStudent from './components/MyStudent.vue'
export default {
name: 'App',
data(){
return{
msg:'你好呀!'
}
},
components:{
MySchool,
MyStudent
}
}
</script>
<style scoped>
.app {
background-color:#999;
width:100%;
height:700px;
}
</style>
全局总线总结:
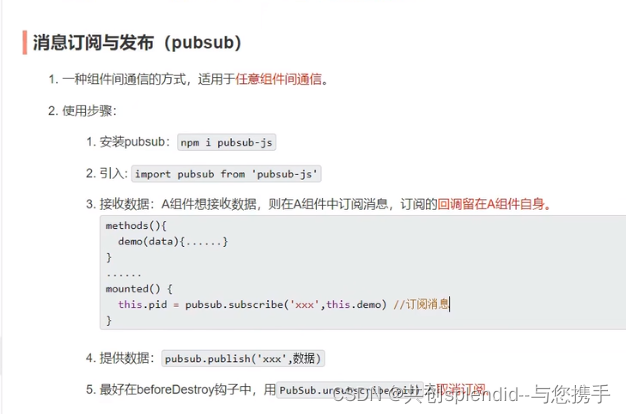
第三部分:消息订阅与发布案例
该案例借用了全局总线的案例,所以修改部分会用特殊色彩字体显示
Myschool.vue
<template>
<div class="table">
<h2>学校名称:{ { name }}</h2>
<h2>学校地址:{ { address }}</h2>
</div>
</template>
<script>
// 该pubsub是库 内部有很多方法 用于订阅消息
import pubsub from 'pubsub-js'
export default {
name: 'MySchool',
data(){
return {
name:'尚硅谷',
address:'北京',
}
},
// 生命周期钩子接收者
mounted(){
// 第一个数据是函数名 第二个是传进来的数据 (外部main.js组件 需要引入全局的数据)
// this.$bus.$on('Hello',(data)=>{
// console.log('我是school组件,收到了数据',data)
// })
//pubsub是方法.subscribe订阅 第一个参数是订阅地址名称 第二个是订阅后对方发布一个回调函数
//回调函数内跟两个参数,第一个参数返回来得是订阅人的名称 第二个参数返回的是对方发布的数据
this.pubsubId = pubsub.subscribe('hello',(msgName,data)=>{
//由于这里需要写this指向 所以这里必须写成箭头函数 若写成普通函数肯定会报错或者undefined
console.log('有人发布了hello数据,hello的回调函数执行了',msgName,data)
})
},
//处理过后的数据进行解绑 解绑的是函数的名称
beforeDestroy(){
// this.$bus.$off('Hello')
//取消订阅 由于获取不到pubsubId数据 所以只能在前加this才可以获取到
pubsub.unsubscribe(this.pubsubId);
}
}
</script>
<style scoped>
.table{
background-color:rgb(0, 217, 255);
width:100%;
height:150px;
padding:40px;
}
</style>
Mystudent.vue
<template>
<div class="text">
<h2>学生姓名:{ { name }}</h2>
<h2>学生性别:{ { sex }}</h2>
<button @click="sendstudent">点击事件</button>
</div>
</template>
<script>
// 该pubsub是库 内部有很多方法 用于订阅消息
import pubsub from 'pubsub-js'
export default {
name: "MyStudent",
data() {
return {
name: "张三",
sex: "男",
}
},
//添加点击事件 方法 通过$emit传出数据给兄弟组件MySchool(外部main.js组件 需要引入全局的数据)
methods:{
sendstudent() {
// this.$bus.$emit('Hello',this.name)
// pubsub库 方法 .publish发布 第一个是订阅人的名称 第二个是发布的数据
pubsub.publish('hello',666)
}
}
};
</script>
<style scoped>
.text{
background-color:pink;
width:100%;
height:150px;
padding:40px;
margin-top:50px;
}
</style>
结构图例: