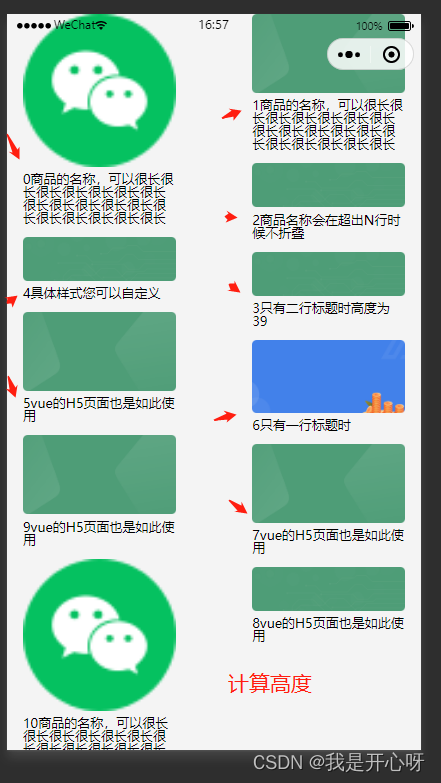
效果图:
<template>
	<view class="container">
		<view class="left">
			<view v-for="(item,index) in leftList" :key="index" class="imgBox">
				<image :src="item.img" alt="" mode="widthFix"></image>
				<view class="txt">{

    {

    item.name}}</view>
			</view>

		</view>
		<view class="right">
			<view v-for="(item,index) in rightList" :key="index" class="imgBox">
				<image :src="item.img" alt="" mode="widthFix"></image>
				<view class="txt">{

    {

    item.name}}</view>
			</view>
		</view>
	</view>
</template>

<script>
	export default {


		data() {


			return {


				list: [{


						img: "../../static/home/weixin.png",
						name: '0商品的名称,可以很长很长很长很长很长很长很长很长很长很长很长很长很长很长很长很长很长很长',
						id: 100
					}, {


						img: "../../static/home/bg_yjc.png",
						name: '1商品的名称,可以很长很长很长很长很长很长很长很长很长很长很长很长很长很长很长很长很长很长',
						id: 100
					}, {


						img: "../../static/home/bg.png",
						name: '2商品名称会在超出N行时候不折叠',
						id: 100
					},
					{


						img: "../../static/home/bg.png",
						name: '3只有二行标题时高度为39',
						id: 100
					}, {


						img: "../../static/home/bg.png",
						name: '4具体样式您可以自定义',
						id: 100
					}, {


						img: "../../static/home/bg_yjc.png",
						name: '5vue的H5页面也是如此使用',
						id: 100
					}, {


						img: "../../static/img/shenfen1.png",
						name: '6只有一行标题时',
						id: 100
					}, {


						img: "../../static/home/bg_yjc.png",
						name: '7vue的H5页面也是如此使用',
						commdityPrice: 100
					}, {


						img: "../../static/home/bg.png",
						name: '8vue的H5页面也是如此使用',
						commdityPrice: 100
					}, {


						img: "../../static/home/bg_yjc.png",
						name: '9vue的H5页面也是如此使用',
						commdityPrice: 100
					}, {


						img: "../../static/home/weixin.png",
						name: '10商品的名称,可以很长很长很长很长很长很长很长很长很长很长很长很长很长很长很长很长很长很长',
						id: 100
					},
				], //商品列表,
				// 初始化左右盒子
				leftList: [],
				rightList: [],
				// 初始化左右盒子高度
				leftH: 0,
				rightH: 0
			}
		},
		// 页面加载
		onLoad(e) {


			this.doList()
		},
		// 页面显示
		onShow() {


		},
		// 方法
		methods: {


			doList() {


				const that = this
				this.list.forEach(res => {


					// 获取图片宽高
					uni.getImageInfo({


						src: res.img,
						success: (image) => {


							console.log(res.img)
							// 计算图片渲染高度
							let showH = (50 * image.height) / image.width
							// 判断左右盒子高度
							if (that.leftH <= that.rightH) {


								that.leftList.push(res)
								that.leftH += showH
							} else {


								that.rightList.push(res)
								that.rightH += showH
							}
						}
					})
				})
			}
		},
		// 计算属性
		computed: {


		},
		// 侦听器
		watch: {


		},
		// 页面隐藏
		onHide() {


		},
		// 页面卸载
		onUnload() {


		},
		// 触发下拉刷新
		onPullDownRefresh() {


			this.pageNum = 1
			// this.getListData()
		},
		// 页面上拉触底事件的处理函数
		onReachBottom() {


			this.pageNum++
			// this.getListData()
		},
	}
</script>

<style lang="scss" scoped>
	.container {


		padding: 0 30rpx;
		font-size: 14rpx;
		line-height: 24rpx;
	}

	.right,
	.left {


		display: inline-block;
		width: 40%;
		vertical-align: top;
		.imgBox{


			margin-bottom: 25rpx;
			.txt{


				font-size: 24rpx;
			}
		}
	}

	.left {


		float: left;
	}
	.right{


		float: right;
	}

	.left image,
	.right image {


		width: 100%;
		margin-bottom: 10rpx;
	}
</style>
转载:感谢分享
原文链接:https://blog.csdn.net/He_n_ry/article/details/125242284