1.使用Istio在K8S集群中部署Bookinfo微服务项目
1.1.Bookinfo图书评测微服务项目介绍
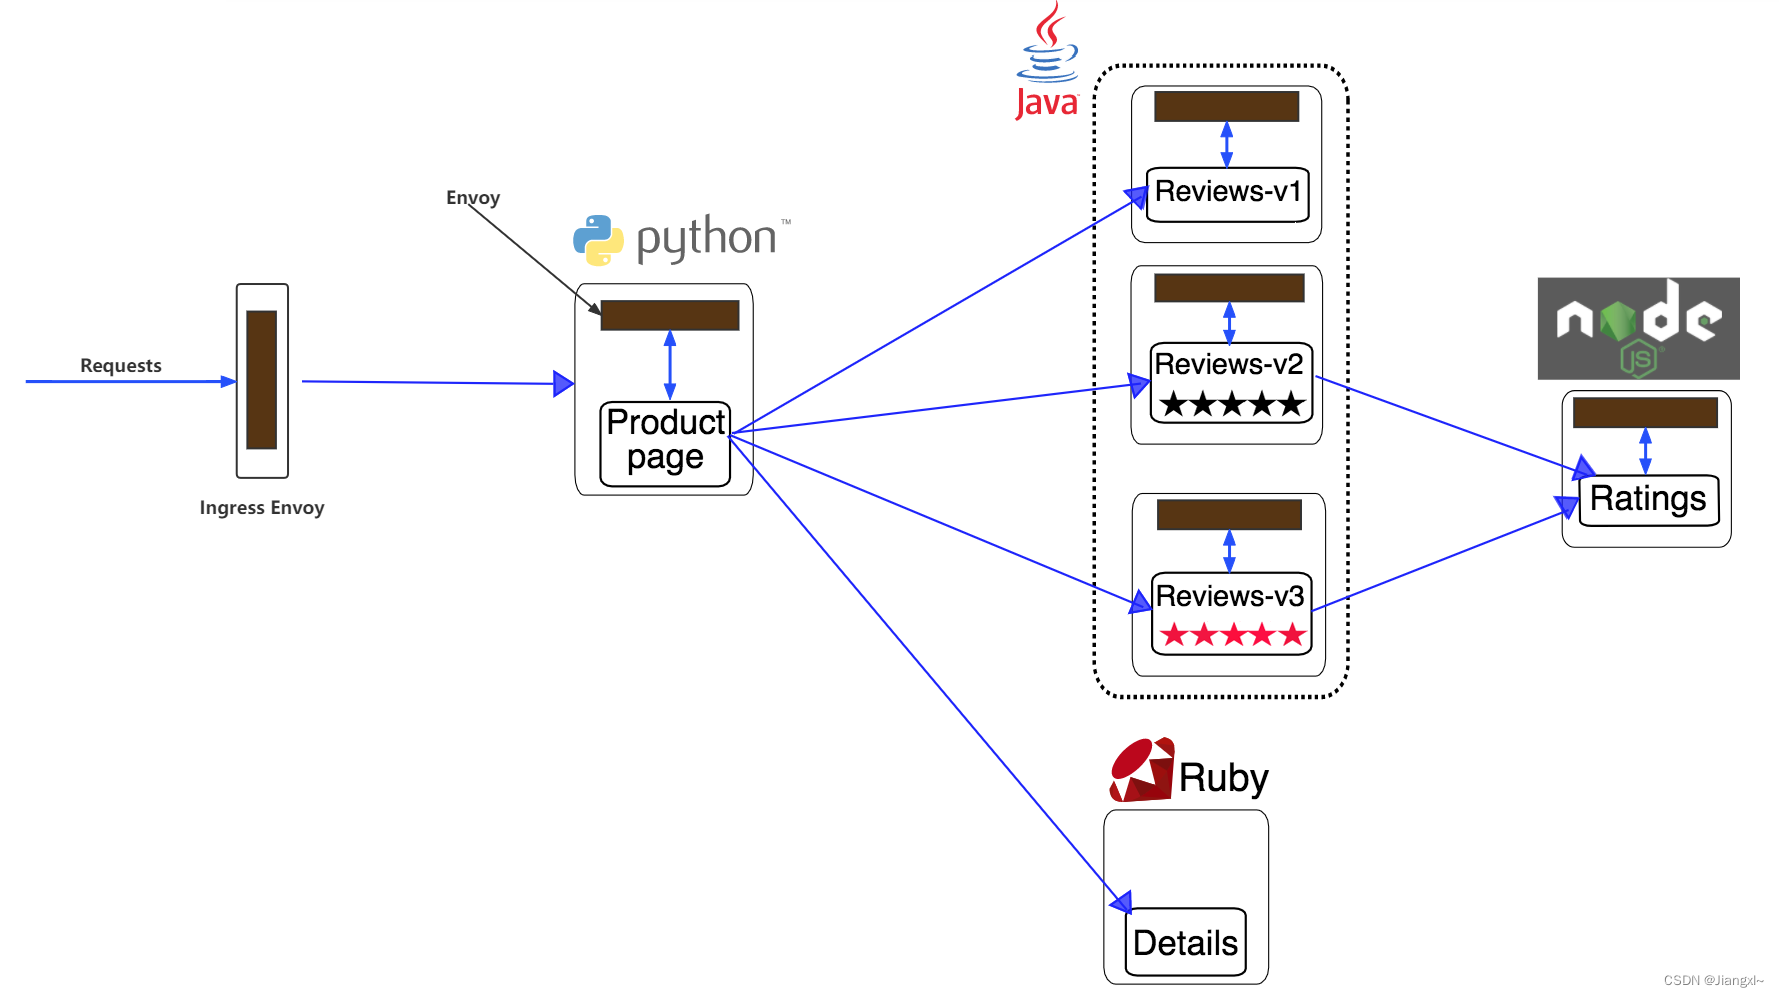
Bookinfo微服务也是istio提供学习istio的一个案例,这个微服务程序中包括4个微服务程序,并且每个微服务程序都是通过不同的语言编写的。
Bookinfo各个微服务程序介绍:
ProductPage(系统首页):ProductPage会调用Reviews评论区系统、Details详情内容,在系统首页展示评论的内容。
Reviews(评论区):Reviews评论区系统会调用Ratings在页面上展示评论的评分。
Details(详情内容):无系统调用。
Ratings(评分):无系统调用。
Bookinfo图书评测系统微服务部署的架构图
请求到达Istio的IngressGateway组件,根据配置的Gateway以及VirtualService资源,将请求由Ingress中的Envoy代理程序发送到ProductPage首页微服务容器中的Envoy代理程序,各个程序之间的调用都采用Envoy代理程序进行通信,ProductPage系统首页微服务会调用Reviews展示评论区的内容,调用Details展示详情内容,Reviews微服务调用Ratings微服务显示评分内容。
下图所示中可以看到有三个Reviews微服务,并且都是不同的版本,启动三个版本的Reviews微服务主要是用来演示灰度发布的,V1版本的评分不调用Ratings微服务以空白展示,V2版本的评分以五颗黑星展示,V3版本的评分以五颗红星展示,系统部署完成后启动的三个版本的Reviews微服务随着页面的刷新也会发生不同的展示样式,当大部分用户使用完系统后,根据反馈信息,锁定采用哪种样式的评分显示。
ProductPage微服务以Python语言开发、Reviews微服务以JAVA语言开发、Details微服务以Ruby语言开发、Ratings微服务以NodeJS语言开发。
1.2.使用Istio网格在K8S集群中部署Bookinfo微服务
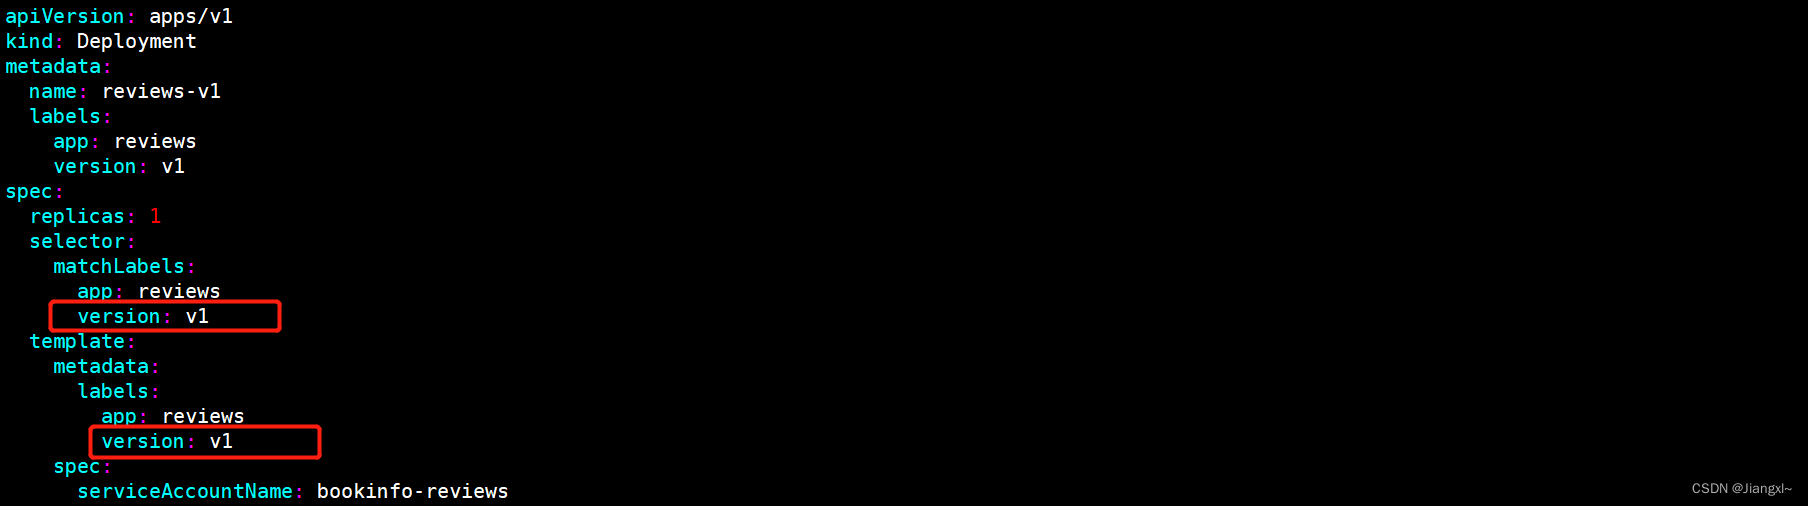
Bookinfo每个微服务程序都采用deployment控制器进行部署,并且每个微服务程序都创建了一个SA账号,Reviews不同版本的Pod同时部署主要是靠Pod中的标签来实现的。
1)创建Bookinfo微服务部署在K8S集群的命名空间并启动Sidecar自动注入。
[root@k8s-master ~]# kubectl create ns bookinfo
namespace/bookinfo created
[root@k8s-master ~]# kubectl label namespace bookinfo istio-injection=enabled
namespace/bookinfo labeled
2)部署Bookinfo微服务项目
1.进入Bookinfo项目提供的YAML文件路径
[root@k8s-master ~]# cd istio-1.8.2/samples/bookinfo/platform/kube/

2.在K8S集群中部署Bookinfo各个微服务程序
[root@k8s-master kube]# kubectl apply -f bookinfo.yaml -n bookinfo
service/details created
serviceaccount/bookinfo-details created
deployment.apps/details-v1 created
service/ratings created
serviceaccount/bookinfo-ratings created
deployment.apps/ratings-v1 created
service/reviews created
serviceaccount/bookinfo-reviews created
deployment.apps/reviews-v1 created
deployment.apps/reviews-v2 created
deployment.apps/reviews-v3 created
service/productpage created
serviceaccount/bookinfo-productpage created
deployment.apps/productpage-v1 created

3.查看部署的资源
[root@k8s-master kube]# kubectl get pod,deploy,svc -n bookinfo
NAME                                  READY   STATUS    RESTARTS   AGE
pod/details-v1-79c697d759-djk9n       2/2     Running   0          5m10s
pod/productpage-v1-65576bb7bf-hk56m   2/2     Running   0          5m9s
pod/ratings-v1-7d99676f7f-qvgz6       2/2     Running   0          5m11s
pod/reviews-v1-987d495c-2xcft         2/2     Running   0          5m10s
pod/reviews-v2-6c5bf657cf-zlbnn       2/2     Running   0          5m10s
pod/reviews-v3-5f7b9f4f77-nnk5d       2/2     Running   0          5m10s

NAME                             READY   UP-TO-DATE   AVAILABLE   AGE
deployment.apps/details-v1       1/1     1            1           5m11s
deployment.apps/productpage-v1   1/1     1            1           5m9s
deployment.apps/ratings-v1       1/1     1            1           5m11s
deployment.apps/reviews-v1       1/1     1            1           5m10s
deployment.apps/reviews-v2       1/1     1            1           5m10s
deployment.apps/reviews-v3       1/1     1            1           5m10s

NAME                  TYPE        CLUSTER-IP      EXTERNAL-IP   PORT(S)    AGE
service/details       ClusterIP   10.99.107.176   <none>        9080/TCP   5m11s
service/productpage   ClusterIP   10.100.152.36   <none>        9080/TCP   5m10s
service/ratings       ClusterIP   10.105.165.26   <none>        9080/TCP   5m11s
service/reviews       ClusterIP   10.110.7.196    <none>        9080/TCP   5m11s

#Bookinfo微服务项目部署好之后就是一个带有灰度发布的机制,Reviews微服务有3个不同的版本,不同版本的应用程序分布通过Deployment资源创建,然后同时接入到一个Service资源中,用户访问时会访问到不同版本的程序。
3)Bookinfo项目的Gateway及VirtualService资源
1.进入网关资源的编排文件目录
[root@k8s-master kube]# cd /root/istio-1.8.2/samples/bookinfo/networking

2.网关资源编排文件内容
[root@k8s-master networking]# cat bookinfo-gateway.yaml
apiVersion: networking.istio.io/v1alpha3
kind: Gateway					#控制器类型为Gateway
metadata:
  name: bookinfo-gateway			#定义控制器的名称
spec:
  selector:
    istio: ingressgateway 			#关联istio的ingressgateway,将代理配置信息配置在ingressgateway中
  servers:							#定义服务使用的端口号
  - port:
      number: 80					#使用80端口,名称为http,协议为http
      name: http
      protocol: HTTP
    hosts:							#允许访问的主机
    - "*"
---
apiVersion: networking.istio.io/v1alpha3
kind: VirtualService					#控制器的类型为VirtualService
metadata:
  name: bookinfo					#定义控制器的名称
spec:
  hosts:							#定义流量转发的机器
  - "*"
  gateways:							#关联Gateway资源
  - bookinfo-gateway
  http:								#定义路由规则
  - match:
    - uri:								#url表示根据url做路由转发规则
        exact: /productpage
    - uri:
        prefix: /static
    - uri:
        exact: /login
    - uri:
        exact: /logout
    - uri:
        prefix: /api/v1/products
    route:								#定义路由转发规则
    - destination:
        host: productpage					#将指定的5个url路径全部转发到productpage的service资源上
        port:
          number: 9080						#service资源的端口号
3)为Bookinfo项目创建Gateway及VirtualService资源
1.创建资源
[root@k8s-master networking]# kubectl apply -f bookinfo-gateway.yaml -n bookinfo
gateway.networking.istio.io/bookinfo-gateway created
virtualservice.networking.istio.io/bookinfo created

2.查看资源的状态
[root@k8s-master networking]# kubectl get gw,vs -n bookinfo
NAME                                           AGE
gateway.networking.istio.io/bookinfo-gateway   10s

NAME                                          GATEWAYS               HOSTS   AGE
virtualservice.networking.istio.io/bookinfo   ["bookinfo-gateway"]   ["*"]   10s
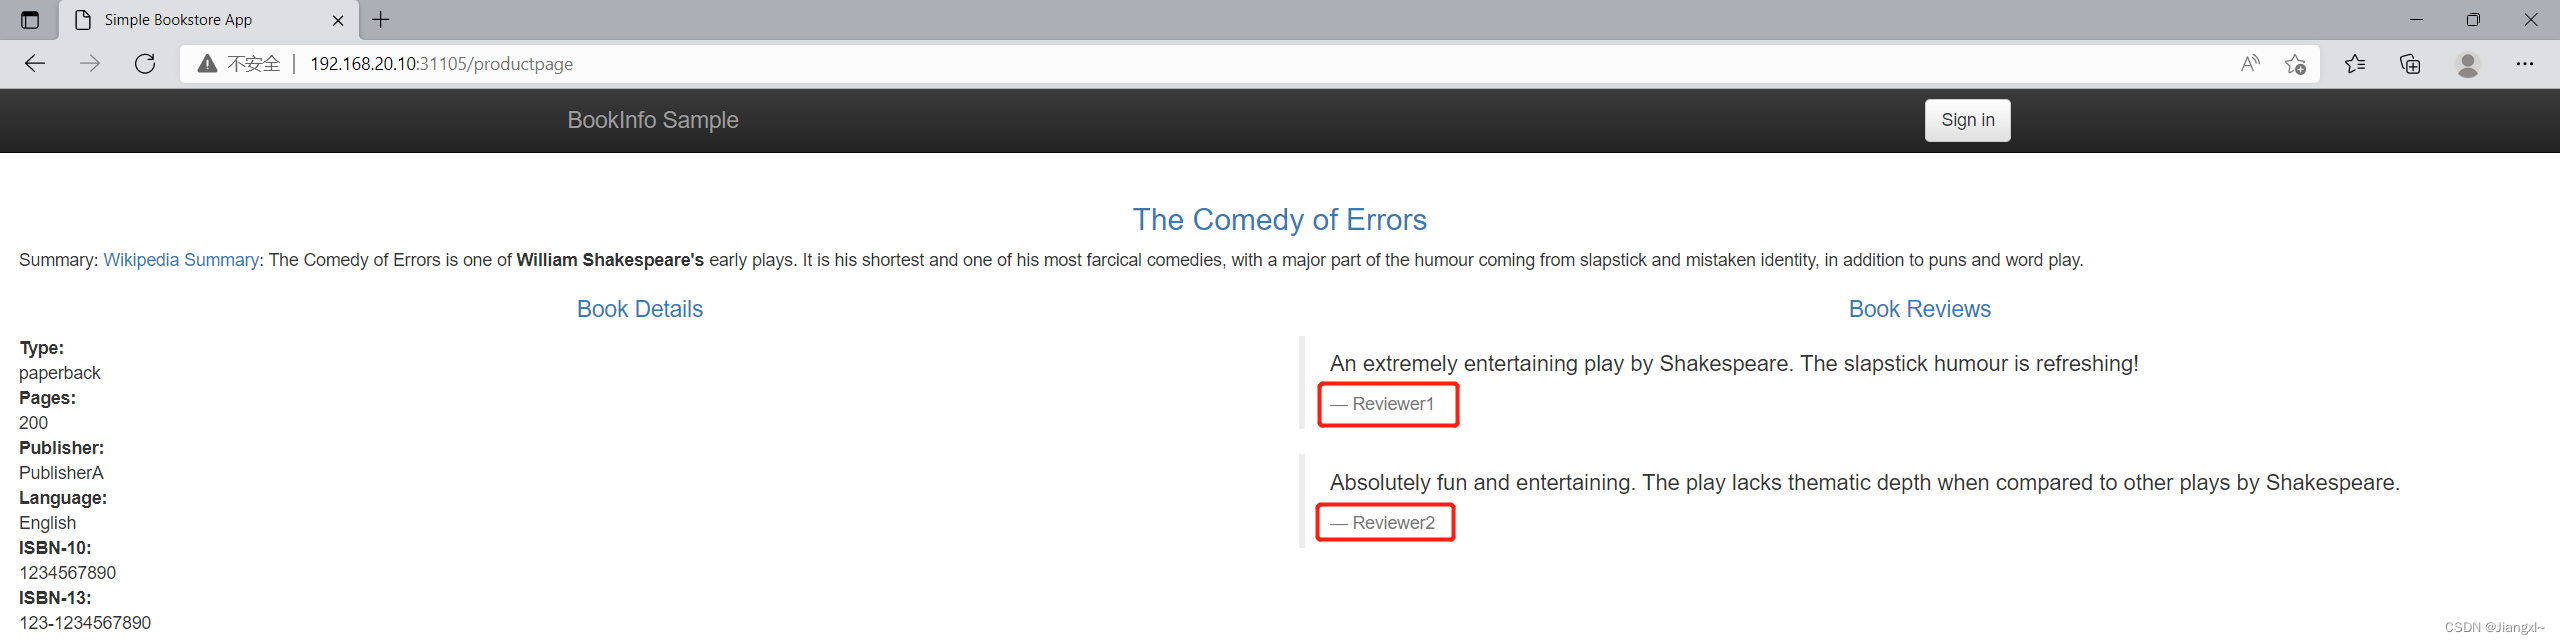
1.3.访问Bookinfo图书评测系统
创建完Bookinfo微服务的Gateway及VirtualService资源后,就可以通过Istio的IngressGateway资源访问网格中的程序了。
使用IngressGateway的80端口映射的NodePort端口进行访问:http://192.168.20.10:31105/productpage。
[root@k8s-master networking]# kubectl get svc -n istio-system
NAME                   TYPE           CLUSTER-IP       EXTERNAL-IP   PORT(S)                                                                      AGE
istio-ingressgateway   LoadBalancer   10.107.107.206   <pending>     15021:32381/TCP,80:31105/TCP,443:30793/TCP,15012:32259/TCP,15443:31377/TCP   7d12h
istiod                 ClusterIP      10.109.130.252   <none>        15010/TCP,15012/TCP,443/TCP,15014/TCP                                        7d12h
Reviews微服务有3个不同的版本,三个不同版本的Pod程序都被Service资源所管理,主要用于测试灰度发布的效果。
[root@k8s-master ~]# kubectl describe svc reviews -n bookinfo
Name:              reviews
Namespace:         bookinfo
Labels:            app=reviews
                   service=reviews
Annotations:       <none>
Selector:          app=reviews
Type:              ClusterIP
IP:                10.110.7.196
Port:              http  9080/TCP
TargetPort:        9080/TCP
Endpoints:         100.64.169.133:9080,100.64.169.134:9080,100.64.169.135:9080			#三个不同版本的Pod资源
Session Affinity:  None
Events:            <none>
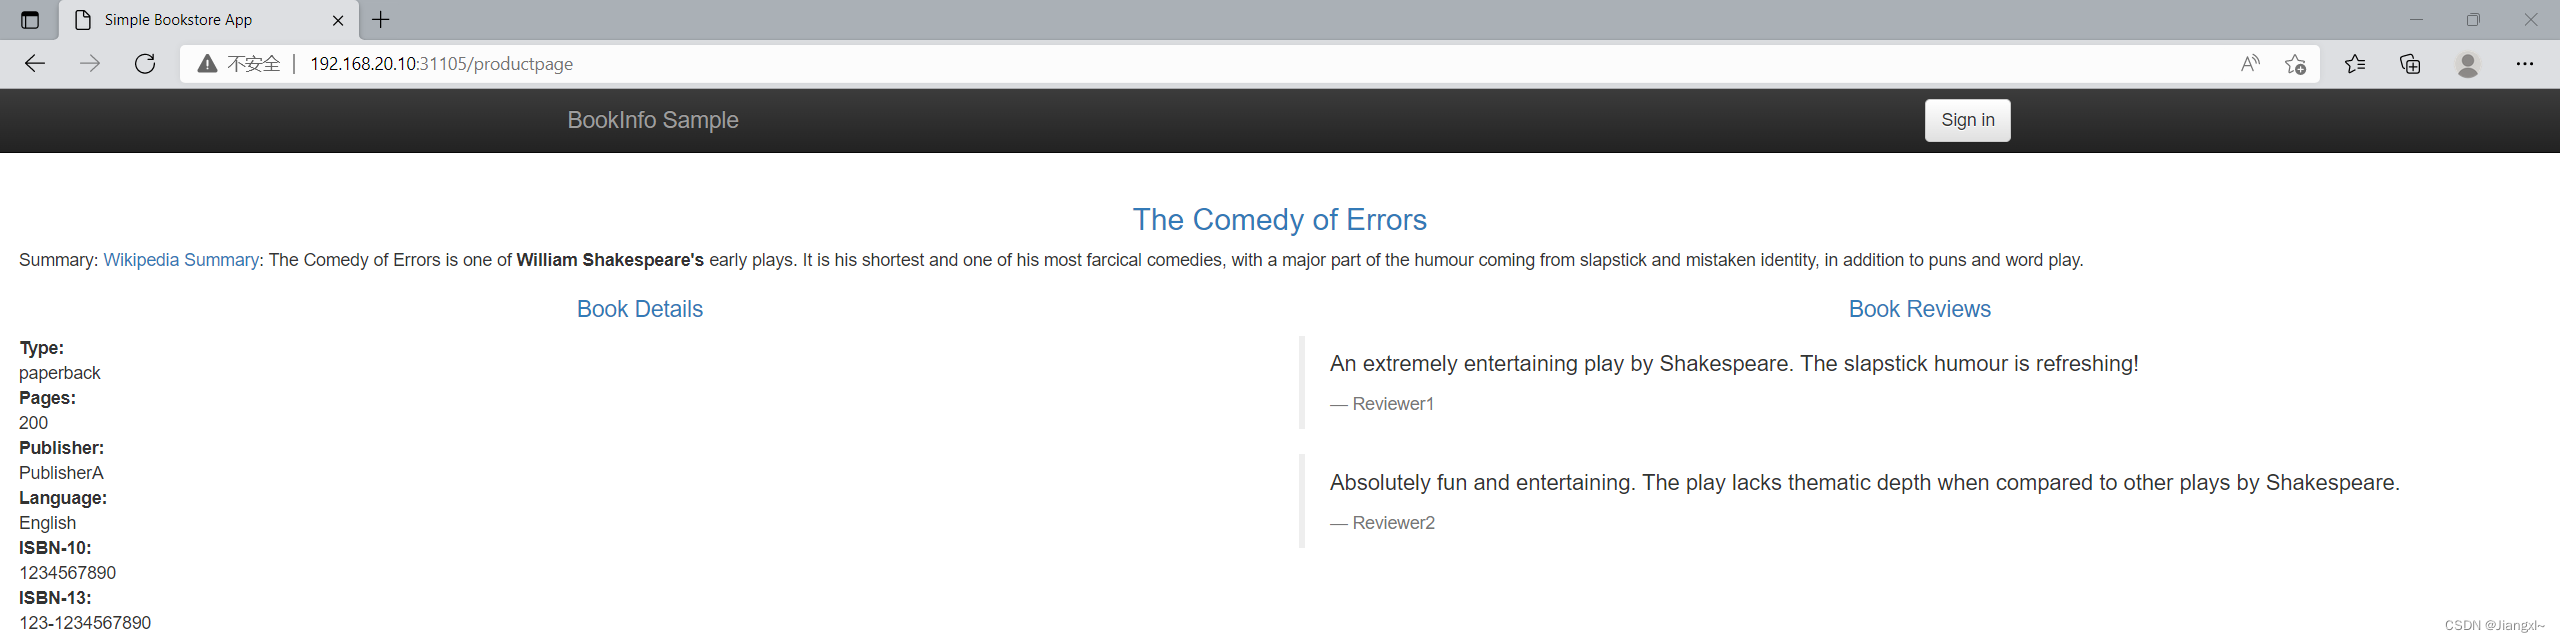
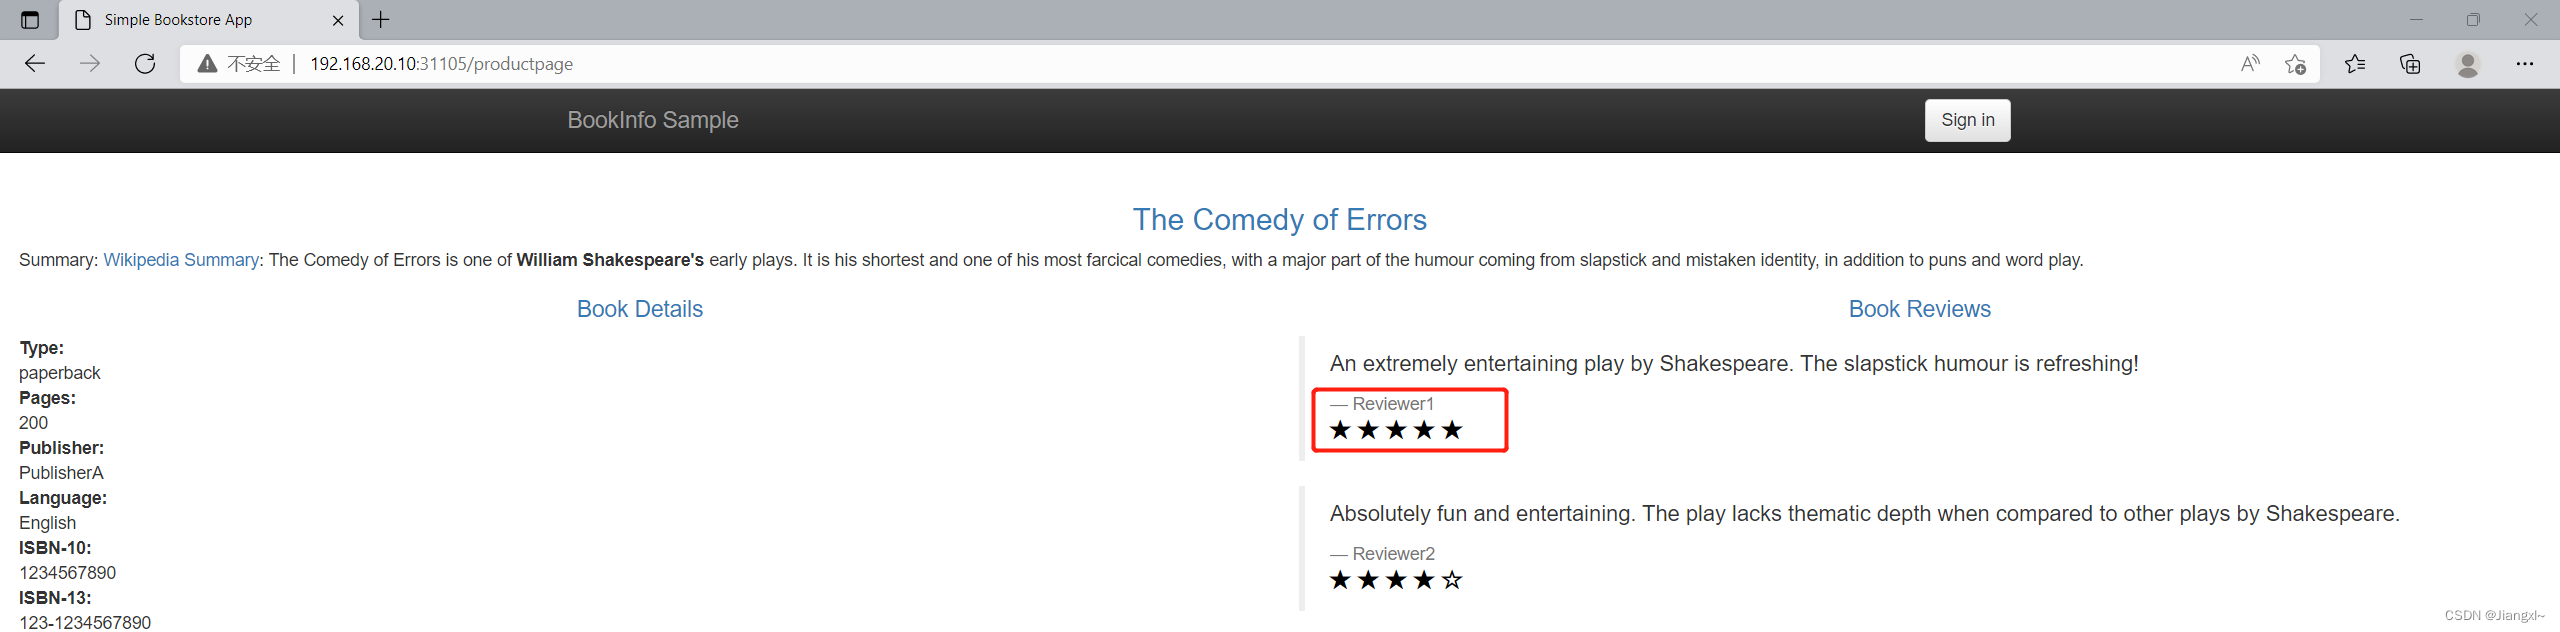
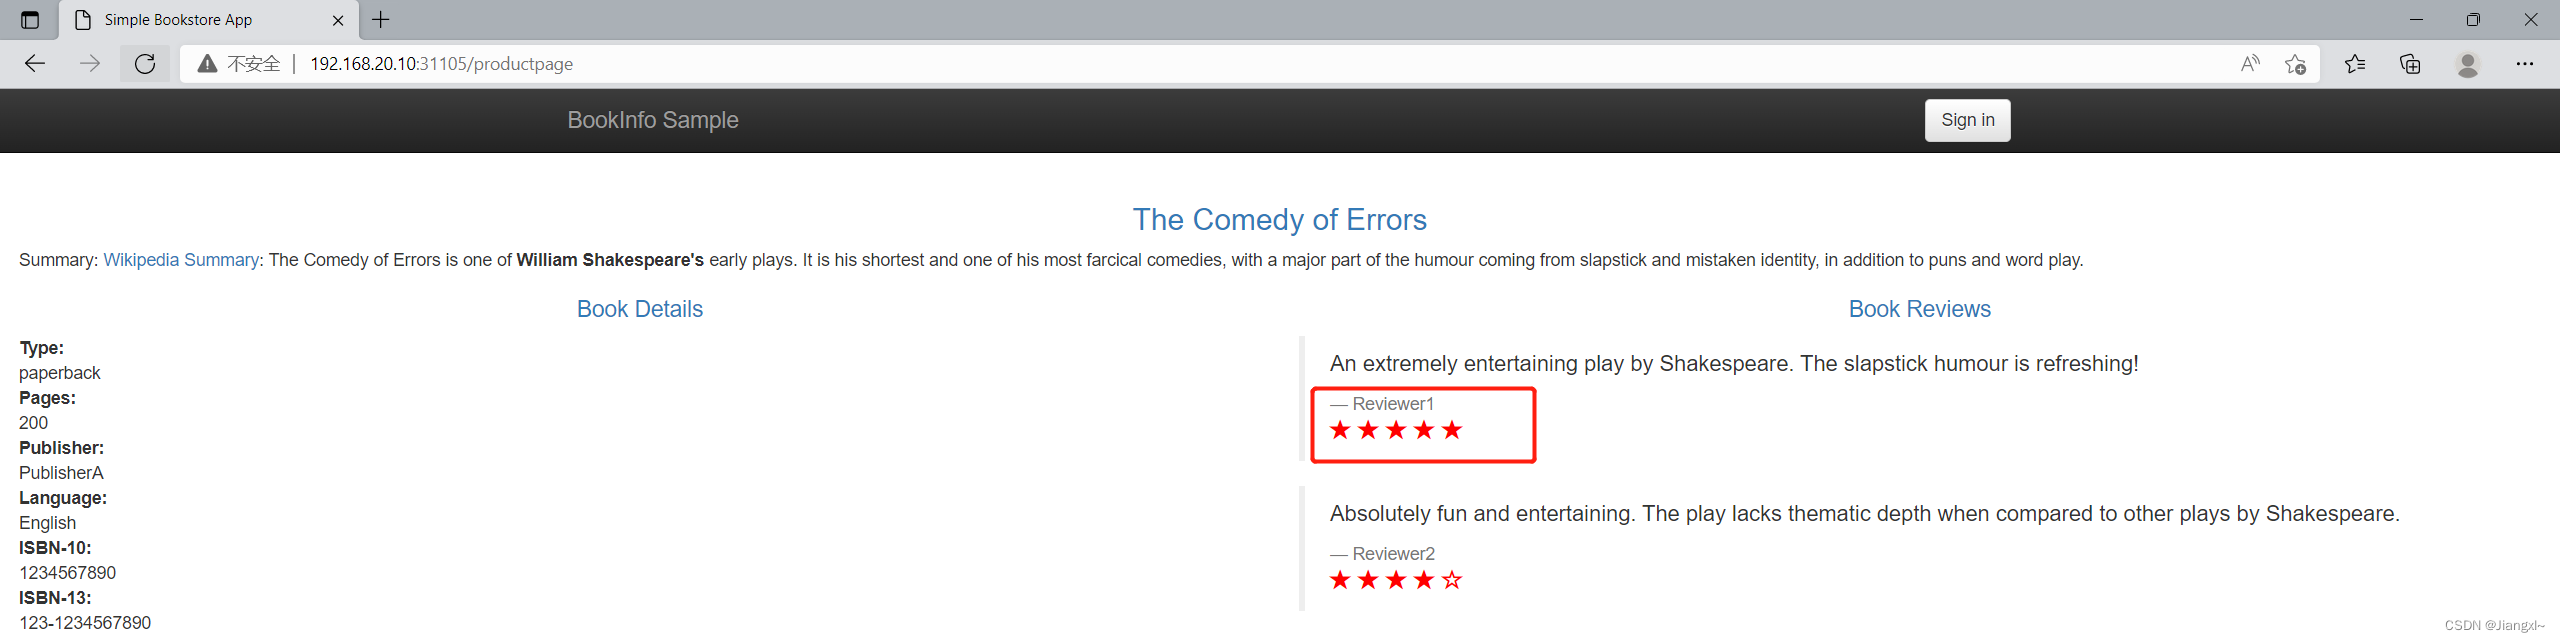
- V1版本不会调用Ratings服务,显示空白。
-
V2版本调用Ratings服务,显示黑色五角星作为评分信息
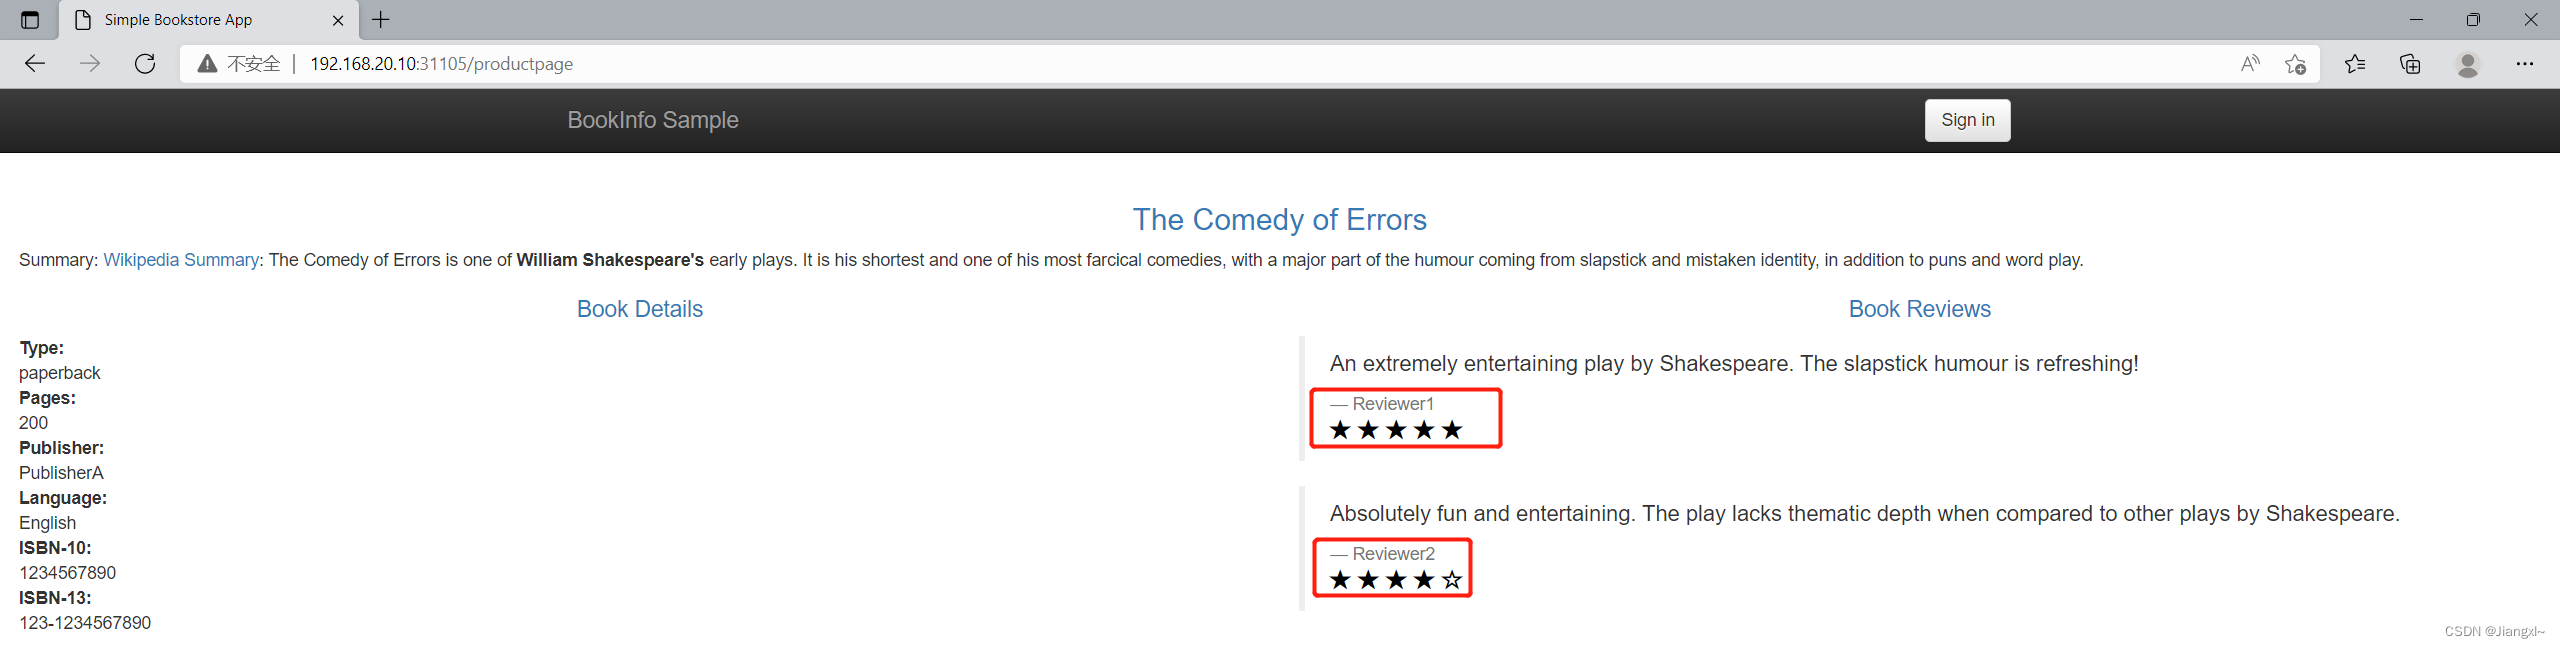
-
V3版本调用Ratings服务,显示红色五角星作为评分信息

针对Bookinfo项目利用Istio实现灰度发布
2.Bookinfo项目利用Istio灰度发布实现流量控制
Istio灰度发布时可以针对流量进行控制,例如90%用户访问V1版本的应用程序,10%的用户访问V2版本的应用程序。
灰度发布主要是基于Pod资源中定义的标签来实现的,不同版本的Pod资源通过不同的标签区分,灰度发布上线时会部署多个不同版本的Pod资源,同时都接入到一个Service资源中,然后通过VirtualService资源将流量请求转发到特定的版本的Pod应用程序上,上线一段时间后,再将不使用的Pod资源删除,这就是Istio的灰度发布过程。
灰度发布的流量控制是通过DestinationRule定义路由规则,由VirtualService将流量分配到指定的路由规则来实现流量控制。
我们通过灰度发布的流量控制实现以下三个目标:
- 用户访问的流量全部发送到Reviews V1的版本(不带五角星)。
- 将90%的用户流量发送到Reviews V1版本,另外10%的流量发送到Reviews V2版本的应用程序(五个黑色五角星)。
- 将50%的流量发送到Reviews V2版本的应用程序,另外50%的流量发送到Reviews V3版本的应用程序(五个红色五角星)。
这三个案例Bookinfo都提供了YAML编排文件,位于/root/istio-1.8.2/samples/bookinfo/networking路径。
2.1.将所有的用户流量全部转发到V1版本的应用程序
用户访问的流量全部发送到Reviews V1的版本
1)定义DestinationRule路由规则资源编排文件
在destination-rule-all.yaml文件中编写了Bookinfo各个微服务程序的路由规则资源编排内容,写法都一样,我们重点来看一下Reviews微服务的编排内容。
[root@k8s-master networking]# vim destination-rule-all.yaml
---
apiVersion: networking.istio.io/v1alpha3
kind: DestinationRule				#定义控制器的类型为DestinationRule
metadata:
  name: reviews						#控制器的名称
spec:
  host: reviews						#针对哪一个Service资源设置路由规则,要与VirtualService中的Service资源保持一致
  subsets:							#定义子集也就是路由规则,可以定义多个
  - name: v1						#规则的名称
    labels:							#路由规则一般都是根据Pod中的Label标签来做的
      version: v1					#v1的路由规则转发到带有version: v1标签的一组Pod资源
  - name: v2
    labels:
      version: v2					#v2的路由规则转发到带有version: v2标签的一组Pod资源
  - name: v3
    labels:
      version: v3					#v3的路由规则转发到带有version: v3标签的一组Pod资源
2)定义VirtualService资源编排文件
virtual-service-all-v1.yaml文件中也包含了所有Bookinfo各个微服务程序的VirtualService虚拟服务资源,可以将流量分配到创建的某个路由规则上。
[root@k8s-master networking]# vim virtual-service-all-v1.yaml
---
apiVersion: networking.istio.io/v1alpha3
kind: VirtualService				#控制器类型为VirtualService
metadata:
  name: reviews						#控制器名称为reviews
spec:
  hosts:							#定义流量访问的目标主机
  - reviews
  http:								#定义HTTP流量转发的规则路由表
  - route:
    - destination:						#定义流量的转发规则
        host: reviews					#转发至Service资源
        subset: v1						#将流量转发到哪一个路由规则子集,这里将流量转发到在DestinationRule中定义的v1路由规则上,就可以实现所有的流量转发到v1版本的Pod资源
3)创建DestinationRule和VirtualService资源
[root@k8s-master networking]# kubectl apply -f destination-rule-all.yaml -n bookinfo
destinationrule.networking.istio.io/productpage created
destinationrule.networking.istio.io/reviews created
destinationrule.networking.istio.io/ratings created
destinationrule.networking.istio.io/details created
[root@k8s-master networking]# kubectl apply -f virtual-service-all-v1.yaml -n bookinfo
virtualservice.networking.istio.io/productpage created
virtualservice.networking.istio.io/reviews created
virtualservice.networking.istio.io/ratings created
virtualservice.networking.istio.io/details created
4)浏览器访问Bookinfo图书测评系统验证路由规则
会发现不论如何刷新页面,都不会出现V2和V3版本的五角星,永远都会只请求V1版本的程序。
2.2.将90%的流量转发到V1版本10%的流量转发至V2版本
将90%的用户流量发送到Reviews V1版本,另外10%的流量发送到Reviews V2版本的应用程序。
1)修改Reviews的VirtualService资源编排文件
基于3.1中的配置,目前所有的流量都在V1版本,现在重新配置VirtualService资源,将90%的流量转发到V1版本的路由规则,将10%的流量转发到V2版本的路由规则。
我们可以手动写,也可以使用现成的YAML:virtual-service-reviews-90-10.yaml
[root@k8s-master networking]# vim virtual-service-reviews-90-10.yaml
apiVersion: networking.istio.io/v1alpha3
kind: VirtualService
metadata:
  name: reviews
spec:
  hosts:
    - reviews
  http:
  - route:
    - destination:
        host: reviews
        subset: v1
      weight: 90				#通过weight参数设置流量访问的权重,90%的流量转发至V1版本
    - destination:
        host: reviews
        subset: v2
      weight: 10				#10%的流量转发至V2版本
2)创建VirtualService资源
1.创建资源
[root@k8s-master networking]# kubectl apply -f virtual-service-reviews-90-10.yaml -n bookinfo
virtualservice.networking.istio.io/reviews configured

2.查看资源的状态
[root@k8s-master networking]# kubectl get vs -n bookinfo
NAME          GATEWAYS               HOSTS             AGE
bookinfo      ["bookinfo-gateway"]   ["*"]             15h
details                              ["details"]       8m34s
productpage                          ["productpage"]   8m34s
ratings                              ["ratings"]       8m34s
reviews                              ["reviews"]       8m34s
3)浏览器访问测试效果
V2版本是黑色五角星,按照9:1的比例,刷新9次页面后会得到一次V2版本的程序,验证了90%的流量会在V1版本,10%的流量在V2版本。
2.3.将50%的流量转发到V2版本50%的流量转发的V3版本
V2版本已经上线使用,弃用了V1版本,V3版本也已经开发完成,现在通过灰度让一半的用户去体验V3版本。
1)修改Reviews的VirtualService资源编排文件
[root@k8s-master networking]# vim virtual-service-reviews-50-v3.yaml
apiVersion: networking.istio.io/v1alpha3
kind: VirtualService
metadata:
  name: reviews
spec:
  hosts:
    - reviews
  http:
  - route:
    - destination:
        host: reviews
        subset: v2
      weight: 50					#50%的流量转发到V2版本
    - destination:
        host: reviews
        subset: v3
      weight: 50					#50%的流量转发到V3版本
2)创建VirtualService资源
[root@k8s-master networking]# kubectl apply -f virtual-service-reviews-50-v3.yaml -n bookinfo
virtualservice.networking.istio.io/reviews configured
3)浏览器访问测试效果
两个版本的比例都是50%,每次刷新都会是不同的版本。
第一次刷新访问是V3版本。
第二次刷新访问是V2版本。

3.Bookinfo项目利用Istio灰度发布实现HTTP头部信息的流量控制
Istio的灰度发布还支持基于HTTP的头部信息字段做一些流量转发控制,比如根据请求中用户使用的浏览器版本做一些流量空开,谷歌浏览器使用V2版本的程序,其他浏览器使用V3版本的程序等等,只要请求头中包含的字段都可以进行匹配然后做出流量控制。
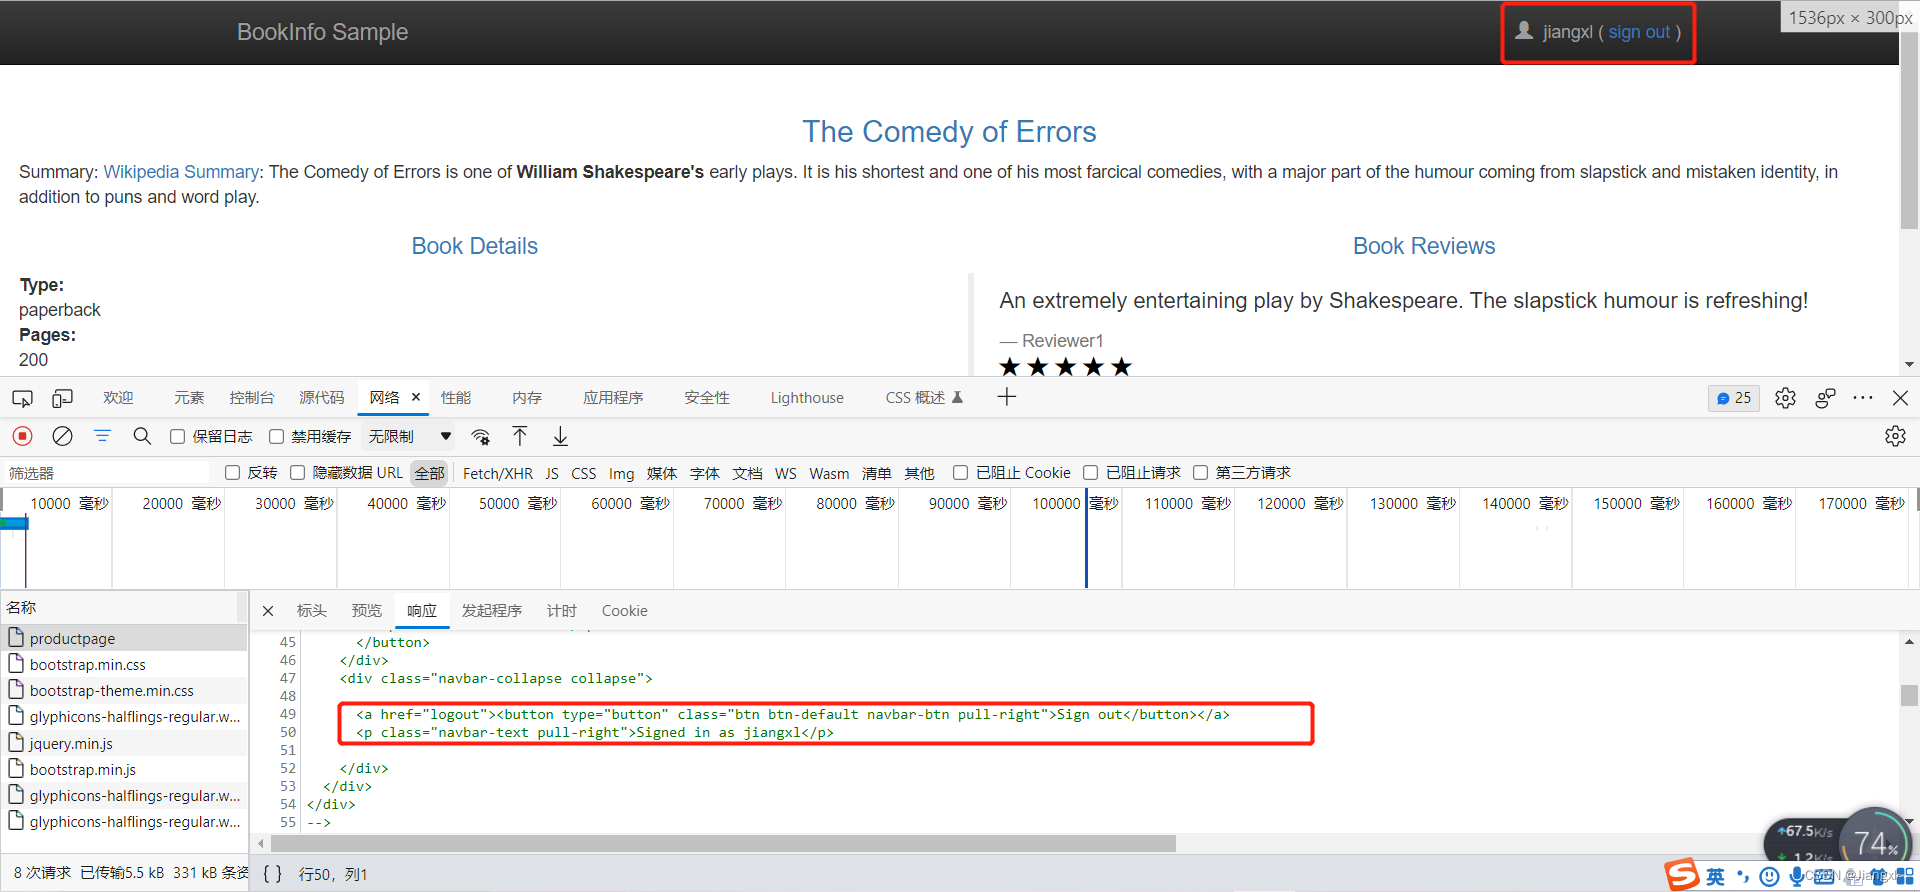
案例:将用户jiangxl的请求转发至V3版本,其余的用户转发到V2版本。
Bookinfo程序是没有数据库服务的,可以任意登陆用户,登陆用户后再响应头中可以看到一些信息,我们可以通过这些信息去匹配,然后进行流量的控制。
1.编写流量控制的VirtualService资源
不同版本的路由规则已经在DestinationRule中定义好了,我们需要在VirtualService资源中根据请求头中包含的信息转发至特定的路由。
[root@k8s-master networking]# vim virtual-service-reviews-jason-v2-v3.yaml
apiVersion: networking.istio.io/v1alpha3
kind: VirtualService
metadata:
  name: reviews
spec:
  hosts:
  - reviews
  http:
  - match:							#定义匹配规则
    - headers:						#定义http头部信息规则匹配
        end-user:					#根据登陆用户进行匹配
          exact: jiangxl				#匹配的用户为jiangxl
    route:
    - destination:					#连起来就是当登陆用户匹配jiangxl时,就将流量转发至v2路由规则的Pod资源上
        host: reviews
        subset: v3
  - route:
    - destination:
        host: reviews
        subset: v2
2.创建资源
[root@k8s-master networking]# kubectl apply -f virtual-service-reviews-jason-v2-v3.yaml -n bookinfo
virtualservice.networking.istio.io/reviews configured
3.浏览器中验证流量匹配规则
当登陆的用户为jiangxl时,流量被转发至V3版本的程序。
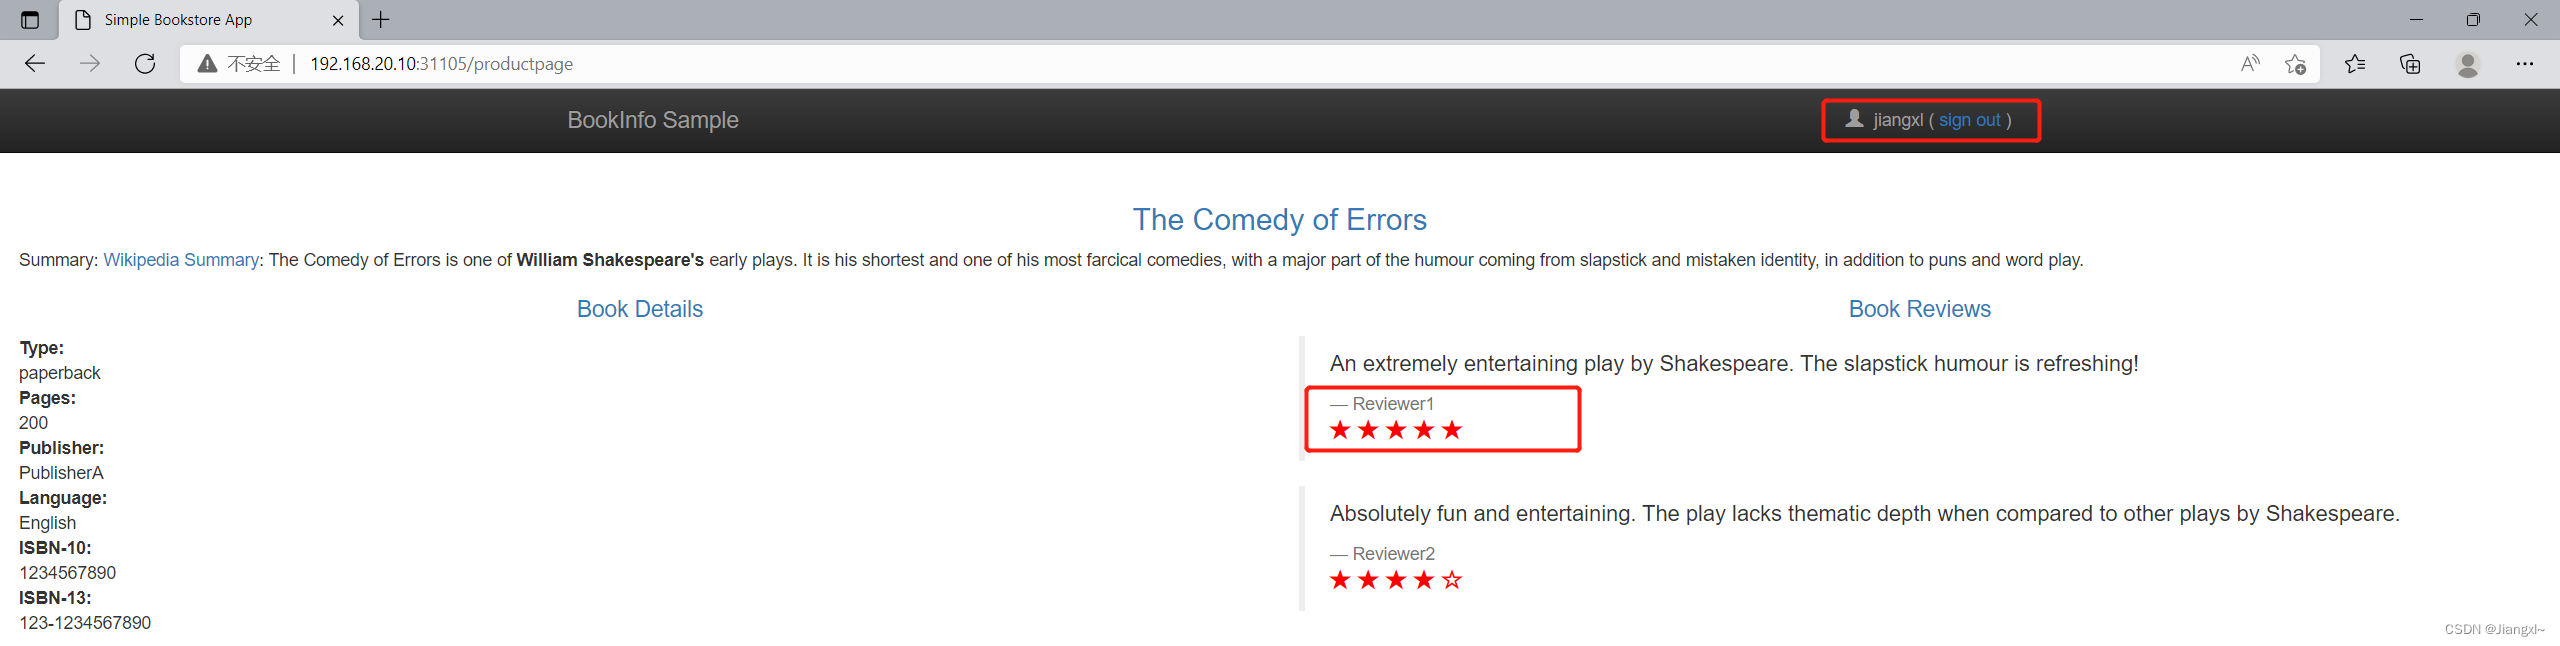
当不登录用户或者用户为其他时,流量会被转发到V2版本的程序。

4.Bookinfo项目利用Istio灰度发布实现URL的流量控制
apiVersion: networking.istio.io/v1alpha3
kind: VirtualService
metadata:
  name: bookinfo
spec:
  hosts:
    - bookinfo.com
  http:
  - match:
    - uri:
        prefix: /reviews
    route:
    - destination:
        host: reviews
  - match:
    - uri:
        prefix: /ratings
    route:
    - destination:
        host: ratings
5.灰度发布工作流程
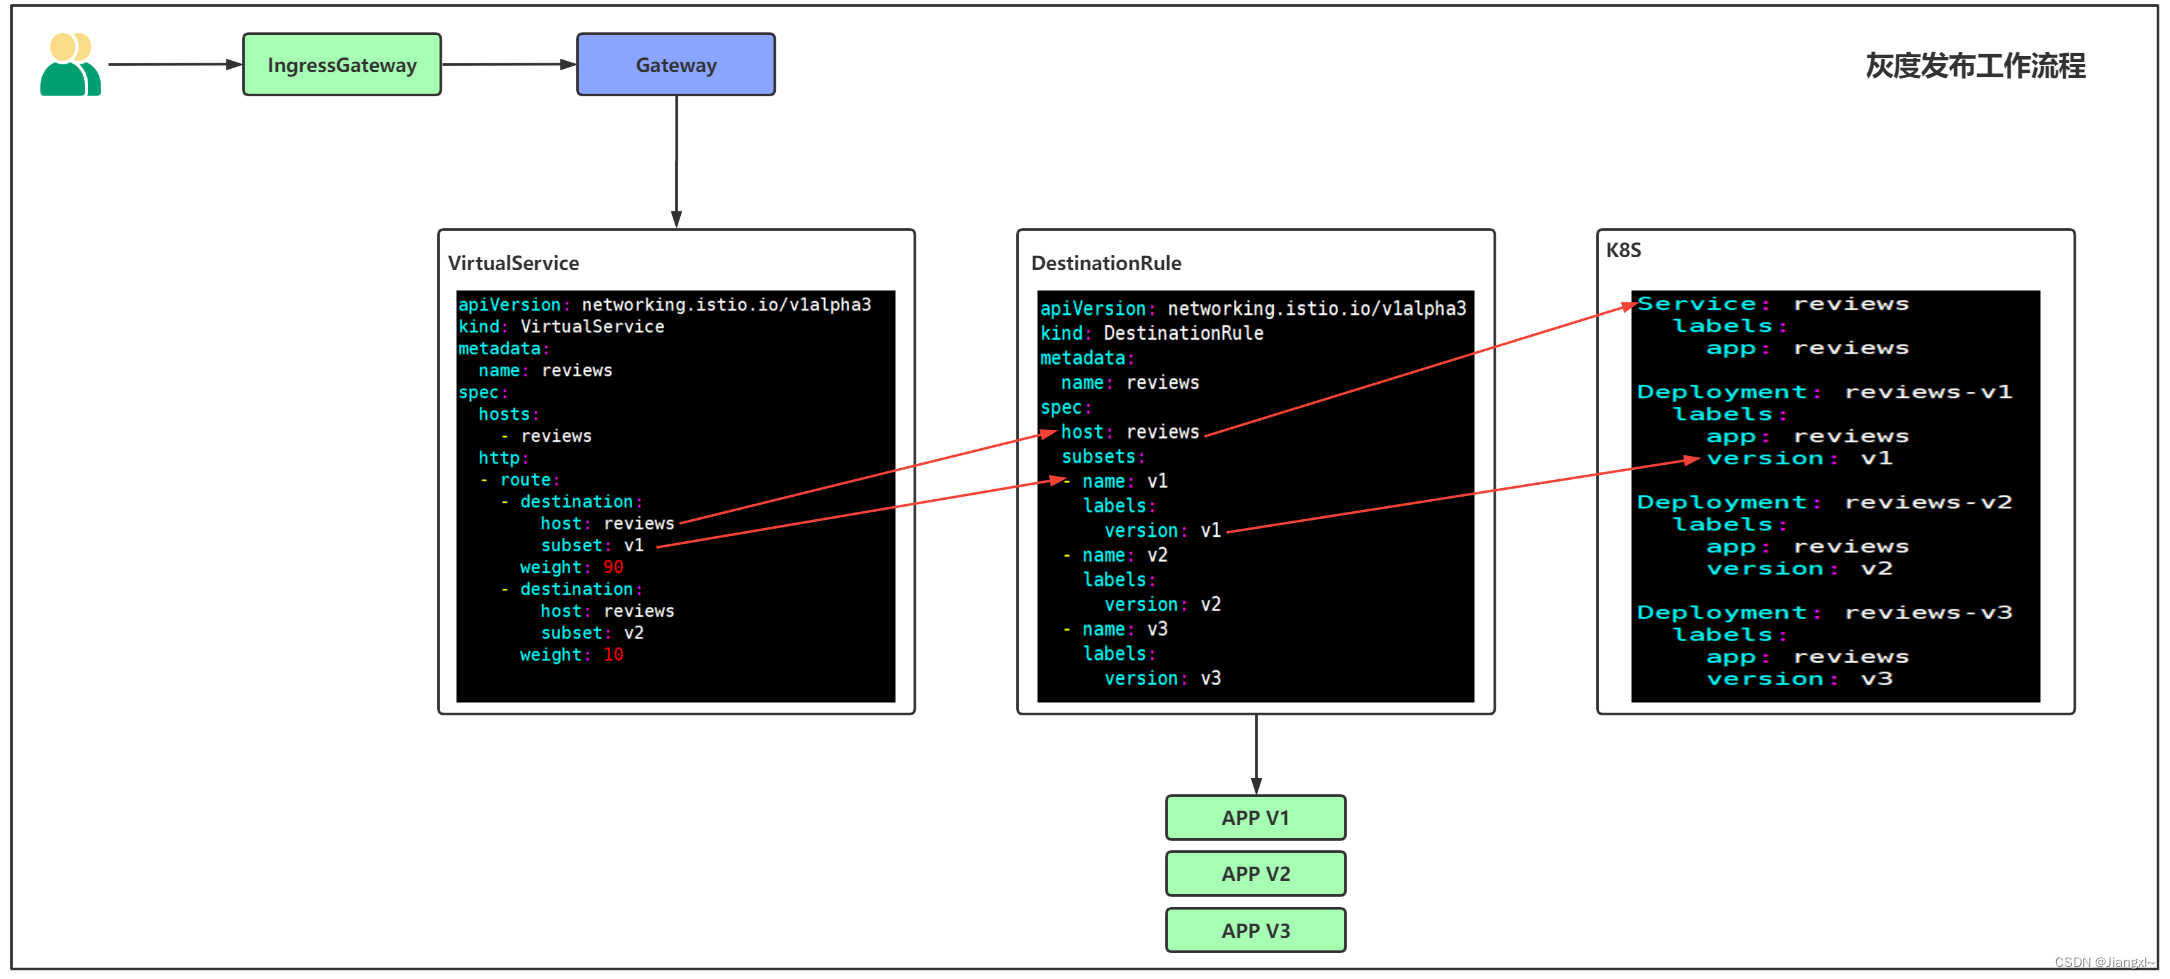
灰度发布工作流程如下图所示:
Istio中想要实现程序的灰度发布需要准备VirtualSever以及DestinationRule两个资源控制器。
- 首先需要通过Deployment控制器根据不同版本的镜像在K8S集群中创建多个版本的应用程序,不同版本的Pod资源通过标签来区分,V1版本的程序使用
version: v1的标签,依次类推,并且全部都自动注入Sidecar代理程序,接入Istio服务网格。- 创建Service资源,通过标签选择器将不同版本的Pod资源全部接入同一个Service资源进行负载。
- 配置DestinationRule目标规则控制器,在subsets子集中定义路由规则,根据不同的程序版本关联版本对应程序使用的Pod标签,每一个版本都需要关联相应的标签。
- 配置VirtualService虚拟服务控制器,根据流量请求方的不同,分布通过subset转发到指定的路由规则中。
IngressGateway—>Gateway—>virtualservice—>service—>deployment
|
DestinationRule