一、根据切点计算曲线运动的朝向
在 【Android UI】Path 测量 PathMeasure ③ ( 使用 PathMeasure 绘制沿曲线运动的小球 ) 博客中 ,使用 PathMeasure 完成了一个沿曲线运动的小球,但是如果绘制的是矩形,就需要使用 getPosTan 函数的切线返回值。
1、getPosTan 函数 ★
getPosTan 函数 作用是 获取指定长度位置的坐标点 以及该点对应切线的值 ;
getPosTan 函数原型 :
open fun getPosTan(
    distance: Float,
    pos: FloatArray!,
    tan: FloatArray!
): Boolean

Pins distance to 0 <= distance <= getLength(),
and then computes the corresponding position and tangent.

Returns false if there is no path, or a zero-length path was specified,
in which case position and tangent are unchanged.

将距离固定到0<=距离<=getLength(),
然后计算相应的位置和切线。

如果没有路径或指定了零长度路径,则返回false,
在这种情况下,位置和切线不变。
- distance: Float 参数 : 沿当前轮廓进行采样的距离 ;
The distance along the current contour to sample
- pos: FloatArray! 参数 : 如果不为null,则返回采样位置(x==[0],y==[1]) ;
If not null, returns the sampled position (x==[0], y==[1])
- tan: FloatArray! 参数 : 如果不为null,则返回采样的切线(x==[0],y==[1]);
If not null, returns the sampled tangent (x==[0], y==[1])
- Boolean 返回值 : 如果没有与此度量值对象关联的路径,则为false ;
false if there was no path associated with this measure object
pos: FloatArray! 和 tan: FloatArray! 这两个数组 , 适用于接收返回值的 , 并不是用于参数传递 ;
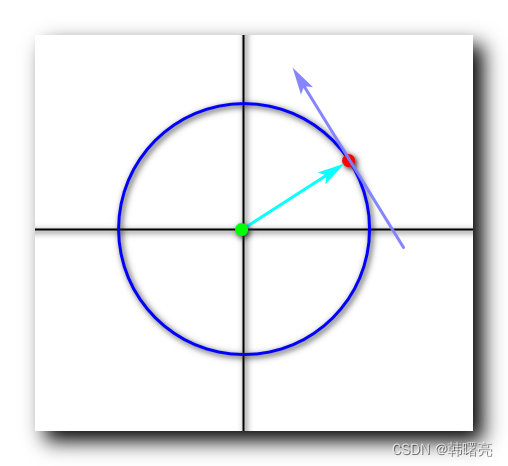
只有曲线找切线才有意义 , 直线的切线直接就是 ( 0, 0 ) 坐标 ;
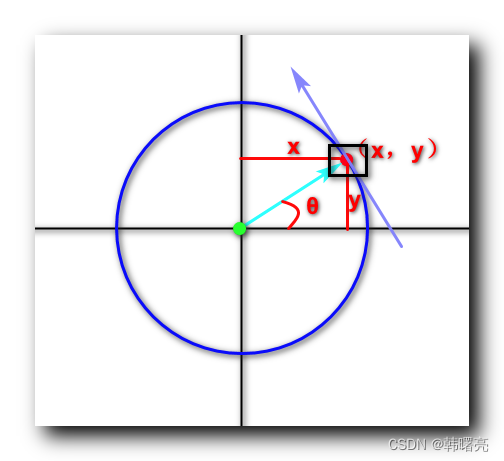
下图中 , 蓝色是 圆形 的曲线 , 红色点 是 曲线上的点 , 则 绿色点就是获取的 tan: FloatArray 参数值 , 该点是曲线的圆心 , 与曲线上的点连接 , 垂直与切线 ;
2、根据切点计算曲线运动的朝向
在图中标注 pos 位置坐标 (x,y),绿色点是切点坐标。
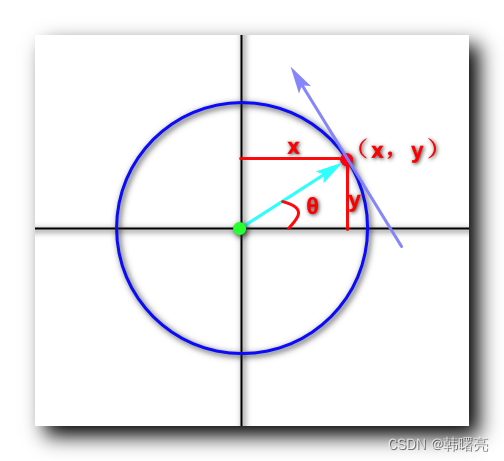
正切函数公式 :
tan θ = y x \tan \theta = \cfrac{y}{x} tanθ=xy
2 π 2 \pi 2π 是 360度, π \pi π 对应180度, 1 1 1 弧度等于 180 π \cfrac{180}{\pi} π180 角度。
上述 θ \theta θ 是弧度,如果转为角度,需要乘以 180 π \cfrac{180}{\pi} π180 。
使用 Java 中的 Math.atan2 函数计算弧度,代码为 :
Math.atan2(tan[1], tan[0])
计算弧度对应的角度,代码为:
Math.atan2(tan[1], tan[0]) * 180 / Math.PI
计算出 θ \theta θ 角度后,需要将黑色的矩形进行旋转,这里直接旋转该角度即可。
计算切线角度完整代码 :
        // 计算切线角度
        float degree = (float) (Math.atan2(tan[1], tan[0]) * 180 / Math.PI);
设置绘图的矩阵参数 :
        // 设置绘图矩阵
        Matrix matrix = new Matrix();
        matrix.reset();
        // 根据切线角度旋转图片
        matrix.postRotate(degree, mBitmap.getWidth() / 2, mBitmap.getHeight() / 2);
        // 设置图片绘制位置, 保证图片中心处于曲线上
        matrix.postTranslate(pos[0] - mBitmap.getWidth() / 2, pos[1] - mBitmap.getHeight() / 2);
绘制图片 :
        // 在该特定点绘制圆形
        canvas.drawBitmap(mBitmap, matrix, mPaint);
二、代码示例
package kim.hsl.paintgradient.pathmeasure;

import android.content.Context;
import android.graphics.Bitmap;
import android.graphics.BitmapFactory;
import android.graphics.Canvas;
import android.graphics.Color;
import android.graphics.LinearGradient;
import android.graphics.Matrix;
import android.graphics.Paint;
import android.graphics.Path;
import android.graphics.PathMeasure;
import android.graphics.RectF;
import android.graphics.Shader;
import android.util.AttributeSet;
import android.util.Log;
import android.view.View;

import androidx.annotation.Nullable;

import kim.hsl.paintgradient.R;

public class PathMeasureView extends View {


    public static final String TAG = "PathMeasureView";

    /**
     * 画笔工具
     * 线性渐变渲染 需要设置给该 画笔工具
     */
    private Paint mPaint;

    private Bitmap mBitmap;

    /**
     * 曲线上的点
     */
    private float[] pos = {

    0F, 0F};

    /**
     * 曲线上点的切点
     */
    private float[] tan = {

    0F, 0F};

    /**
     * 前进百分比, 0F ~ 1F
     */
    private float mProgress;

    public PathMeasureView(Context context) {


        this(context, null);
    }

    public PathMeasureView(Context context, @Nullable AttributeSet attrs) {


        this(context, attrs, 0);
    }

    public PathMeasureView(Context context, @Nullable AttributeSet attrs, int defStyleAttr) {


        super(context, attrs, defStyleAttr);
        initPaint();
        mBitmap = BitmapFactory.decodeResource(context.getResources(), R.drawable.ic_launcher);
        Log.i(TAG, "mBitmap : " +mBitmap);
    }

    /**
     * 初始化 画笔工具, 主要是设置该画笔的渲染
     */
    private void initPaint() {


        mPaint = new Paint();
        mPaint.setAntiAlias(true);
        mPaint.setColor(Color.BLUE);
        mPaint.setStyle(Paint.Style.STROKE);
    }

    @Override
    protected void onSizeChanged(int width, int height, int oldWidth, int oldHeight) {


        super.onSizeChanged(width, height, oldWidth, oldHeight);
    }

    @Override
    protected void onDraw(Canvas canvas) {


        super.onDraw(canvas);

        // 每次前进千分之五
        mProgress += 0.005;
        // 到达结束点后, 继续循环运动
        if (mProgress >= 1) mProgress = 0;

        canvas.drawColor(Color.WHITE);
        canvas.translate(getWidth() / 2, getHeight() / 2);

        // 绘制的 Path
        Path path = new Path();

        // 绘制圆形
        path.addCircle(0, 0, 300, Path.Direction.CW);
        canvas.drawPath(path, mPaint);

        // 圆形曲线测量
        PathMeasure pathMeasure = new PathMeasure(path, false);

        // 获取特定点的 坐标 以及 切点
        pathMeasure.getPosTan(pathMeasure.getLength() * mProgress, pos, tan);

        // 计算切线角度
        float degree = (float) (Math.atan2(tan[1], tan[0]) * 180 / Math.PI);

        // 设置绘图矩阵
        Matrix matrix = new Matrix();
        matrix.reset();
        // 根据切线角度旋转图片
        matrix.postRotate(degree, mBitmap.getWidth() / 2, mBitmap.getHeight() / 2);
        // 设置图片绘制位置, 保证图片中心处于曲线上
        matrix.postTranslate(pos[0] - mBitmap.getWidth() / 2, pos[1] - mBitmap.getHeight() / 2);

        // 在该特定点绘制圆形
        canvas.drawBitmap(mBitmap, matrix, mPaint);

        // 触发下一次绘制
        invalidate();
    }

}
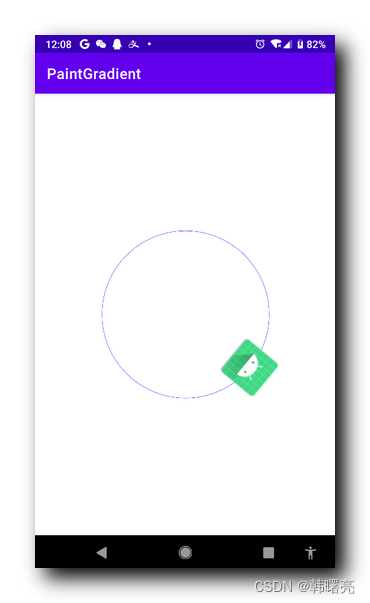
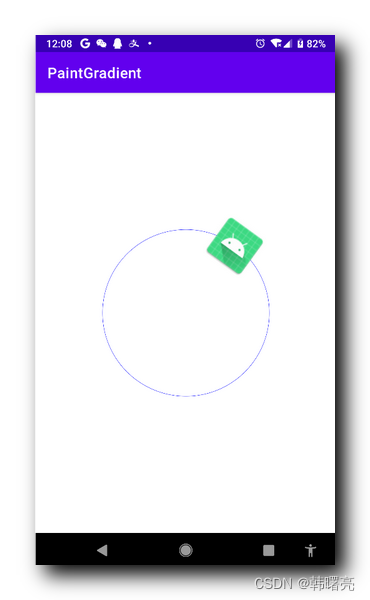
三、运行效果
运行时 ,图片是沿着曲线运动的 , 并且其永远朝向曲线前进方向 ;