Flutter从入门到实战
一共分为23个系列
①(Flutter、Dart环境搭建篇) 共3个内容 已更新
②(Dart语法1 篇) 共4个内容 已更新
③(Dart语法2 篇) 共2个内容 已更新
④(Flutter案例开发篇) 共4个内容 已更新
⑤(Flutter的StatelessWidget 共3个内容 已更新
⑥(Flutter的基础Widget篇) 共2个内容 已更新
⑦(布局Widget篇) 共1个内容 已更新
⑧(Flex、Row、Column以及Flexible、Stack篇) 共1个内容 已更新
⑨(滚动的Widget篇) 共4个内容 已更新
⑩(Dart的Future和网络篇) 共3个内容 已更新
⑪(豆瓣案例-1篇) 共3个内容 已更新
⑫(豆瓣案例-2篇) 共3个内容 已更新
⑬(Flutter渲染流程篇) 共3个内容 已更新
⑭(状态管理篇) 共3个内容 已更新
⑮(Flutter事件监听-以及路由使用篇) 共2个内容 已更新
⑯(Flutter的动画篇) 共4个内容 已更新
⑰(Flutter的主题、屏幕适配、测试篇) 共4个内容 已更新
官方文档说明
官方视频教程
Flutter的YouTube视频教程-小部件
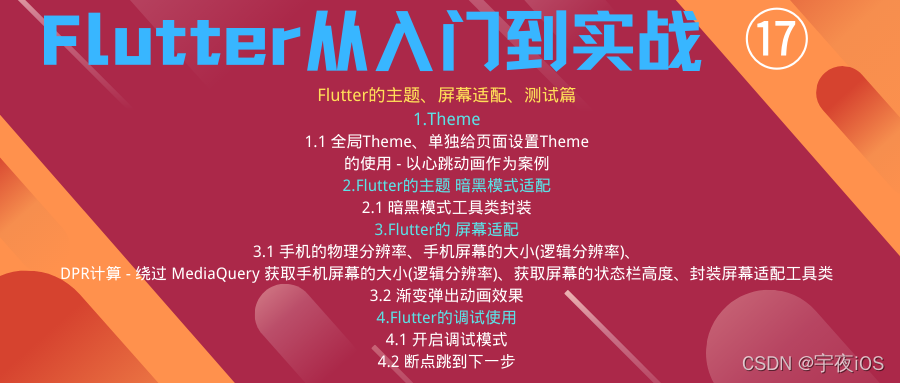
⑰、Flutter的主题、国际化、测试篇
①、Flutter的主题风格
1、全局Theme
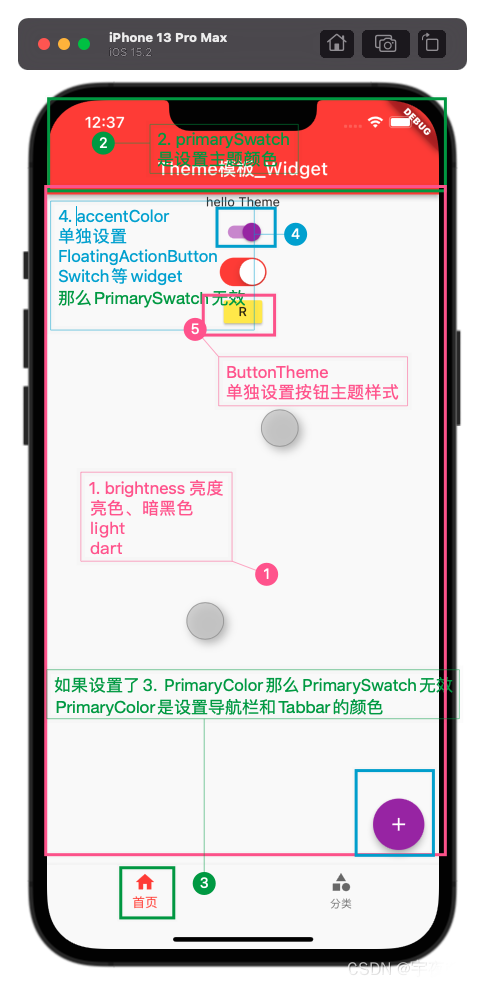
1.1、代码 - Theme的brightness、primarySwatch、primaryColor、accentColor、buttonTheme、的使用
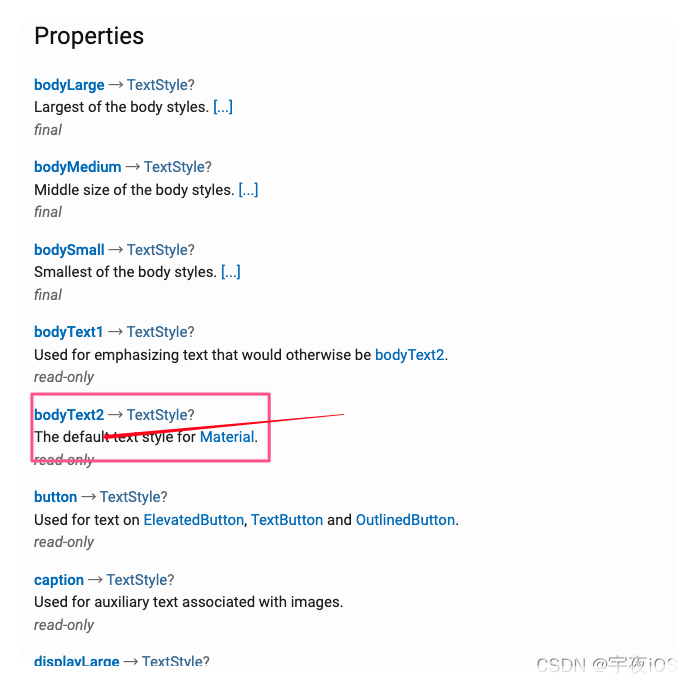
brightness: Flutter的亮度 - 暗黑模式primarySwatch: Flutter 主题颜色 (不设置3、4的情况下 会根据primarySwatch 颜色为主题颜色)primaryColor: Flutter 单独设置导航和Tabbar的颜色accentColor: Flutter 单独设置FloatingActionButton\Switch 等其他WidgetbuttonThemeFlutter 按钮的主题设置cardTheme: Flutter 卡的主题设置- TextTheme : Flutter 字体的主题设置 默认字体是bodyText2
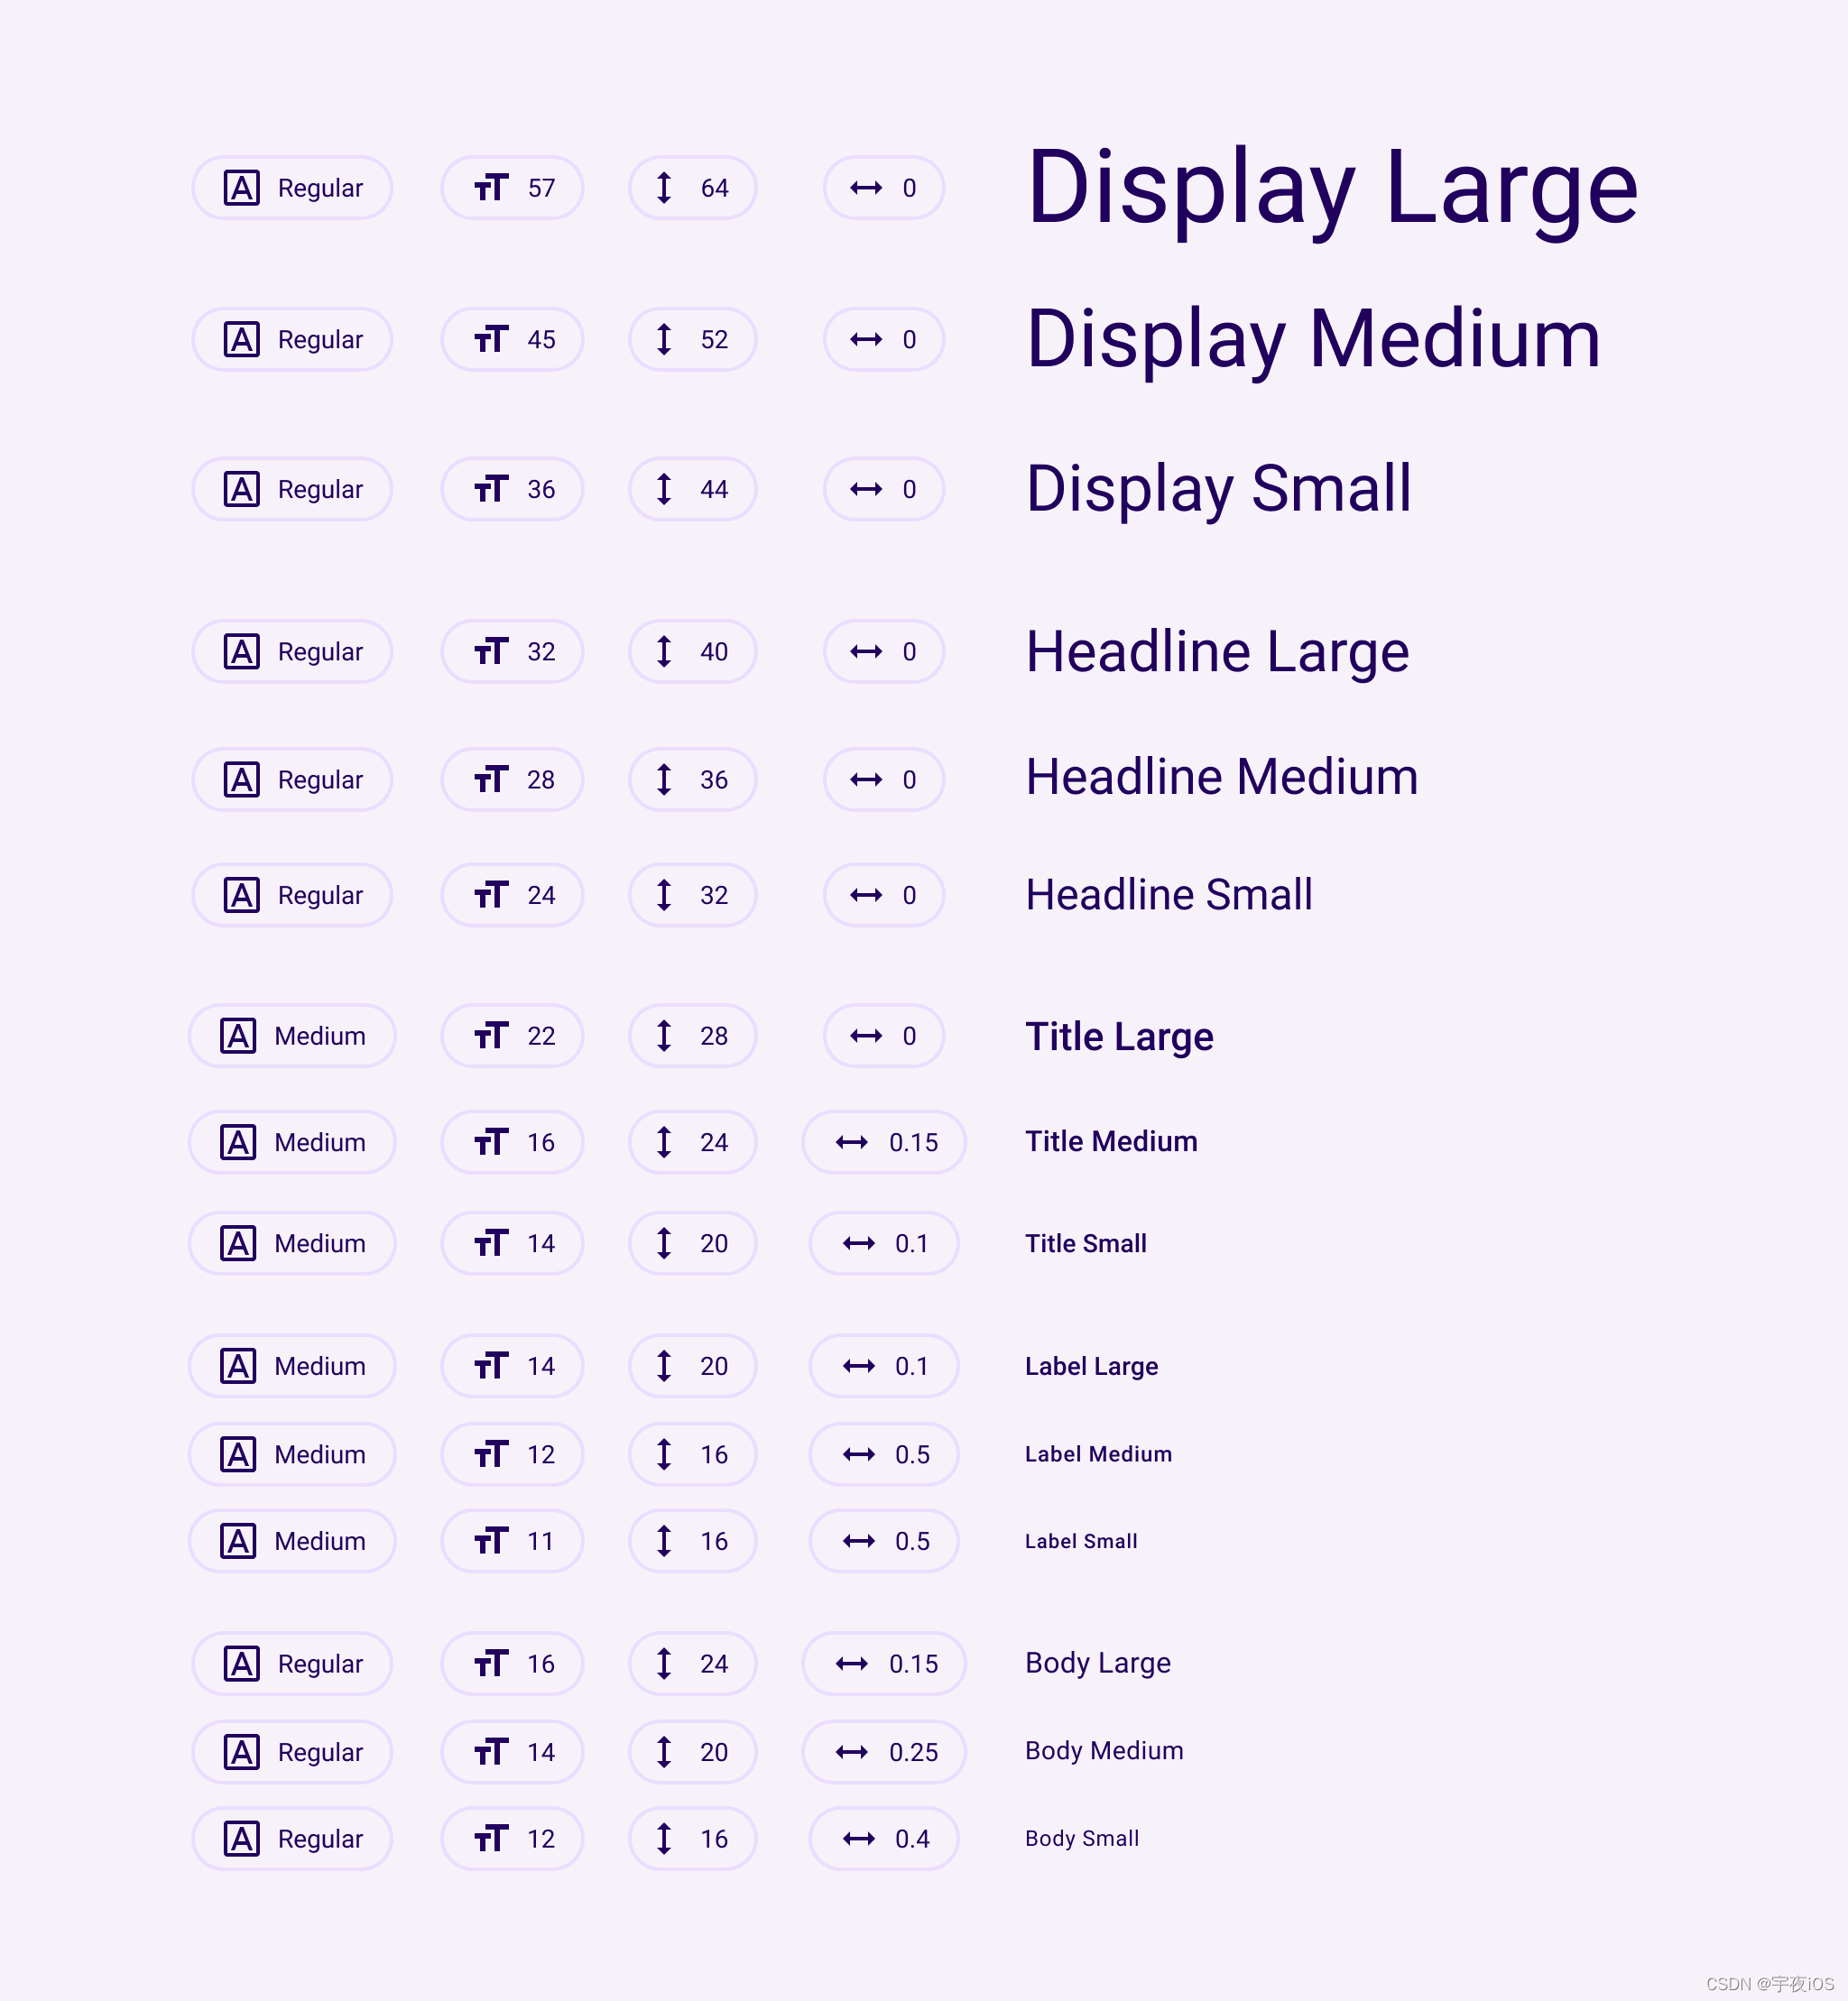
字体的大小尺寸
import 'package:flutter/cupertino.dart';
import 'package:flutter/material.dart'; // runApp在这个material库里面

main() => runApp(MyApp());

class MyApp extends StatelessWidget {


  const MyApp({

    Key? key}) : super(key: key);

  @override
  Widget build(BuildContext context) {


    // title 如果不知道作用在哪里 可以查看以下官方文档 比如 这个是属于 MaterialApp 那么就去找 MaterialApp
    /**官方说明
     * 在 Android 上,标题出现在任务管理器的应用程序快照上方,当用户按下“最近的应用程序”按钮时会显示这些快照。
     * 在 iOS 上不能使用这个值。CFBundleDisplayName应用程序中的应用程序Info.plist在出现时被引用,CFBundleName否则。
     * 在网络上,它用作页面标题,显示在浏览器的打开选项卡列表中。
     *
     * 意思就是说 当Android进入后台查看程序时 显示的标题
     * 但是在iOS需要另外配置
     * */

    /**
     * ThemeData
     * 1. 一旦设置了主题。那么应用程序中的某些Widget,就会直接使用主题的样式
     * */
    Color? _color = Colors.red[100];


    return MaterialApp(


      title: "App Theme",
      theme: ThemeData(
        // 1. 亮度⁄
        brightness: Brightness.light, // dark 暗黑模式
        // primarySwatch: Colors.red,  //
        // primarySwatch 传入不是Color 而是MaterialColor
        /**
         * MaterialColor extends Color
         * MaterialColor 是 Color的子类
         *
         * (错误写法)下面是 子类的引用指向父类的对象
         * MaterialColor color = Color(0xff000000);
         *
         * (正确写法) 下面是 父类的引用指向一个子类的对象
         * Color color = Colors.red;
         * */
        primarySwatch: Colors.red,  //
        // 3.primaryColor 单独设置导航和Tabbar的颜色
        primaryColor: Colors.orange,
        // 4. accentColor : 单独设置FloatingActionButton\Switch
        accentColor:Colors.purple,
        //   splashColor: Colors.transparent
        // 5. Button的主题
        buttonTheme:  ButtonThemeData(
          height: 25,
          minWidth: 10,
          buttonColor: Colors.yellow,
        ),
        cardTheme: CardTheme(
          color: Colors.blue,
          elevation: 10,
        ),
          textTheme: TextTheme(
            // 默认是bodyText2 16字体
          bodyText2: TextStyle(fontSize: 20),

        )
      ),
      home: YHiOSHomePage(),
    );
  }
}

class YHiOSHomePage extends StatelessWidget {


  @override
  Widget build(BuildContext context) {


    return Scaffold(
      appBar: AppBar(
        title: Text("Theme模板_Widget"),
      ),
      body: Center(
        child: Column(
            children: [
              Text("hello Theme"),
              Text("hello111 Theme",style: TextStyle(fontSize: 14),),
              Text("hello222 Theme",style: Theme.of(context).textTheme.bodyMedium,),

              Switch(value: true, onChanged: (value){


              }),
              CupertinoSwitch(value: true,activeColor: Colors.red, onChanged: (vlaue){


              }),
              RaisedButton(
                  child:Text("R"),
                  onPressed: (){


              }
              ),
              Card(child: Text("宇夜iOS",style: TextStyle(fontSize: 50),),)
            ],
            ),
      ),
      bottomNavigationBar:  BottomNavigationBar(
        items: [
          BottomNavigationBarItem(
              icon: Icon(Icons.home),
            label: "首页",
          ),
          BottomNavigationBarItem(
            icon: Icon(Icons.category),
            label: "分类",
          ),
        ],
      ),
      floatingActionButton: FloatingActionButton(
        child: Icon(Icons.add),
        onPressed: (){


        },
      ),
    );
  }
}
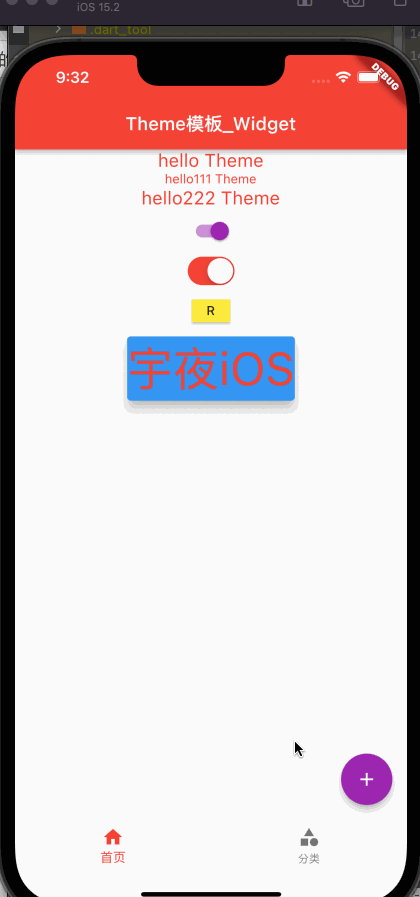
1.1、效果图 - Theme的brightness、primarySwatch、primaryColor、accentColor、buttonTheme的使用
1.2 代码 - 其他页面设置独立Theme
在页面进行包裹
Theme
设置primaryColor没有效果 那么需要通过设置colorScheme
data: Theme.of(context).copyWith(colorScheme:Theme.of(context).colorScheme.copyWith(
// 只有通过设置 colorScheme 才有效果
primary: Colors.green,
)),
import 'package:flutter/cupertino.dart';
import 'package:flutter/material.dart'; // runApp在这个material库里面

main() => runApp(MyApp());

class MyApp extends StatelessWidget {


  const MyApp({

    Key? key}) : super(key: key);

  @override
  Widget build(BuildContext context) {


    // title 如果不知道作用在哪里 可以查看以下官方文档 比如 这个是属于 MaterialApp 那么就去找 MaterialApp
    /**官方说明
     * 在 Android 上,标题出现在任务管理器的应用程序快照上方,当用户按下“最近的应用程序”按钮时会显示这些快照。
     * 在 iOS 上不能使用这个值。CFBundleDisplayName应用程序中的应用程序Info.plist在出现时被引用,CFBundleName否则。
     * 在网络上,它用作页面标题,显示在浏览器的打开选项卡列表中。
     *
     * 意思就是说 当Android进入后台查看程序时 显示的标题
     * 但是在iOS需要另外配置
     * */

    /**
     * ThemeData
     * 1. 一旦设置了主题。那么应用程序中的某些Widget,就会直接使用主题的样式
     * */
    Color? _color = Colors.red[100];


    return MaterialApp(


      title: "App Theme",
      theme: ThemeData(
        // 1. 亮度⁄
        brightness: Brightness.light, // dark 暗黑模式
        // primarySwatch: Colors.red,  //
        // primarySwatch 传入不是Color 而是MaterialColor
        /**
         * MaterialColor extends Color
         * MaterialColor 是 Color的子类
         *
         * (错误写法)下面是 子类的引用指向父类的对象
         * MaterialColor color = Color(0xff000000);
         *
         * (正确写法) 下面是 父类的引用指向一个子类的对象
         * Color color = Colors.red;
         * */
        primarySwatch: Colors.red,  //
        // 3.primaryColor 单独设置导航和Tabbar的颜色
        primaryColor: Colors.orange,
        // 4. accentColor : 单独设置FloatingActionButton\Switch
        accentColor:Colors.purple,
        //   splashColor: Colors.transparent
        // 5. Button的主题
        buttonTheme:  ButtonThemeData(
          height: 25,
          minWidth: 10,
          buttonColor: Colors.yellow,
        ),
        cardTheme: CardTheme(
          color: Colors.blue,
          elevation: 10,
        ),
          textTheme: TextTheme(
            // 默认是bodyText2 16字体
            bodyText1: TextStyle(fontSize: 16,color: Colors.orange),
          bodyText2: TextStyle(fontSize: 20,color: Colors.red),

        )
      ),
      home: YHiOSHomePage(),
    );
  }
}

class YHiOSHomePage extends StatelessWidget {


  @override
  Widget build(BuildContext context) {


    return Scaffold(
      appBar: AppBar(
        title: Text("Theme模板_Widget"),
      ),
      body: Center(
        child: Column(
            children: [
              Text("hello Theme"),
              Text("hello111 Theme",style: TextStyle(fontSize: 14),),
              Text("hello222 Theme",style: Theme.of(context).textTheme.bodyMedium,),

              Switch(value: true, onChanged: (value){


              }),
              CupertinoSwitch(value: true,activeColor: Colors.red, onChanged: (vlaue){


              }),
              RaisedButton(
                  child:Text("R"),
                  onPressed: (){


              }
              ),
              Card(child: Text("宇夜iOS",style: TextStyle(fontSize: 50),),)
            ],
            ),
      ),
      bottomNavigationBar:  BottomNavigationBar(
        items: [
          BottomNavigationBarItem(
              icon: Icon(Icons.home),
            label: "首页",
          ),
          BottomNavigationBarItem(
            icon: Icon(Icons.category),
            label: "分类",
          ),
        ],
      ),
      floatingActionButton: FloatingActionButton(
        child: Icon(Icons.add),
        onPressed: (){


          Navigator.of(context).push(MaterialPageRoute(builder: (cxt){


            return YHDetailsPage();
          }
          ));
        },
      ),
    );
  }
}


class YHDetailsPage extends StatelessWidget {


  const YHDetailsPage({

    Key? key}) : super(key: key);

  @override
  Widget build(BuildContext context) {


    // 局部的主题
    return Theme(
    data: Theme.of(context).copyWith(
      colorScheme: Theme.of(context).colorScheme.copyWith(
        // 只有通过设置 colorScheme 才有效果
        primary: Colors.green,
      ),
      // 下面设置主题颜色无效
      primaryColor: Colors.green,
      accentColor: Colors.red,

    ),
      child: Scaffold(
        appBar: AppBar(
          title: Text("详情页"),
          // backgroundColor: Colors.green,
        ),
        body: Center(
          child: Text("details page"),
        ),
        floatingActionButton:Theme(
          data: Theme.of(context).copyWith(
            // 如果直接设置单独主题primaryColor是无效的 需要设置colorScheme
            colorScheme:  Theme.of(context).colorScheme.copyWith(
              // 修改FloatActionButton的主题
              secondary: Colors.red
            ),
          ),
          child: FloatingActionButton(
            child: Icon(Icons.pets),
            onPressed: (){


            },
          ),
        ),
      ),
    );
  }
}
1.2 效果图 - 其他页面设置独立Theme
②、Flutter的主题 暗黑模式适配
1.1、代码 - Flutter的主题 暗黑模式适配
main.drat
import 'package:flutter/material.dart';
import 'package:learn_flutter/day13_%20theme/shared/app_theme.dart'; // runApp在这个material库里面
main() => runApp(MyApp());

class MyApp extends StatelessWidget {


  const MyApp({

    Key? key}) : super(key: key);

  @override
  Widget build(BuildContext context) {


    YHAppTheme appTheme = YHAppTheme();
    return MaterialApp(
      title: "学习模板 Demo",
      theme: appTheme.norTheme(context),
      darkTheme: appTheme.darkTheme(context),
      home: YHHomePage(),
    );
  }
}

class YHHomePage extends StatelessWidget {


  @override
  Widget build(BuildContext context) {


    return Scaffold(
      appBar: AppBar(
        title: Text("Flutter Widget"),
      ),
      body: Center(
        child: Text("Hello World"),
      ),
    );
  }
}
YHAppTheme.drat 主题封装
import 'package:flutter/material.dart';

// 封装主题
class YHAppTheme {


  // final  BuildContext _context;
  //
  // YHAppTheme(this._context);
  //
  // static final ThemeData norTheme = ThemeData(
  //   colorScheme: Theme.of(_context).colorScheme.copyWith(
  //       primary: Colors.red
  //   ),
  //   textTheme: TextTheme(
  //     bodyText2: TextStyle(color: Colors.blue),
  //   ),
  // );
  //
  // static final ThemeData darkTheme = ThemeData(
  //   colorScheme: Theme.of(_context).colorScheme.copyWith(
  //       primary: Colors.orange
  //   ),
  //   textTheme: TextTheme(
  //     bodyText2: TextStyle(color: Colors.green),
  //   ),
  // );


  static const double smallFontSize = 16;
  static const double normalFontSize = 22;
  static const double largeFontSize = 24;

  static final Color norTextColors = Colors.blue;
  static final Color darkTextColors = Colors.green;

// 由于需要传递context值 所以使用方法进行处理
  ThemeData norTheme(BuildContext context){


    return ThemeData(
      colorScheme: Theme.of(context).colorScheme.copyWith(
          primary: Colors.red
      ),
      textTheme: TextTheme(
        bodyText2: TextStyle(fontSize: smallFontSize,color: norTextColors),
      ),
    );
  }

  ThemeData darkTheme(BuildContext context){


    return ThemeData(
      colorScheme: Theme.of(context).colorScheme.copyWith(
          primary: Colors.orange
      ),
      textTheme: TextTheme(
        bodyText2: TextStyle(fontSize: smallFontSize, color: darkTextColors),
      ),
    );
  }
}
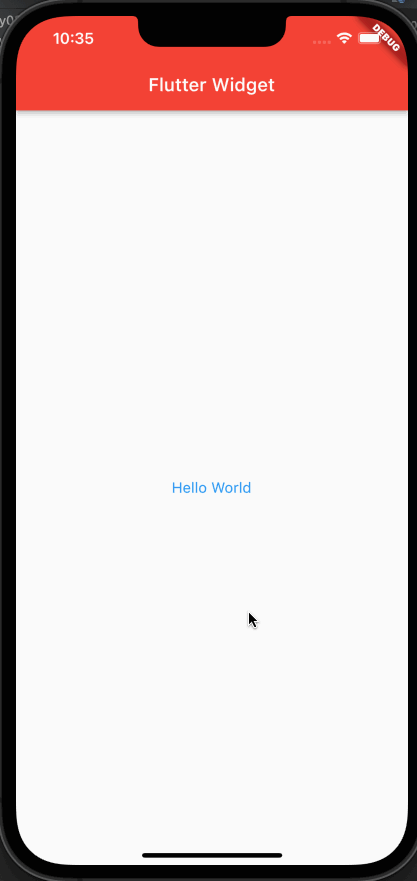
1.1、效果图 - Flutter的主题 暗黑模式适配
③、Flutter的 屏幕适配
我们看一下苹果官方的屏幕尺寸

1.1、Flutter 手机的物理分辨率
   final physicalWidth = window.physicalSize.width;
    final physicalHeight = window.physicalSize.height;
    print('分辨率: $physicalWidth * $physicalHeight');
1.2、Flutter 手机屏幕的大小(逻辑分辨率)
    final width = MediaQuery.of(context).size.width;
    final height = MediaQuery.of(context).size.height;
    print('手机屏幕的大小(逻辑分辨率): $width * $height');
1.3、DPR计算 - 绕过 MediaQuery 获取手机屏幕的大小(逻辑分辨率)
为什么要 绕过 MediaQuery?
因为MediaQuery 是通过初始化 屏幕才能拿到手机屏幕的大小(逻辑分辨率)
我们查看系统MediaQuery获取屏幕的宽高。是通过devicePixelRatio
我们手动计算dpr
iPhone6的dpr(devicePixelRatio)是2.0,iPhone6plus的dpr是3.0
   // 1. 手机的物理分辨率
     physicalWidth = window.physicalSize.width;
     physicalHeight = window.physicalSize.height;
     dpr = window.devicePixelRatio;
     screentWidth = physicalWidth / dpr;
     screentHeight = physicalHeight / dpr;
1.4、获取屏幕的状态栏高度
statusHeight = window.padding.top / dpr;
1.5、封装屏幕适配工具类
工具类使用
- 初始化
YHSizeFit.initialize(standardSize: 750);- 使用
print(“状态栏的高度 ${YHSizeFit.statusHeight}”);
import 'dart:ui';

class YHSizeFit {


  static double physicalWidth = 0.0;
  static double physicalHeight = 0.0;
  static double screentWidth = 0.0;
  static double screentHeight = 0.0;
  static double dpr = 0.0;
  static double statusHeight = 0.0;


  static double rpx = 0.0 ;
  static double px = 0.0; // 比如200的宽度高大小 在700 应该是乘以2

  // standardSize 因为有些公司的屏幕适配的规范基数不一样 所以单独抽取出来
  static void initialize({

     double standardSize = 750}){


    // 1. 手机的物理分辨率
     physicalWidth = window.physicalSize.width;
     physicalHeight = window.physicalSize.height;
    // print('分辨率: $physicalWidth * $physicalHeight');

    // // 2.手机屏幕的大小(逻辑分辨率)
    // final width = MediaQuery.of(context).size.width;
    // final height = MediaQuery.of(context).size.height;
    // print('手机屏幕的大小(逻辑分辨率): $width * $height');

    //  绕过MediaQuery获取屏幕的物理分辨率
    // 2. 获取dpr - 屏幕分辨率的比例系数
     dpr = window.devicePixelRatio;

    // 3. 宽度和高度
     screentWidth = physicalWidth / dpr;
     screentHeight = physicalHeight / dpr;

    // print('宽度和高度: $screentWidth * $screentHeight');

    // 4. 状态栏高度
     statusHeight = window.padding.top / dpr;
    // print('状态栏高度: $statusHeight');

    // 5. 计算rpx的大小 - 以小程序的比例计算
     // 以iPhone6为基准 不管什么屏幕 整体都按照750等分分割
    rpx = screentWidth / standardSize;
    px = screentWidth / standardSize * 2;

  }

  // 抽取方法 设置
  static double setRpx(double size){


    return rpx * size;
  }

  static double setPx(double size){


    return px * size;
  }

}
1.6 代码 - Flutter屏幕适配案例
main.dart
import 'dart:ui';

import 'package:flutter/material.dart';
import 'package:learn_flutter/day14_screenFit/shared/size_fit.dart'; // runApp在这个material库里面

main() => runApp(MyApp());

class MyApp extends StatelessWidget {


  const MyApp({

    Key? key}) : super(key: key);

  @override
  Widget build(BuildContext context) {


    // // 1. 手机的物理分辨率
    // final physicalWidth = window.physicalSize.width;
    // final physicalHeight = window.physicalSize.height;
    // print('分辨率: $physicalWidth * $physicalHeight');
    //
    // // // 2.手机屏幕的大小(逻辑分辨率)
    // // final width = MediaQuery.of(context).size.width;
    // // final height = MediaQuery.of(context).size.height;
    // // print('手机屏幕的大小(逻辑分辨率): $width * $height');
    //
    // //  绕过MediaQuery获取屏幕的物理分辨率
    // // 2. 获取dpr - 屏幕分辨率的比例系数
    // final dpr = window.devicePixelRatio;
    //
    // // 3. 宽度和高度
    // final width = physicalWidth / dpr;
    // final height = physicalHeight / dpr;
    //
    // print('宽度和高度: $width * $height');
    //
    // // 4. 状态栏高度
    // final statusHeight = window.padding.top / dpr;
    // print('状态栏高度: $statusHeight');

    YHSizeFit.initialize(standardSize: 750);


    return MaterialApp(
      title: "学习模板 Demo",
      theme: ThemeData(
        primaryColor: Colors.red,
        splashColor: Colors.orange,
      ),
      home: YHHomePage(),
    );
  }
}

class YHHomePage extends StatelessWidget {


  @override
  Widget build(BuildContext context) {


    // // 1. 手机的物理分辨率
    // final physicalWidth = window.physicalSize.width;
    // final physicalHeight = window.physicalSize.height;
    // print('分辨率: $physicalWidth * $physicalHeight');
    //
    // 2.手机屏幕的大小(逻辑分辨率)
    // final width = MediaQuery.of(context).size.width;
    // final height = MediaQuery.of(context).size.height;
    // print('手机屏幕的大小(逻辑分辨率): $width * $height');


    //
    print("状态栏的高度 ${YHSizeFit.statusHeight}");

    return Scaffold(
      appBar: AppBar(
        title: Text("Flutter Widget"),
      ),
      body: Center(
        child: Container(
          width: YHSizeFit.setPx(200),
            height: YHSizeFit.setPx(200),
          color: Colors.red,
            alignment: Alignment.center,
            child: Text("Hello World")),
      ),
    );
  }
}
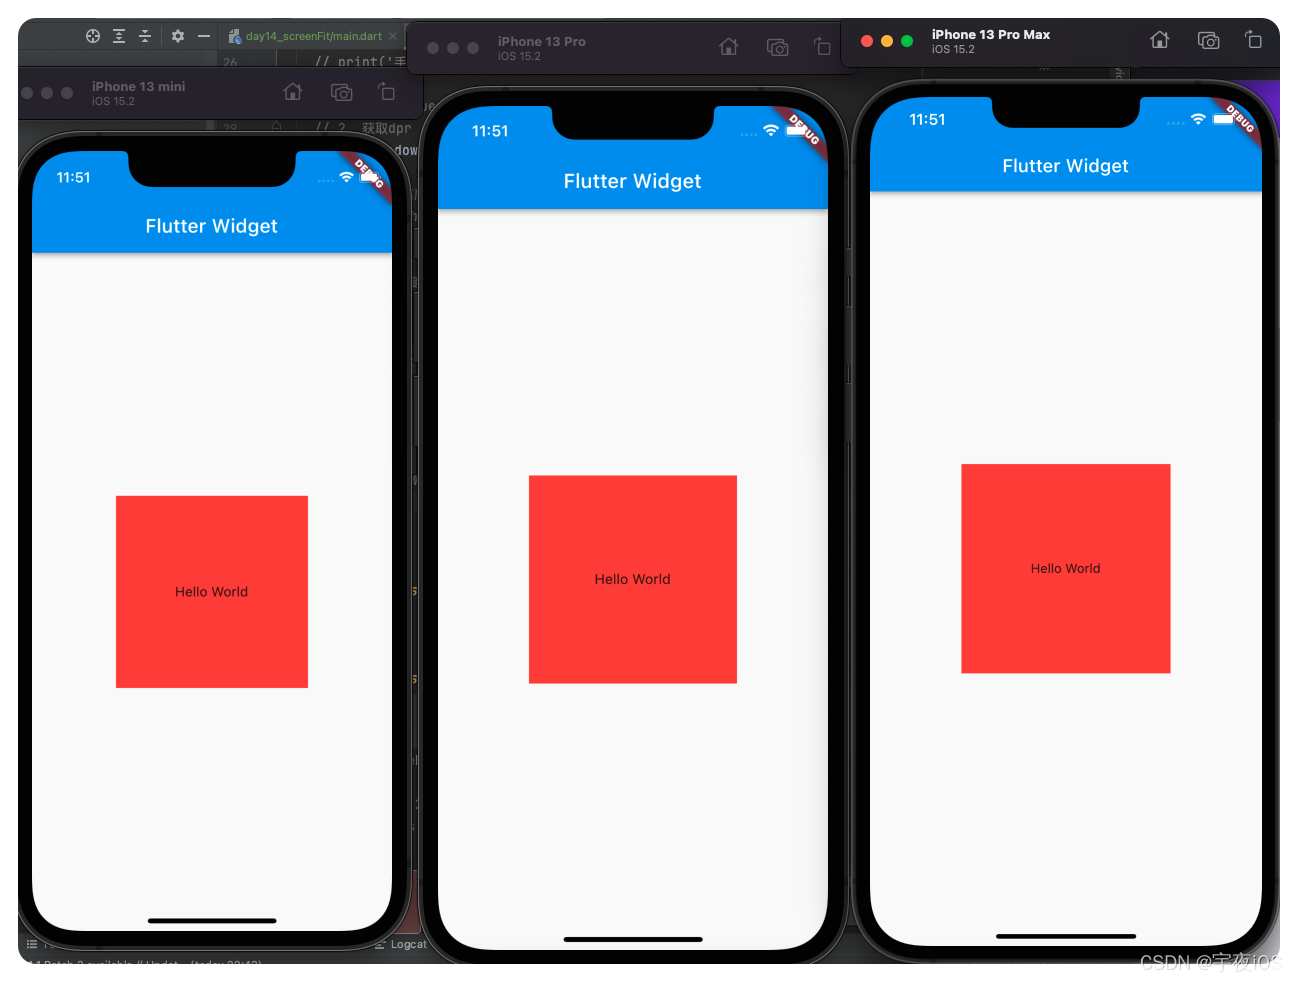
1.6 效果图 - Flutter屏幕适配案例
1.7、flutter第三方库屏幕适配 flutter_screenutil
https://pub.dev/packages/flutter_screenutil
④、Flutter的调试使用
1.1 开启调试模式

1.2 断点跳到下一步
