目录
一、深度学习项目的基本构成
一个深度学习模型一般包含以下几个文件:
datasets文件夹:存放需要训练和测试的数据集
dataset.py:加载数据集,将数据集转换为固定的格式,返回图像集和标签集
model.py:根据自己的需求搭建一个深度学习模型,具体搭建方法参考
【深度学习】——pytorch搭建模型及相关模型
https://blog.csdn.net/qq_45769063/article/details/120246601config.py:将需要配置的参数均放在这个文件中,比如batchsize,transform,epochs,lr等超参数
train.py:加载数据集,训练
predict.py:加载训练好的模型,对图像进行预测
requirements.txt:一些需要的库,通过pip install -r requirements.txt可以进行安装
readme:记录一些log
log文件:存放训练好的模型
loss文件夹:存放训练记录的loss图像
二、实战(猫狗分类)
1、数据集下载
下载数据
- 训练数据
链接: https://pan.baidu.com/s/1UOJUi-Wm6w0D7JGQduq7Ow 提取码: 485q
- 测试数据
链接: https://pan.baidu.com/s/1sSgLFkv9K3ciRVLAryWUKg 提取码: gyvs
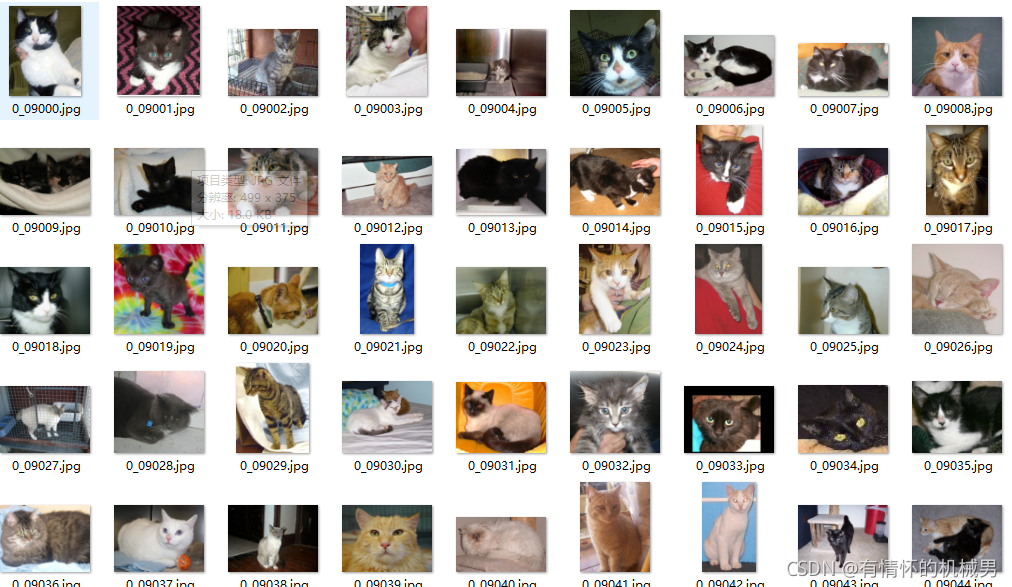
下载好之后解压,可以发现训练数据以cat或dog开头,测试数据都以数字命名。
这里我重命名了,cats以0开始,dogs以1开始
创建dataset文件夹
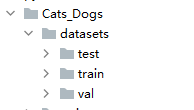
一般习惯这样构造目录,直接人为划分三个数据集,当然也可以用程序进行划分
2、dataset.py文件
主要是继承dataset类,然后在__getitem__方法中编写代码,得到一个可以通过字典key来取值的实例化对象
## 导入模块
from torch.utils.data import DataLoader,Dataset
from skimage import io,transform
import matplotlib.pyplot as plt
import os
import torch
from torchvision import transforms, utils
from PIL import Image
import pandas as pd
import numpy as np
#过滤警告信息
import warnings
warnings.filterwarnings("ignore")


class MyDataset(Dataset):  # 继承Dataset

	def __init__(self, path_dir, transform=None,train=True,test=True,val=True):  # 初始化一些属性
		self.path_dir = path_dir  # 文件路径,如'.\data\cat-dog'
		self.transform = transform  # 对图形进行处理,如标准化、截取、转换等
		self.images = os.listdir(self.path_dir)  # 把路径下的所有文件放在一个列表中
		self.train = train
		self.test = test
		self.val = val
		if self.test:
			self.images = os.listdir(self.path_dir + r"\cats")
			self.images.extend(os.listdir(self.path_dir+r"\dogs"))
		if self.train:
			self.images = os.listdir(self.path_dir + r"\cats")
			self.images.extend(os.listdir(self.path_dir+r"\dogs"))
		if self.val:
			self.images = os.listdir(self.path_dir + r"\cats")
			self.images.extend(os.listdir(self.path_dir+r"\dogs"))

	def __len__(self):  # 返回整个数据集的大小
		return len(self.images)

	def __getitem__(self, index):  # 根据索引index返回图像及标签
		image_index = self.images[index]  # 根据索引获取图像文件名称
		if image_index[0] == "0":
			img_path = os.path.join(self.path_dir,"cats", image_index)  # 获取图像的路径或目录
		else:
			img_path = os.path.join(self.path_dir,"dogs", image_index)  # 获取图像的路径或目录
		img = Image.open(img_path).convert('RGB')  # 读取图像

		# 根据目录名称获取图像标签(cat或dog)

		# 把字符转换为数字cat-0,dog-1
		label = 0 if image_index[0] == "0" else 1

		if self.transform is not None:
			img = self.transform(img)
			# print(type(img))
			# print(img.size)
		return img, label
3、model.py
模型是在VGG16的基础上进行修改的,主要是增加了一层卷积层和两层全连接层,将输入的图像resize成448,448大小
from torch import nn


class VGG19(nn.Module):

	def __init__(self, num_classes=2):
		super(VGG19, self).__init__()  # 继承父类属性和方法
		# 根据前向传播的顺序,搭建各个子网络模块
		## 十四个卷积层,每个卷积模块都有卷积层、激活层和池化层,用nn.Sequential()这个容器将各个模块存放起来
		# [1,3,448,448]
		self.conv0 = nn.Sequential(
			nn.Conv2d(3, 32, (3, 3), (1, 1), (1, 1)),
			nn.ReLU(inplace=True),  # inplace = True表示是否进行覆盖计算
			nn.MaxPool2d((2, 2), (2, 2))
		)
		# [1,32,224,224]
		self.conv1 = nn.Sequential(
			nn.Conv2d(32, 64, (3, 3), (1, 1), (1, 1)),
			nn.ReLU(inplace=True),  # inplace = True表示是否进行覆盖计算
		)
		# [1,64,224,224]
		self.conv2 = nn.Sequential(
			nn.Conv2d(64, 64, (3, 3), (1, 1), (1, 1)),
			nn.ReLU(inplace=True),  # inplace = True表示是否进行覆盖计算
			nn.MaxPool2d((2, 2), (2, 2))
		)
		# [1,64,112,112]
		self.conv3 = nn.Sequential(
			nn.Conv2d(64, 128, (3, 3), (1, 1), (1, 1)),
			nn.ReLU(inplace=True),  # inplace = True表示是否进行覆盖计算
		)
		# [1,128,112,112]
		self.conv4 = nn.Sequential(
			nn.Conv2d(128, 128, (3, 3), (1, 1), (1, 1)),
			nn.ReLU(inplace=True),  # inplace = True表示是否进行覆盖计算
			nn.MaxPool2d((2, 2), (2, 2))
		)
		# [1,128,56,56]
		self.conv5 = nn.Sequential(
			nn.Conv2d(128, 256, (3, 3), (1, 1), (1, 1)),
			nn.ReLU(inplace=True),  # inplace = True表示是否进行覆盖计算
		)
		# [1,256,56,56]
		self.conv6 = nn.Sequential(
			nn.Conv2d(256, 256, (3, 3), (1, 1), (1, 1)),
			nn.ReLU(inplace=True),  # inplace = True表示是否进行覆盖计算
		)
		# [1,256,56,56]
		self.conv7 = nn.Sequential(
			nn.Conv2d(256, 256, (3, 3), (1, 1), (1, 1)),
			nn.ReLU(inplace=True),  # inplace = True表示是否进行覆盖计算
			nn.MaxPool2d((2, 2), (2, 2))
		)
		# [1,256,28,28]
		self.conv8 = nn.Sequential(
			nn.Conv2d(256, 512, (3, 3), (1, 1), (1, 1)),
			nn.ReLU(inplace=True)
		)
		# [1,512,28,28]
		self.conv9 = nn.Sequential(
			nn.Conv2d(512, 512, (3, 3), (1, 1), (1, 1)),
			nn.ReLU(inplace=True)
		)
		# [1,512,28,28]
		self.conv10 = nn.Sequential(
			nn.Conv2d(512, 512, (3, 3), (1, 1), (1, 1)),
			nn.ReLU(inplace=True),
			nn.MaxPool2d((2, 2), (2, 2))
		)
		# [1,512,14,14]
		self.conv11 = nn.Sequential(
			nn.Conv2d(512, 512, (3, 3), (1, 1), (1, 1)),
			nn.ReLU(inplace=True),
		)
		# [1,512,14,14]
		self.conv12 = nn.Sequential(
			nn.Conv2d(512, 512, (3, 3), (1, 1), (1, 1)),
			nn.ReLU(inplace=True),
		)
		# [1,512,14,14]-->[1,512,7,7]
		self.conv13 = nn.Sequential(
			nn.Conv2d(512, 512, (3, 3), (1, 1), (1, 1)),
			nn.ReLU(inplace=True),
			nn.MaxPool2d((2, 2), (2, 2))
		)

		# 五个全连接层,每个全连接层之间存在激活层和dropout层
		self.classfier = nn.Sequential(
			# [1*512*7*7]
			nn.Linear(1 * 512 * 7 * 7, 4096),
			nn.ReLU(True),
			nn.Dropout(),

			# 4096
			nn.Linear(4096, 4096),
			nn.ReLU(True),
			nn.Dropout(),

			# 4096-->1000
			nn.Linear(4096, 1000),
			nn.ReLU(True),
			nn.Dropout(),

			# 1000-->100
			nn.Linear(1000, 100),
			nn.ReLU(True),
			nn.Dropout(),

			nn.Linear(100, num_classes),
			nn.Softmax(dim=1)
		)

	# 前向传播函数
	def forward(self, x):
		# 十四个卷积层
		x = self.conv0(x)
		x = self.conv1(x)
		x = self.conv2(x)
		x = self.conv3(x)
		x = self.conv4(x)
		x = self.conv5(x)
		x = self.conv6(x)
		x = self.conv7(x)
		x = self.conv8(x)
		x = self.conv9(x)
		x = self.conv10(x)
		x = self.conv11(x)
		x = self.conv12(x)
		x = self.conv13(x)

		# 将图像扁平化为一维向量,[1,512,7,7]-->1*512*7*7
		x = x.view(x.size(0), -1)

		# 三个全连接层
		output = self.classfier(x)
		return output

if __name__ == '__main__':
	import torch
	net = VGG19()
	print(net)
	input = torch.randn([1,3,448,448])
	output = net(input)
	print(output)
4、config.py
from torchvision import transforms as T

# 数据集准备
trainFlag = True
valFlag = True
testFlag = False

trainpath = r".\datasets\train"
testpath = r".\datasets\test"
valpath = r".\datasets\val"

transform_ = T.Compose([
	T.Resize(448),  # 缩放图片(Image),保持长宽比不变,最短边为224像素
	T.CenterCrop(448),  # 从图片中间切出224*224的图片
	T.ToTensor(),  # 将图片(Image)转成Tensor,归一化至[0, 1]
	T.Normalize(mean=[.5, .5, .5], std=[.5, .5, .5])  # 标准化至[-1, 1],规定均值和标准差
])

# 训练相关参数
batchsize = 2
lr = 0.001
epochs = 100
5、predict.py
加载训练好的模型,对图像进行预测
from pytorch.Cats_Dogs.model import VGG19
from PIL import Image
import torch
from pytorch.Cats_Dogs.configs import transform_


def predict_(model, img):
	# 将输入的图像从array格式转为image
	img = Image.fromarray(img)
	# 自己定义的pytorch transform方法
	img = transform_(img)
	# .view()用来增加一个维度
	# 我的图像的shape为(1, 64, 64)
	# channel为1,H为64, W为64
	# 因为训练的时候输入的照片的维度为(batch_size, channel, H, W) 所以需要再新增一个维度
	# 增加的维度是batch size,这里输入的一张图片,所以为1
	img = img.view(1, 1, 64, 64)
	output = model(img)
	_, prediction = torch.max(output, 1)
	# 将预测结果从tensor转为array,并抽取结果
	prediction = prediction.numpy()[0]
	return prediction


if __name__ == '__main__':
	img_path = r"*.jpg"
	img = Image.open(img_path).convert('RGB')  # 读取图像

	device = torch.device('cuda:0' if torch.cuda.is_available() else 'cpu')
	# device = torch.device('cuda:0' if torch.cuda.is_available() else 'cpu')
	model = VGG19()
	# save_path,和模型的保存那里的save_path一样
	# .eval() 预测结果前必须要做的步骤,其作用为将模型转为evaluation模式
	# Sets the module in evaluation mode.
	model.load_state_dict(torch.load("*.pth"))
	model.eval()

	pred = predict_(model,img)
	print(pred)