SpringBoot+Vue+Element UI 实现前后端分离小案例
搭配Element UI的组件进行使用,详述了表格、表单、轮播图、分页组件的属性使用和事件调用的细节
用户列表全代码在底部
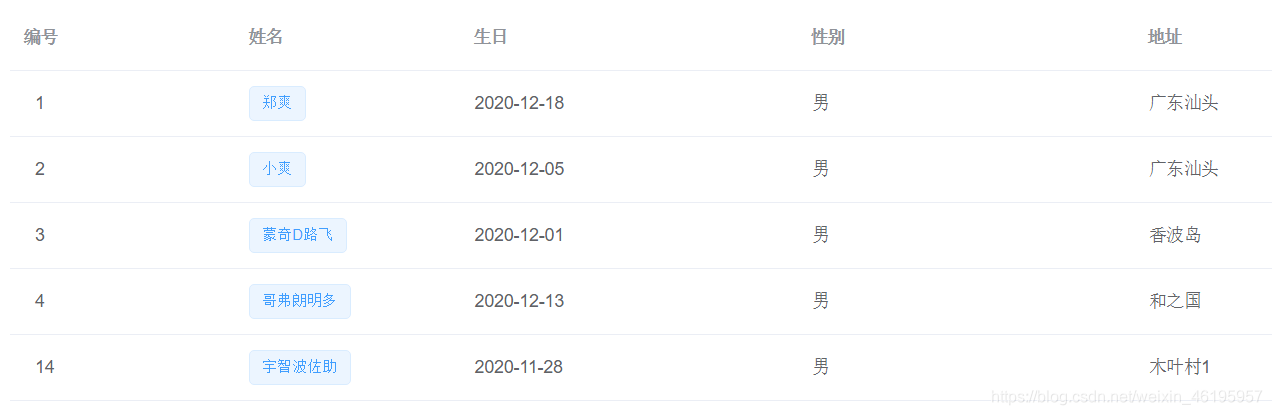
用户列表
1、搭建环境,通过vue脚手架创建项目
vue init webpack element(项目名)
2、在vue脚手架中安装element ui
1、npm 安装
推荐使用 npm 的方式安装,它能更好地和 webpack 打包工具配合使用。
npm i element-ui -S
2、在当前指定项目中使用element ui
在main.js中
import ElementUI from 'element-ui';
import 'element-ui/lib/theme-chalk/index.css';

//在vue脚手架中使用element ui
Vue.use(ElementUI)
3、定义主页
1、将主页注册到路由中
在src目录下的components中创建一个index.vue 作为我们的主页,同时将该组件注册到(router/index.js)路由中
import Vue from 'vue'
import Router from 'vue-router'
import Index from "../components/Index";

Vue.use(Router)

export default new Router({


  base: process.env.BASE_URL,
  routes: [
    {

    path: '/',redirect:'/index'},
    {

    path:'/index',component:Index},
  ]
})
2、编写主页内容
1、在element ui中找到合适的布局并添加菜单管理
<el-container>
  <el-header>Header</el-header>
  <el-main>Main</el-main>
</el-container>
<el-container>
  <el-header>
    <!--导航菜单-->
    <el-menu :default-active="activeIndex" class="el-menu-demo" mode="horizontal" @select="handleSelect">
      <el-menu-item index="/index">主页</el-menu-item>
      <el-menu-item index="/users" >用户管理</el-menu-item>

      <el-menu-item index="/msgs" >消息中心</el-menu-item>
      <el-menu-item index="orders">订单管理</el-menu-item>
    </el-menu>
    <div class="line"></div>

  </el-header>
  <el-main>
    <router-view/>    #  组件响应的地方
  </el-main>
</el-container>
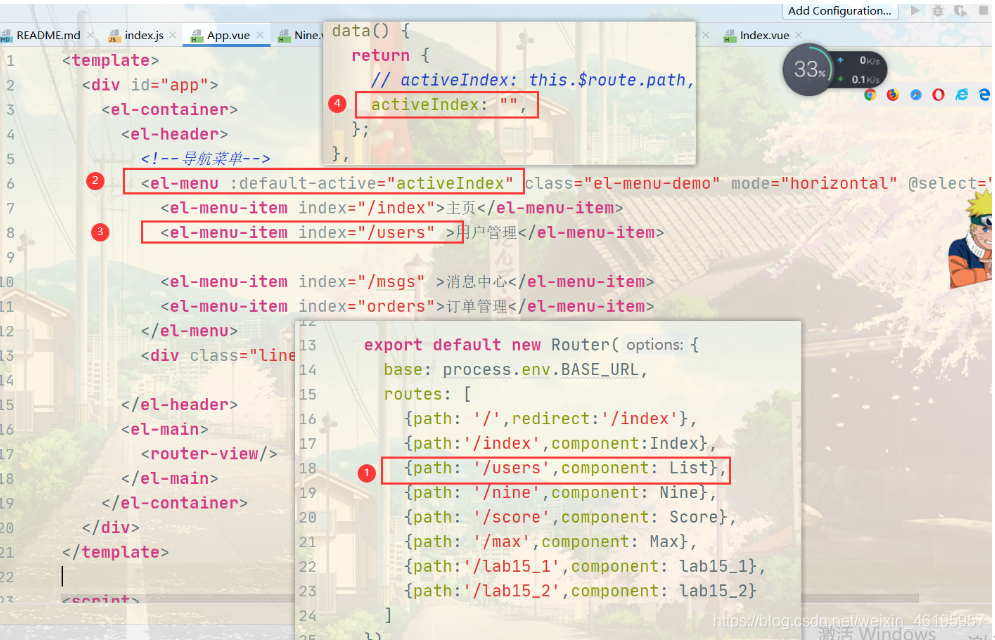
在现在的使用中我们发现在用户管理页面进行刷新,出现的是用户管理的界面,但是菜单高亮的却是主页,这个时候我们需要设置一下 :default-active 的激活规则
export default {


  name: 'App',
  data() {


    return {


      activeIndex: this.$route.path,   #  设置激活路径
      // activeIndex: "",
    };
  },
  methods: {


    handleSelect(key, keyPath) {


      console.log(key, keyPath);
      this.$router.push(key);
    }
  }
}
</script>
激活的索引应该跟着路径一起,
![[外链图片转存失败,源站可能有防盗链机制,建议将图片保存下来直接上传(img-ANYhhE6Y-1616245610134)(Vue.assets/image-20210319124036692.png)]](https://img-blog.csdnimg.cn/20210320211324832.png)
2、页面管理
我们会在components下为不同页面创建对应的文件夹
![[外链图片转存失败,源站可能有防盗链机制,建议将图片保存下来直接上传(img-Px0ytwpn-1616245610135)(Vue.assets/image-20210319125009242.png)]](https://img-blog.csdnimg.cn/20210320211335432.png?x-oss-process=image/watermark,type_ZmFuZ3poZW5naGVpdGk,shadow_10,text_aHR0cHM6Ly9ibG9nLmNzZG4ubmV0L3dlaXhpbl80NjE5NTk1Nw==,size_16,color_FFFFFF,t_70)
3、用户管理组件跳转
我们现在想要实现这样一个功能,点击用户管理,在菜单栏的下方显示用户管理的组件页面
4、主页添加轮播图
Element Ui 模板
<template>
  <el-carousel indicator-position="outside">
    <el-carousel-item v-for="item in 4" :key="item">
      <h3>{

   { item }}</h3>
    </el-carousel-item>
  </el-carousel>
</template>

<style>
  .el-carousel__item h3 {


    color: #475669;
    font-size: 18px;
    opacity: 0.75;
    line-height: 300px;
    margin: 0;
  }

  .el-carousel__item:nth-child(2n) {


    background-color: #99a9bf;
  }

  .el-carousel__item:nth-child(2n+1) {


    background-color: #d3dce6;
  }
</style>
![[外链图片转存失败,源站可能有防盗链机制,建议将图片保存下来直接上传(img-we7sEvx9-1616245610139)(Vue.assets/image-20210319163329899.png)]](https://img-blog.csdnimg.cn/20210320211505344.png?x-oss-process=image/watermark,type_ZmFuZ3poZW5naGVpdGk,shadow_10,text_aHR0cHM6Ly9ibG9nLmNzZG4ubmV0L3dlaXhpbl80NjE5NTk1Nw==,size_16,color_FFFFFF,t_70)
添加到案例中
<template>
    <div>
      <el-carousel indicator-position="outside"  trigger="click" height="37vw" @change="loadAnimate"  :interval="5000" arrow="hover">
        <el-carousel-item v-for="item in imgs" :key="item">
          <el-image
            style=" height: 600px"
            :src="item"
            fit="fill"></el-image>
        </el-carousel-item>
      </el-carousel>

    </div>
</template>

<script>
  import homeImg1 from "../assets/indeximgs/背景1.png";
  import homeImg2 from "../assets/indeximgs/背景2.png";
  import homeImg3 from "../assets/indeximgs/背景3.png";
  import homeImg4 from "../assets/indeximgs/背景4.png";
  import homeImg5 from "../assets/indeximgs/1.jpg"
  import homeImg6 from "../assets/indeximgs/2.jpg"
    export default {


        name: "Index",
      data(){


          return{


            imgs:[homeImg1,homeImg2,homeImg3,homeImg4,homeImg5,homeImg6 ]
          }
      }

    }
</script>

<style scoped>
  .el-carousel__item h3 {


    color: #475669;
    font-size: 18px;
    opacity: 0.75;
    /*line-height: 1500px;*/
    margin: 0;}
</style>
![[外链图片转存失败,源站可能有防盗链机制,建议将图片保存下来直接上传(img-6QczCxGE-1616245610140)(Vue.assets/image-20210319230552999.png)]](https://img-blog.csdnimg.cn/20210320211519791.png?x-oss-process=image/watermark,type_ZmFuZ3poZW5naGVpdGk,shadow_10,text_aHR0cHM6Ly9ibG9nLmNzZG4ubmV0L3dlaXhpbl80NjE5NTk1Nw==,size_16,color_FFFFFF,t_70)
![[外链图片转存失败,源站可能有防盗链机制,建议将图片保存下来直接上传(img-fHBoh2up-1616245610140)(Vue.assets/image-20210319165000949.png)]](https://img-blog.csdnimg.cn/2021032021153073.png?x-oss-process=image/watermark,type_ZmFuZ3poZW5naGVpdGk,shadow_10,text_aHR0cHM6Ly9ibG9nLmNzZG4ubmV0L3dlaXhpbl80NjE5NTk1Nw==,size_16,color_FFFFFF,t_70)
4、用户列表组件
<template>
    <div>
      <h1>Table表格组件的使用</h1>
      <el-table
        ref="mytable"
        @select="selectRow"
        <!--数据校验格式-->
        :data="tableData.filter(data => !search || data.name.toLowerCase().includes(search.toLowerCase()))" border height="400px" stripe>
        <el-table-column type="selection"></el-table-column>
        <el-table-column prop="id" :resizable="false" label="编号" width="200px" align="center"></el-table-column>
        <el-table-column prop="name" :resizable="false" label="姓名" width="200px"></el-table-column>
        <el-table-column prop="age" :resizable="true" label="年龄" sortable width="200px"></el-table-column>
        <el-table-column prop="email" label="邮箱" width="200px" header-align="center"></el-table-column>
        <el-table-column prop="dept.name" label="部门" width="200px" :formatter="showDept" align="center"></el-table-column>

        <el-table-column  label="操作">
          <template slot="header" slot-scope="scope">
            <el-input
              v-model="search"
              size="mini"
              placeholder="输入关键字搜索"/>
          </template>
          <template slot-scope="scope">
            <el-button
              size="mini"
              @click="handleEdit(scope.$index, scope.row)">编辑</el-button>
            <el-button
              size="mini"
              type="danger"
              @click="handleDelete(scope.$index, scope.row)">删除</el-button>
          </template>
        </el-table-column>
      </el-table>
      <el-button type="primary" @click="clearSelect">清空选择</el-button>
    </div>
</template>

<script>
    export default {


        name: "Table",
      data(){


          return{


            tableData:[
              {

     id:1,name:"郑爽",age:21,email:"[email protected]",dept:{

     id:1,name:"研发部"}},
              {

     id:2,name:"鸣人",age:24,email:"[email protected]",dept: {

     id:2,name:"小卖部"}},
              {

     id:3,name:"佐助",age:23,email:"[email protected]"},
              {

     id:4,name:"卡卡西",age:25,email:"[email protected]"},
              {

     id:5,name:"宇智波鼬",age:23,email:"[email protected]"},
              {

     id:6,name:"波风水门",age:21,email:"[email protected]"}
            ],
            search:''
          }
      },
      methods:{


          clearSelect(){


            this.$refs.mytable.clearSelection();
          },
          selectRow(selection, row){


            console.log(selection);
            console.log(row);
          },
          showDept(row, column, cellValue, index){


            /*console.log("这是row---->"+row);
            console.log("这是column————>"+column);
            console.log("这是cellValue————>"+cellValue);
            console.log("这是index————>"+index);*/
            if (cellValue){


              return cellValue
            }else {


              return "暂无部门"
            }
          },
        handleEdit(index,row){


          console.log("编辑index:"+index);
          console.log(row);
        },
        handleDelete(index,row){


          console.log("删除index:"+index);
          console.log(row);
        }
      }
    }
</script>

<style scoped>

</style>
5、搭建后台(springboot_user_vue)
1、导入依赖(maven)
<dependencies>
    <dependency>
        <groupId>org.springframework.boot</groupId>
        <artifactId>spring-boot-starter-web</artifactId>
    </dependency>
    <dependency>
        <groupId>org.mybatis.spring.boot</groupId>
        <artifactId>mybatis-spring-boot-starter</artifactId>
        <version>2.1.4</version>
    </dependency>

    <dependency>
        <groupId>mysql</groupId>
        <artifactId>mysql-connector-java</artifactId>
        <scope>runtime</scope>
    </dependency>
    <dependency>
        <groupId>org.projectlombok</groupId>
        <artifactId>lombok</artifactId>
        <optional>true</optional>
    </dependency>
    <dependency>
        <groupId>org.springframework.boot</groupId>
        <artifactId>spring-boot-starter-test</artifactId>
        <scope>test</scope>
    </dependency>
    <dependency>
        <groupId>com.alibaba</groupId>
        <artifactId>druid-spring-boot-starter</artifactId>
        <version>1.1.9</version>
    </dependency>
</dependencies>
2、application.properteies
spring.application.name=vue
server.servlet.context-path=/vue
server.port=8989

spring.datasource.type=com.alibaba.druid.pool.DruidDataSource
spring.datasource.username=root
spring.datasource.password=83821979Zs
spring.datasource.url=jdbc:mysql://localhost:3306/vue?useSSL=true&useUnicode=true&characterEncoding=UTF-8&serverTimezone=UTC

mybatis.mapper-locations=classpath:mapper/*.xml
mybatis.type-aliases-package=com.shuang.entity

logging.level.root=info
logging.level.com.shuang.dao=debug
3、实体类
注意:数据库中定义的id是int类型的,而在ORM映射中我们使用String,因为一切皆字符串
@Data
@AllArgsConstructor
@NoArgsConstructor
@ToString
@Accessors(chain = true)    // 链式调用
public class User {


  private String id;
  private String name;
  private Integer age;
  @JsonFormat(pattern = "yyyy-MM-dd",timezone = "GTM+8")
  private Date bir;
}
4、定义查询所有接口
dao
@Mapper
@Repository
public interface EUserDao {


  //查询所有用户信息
  List<EUser> findAll();
}
mapper.xml
<?xml version="1.0" encoding="UTF-8" ?>
<!DOCTYPE mapper
        PUBLIC "-//mybatis.org//DTD Mapper 3.0//EN"
        "http://mybatis.org/dtd/mybatis-3-mapper.dtd">

<mapper namespace="com.shuang.dao.EUserDao">

    <!--查询所有的方法-->
    <select id="findAll" resultType="EUser">
        select id, name, bir, sex, address
        from vue.element_user
    </select>
</mapper>
service
public interface EUserService {


  //查询所有的方法
  List<EUser> findAll();
}
serviceImpl
@Service
@Transactional
public class EUserServiceImpl implements EUserService{


  @Autowired
  private EUserDao eUserDao;

  @Override
  @Transactional(propagation = Propagation.SUPPORTS)
  public List<EUser> findAll() {


    return eUserDao.findAll();
  }
}
test 测试接口
@Test
public void testFindAll(){


  eUserService.findAll().forEach(eUser -> System.out.println("euser="+eUser));
}
controller
package com.shuang.controller;

import com.shuang.entity.User;
import com.shuang.service.UserService;
import org.springframework.beans.factory.annotation.Autowired;
import org.springframework.web.bind.annotation.*;

import java.util.HashMap;
import java.util.List;
import java.util.Map;

@RestController  //前后端分离
@CrossOrigin     //解决跨域问题
@RequestMapping("user")

public class UserController {


  @Autowired
  private UserService userService;
  /**
   * 查询所有用户信息
   *
   * @return
   */
  @GetMapping("findAll")
  public Map<String, Object> findAll() {


    Map<String, Object> map = new HashMap<>();

    try {


      List<User> all = userService.findAll();
      map.put("results", all);
    } catch (Exception e) {


      e.printStackTrace();
    }


    return map;
  }
}
![[外链图片转存失败,源站可能有防盗链机制,建议将图片保存下来直接上传(img-aZvgXxnF-1616245610141)(Vue.assets/image-20210320121602822.png)]](https://img-blog.csdnimg.cn/20210320211629965.png?x-oss-process=image/watermark,type_ZmFuZ3poZW5naGVpdGk,shadow_10,text_aHR0cHM6Ly9ibG9nLmNzZG4ubmV0L3dlaXhpbl80NjE5NTk1Nw==,size_16,color_FFFFFF,t_70)
6、增删改查
1、安装axios
2、列表展示功能
created(){


	this.$http.get("http://localhost:8989/vue/user/findAll").then(res=>{


		this.tableData = res.data;
})
}
3、列表添加功能
1、添加动画过渡效果
我们先定义一个点击添加按钮就能出现的动画过渡
<transition name="el-zoom-in-center">
  <div v-show="show" class="transition-box">
    <!-- 这里存放我们想要展示的页面 -->
  </div>
</transition>

	  <!-- 给按钮添加点击事件 -->
<el-button style="margin: 10px 0px;" @click="show=!show" type="success" size="mini">
    添加
</el-button>

export default {
    name: "List",
    data() {
      return {
        show: false,}
	}
}

  .transition-box {
    margin-bottom: 10px;
    width: 100%;
    height: 600px;
    border-radius: 4px;
    /*background-color: #409EFF;*/
    /*text-align: center;*/

    padding: 40px 20px;
    box-sizing: border-box;
    margin-right: 20px;
  }
2、动画过渡中添加表单
下面这个是我们在element ui 拿过来的表单案例,我们直接拿过来修改即可,不需要自己手动去写
<el-form ref="form" :model="form" label-width="80px">
  <el-form-item label="活动名称">
    <el-input v-model="form.name"></el-input>
  </el-form-item>
  <el-form-item label="活动区域">
    <el-select v-model="form.region" placeholder="请选择活动区域">
      <el-option label="区域一" value="shanghai"></el-option>
      <el-option label="区域二" value="beijing"></el-option>
    </el-select>
  </el-form-item>
  <el-form-item label="活动时间">
    <el-col :span="11">
      <el-date-picker type="date" placeholder="选择日期" v-model="form.date1" style="width: 100%;"></el-date-picker>
    </el-col>
    <el-col class="line" :span="2">-</el-col>
    <el-col :span="11">
      <el-time-picker placeholder="选择时间" v-model="form.date2" style="width: 100%;"></el-time-picker>
    </el-col>
  </el-form-item>
  <el-form-item label="即时配送">
    <el-switch v-model="form.delivery"></el-switch>
  </el-form-item>
  <el-form-item label="活动性质">
    <el-checkbox-group v-model="form.type">
      <el-checkbox label="美食/餐厅线上活动" name="type"></el-checkbox>
      <el-checkbox label="地推活动" name="type"></el-checkbox>
      <el-checkbox label="线下主题活动" name="type"></el-checkbox>
      <el-checkbox label="单纯品牌曝光" name="type"></el-checkbox>
    </el-checkbox-group>
  </el-form-item>
  <el-form-item label="特殊资源">
    <el-radio-group v-model="form.resource">
      <el-radio label="线上品牌商赞助"></el-radio>
      <el-radio label="线下场地免费"></el-radio>
    </el-radio-group>
  </el-form-item>
  <el-form-item label="活动形式">
    <el-input type="textarea" v-model="form.desc"></el-input>
  </el-form-item>
  <el-form-item>
    <el-button type="primary" @click="onSubmit">立即创建</el-button>
    <el-button>取消</el-button>
  </el-form-item>
</el-form>
<script>
  export default {


    data() {


      return {


        form: {


          name: '',
          region: '',
          date1: '',
          date2: '',
          delivery: false,
          type: [],
          resource: '',
          desc: ''
        }
      }
    },
    methods: {


      onSubmit() {


        console.log('submit!');
      }
    }
  }
</script>
这是我们修改之后的表单
<transition name="el-zoom-in-center">
  <div v-show="show" class="transition-box">
    <el-form :hide-required-asterisk="false" :rules="rules" ref="userForm" :model="form" label-width="80px"
             label-suffix=":">  <!-- 统一添加后缀,可以发现下面的展示图每个label后面都有: -->
      <el-form-item label="姓名" prop="name">  <!--在rules中匹配对应的名称-->
        <el-col :span="4">
          <el-input v-model="form.name"></el-input>
        </el-col>

      </el-form-item>

      <el-form-item label="生日" prop="bir">
        <el-col :span="4">
            <!--添加 value-format 防止出现少一天的时区问题-->
          <el-date-picker value-format="yyyy-MM-dd" type="date" placeholder="选择日期" v-model="form.bir" style="width: 100%;"></el-date-picker>
        </el-col>
      </el-form-item>
      <el-form-item label="性别">
        <el-radio-group v-model="form.sex">
          <el-radio label="男"></el-radio>
          <el-radio label="女"></el-radio>
        </el-radio-group>
      </el-form-item>
      <el-form-item label="地址" prop="address">
        <el-input type="textarea" v-model="form.address"></el-input>
      </el-form-item>
      <el-form-item>
        <el-button type="primary" @click="onSubmit('userForm')">保存用户信息</el-button>
        <el-button>取消</el-button>
      </el-form-item>
    </el-form>
  </div>
</transition>
上面表单中绑定在data中的数据
<script>
  export default {


    name: "List",
    data() {


      return {


        form: {


          name: '',
          bir: '',
          sex: '男',
          address: '',
        },
          <!-- 表单中添加的纯前端的校验规则 -->
        rules: {


          name: [
            {

    required: true, message: '请输入用户名信息', trigger: 'blur'},
          ],
          bir: [
            {

    required: true, message: '请输入用户名出生日期', trigger: 'blur'},
          ],
          address: [
            {

    required: true, message: '请输入用户地址', trigger: 'blur'},
          ]
        },
      }
    },
  }
</script>
效果是这个样子的
![[外链图片转存失败,源站可能有防盗链机制,建议将图片保存下来直接上传(img-V7t7a7nW-1616245610141)(Vue.assets/image-20210320095447745.png)][外链图片转存失败,源站可能有防盗链机制,建议将图片保存下来直接上传(img-EgQcywbW-1616245610142)(Vue.assets/image-20210320100203872.png)]](https://img-blog.csdnimg.cn/20210320211740628.png?x-oss-process=image/watermark,type_ZmFuZ3poZW5naGVpdGk,shadow_10,text_aHR0cHM6Ly9ibG9nLmNzZG4ubmV0L3dlaXhpbl80NjE5NTk1Nw==,size_16,color_FFFFFF,t_70)
3、后端编写添加接口
类似查询接口,流程不在详述
@Mapper
@Repository
public interface EUserDao {


  //查询所有用户信息
  List<EUser> findAll();

  //添加用户信息
  void save(EUser eUser);
}

public interface EUserService {


  //查询所有的方法
  List<EUser> findAll();
  //保存用户信息
  void save(EUser eUser);
}

@Service
@Transactional
public class EUserServiceImpl implements EUserService{


  @Autowired
  private EUserDao eUserDao;

  @Override
  @Transactional(propagation = Propagation.SUPPORTS)
  public List<EUser> findAll() {


    return eUserDao.findAll();
  }

  @Override
  public void save(EUser eUser) {


    eUserDao.save(eUser);
  }
}
<?xml version="1.0" encoding="UTF-8" ?>
<!DOCTYPE mapper
        PUBLIC "-//mybatis.org//DTD Mapper 3.0//EN"
        "http://mybatis.org/dtd/mybatis-3-mapper.dtd">

<mapper namespace="com.shuang.dao.EUserDao">

    <!--查询所有的方法-->
    <select id="findAll" resultType="EUser">
        select id, name, bir, sex, address
        from vue.element_user
    </select>

    <!--保存用户信息-->
    <insert id="save" parameterType="EUser">
        insert into vue.element_user
        values (#{id}, #{name}, #{bir}, #{sex}, #{address})
    </insert>
</mapper>
package com.shuang.controller;

import com.shuang.entity.User;
import com.shuang.service.UserService;
import org.springframework.beans.factory.annotation.Autowired;
import org.springframework.web.bind.annotation.*;

import java.util.HashMap;
import java.util.List;
import java.util.Map;

@RestController  //前后端分离
@CrossOrigin     //跨域
@RequestMapping("user")

public class UserController {


  @Autowired
  private UserService userService;
  /**
   * 添加用户信息
   */
  @PostMapping("save")
  public Map<String, Object> save(@RequestBody User user) {


    System.out.println(user.toString());
    Map<String, Object> map = new HashMap<>();

    try {


      userService.save(user);
      map.put("success", true);
      map.put("msg", "添加用户成功!");
    } catch (Exception e) {


      e.printStackTrace();
      map.put("success", false);
      map.put("msg", "添加用户失败:" + e.getMessage());
    }
    return map;
  }
}
注意
我们上面的接口中返回的是Map,这样做的目的是为了做到一种定制化的响应信息,因为在前端发送请求在后端得到响应并返回相应的json数据,前端除了得到想要的json格式的数据,还要得到是否成功,后端是否抛出异常等等,前端通过后端反馈的信息来进行一些判断,比如
if(!res.data.success){
alert("失败");
return
}
`````
下面是在success为true的时候继续执行的操作,可以是赋值,事件等等
改进
我们发现虽然Map是万能的,因为Map是个键值对,我们想put什么值都可以,但是有些时候我们的请求可能只是添加、删除、更新操作,后端响应返回的数据仅仅只有成功或者失败还附带一些信息,并没有返回实体类的数据,所以这里我们做一个改进,俗话说得好“专业的事情交给专业的人去做!”
我们在com.shuang 包路径下再创建一个vo包,value object值对象。通常用于业务层之间的数据传递,和PO一样也是仅仅包含数据而已。
package com.shuang.vo;

import lombok.Data;
import lombok.experimental.Accessors;

@Data
@Accessors(chain = true)   // 链式编程
public class Result {


  private Boolean status = true;
  private String msg;
}
我们修改一下上面的添加接口
/**
 * 保存用户
 * @param User 用户实体类
 * @return 返回结果信息
 */
@PostMapping("save")
public Result save(@RequestBody User User) {


  Result result = new Result();

  try {


      eUserService.save(eUser);
      result.setStatus(true).setMsg("用户信息保存成功!!!");
  } catch (Exception e) {


    result.setStatus(false).setMsg("系统错误:保存用户失败,请稍后再试....");
  }
  return result;
}
4、前端发送请求
我们在返回到前端发送axios请求
<el-form-item>
  <el-button type="primary" @click="onSubmit('userForm')">保存用户信息</el-button>
  <el-button>取消</el-button>
</el-form-item>
添加 保存用户信息按钮,发送axios请求添加一个载体
methods: {


  onSubmit(userForm) {


    console.log('submit!');
    this.$refs[userForm].validate((valid) => {


      if (valid) {


        this.$http.post("http://localhost:8989/vue/EUser/saveOrUpdate", this.form)
            .then(res => {


          if (res.data.status) {


            this.$message({


              message: '恭喜你,' + res.data.msg,
              type: 'success'
            });
            //清空表单信息  保留sex的默认值
            this.form = {

    sex: '男'};
            //隐藏添加表单
            this.show = false;
            //调用刷新数据的方法
            this.findAll()
            // this.$router.push("/#users")
          } else {


            this.$message.error(res.data.msg);
          }
        })
      } else {


        this.$message.error("当前输入的数据不合法!!!")
        return false;
      }
    });
![[外链图片转存失败,源站可能有防盗链机制,建议将图片保存下来直接上传(img-75iTFIHK-1616245610143)(Vue.assets/image-20210320103646319.png)]](https://img-blog.csdnimg.cn/20210320211819960.png?x-oss-process=image/watermark,type_ZmFuZ3poZW5naGVpdGk,shadow_10,text_aHR0cHM6Ly9ibG9nLmNzZG4ubmV0L3dlaXhpbl80NjE5NTk1Nw==,size_16,color_FFFFFF,t_70)
4、列表删除功能
在展示栏上有一个删除按钮,element ui 帮我们绑定了事件方法
<el-button
     size = "mini"
     type = "danger"
     @click = "handleDelete(scope.$index,scope.row)">
	删除
</el-button>
事件
handleDelete(index, row) {

      // index是索引, row 是行对象
  this.$http.get("http://localhost:8989/vue/EUser/delete?id=" + row.id).then(res => {


    if (res.data.status) {


      this.$message({


        message: '名字为:' + row.name + res.data.msg,
        type: 'success',
      });
      //刷新表格数据
      this.findAll();
    } else {


      this.$message.error(res.data.msg);
    }
  })
}
开发对应的后端接口
同样我们不在详述,只给出代码和对应的注释
@Mapper
@Repository
public interface EUserDao {


  //查询所有用户信息
  List<EUser> findAll();

  //添加用户信息
  void save(EUser eUser);

  //删除用户信息
  void delete(String id);
}

public interface EUserService {


  //查询所有的方法
  List<EUser> findAll();
  //保存用户信息
  void save(EUser eUser);
  //删除用户信息
  void delete(String id);
}

@Service
@Transactional
public class EUserServiceImpl implements EUserService{


  @Autowired
  private EUserDao eUserDao;

  @Override
  @Transactional(propagation = Propagation.SUPPORTS)
  public List<EUser> findAll() {


    return eUserDao.findAll();
  }

  @Override
  public void save(EUser eUser) {


    eUserDao.save(eUser);
  }

  @Override
  public void delete(String id) {


    eUserDao.delete(id);
  }
}

/**
   * 删除用户信息
   */
  @GetMapping("delete")
  public Result delete(String id){


    System.out.println("传入的id为:"+id);
    Result result = new Result();

    try {


      eUserService.delete(id);
      result.setMsg("的用户信息删除成功!");
    } catch (Exception e) {


      e.printStackTrace();
      result.setStatus(false).setMsg("用户信息删除失败!");
    }

    return result;
  }
mapper.xml
<?xml version="1.0" encoding="UTF-8" ?>
<!DOCTYPE mapper
        PUBLIC "-//mybatis.org//DTD Mapper 3.0//EN"
        "http://mybatis.org/dtd/mybatis-3-mapper.dtd">

<mapper namespace="com.shuang.dao.EUserDao">

    <!--查询所有的方法-->
    <select id="findAll" resultType="EUser">
        select id, name, bir, sex, address
        from vue.element_user
    </select>

    <!--保存用户信息-->
    <insert id="save" parameterType="EUser">
        insert into vue.element_user
        values (#{id}, #{name}, #{bir}, #{sex}, #{address})
    </insert>

    <!--删除用户信息-->
    <delete id="delete" parameterType="String">
        delete
        from vue.element_user
        where id = #{id}
    </delete>
</mapper>
注意
上面的删除按钮,点击后删除的事件,显然是做到不厚道的,假设用户不小心误触,把数据之间从数据库中删除了怎么办,当然正常情况下是不可能的,因为我们通常会用到逻辑删除,只有管理员才能真正把数据从数据库中删除,普通用户的权限不够。为了贴近正常使用,我们给在触发按钮做些文章
element ui 中的气泡确认框
<template>
<el-popconfirm
  confirm-button-text='好的'
  cancel-button-text='不用了'
  icon="el-icon-info"
  icon-color="red"
  title="这是一段内容确定删除吗?"
>
  <el-button slot="reference">删除</el-button>
</el-popconfirm>
</template>
![[外链图片转存失败,源站可能有防盗链机制,建议将图片保存下来直接上传(img-ykXRvmfc-1616245610143)(Vue.assets/image-20210320135928968.png)]](https://img-blog.csdnimg.cn/20210320211910697.png?x-oss-process=image/watermark,type_ZmFuZ3poZW5naGVpdGk,shadow_10,text_aHR0cHM6Ly9ibG9nLmNzZG4ubmV0L3dlaXhpbl80NjE5NTk1Nw==,size_16,color_FFFFFF,t_70)
我们进行一些修改
<el-popconfirm
  confirm-button-text='好的'
  cancel-button-text='不用了'
  icon="el-icon-info"
  icon-color="red"
  title="确定要删除当前用户吗?">
  <el-button
     size = "mini"
     type = "danger"
     @click = "handleDelete(scope.$index,scope.row)">
	删除
</el-button>
</el-popconfirm>
如果我们设置成这样,你在页面一点击,还没等你点’好的’,数据就已经被删除了
element ui 中为我们提供这样的事件
![[外链图片转存失败,源站可能有防盗链机制,建议将图片保存下来直接上传(img-lw2aKEPV-1616245610144)(Vue.assets/image-20210320140359612.png)]](https://img-blog.csdnimg.cn/20210320211921834.png?x-oss-process=image/watermark,type_ZmFuZ3poZW5naGVpdGk,shadow_10,text_aHR0cHM6Ly9ibG9nLmNzZG4ubmV0L3dlaXhpbl80NjE5NTk1Nw==,size_16,color_FFFFFF,t_70)
最终修改成这样
<el-popconfirm
  confirm-button-text='好的'
  cancel-button-text='不用了'
  icon="el-icon-info"
  icon-color="red"
  title="确定要删除当前用户吗?"
  @confirm="handleDelete(scope.$index, scope.row)">
  <!--@oncance="绑定取消方法"-->
  <el-button slot="reference" size="mini" type="danger">删除</el-button>
</el-popconfirm>
5、列表编辑功能
在我们点击页面的编辑按钮的时候,回将数据进行回显到我们对应的表单里面,在element ui中的编辑按钮,已经帮我们做到数据回显,我们利用刚才的添加表单,作为回显数据的载体
<el-button
  size="mini"
  @click="handleEdit(scope.$index, scope.row)">编辑
</el-button>
handleEdit(index, row) {


  console.log(row);
  this.show = true; // 展示添加功能的表单
  this.form = row;//双向数据绑定,回显数据
},
![[外链图片转存失败,源站可能有防盗链机制,建议将图片保存下来直接上传(img-IhkGkrdR-1616245610144)(Vue.assets/image-20210320142130291.png)]](https://img-blog.csdnimg.cn/2021032021193491.png?x-oss-process=image/watermark,type_ZmFuZ3poZW5naGVpdGk,shadow_10,text_aHR0cHM6Ly9ibG9nLmNzZG4ubmV0L3dlaXhpbl80NjE5NTk1Nw==,size_16,color_FFFFFF,t_70)
大家应该能够想象得到,更新操作跟添加操作其实可以合到一起,至于后台执行的是哪个更新操作还是插入操作,在传回后端的参数中有id(我们在点击编辑的时候会有数据回显到我们之前的添加表单,但是id是不会显示的,因为在更新操作中是不允许改变id索引的,),就是更新操作,如果没有就是插入操作(插入操作,主键自增)
我们把前端添加的事件修改一下
onSubmit(userForm) {


  console.log('submit!');
  this.$refs[userForm].validate((valid) => {


    if (valid) {


      this.$http.post("http://localhost:8989/vue/EUser/saveOrUpdate", this.form)
          .then(res => {


        if (res.data.status) {


          this.$message({


            message: '恭喜你,' + res.data.msg,
            type: 'success'
          });
          //清空表单信息
          this.form = {

    sex: '男'};
          //隐藏添加表单
          this.show = false;
          //调用刷新数据的方法
          this.findAll()
          // this.$router.push("/#users")
        } else {


          this.$message.error(res.data.msg);
        }
      })
    } else {


      this.$message.error("当前输入的数据不合法!!!")
      return false;
    }
  });
注意:
在这里我提一个点,可能有小伙伴已经发现了,在表单中或者data中并没有见到id的影子,为什么在点击编辑进行数据回显的时候附带有id给 data中的form呢?
原因是这样的:
- 我们在打开页面的时候就已经在created的生命周期中定义好了方法,将后端响应的users对象数组赋值给data中定义的tableData
findAll() {


  this.$http.get("http://localhost:8989/vue/user/findAll?).then(res => {


    this.tableData = res.data.users;
  });
}
- 绑定的tableData中的字段会自动映射到表格中,通过scope/props,给对应id,name等赋值
下面是用户展示页面,我们添加了Scoped slot
Scoped slot
用域插槽其实就是一个带有数据的插槽,我们知道组件中的数据只能在对应的组件模板中使用,在其他地方无 法获取,那么要想在其他地方获取到该数据,就可以通过使用 slot-scope 来获取
通过 Scoped slot 可以获取到 row, column, $index 和 store(table 内部的状态管理)的数据,类似我们的pros
在中就已经把findAll()函数返回的数据对应的填充到table中,而我们使用slot-scope插槽可以随意拿取我们想要的数据
比如说去拿索引,或者是某一行
scope.$index 获取当前行下标
通过scope.row.属性名可以获取当前行对应的属性值
<el-table
    // 校验规则
  :data="tableData.filter(data => !search || data.name.toLowerCase().includes(search.toLowerCase()))"
  style="width: 100%" :height="400">
  <el-table-column
    label="编号"
    width="180">
    <template slot-scope="scope">  <!-- prop="id"-->
      <span style="margin-left: 10px">{

   { scope.row.id }}</span>
    </template>
  </el-table-column>
  <el-table-column
    label="姓名"
    width="180">
    <template slot-scope="scope">
      <el-popover trigger="hover" placement="top">
        <p>姓名: {

   { scope.row.name }}</p>
        <p>住址: {

   { scope.row.address }}</p>
        <div slot="reference" class="name-wrapper">
          <el-tag size="medium">{

   { scope.row.name }}</el-tag>
        </div>
      </el-popover>
    </template>
  </el-table-column>
  <el-table-column label="生日" prop="bir"></el-table-column>
  <el-table-column label="性别" prop="sex"></el-table-column>
  <el-table-column label="地址" prop="address"></el-table-column>
  <el-table-column
    align="right">
    <template slot="header" slot-scope="scope">
      <el-input
        v-model="search"
        size="mini"
        placeholder="输入关键字搜索"/>
    </template>
    <template slot-scope="scope">
      <el-button
        size="mini"
        @click="handleEdit(scope.$index, scope.row)">编辑
      </el-button>
      <el-popconfirm
        confirm-button-text='好的'
        cancel-button-text='不用了'
        icon="el-icon-info"
        icon-color="red"
        title="确定要删除当前用户吗?"
        @confirm="handleDelete(scope.$index, scope.row)">
        <!--@oncance="绑定取消方法"-->
        <el-button slot="reference" size="mini" type="danger">删除</el-button>
      </el-popconfirm>
    </template>
  </el-table-column>
</el-table>
3、我们在点击编辑按钮进行数据回显的时候,已经将该行的所有数据赋值到form对象中,
handleEdit(index, row) {


          console.log(row);
          this.show = true;
          this.form = row;//双向数据绑定,回显数据
        },
4、在data中我们并没有定义id这个属性,但是照样能够接受到,这是因为js是弱类型的(弱类型不需要事先声明变量的类型,因为它是全类型都可以使用的说白了弱类型就是指原先声明什么类型无所谓,只要给赋值一个新值,那么最终结果就是这个新值),我们只需要在data中定义一个form对象,附什么值都可以,在添加操作中我们没有赋值id,在更新操作中我们赋值了id,所以在发送saveOrUpdate请求中就可以判断有id的就是更新操作,没有id的就是添加操作
我们回到我们的编辑功能,上面说到要把添加功能接口跟更新功能接口合并进行复用,只需要判断是否有id即可
现在我们需要修改发送的保存用户信息按钮对应的axios请求
onSubmit(userForm) {


  console.log('submit!');
  this.$refs[userForm].validate((valid) => {


    if (valid) {


      this.$http.post("http://localhost:8989/vue/EUser/saveOrUpdate", this.form)
          .then(res => {


        if (res.data.status) {


          this.$message({


            message: '恭喜你,' + res.data.msg,
            type: 'success'
          });
          //清空表单信息
          this.form = {

    sex: '男'};
          //隐藏添加表单
          this.show = false;
          //调用刷新数据的方法
          this.findAll()
          // this.$router.push("/#users")
        } else {


          this.$message.error(res.data.msg);
        }
      })
    } else {


      this.$message.error("当前输入的数据不合法!!!")
      return false;
    }
  });
![[外链图片转存失败,源站可能有防盗链机制,建议将图片保存下来直接上传(img-thn27cgE-1616245610145)(Vue.assets/image-20210320161638238.png)]](https://img-blog.csdnimg.cn/20210320212116108.png?x-oss-process=image/watermark,type_ZmFuZ3poZW5naGVpdGk,shadow_10,text_aHR0cHM6Ly9ibG9nLmNzZG4ubmV0L3dlaXhpbl80NjE5NTk1Nw==,size_16,color_FFFFFF,t_70)
修改后端的添加接口
/**
 * 保存用户
 * @param eUser 用户实体类
 * @return 返回结果信息
 */
@PostMapping("saveOrUpdate")
public Result saveOrUpdate(@RequestBody EUser eUser) {


  Result result = new Result();

  try {


    if (StringUtils.isEmpty(eUser.getId())){


      eUserService.save(eUser);
      result.setMsg("用户信息保存成功!!!");
    }else {


      eUserService.update(eUser);
      result.setMsg("用户信息编辑成功");
    }

  } catch (Exception e) {


    e.printStackTrace();
    result.setStatus(false).setMsg("系统错误:保存用户失败,请稍后再试....");
  }
  return result;
}
7、添加表单验证
表单验证
表单验证就是通常在正常使用的系统中,我们会在用户操作页面设有两次数据验证,一次在后端,还有一次就是在前端了,我们可以借助element ui 提供的表单验证
| 参数 | 说明 | 类型 | 可选值 | 默认值 |
|---|---|---|---|---|
| hide-required-asterisk | 是否显示必填字段的标签旁边的红色星号 | boolean | — | false |
1、红色星号
一般的我们会在必填的表单字段前添加红色信号,在form attributes 中可以找到这属性
<el-form :hide-required-asterisk="false" :rules="rules" :model="form" label-width="80px" label-suffix=":">
2、rules规则
添加 hide-required-asterisk 后我们需要绑定一些rules规则,rules规则就是一个数据对象,直接放在data中就好了
rules: {


  name: [
    {

    required: true, message: '请输入用户名信息', trigger: 'blur'},
  ],
  bir: [
    {

    required: true, message: '请输入用户名出生日期', trigger: 'blur'},
  ],
  address: [
    {

    required: true, message: '请输入用户地址', trigger: 'blur'},
  ]
},
在rules中的name规则我们要应用到表单中的name字段,需要prop来标记规则名称
<el-form-item label="姓名" prop="name">  <!--在rules中匹配对应的名称-->
  <el-col :span="4">
    <el-input v-model="form.name"></el-input>
  </el-col>
</el-form-item>
3、验证失败拒绝提交事件
前面我们定义了校验规则,但是也只能起到一个提醒的作用,我们需要在验证不通过的情况下拒绝提交表单事件
首先我们需要给表单起一个别名,使用 ref="userForm"
<el-form :hide-required-asterisk="false" :rules="rules" ref="userForm" :model="form" label-width="80px" label-suffix=":">
在提交表单信息时,把ref的别名传入提交事件中
<el-button type="primary" @click="onSubmit('userForm')">保存用户信息</el-button>
onSubmit(userForm) {


  console.log('submit!');
  this.$refs[userForm].validate((valid) => {

      // 通过refs数组中的指定元素拿到对应的表单
    if (valid) {


      this.$http.post("http://localhost:8989/vue/EUser/saveOrUpdate", this.form)
          .then(res => {


        if (res.data.status) {


          this.$message({


            message: '恭喜你,' + res.data.msg,
            type: 'success'
          });
          //清空表单信息
          this.form = {

    sex: '男'};
          //隐藏添加表单
          this.show = false;
          //调用刷新数据的方法
          this.findAll()
          // this.$router.push("/#users")
        } else {


          this.$message.error(res.data.msg);
        }
      })
    } else {


      this.$message.error("当前输入的数据不合法!!!")
      return false;
    }
  });
![#### [外链图片转存失败,源站可能有防盗链机制,建议将图片保存下来直接上传(img-zRQ8DUgo-1616245610146)(Vue.assets/image-20210320170302844.png)]](https://img-blog.csdnimg.cn/20210320212153953.png?x-oss-process=image/watermark,type_ZmFuZ3poZW5naGVpdGk,shadow_10,text_aHR0cHM6Ly9ibG9nLmNzZG4ubmV0L3dlaXhpbl80NjE5NTk1Nw==,size_16,color_FFFFFF,t_70)
8、分页组件
同样我们还是使用element ui 提供好的分页组件
<el-pagination
    layout="prev, pager, next"
    :total="50">
  </el-pagination>
设置layout,表示需要显示的内容,用逗号分隔,布局元素会依次显示。prev表示上一页,next为下一页,pager表示页码列表,除此以外还提供了jumper和total,size和特殊的布局符号->,->后的元素会靠右显示,jumper表示跳页元素,total表示总条目数,size用于设置每页显示的页码数量。
这是我们最终修改后的分页组件,同时使用栅格布局
<el-row>
  <!-- 占12份,偏移12份 -->
  <el-col :span="12" :offset="12">
<!--分页工具组件-->
    <el-pagination style="margin: 15px 0px"
                   layout="prev, pager, next,jumper,total,sizes"
                   prev-text="上一页" next-text="下一页"
                   :page-size="size"
                   :current-page="pageNow"
                   :page-sizes="[2,4,8,10,16]"
                   @current-change="findPage"
                   @size-change="findSize"
                   :total="total"
                   background>
    </el-pagination>
  </el-col>
</el-row>
1、分页属性
| 参数 | 说明 | 类型 | 可选值 | 默认值 |
|---|---|---|---|---|
| background | 是否为分页按钮添加背景色 | boolean | — | false |
| page-size | 每页显示条目个数,支持 .sync 修饰符 | number | — | 10 |
| total | 总条目数 | number | — | — |
| page-count | 总页数,total 和 page-count 设置任意一个就可以达到显示页码的功能;如果要支持 page-sizes 的更改,则需要使用 total 属性 | Number | — | — |
| current-page | 当前页数,支持 .sync 修饰符 | number | — | 1 |
| page-sizes | 每页显示个数选择器的选项设置 | number[] | — | [10, 20, 30, 40, 50, 100] |
| prev-text | 替代图标显示的上一页文字 | string | — | — |
| next-text | 替代图标显示的下一页文字 | string | — | — |
size是每页默认显示的页码数
# 注意
 size的值一定得是page-sizes的其中一个元素
:page-size="size"
:page-sizes="[2,4,8,10,16]"
2、分页事件
| 事件名称 | 说明 | 回调参数 |
|---|---|---|
| size-change | pageSize 改变时会触发 | 每页条数 |
| current-change | currentPage 改变时会触发 | 当前页 |
| prev-click | 用户点击上一页按钮改变当前页后触发 | 当前页 |
| next-click | 用户点击下一页按钮改变当前页后触发 | 当前页 |
findSize(size) {

     //用来处理每页显示记录数目变化的方法  就是那个下拉框,如果改成8条/页,返回值就是8
  console.log(size);
  this.size=size;
},
findPage(page) {

    //用来处理分页的相关方法  点击哪一页就会得到哪一页的值
  console.log(page);
  this.page=page;
},
![[外链图片转存失败,源站可能有防盗链机制,建议将图片保存下来直接上传(img-LiD0VCKm-1616245610146)(Vue.assets/image-20210320194654255.png)]](https://img-blog.csdnimg.cn/20210320212248227.png?x-oss-process=image/watermark,type_ZmFuZ3poZW5naGVpdGk,shadow_10,text_aHR0cHM6Ly9ibG9nLmNzZG4ubmV0L3dlaXhpbl80NjE5NTk1Nw==,size_16,color_FFFFFF,t_70)
3、分页查询
@Mapper
@Repository
public interface UserDao {


  //分页查询  注意:基本类型的数据需要添加@Param注解进行参数绑定
  List<EUser> findByPage (@Param("start") Integer start,@Param("rows") Integer rows);

  //查询总条数
  Long findTotals();
}
public interface EUserService {


  //分页查询
  List<EUser> findByPage (Integer pageNow, Integer rows);

  //查询总条数
  Long findTotals();
}
@Service
@Transactional
public class EUserServiceImpl implements EUserService{


  @Autowired
  private EUserDao eUserDao;

  @Override
  public List<EUser> findByPage(Integer pageNow, Integer rows) {


    int start = (pageNow-1)*rows;
    return eUserDao.findByPage(start,rows);
  }

  @Override
  public Long findTotals() {


    return eUserDao.findTotals();
  }
}
<!--分页查询-->
    <select id="findByPage" resultType="EUser">
        select id, name, bir, sex, address
        from vue.element_user limit #{start},#{rows}
    </select>

<!--查询总条数-->
    <select id="findTotals" resultType="Long">
        select count(id) from vue.element_user
    </select>
</mapper>
/**
 * 分页查询方法
 */
@GetMapping("findByPage")
public Map<String,Object> findByPage(Integer pageNow,Integer pageSize){


  Map<String,Object> result = new HashMap<>();
  // 第一次访问时候两个参数的值都为0,我们需要设置默认参数
  pageNow = pageNow==null?1:pageNow;
  pageSize = pageSize==null?4:pageSize;
  List<EUser> users = userService.findByPage(pageNow, pageSize);
  Long totals = userService.findTotals();
  result.put("users",users);
  result.put("total",totals);

  return result;
}
修改前端查询所有的方法
data数据定义
data() {
  return {
    tableData: [],
    search: '',
    show: false,
    total: 0,
    size: "5",   // 每次默认显示5条
    pageNow: 1,  // 每次打开页面默认为1
    },
findAll(page, size) {


  page = page ? page : this.pageNow,
  size = size ? size : this.size;
  this.$http.get("http://localhost:8989/vue/EUser/findByPagepageNow="+page+"&pageSize="+size).then(res => {


    this.tableData = res.data.users;
    this.total = res.data.total;
  });
findSize(size) {

     //用来处理每页显示记录发生变化的方法
  console.log(size);
  this.size=size;
  // page不变,size变  当前页显示size条
  this.findAll(this.page,this.size)
},
findPage(page) {

    //用来处理分页的相关方法
  console.log(page);
  this.page=page;
  // page变,size不变  改变页数,每页显示条数不变
  this.findAll(page, this.size)
},
9、将前端项目进行打包部署
在webstrom的控制台执行npm run build
![[外链图片转存失败,源站可能有防盗链机制,建议将图片保存下来直接上传(img-Pu0DlNrH-1616245610147)(Vue.assets/image-20210320202937380.png)]](https://img-blog.csdnimg.cn/20210320212305974.png)
可以看到在项目目录下有个dist目录,直接把这个目录放到后端的static目录下
![[外链图片转存失败,源站可能有防盗链机制,建议将图片保存下来直接上传(img-HfHplypr-1616245610147)(Vue.assets/image-20210320203041576.png)]](https://img-blog.csdnimg.cn/20210320212314100.png)
![[外链图片转存失败,源站可能有防盗链机制,建议将图片保存下来直接上传(img-j99pBrf1-1616245610148)(Vue.assets/image-20210320203222073.png)]](https://img-blog.csdnimg.cn/20210320212321539.png?x-oss-process=image/watermark,type_ZmFuZ3poZW5naGVpdGk,shadow_10,text_aHR0cHM6Ly9ibG9nLmNzZG4ubmV0L3dlaXhpbl80NjE5NTk1Nw==,size_16,color_FFFFFF,t_70)
由于我们直接在static下有个index.html,所以我们可以直接以一个静态资源的方式进行一个访问
需要在application.properties下配置一个静态资源的路径
spring.web.resources.static-locations=classpath:/static/
这是用户管理组件的全代码
<template>
  <div>
    <el-table
      :data="tableData.filter(data => !search || data.name.toLowerCase().includes(search.toLowerCase()))"
      style="width: 100%" :height="400">
      <el-table-column
        label="编号"
        width="180" > <!-- prop="id"-->
        <template slot-scope="scope">
          <span style="margin-left: 10px">{

   { scope.row.id }}</span>
        </template>
      </el-table-column>
      <el-table-column
        label="姓名"
        width="180">
        <template slot-scope="scope">
          <el-popover trigger="hover" placement="top">
            <p>姓名: {

   { scope.row.name }}</p>
            <p>住址: {

   { scope.row.address }}</p>
            <div slot="reference" class="name-wrapper">
              <el-tag size="medium">{

   { scope.row.name }}</el-tag>
            </div>
          </el-popover>
        </template>
      </el-table-column>
      <el-table-column label="生日" prop="bir"></el-table-column>
      <el-table-column label="性别" prop="sex"></el-table-column>
      <el-table-column label="地址" prop="address"></el-table-column>
      <el-table-column
        align="right">
        <template slot="header" slot-scope="scope">
          <el-input
            v-model="search"
            size="mini"
            placeholder="输入关键字搜索"/>
        </template>
        <template slot-scope="scope">
          <el-button
            size="mini"
            @click="handleEdit(scope.$index, scope.row)">编辑
          </el-button>
          <el-popconfirm
            confirm-button-text='好的'
            cancel-button-text='不用了'
            icon="el-icon-info"
            icon-color="red"
            title="确定要删除当前用户吗?"
            @confirm="handleDelete(scope.$index, scope.row)">
            <!--@oncance="绑定取消方法"-->
            <el-button slot="reference" size="mini" type="danger">删除</el-button>
          </el-popconfirm>
        </template>
      </el-table-column>
    </el-table>

    <el-row>
      <!-- 占12份,偏移12份 -->
      <el-col :span="12" :offset="12">
    <!--分页工具组件-->
        <el-pagination style="margin: 15px 0px"
                       layout="prev, pager, next,jumper,total,sizes"
                       prev-text="上一页" next-text="下一页"
                       :page-size="size"
                       :current-page="pageNow"
                       :page-sizes="[2,4,8,10,16]"
                       @current-change="findPage"
                       @size-change="findSize"
                       :total="total"
                       background>
        </el-pagination>
      </el-col>
    </el-row>


    <el-button style="margin: 10px 0px;" @click="saveUserInfo" type="success" size="mini">添加</el-button>

    <!--      <div style="display: flex; margin-top: 20px; ">-->
    <transition name="el-zoom-in-center">
      <div v-show="show" class="transition-box">
        <el-form :hide-required-asterisk="false" :rules="rules" ref="userForm" :model="form" label-width="80px"
                 label-suffix=":">
          <el-form-item label="姓名" prop="name">  <!--在rules中匹配对应的名称-->
            <el-col :span="4">
              <el-input v-model="form.name"></el-input>
            </el-col>
          </el-form-item>

          <el-form-item label="生日" prop="bir">
            <el-col :span="4">
              <!--添加 value-format 防止出现少一天的时区问题-->
              <el-date-picker value-format="yyyy-MM-dd" type="date" placeholder="选择日期" v-model="form.bir" style="width: 100%;"></el-date-picker>
            </el-col>
          </el-form-item>
          <el-form-item label="性别">
            <el-radio-group v-model="form.sex">
              <el-radio label="男"></el-radio>
              <el-radio label="女"></el-radio>
            </el-radio-group>
          </el-form-item>
          <el-form-item label="地址" prop="address">
            <el-input type="textarea" v-model="form.address"></el-input>
          </el-form-item>
          <el-form-item>
            <el-button type="primary" @click="onSubmit('userForm')">保存用户信息</el-button>
            <el-button>取消</el-button>
          </el-form-item>
        </el-form>
      </div>
    </transition>
  </div>
</template>

  <script>
    export default {


      name: "List",
      data() {


        return {


          tableData: [],
          search: '',
          show: false,
          total: 0,
          size: "5",
          pageNow: 1,
          form: {


            /*name: '',
            bir: '',
            sex: '男',
            address: '',
            id:''*/

          },
          rules: {


            name: [
              {

     required: true, message: '请输入用户名信息', trigger: 'blur'},
            ],
            bir: [
              {

     required: true, message: '请输入用户名出生日期', trigger: 'blur'},
            ],
            address: [
              {

     required: true, message: '请输入用户地址', trigger: 'blur'},
            ]
          },
        }
      },

      methods: {


        findSize(size) {

      //用来处理每页显示记录发生变化的方法
          console.log(size);
          this.size=size;
          // page不变,size变  当前页显示size条
          this.findAll(this.page,this.size)
        },
        findPage(page) {

     //用来处理分页的相关方法
          console.log(page);
          this.page=page;
          // page变,size不变  改变页数,每页显示条数不变
          this.findAll(page, this.size)
        },
        saveUserInfo() {

      //点击添加时的信息处理
          this.show = !this.show;
          this.form = {

     sex: '男'};
        },
        findAll(page, size) {


          page = page ? page : this.pageNow,
            size = size ? size : this.size;
          this.$http.get("http://localhost:8989/vue/EUser/findByPage?pageNow="+page+"&pageSize="+size).then(res => {


            this.tableData = res.data.users;
            this.total = res.data.total;
          });
        },
        onSubmit(userForm) {


          console.log('submit!');
          this.$refs[userForm].validate((valid) => {


            if (valid) {


              this.$http.post("http://localhost:8989/vue/EUser/saveOrUpdate", this.form).then(res => {


                if (res.data.status) {


                  this.$message({


                    message: '恭喜你,' + res.data.msg,
                    type: 'success'
                  });
                  //清空表单信息
                  this.form = {

     sex: '男'};
                  //隐藏添加表单
                  this.show = false;
                  //调用刷新数据的方法
                  this.findAll()
                  // this.$router.push("/#users")
                } else {


                  this.$message.error(res.data.msg);
                }
              })
            } else {


              this.$message.error("当前输入的数据不合法!!!")
              return false;
            }
          });
          //发送axios请求

        },
        handleEdit(index, row) {


          console.log(row);
          this.show = true;
          this.form = row;//双向数据绑定,回显数据
        },
        handleDelete(index, row) {


          this.$http.get("http://localhost:8989/vue/EUser/delete?id=" + row.id).then(res => {


            if (res.data.status) {


              this.$message({


                message: '名字为:' + row.name + res.data.msg,
                type: 'success',
              });
              //刷新表格数据
              this.findAll();
            } else {


              this.$message.error(res.data.msg);
            }
          })
        }
      },
      created() {


        this.findAll()
      }
    }
  </script>

<style scoped>
  .transition-box {


    margin-bottom: 10px;
    width: 100%;
    height: 600px;
    border-radius: 4px;
    /*background-color: #409EFF;*/
    /*text-align: center;*/

    padding: 40px 20px;
    box-sizing: border-box;
    margin-right: 20px;
  }
</style>
喜欢的可以点赞跟关注,并留下你宝贵的意见!
欢迎私聊我,一起沟通学习进步!