- 缓存设计
- 为了提高查询性能,使用快速存取设备:内存
- 将缓存推到里用户最近的地方
- 脏缓存清理
- 多级缓存
- redis缓存
- 热点内存本地缓存
- nginx proxy cache缓存
- nginx lua缓存
- redis缓存模式
- 单机模式
- sentinel哨兵模式
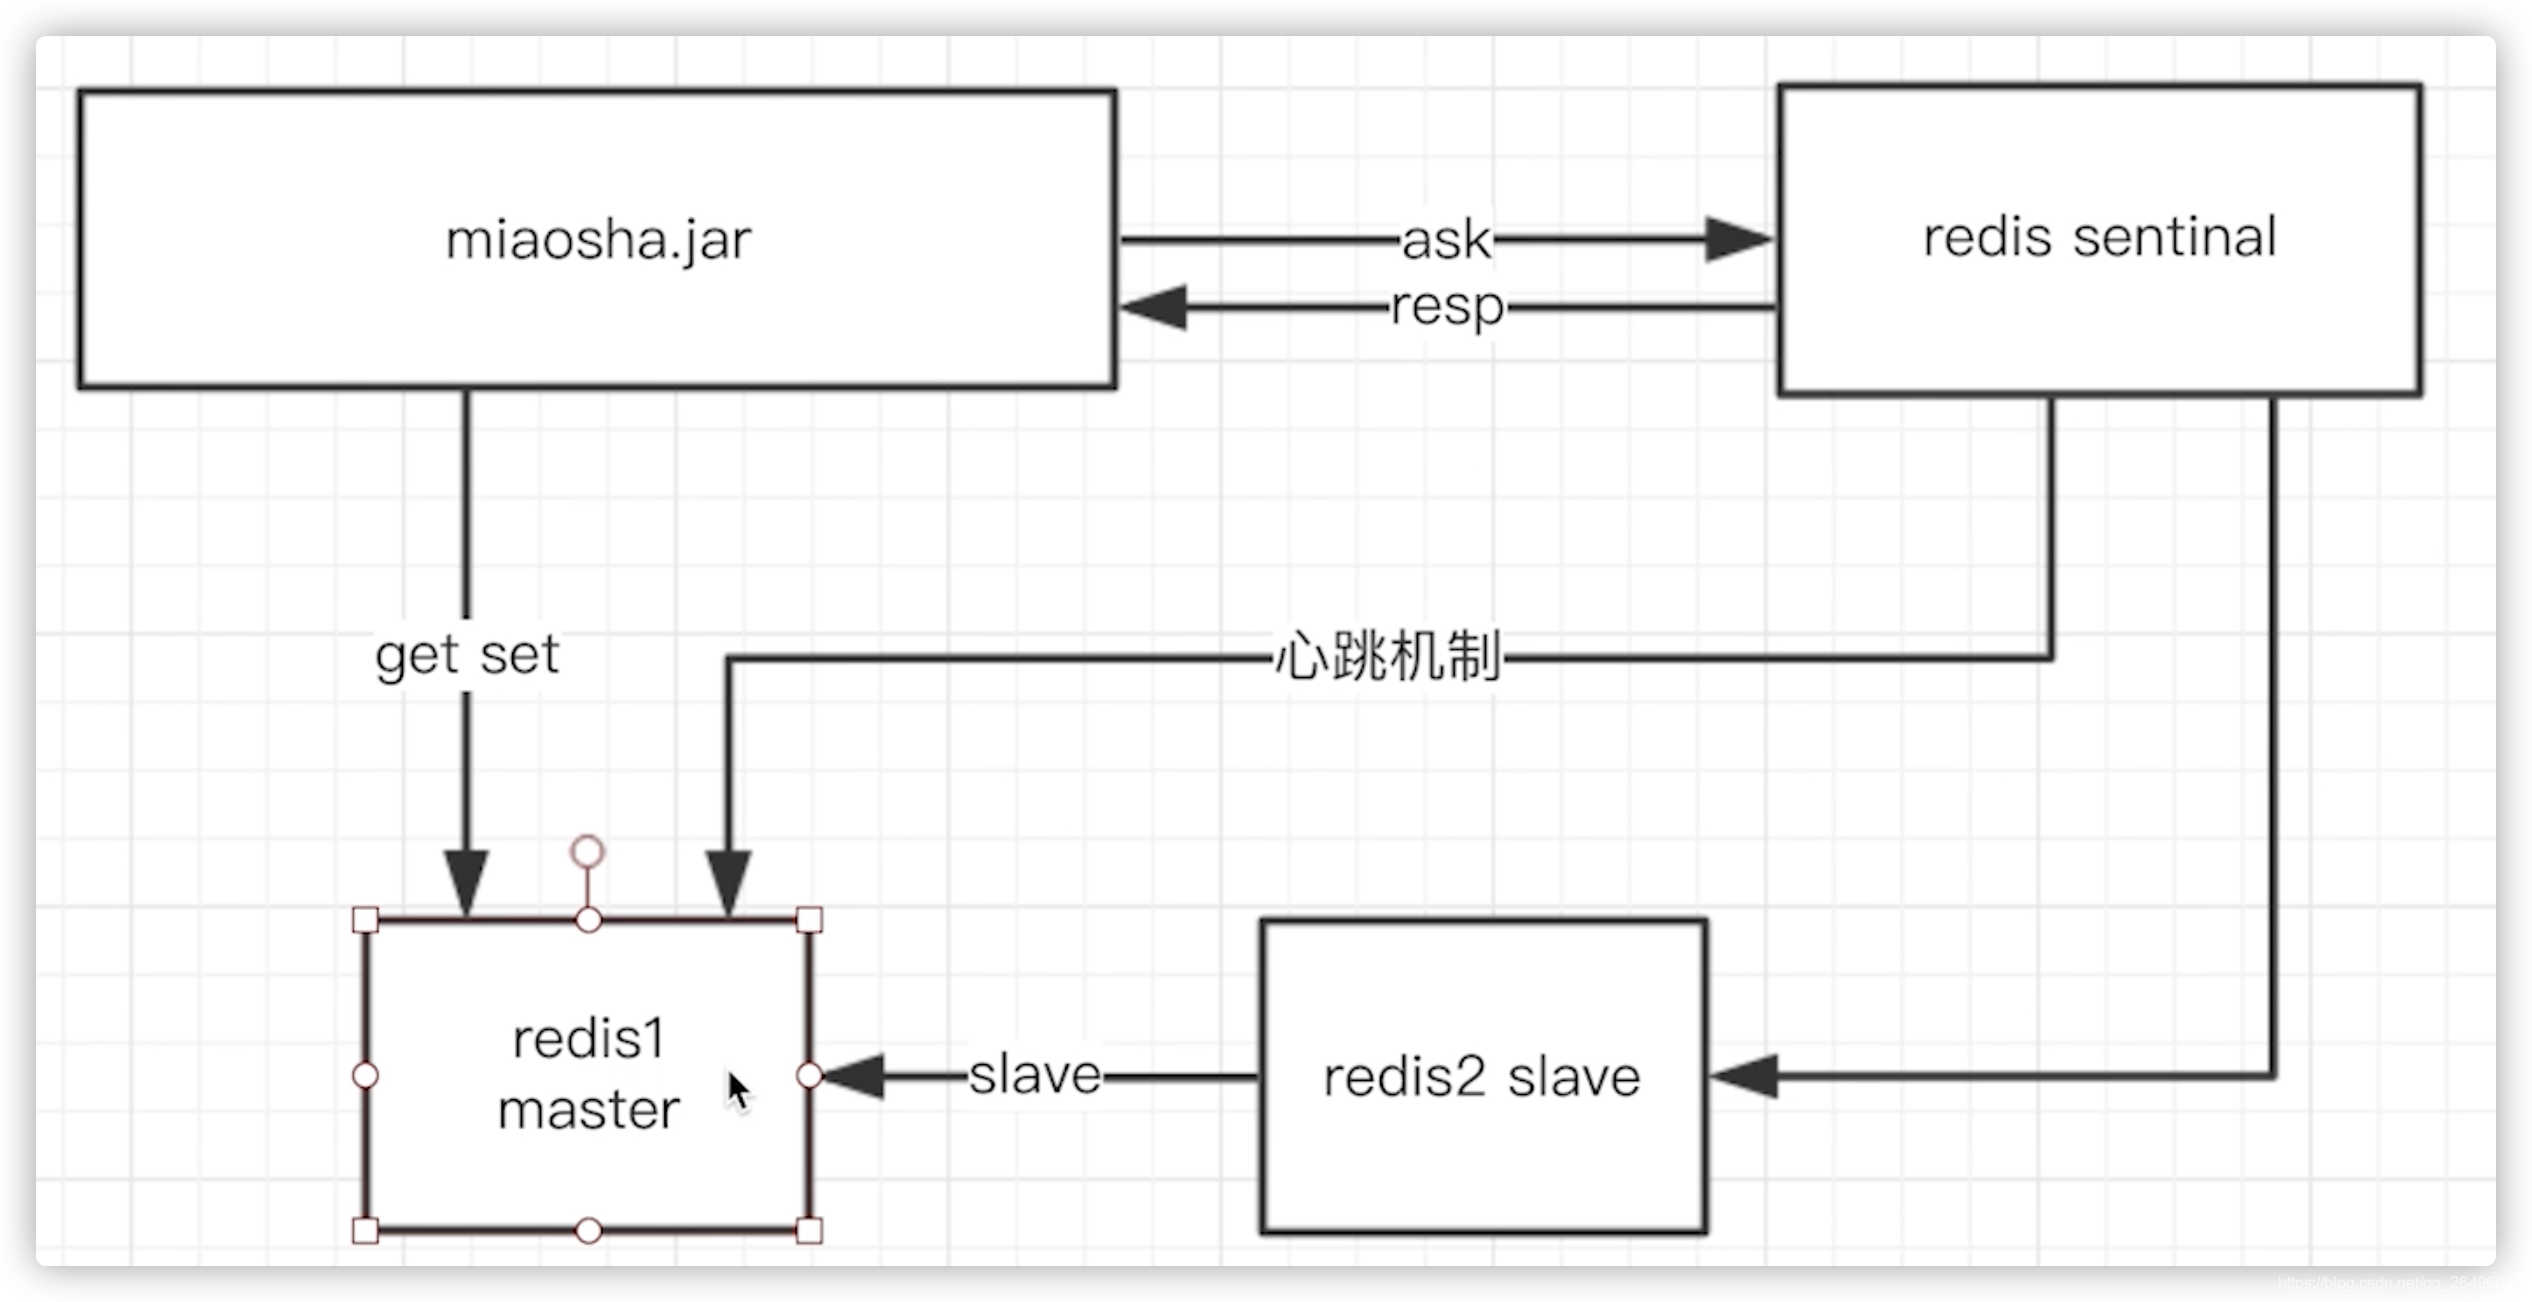
- 哨兵通过心跳机制监控主从redis是否宕机,应用服务器询问sentinel哨兵哪台是master redis,并从master redis中执行set和get操作,当master redis宕机后,便进行master redis和slave redis切换.
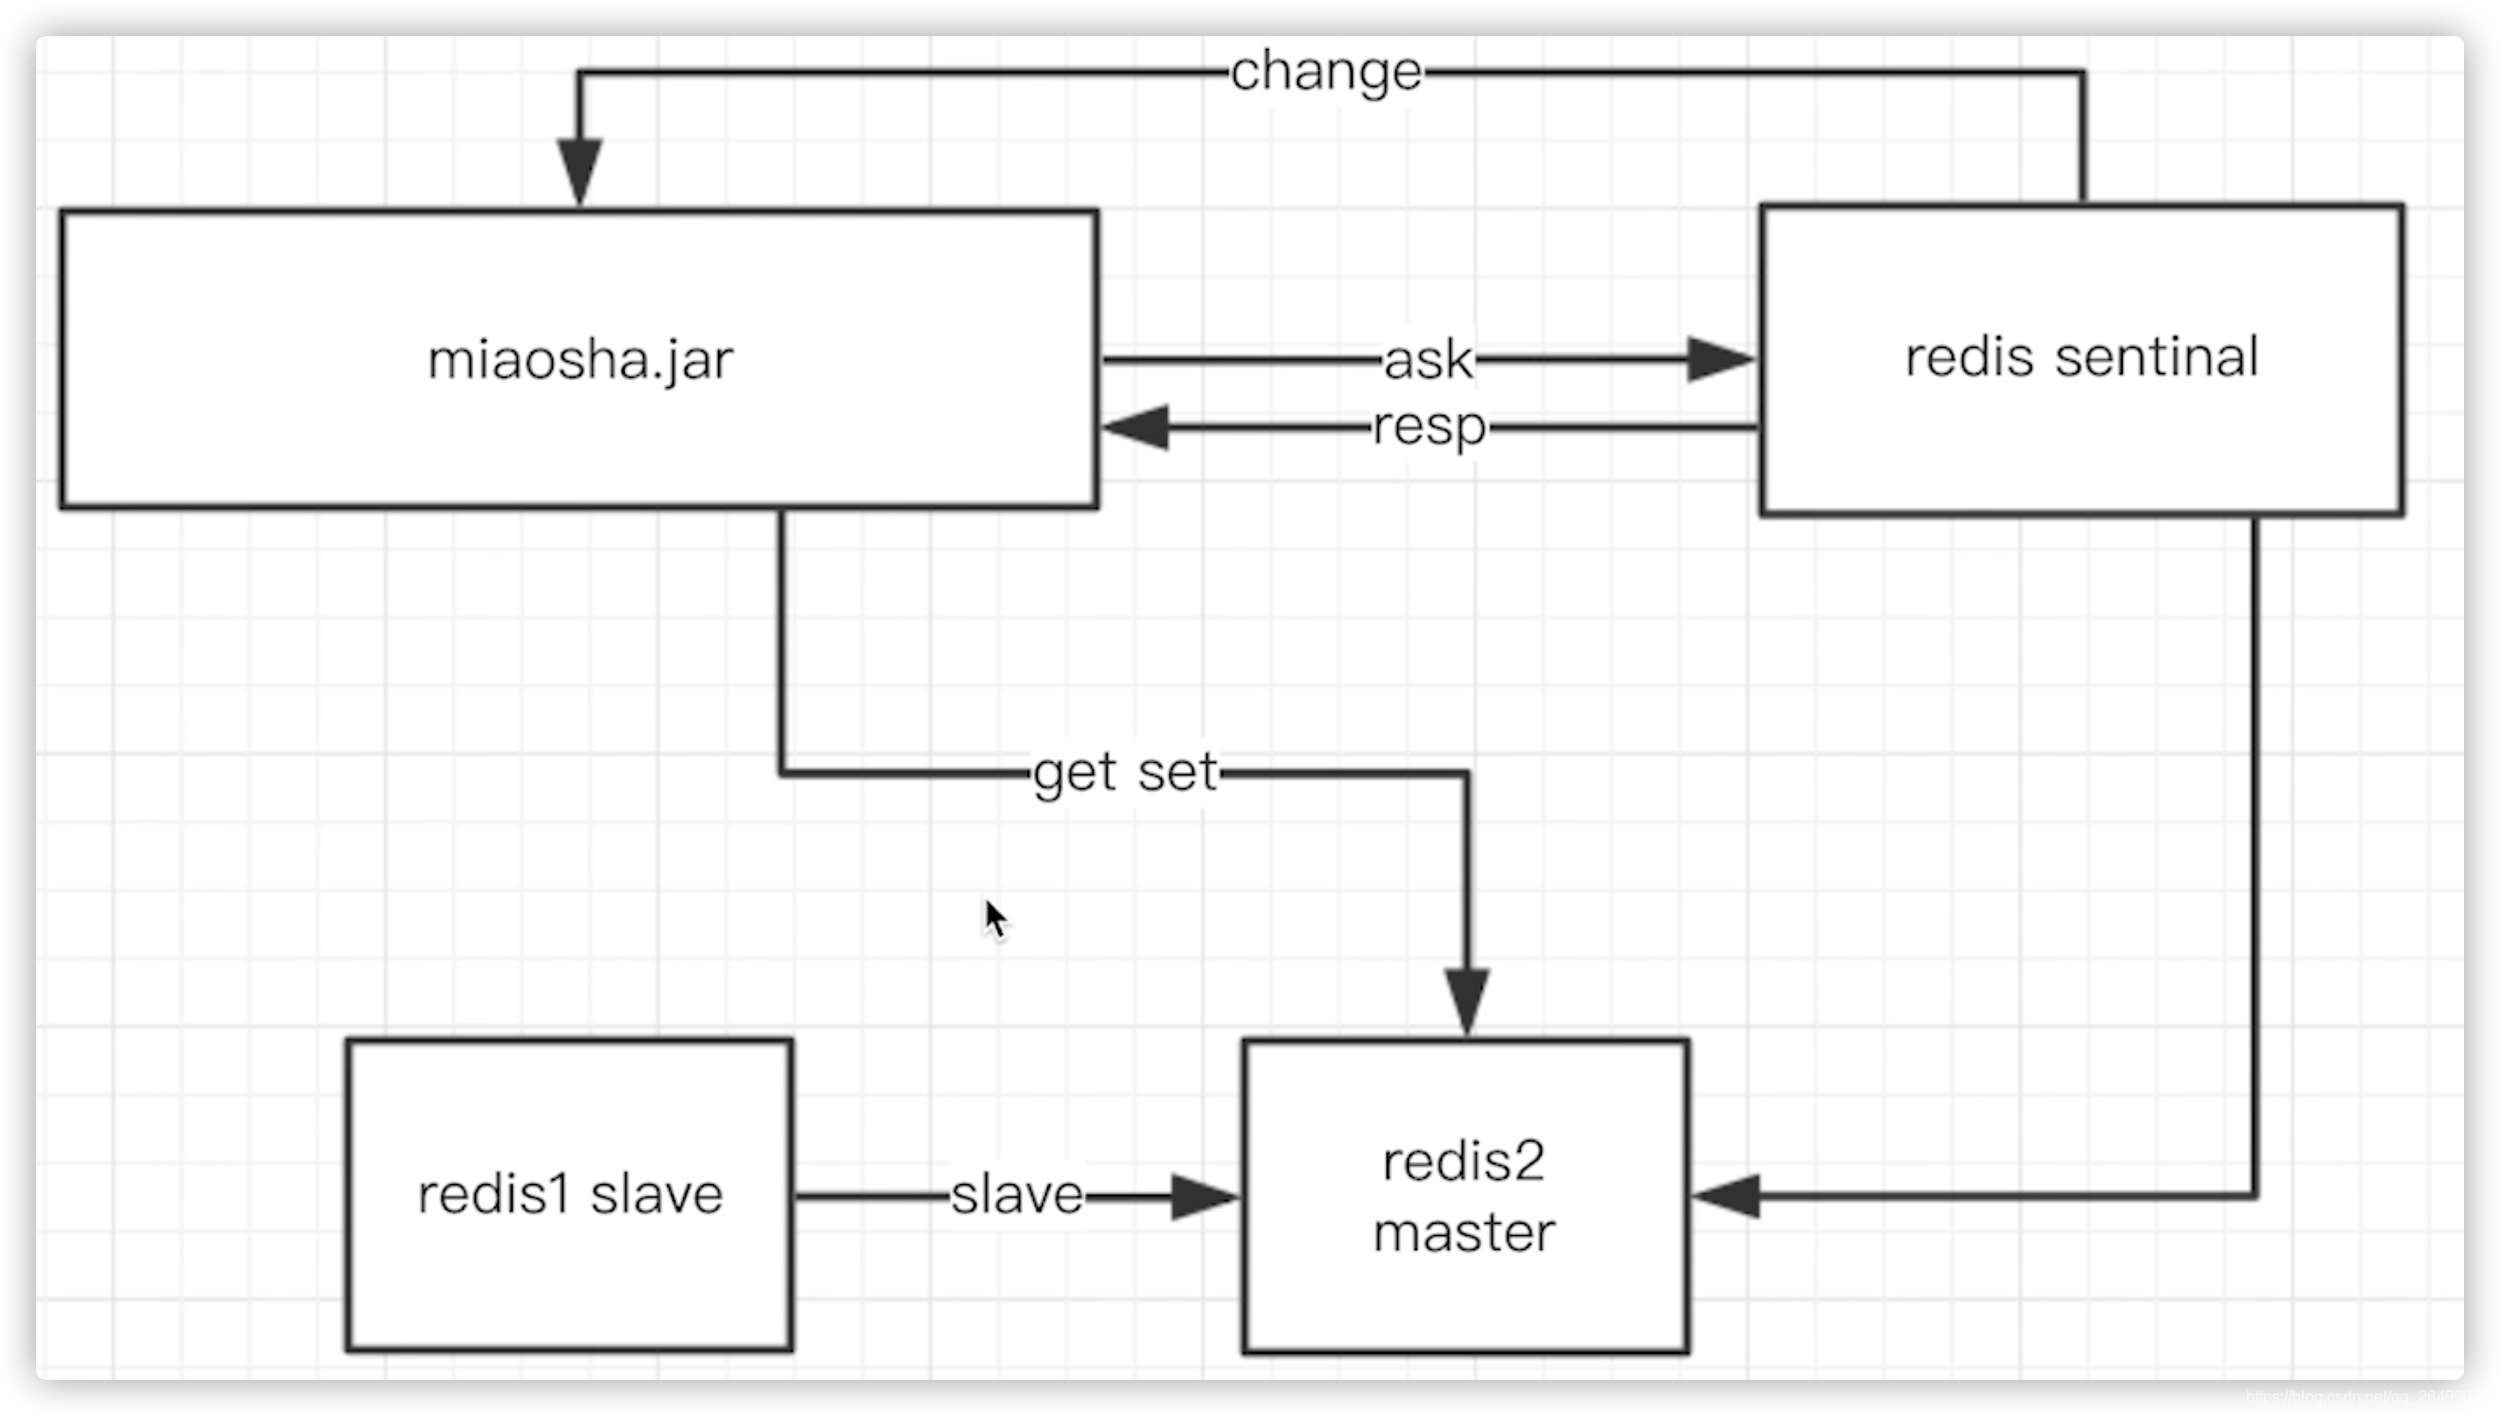
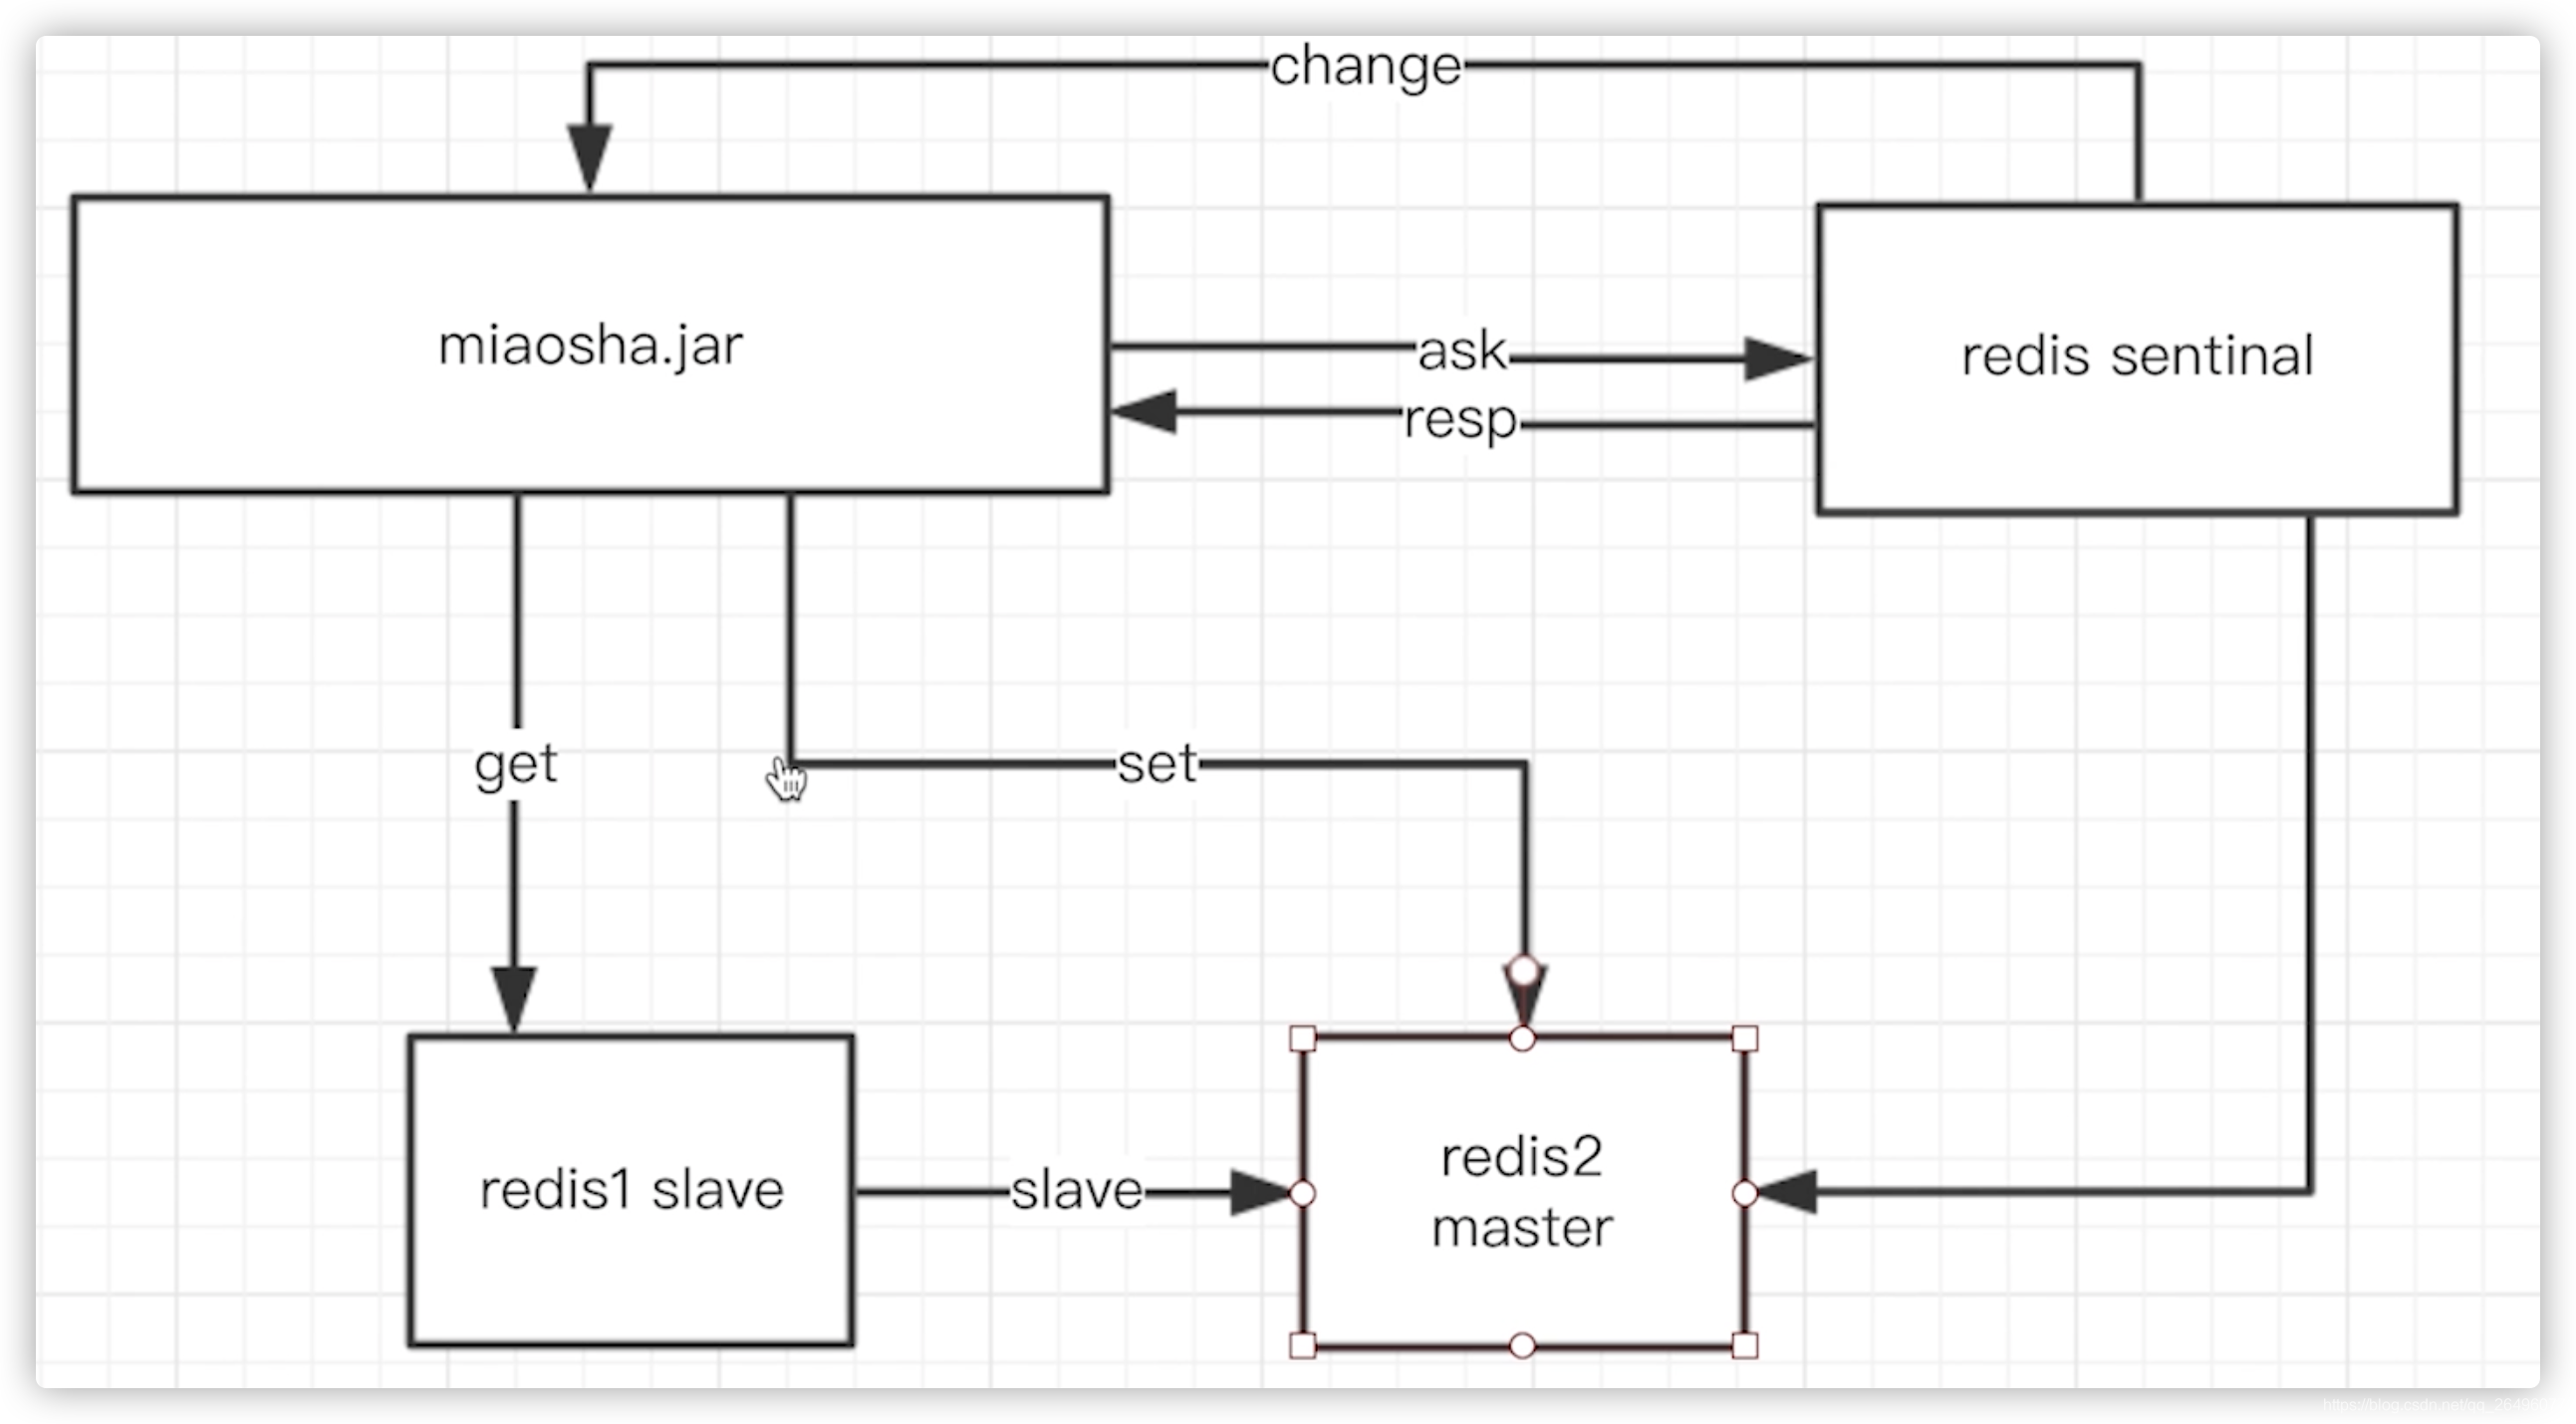
- 读写分离的哨兵模式
- 哨兵通过心跳机制监控主从redis是否宕机,应用服务器询问sentinel哨兵哪台是master redis,并从master redis中执行set和get操作,当master redis宕机后,便进行master redis和slave redis切换.
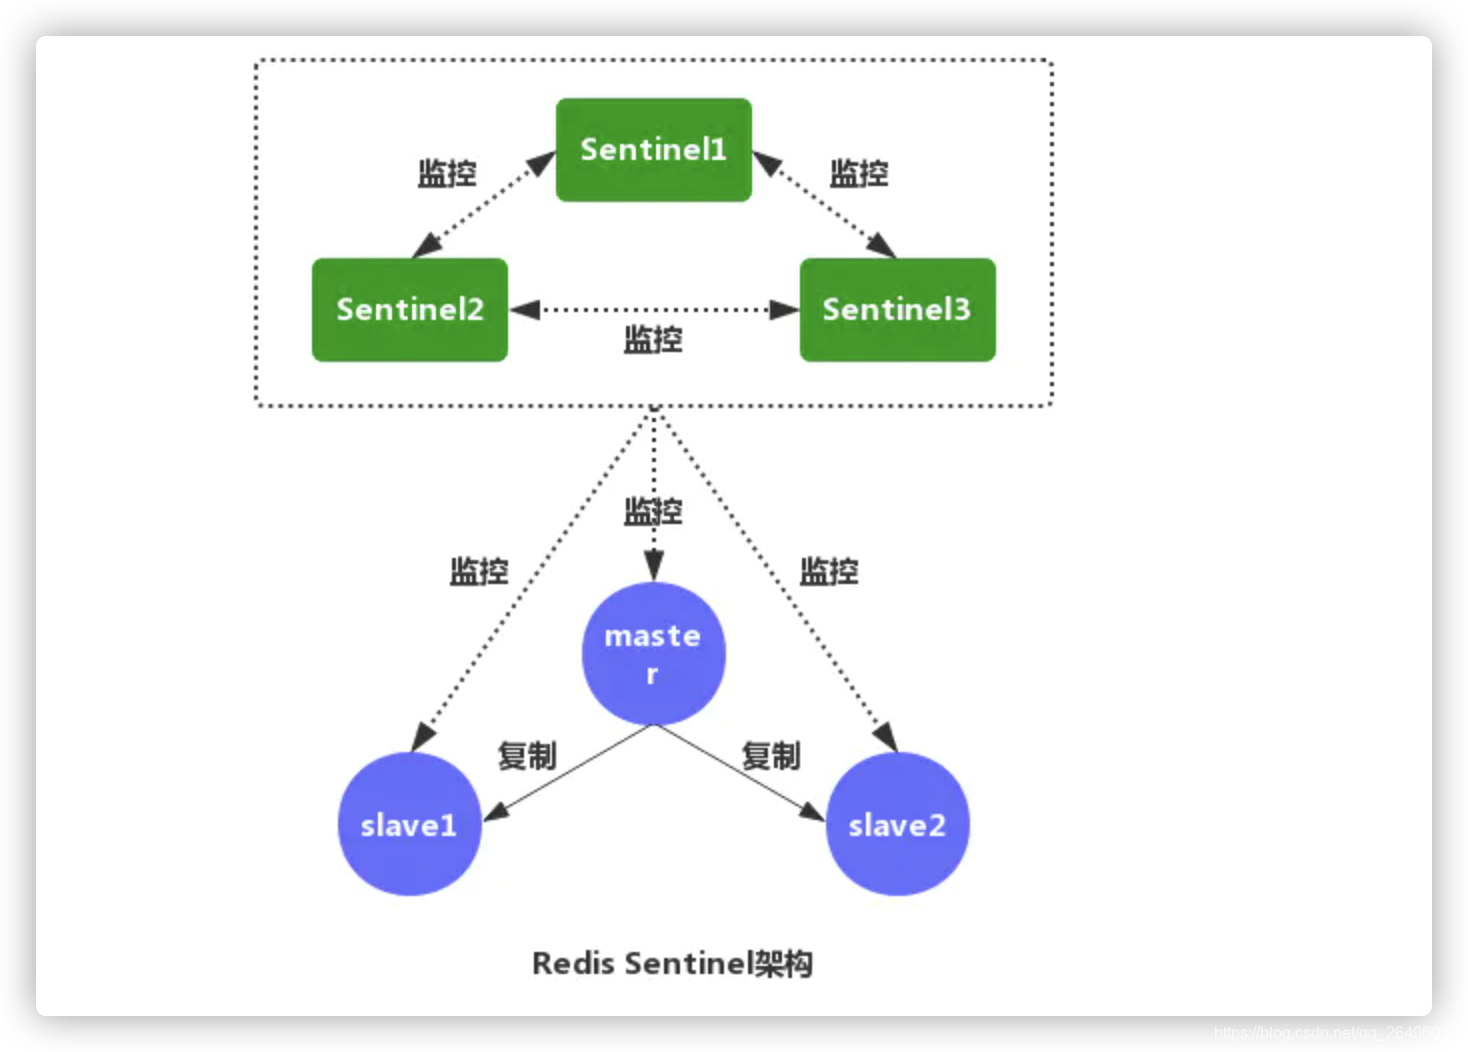
- 那么sentinel哨兵出现故障呢?
实际上,sentinel哨兵也是一个集群,sentinel哨兵监控redis集群以及互相监控,并通过投票方式决定master redis.
- cluster集群模式
- 简单hash算法
- 一致性hash算法
- redis cluster 的 hash slot 算法
redis集群模式参考链接
- 商品详情页redis缓存实现
-
思想
在controller层引入redis,如果能够在redis中查询到相应数据则返回,否则调用service层、dao层,从数据库中查询. -
代码实现
-
ItemController.java
@RestController @RequestMapping("/item") @CrossOrigin(origins = { "*"}, allowCredentials = "true") public class ItemController extends BaseController{ @Resource private RedisTemplate redisTemplate; @GetMapping(value = "/get") public CommonReturnType getItem(@RequestParam("id") Integer id){ ItemModel itemModel = (ItemModel)redisTemplate.opsForValue().get("item_" + id); if(itemModel == null) { itemModel = itemService.getItemById(id); redisTemplate.opsForValue().set("item_" + id, itemModel); redisTemplate.expire("item_" + id, 10, TimeUnit.MINUTES); } ItemVO itemVO = convertVOFromModel(itemModel); return CommonReturnType.create(itemVO); } } -
效果展示
当执行第一次代码从redis中获取的itemModel为空,从数据库中查询数据,并将itemModel放入redis中,第二次查询则从redis中获取.
-
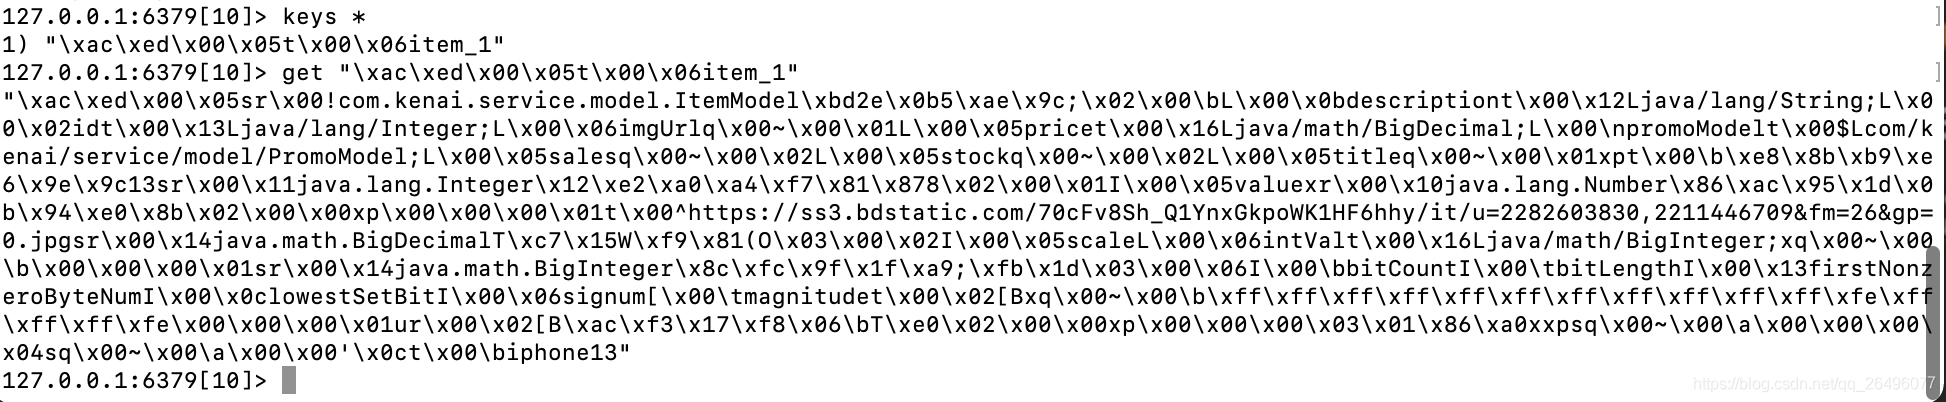
由于存入redis中的数据要经过序列化,默认序列化后的形式如下,不方便调试,所以改进如下:
-
定制化redisTemplate: RedisConfig.java
package com.kenai.config;
import com.fasterxml.jackson.databind.ObjectMapper;
import com.fasterxml.jackson.databind.module.SimpleModule;
import com.kenai.serializer.JodaDateTimeJsonDeserializer;
import com.kenai.serializer.JodaDateTimeJsonSerializer;
import org.joda.time.DateTime;
import org.springframework.context.annotation.Bean;
import org.springframework.data.redis.connection.RedisConnectionFactory;
import org.springframework.data.redis.core.RedisTemplate;
import org.springframework.data.redis.serializer.Jackson2JsonRedisSerializer;
import org.springframework.data.redis.serializer.StringRedisSerializer;
import org.springframework.session.data.redis.config.annotation.web.http.EnableRedisHttpSession;
import org.springframework.stereotype.Component;

// 把当前类对象作为一个bean存入spirng容器
@Component
// maxInactiveIntervalInSeconds: 设置 Session 失效时间(默认1800,即30分钟,单位秒),使用Redis Session 之后,原SpringBoot的server.session.timeout属性不再生效。
@EnableRedisHttpSession(maxInactiveIntervalInSeconds = 3600)
public class RedisConfig {


    // 定制化RedisTemplate
    @Bean
    public RedisTemplate redisTemplate(RedisConnectionFactory redisConnectionFactory){


        RedisTemplate redisTemplate = new RedisTemplate();
        redisTemplate.setConnectionFactory(redisConnectionFactory);
        // 解决key的序列化方式
        StringRedisSerializer stringRedisSerializer = new StringRedisSerializer();
        redisTemplate.setKeySerializer(stringRedisSerializer);

        // 解决value的序列化方式,springmvc中默认使用jackson解析json
        Jackson2JsonRedisSerializer jackson2JsonRedisSerializer = new Jackson2JsonRedisSerializer(Object.class);
        ObjectMapper objectMapper = new ObjectMapper();
        // 定制化序列化和反序列化方法
        SimpleModule simpleModule = new SimpleModule();
        simpleModule.addSerializer(DateTime.class, new JodaDateTimeJsonSerializer());
        simpleModule.addDeserializer(DateTime.class, new JodaDateTimeJsonDeserializer());
        // 指定序列化的输入类型
        objectMapper.enableDefaultTyping(ObjectMapper.DefaultTyping.NON_FINAL);
        objectMapper.registerModule(simpleModule);
        // 注册到jackson2JsonRedisSerializer容器中
        jackson2JsonRedisSerializer.setObjectMapper(objectMapper);
        redisTemplate.setValueSerializer(jackson2JsonRedisSerializer);
        return redisTemplate;
    }
}
- JodaDateTimeJsonDerializer.java
package com.kenai.serializer;
import com.fasterxml.jackson.core.JsonGenerator;
import com.fasterxml.jackson.databind.JsonSerializer;
import com.fasterxml.jackson.databind.SerializerProvider;
import org.joda.time.DateTime;
import java.io.IOException;

public class JodaDateTimeJsonSerializer extends JsonSerializer<DateTime> {


    @Override
    public void serialize(DateTime dateTime, JsonGenerator jsonGenerator, SerializerProvider serializerProvider) throws IOException {


        jsonGenerator.writeString(dateTime.toString("yyyy-MM-dd HH:mm:ss"));
    }
}
-
JodaDateTimeJsonDeserializer.java
package com.kenai.serializer; import com.fasterxml.jackson.core.JsonParser; import com.fasterxml.jackson.core.JsonProcessingException; import com.fasterxml.jackson.databind.DeserializationContext; import com.fasterxml.jackson.databind.JsonDeserializer; import org.joda.time.DateTime; import org.joda.time.format.DateTimeFormat; import org.joda.time.format.DateTimeFormatter; import java.io.IOException; public class JodaDateTimeJsonDeserializer extends JsonDeserializer<DateTime> { @Override public DateTime deserialize(JsonParser jsonParser, DeserializationContext deserializationContext) throws IOException, JsonProcessingException { String dateString = jsonParser.readValueAs(String.class); DateTimeFormatter dateTimeFormatter = DateTimeFormat.forPattern("yyyy-MM-dd HH:mm:ss"); return DateTime.parse(dateString, dateTimeFormatter); } } -
效果展示

-
可见,存入redis中的key-val效果更加清晰,其中""是转义字符.
-
-
jmeter进行压测
-
实验环境: 线程数2000, ramp-up:10, 循环次数20
-
使用redis缓存前的效果: 平均值: 1194ms, 95值: 1327ms, 吞吐量TPS: 1073/sec.

-
使用redis缓存后第一次压测的效果: 平均值452ms, 95值604ms, 吞吐量TPS: 1784/sec

-
使用redis缓存后第二次压测效果: 平均值264ms, 95值135ms, 吞吐量TPS: 1861/sec, TPS峰值达到2280/sec(可能是因为第一次压测需要从数据库中获取数据,第二次压测纯从redis中获取数据)

-
可见,使用redis后效果提升很大
-
压测中碰到的问题: 压测效果不理想
-
原因剖析: linux有一个kernel参数: net.core.somaxconn,表示socket监听(listen)的backlog上限。backlog是socket的监听队列,当一个请求(request)尚未被处理或建立时,他会进入backlog。而socket server可以一次性处理backlog中的所有请求,处理后的请求不再位于监听队列中。当server处理请求较慢,以至于监听队列被填满后,新来的请求会被拒绝。
-
解决办法: 修改/etc/sysctl.conf,然后执行sysctl -p命令
net.core.somaxconn= 2048
-
-
压测中碰到的问题: redis启动警告/报错
解决办法
-
- 本地热点缓存(缓存放在应用服务器)
-
本地热点缓存特点
- 存储热点数据
不可能将所有访问的数据都放到内存中,内存空间资源非常宝贵 - 脏读非常不敏感
对于分布式的应用服务器来说,如果数据经常修改,那么本地热点数据需要经常更新,浪费资源,还会造成延时. - 内存可控
内存宝贵,热点数据大小要控制在一定范围内. - 内存可控+脏读不敏感决定了热点数据的生命周期比较短,要比redis中数据的生命周期短很多,因为redis中数据修改比较容易.
- 存储热点数据
-
实现方案: Guava cache(本质是key-value键值对)
-
Guava cache特点
- 可控制key-value的大小和超时时间
- 可配置的lru策略
- 线程安全
-
引入guava依赖
<!-- 用户简化开发,用于缓存,基本工具集、集合类等--> <dependency> <groupId>com.google.guava</groupId> <artifactId>guava</artifactId> <version>18.0</version> </dependency> -
CacheService.interface
package com.kenai.service; /** * 封装本地缓存操作类 */ public interface CacheService { // 存方法 void setCommonCache(String key, Object value); // 取方法 Object getFromCommonCache(String key); } -
CacheServiceImpl.java
package com.kenai.service.impl; import com.google.common.cache.Cache; import com.google.common.cache.CacheBuilder; import com.kenai.service.CacheService; import org.springframework.stereotype.Service; import javax.annotation.PostConstruct; import java.util.concurrent.TimeUnit; @Service public class CacheServiceImpl implements CacheService { private Cache<String, Object> commonCache = null; // 在构造器后执行,在init()方法前面执行,只被服务器执行一次 @PostConstruct public void init(){ commonCache = CacheBuilder.newBuilder() // 设置缓存容器的初始容量为10 .initialCapacity(10) // 缓存中最多可以存储100个key,超出则按照LRU算法移除最近最少使用的缓存 .maximumSize(100) // 设置写缓存后多长时间过期 .expireAfterWrite(1, TimeUnit.MINUTES).build(); } @Override public void setCommonCache(String key, Object value) { commonCache.put(key, value); } @Override public Object getFromCommonCache(String key) { return commonCache.getIfPresent(key); } } -
ItemController.java
public class ItemController extends BaseController{ ... @Resource private CacheService cacheService; @GetMapping(value = "/get") public CommonReturnType getItem(@RequestParam("id") Integer id){ ItemModel itemModel = null; // 先取本地缓存 itemModel = (ItemModel)cacheService.getFromCommonCache("item_" + id); if(itemModel == null){ // 若本地缓存不存在,从redis中取 itemModel = (ItemModel)redisTemplate.opsForValue().get("item_" + id); if(itemModel == null) { // 若redis中也不存在,则从数据库中取 itemModel = itemService.getItemById(id); redisTemplate.opsForValue().set("item_" + id, itemModel); redisTemplate.expire("item_" + id, 10, TimeUnit.MINUTES); } // 填充本地缓存 cacheService.setCommonCache("item_" + id, itemModel); } ItemVO itemVO = convertVOFromModel(itemModel); return CommonReturnType.create(itemVO); } } -
运行项目,执行两次get请求,第一次本次缓存itemModel为空,第二次有数据(服务器一停止,内存中的本地缓存数据就没了).
-
-
将项目部署到云端服务器
-
本地缓存压测
- 实验环境: 线程数2000, ramp-up:10, 循环次数20
- 使用本地热点缓存后压测效果: 平均值263ms, 95值128ms, 吞吐量TPS: 1965/sec, TPS峰值2340/sec(不太稳定,每次测得不一样,这也正常).

- nginx proxy cache缓存实现(缓存放在nginx服务器)
-
缓存放在nginx服务器原因
nginx服务器离客户端更近,节省网络等开销,离客户端越近就越快. -
主要思想
nginx proxy cache缓存的数据放在磁盘中,key(比如将请求的url作为key)放在内存中,nginx取这个key的md5作为缓存文件,从后往前取相应的位数作为缓存目录.从而根据访问的uri得到请求数据具体存放的位置. -
前提条件
-
nginx反向代理前置
也就是满足nginx配置反向代理,如果nginx不是反向代理,那么要nginx就没有用了,直接请求服务器好了. -
依靠文件系统存储索引级的文件
将请求作为一个文件存储在nginx服务器中,下次请求过来看是否有该请求文件即可. -
依靠内存缓存文件地址
缓存的key存放在内存当中,并在内存中存放key对应value的地址,实际的vlaue内容存放在磁盘中.
-
-
nginx proxy cache操作
-
nginx.conf
# 设置缓存路径和配置 # levels: 缓存目录级别,1:2表示二级目录,1和2表示用1位和2位16进制来命名目录名称。所以一级目录数有16个,二级目录数有16*16=256个。 # 具体操作是对uri作hash操作,取某位作为一级目录和二级目录索引,这样文件会被分散到多个目录中,减少寻址消耗,如果放到同一目录下就会冲突,然后遍>历,复杂度O(n) # inactive:指定了项目在不被访问的情况下能够在内存中保持的时间,为7天 # 内存中分配100m给tmp_cache用于存放key # max_size=10g: 缓存的上限为10g,超出的话会移除最近最少使用的文件 proxy_cache_path /usr/local/openresty/nginx/tmp_cache levels=1:2 keys_zone=tmp_cache:100m inactive=7d max_size=10g; # url请求路径中没有resources的其他请求按下面方式处理 location / { # 设置被代理server的协议和地址,backend_server在上面指定 proxy_pass http://backend_server; # 启用缓存 proxy_cache tmp_cache; # 使用uri作为nginx proxy cache的key proxy_cache_key $uri; # 只有当向后端服务器发送请求(说明没有缓存),并且后端服务器返回的状态码是200/206/304/302,才会缓存.缓存周期是7天 proxy_cache_valid 200 206 304 302 10d; ... } -
重启nginx
./nginx -s reload
-
-
nginx proxy cache压测
- 实验环境: 线程数2000, ramp-up:10, 循环次数20
- 压测效果: 平均值1ms, 95值2ms, 吞吐量TPS: 3983/sec.

- 总结: 效果太强了
- nginx lua原理
-
lua协程机制
- 依附于线程的内存模型,切换开销小
- 遇堵塞及时归还执行权,代码同步
- 无需加锁
-
nginx协程
- nginx协程机制的每一个worker进程都是在epoll或kqueue这种事件模型之上,封装成协程.
- 每一个请求都由一个协程负责处理
- 即使ngx_lua必须要运行lua,相对C语言来说有一定的开销,但依旧能保证高并发能力.
-
nginx协程机制
- nginx每个工作进程创建一个lua虚拟机,用来跑lua脚本文件
- 工作进程中的所有协程共享同一个lua虚拟机.
- 每个外部请求由一个lua协程处理,它们之间数据隔离
- lua代码调用io等异步接口时,协程被挂起,上下文数据保持不变
- 自动保存,不堵塞工作进程
- io异步操作完成后还原协程上下文,代码继续执行
-
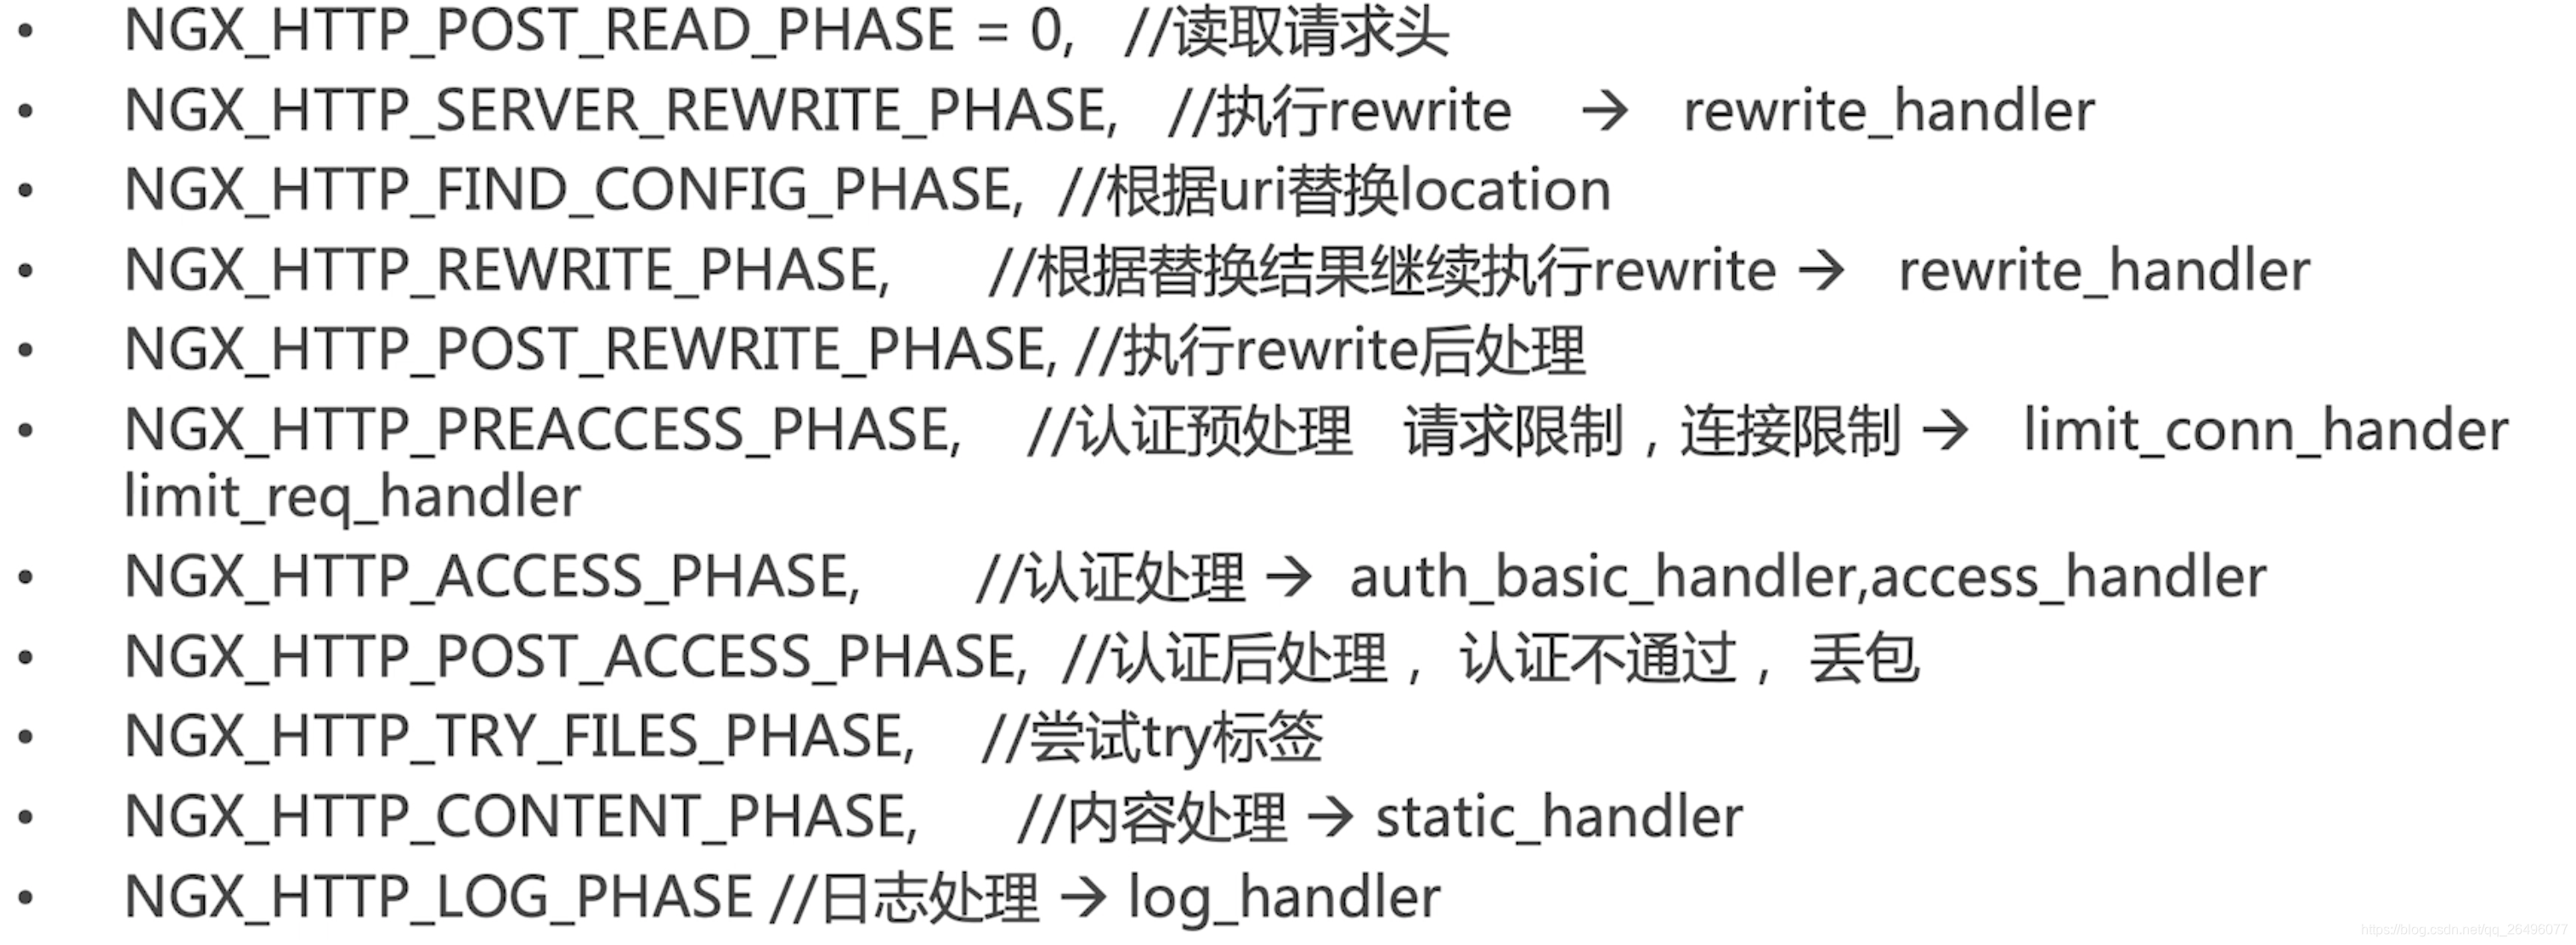
nginx处理阶段
-
nginx lua插载点

其中最常用的是content_by_lua.
作用: 修改location固定的url对应的lua编程,使用lua脚本的方式处理请求,而不用访问后端服务器.
- nginx lua实战
-
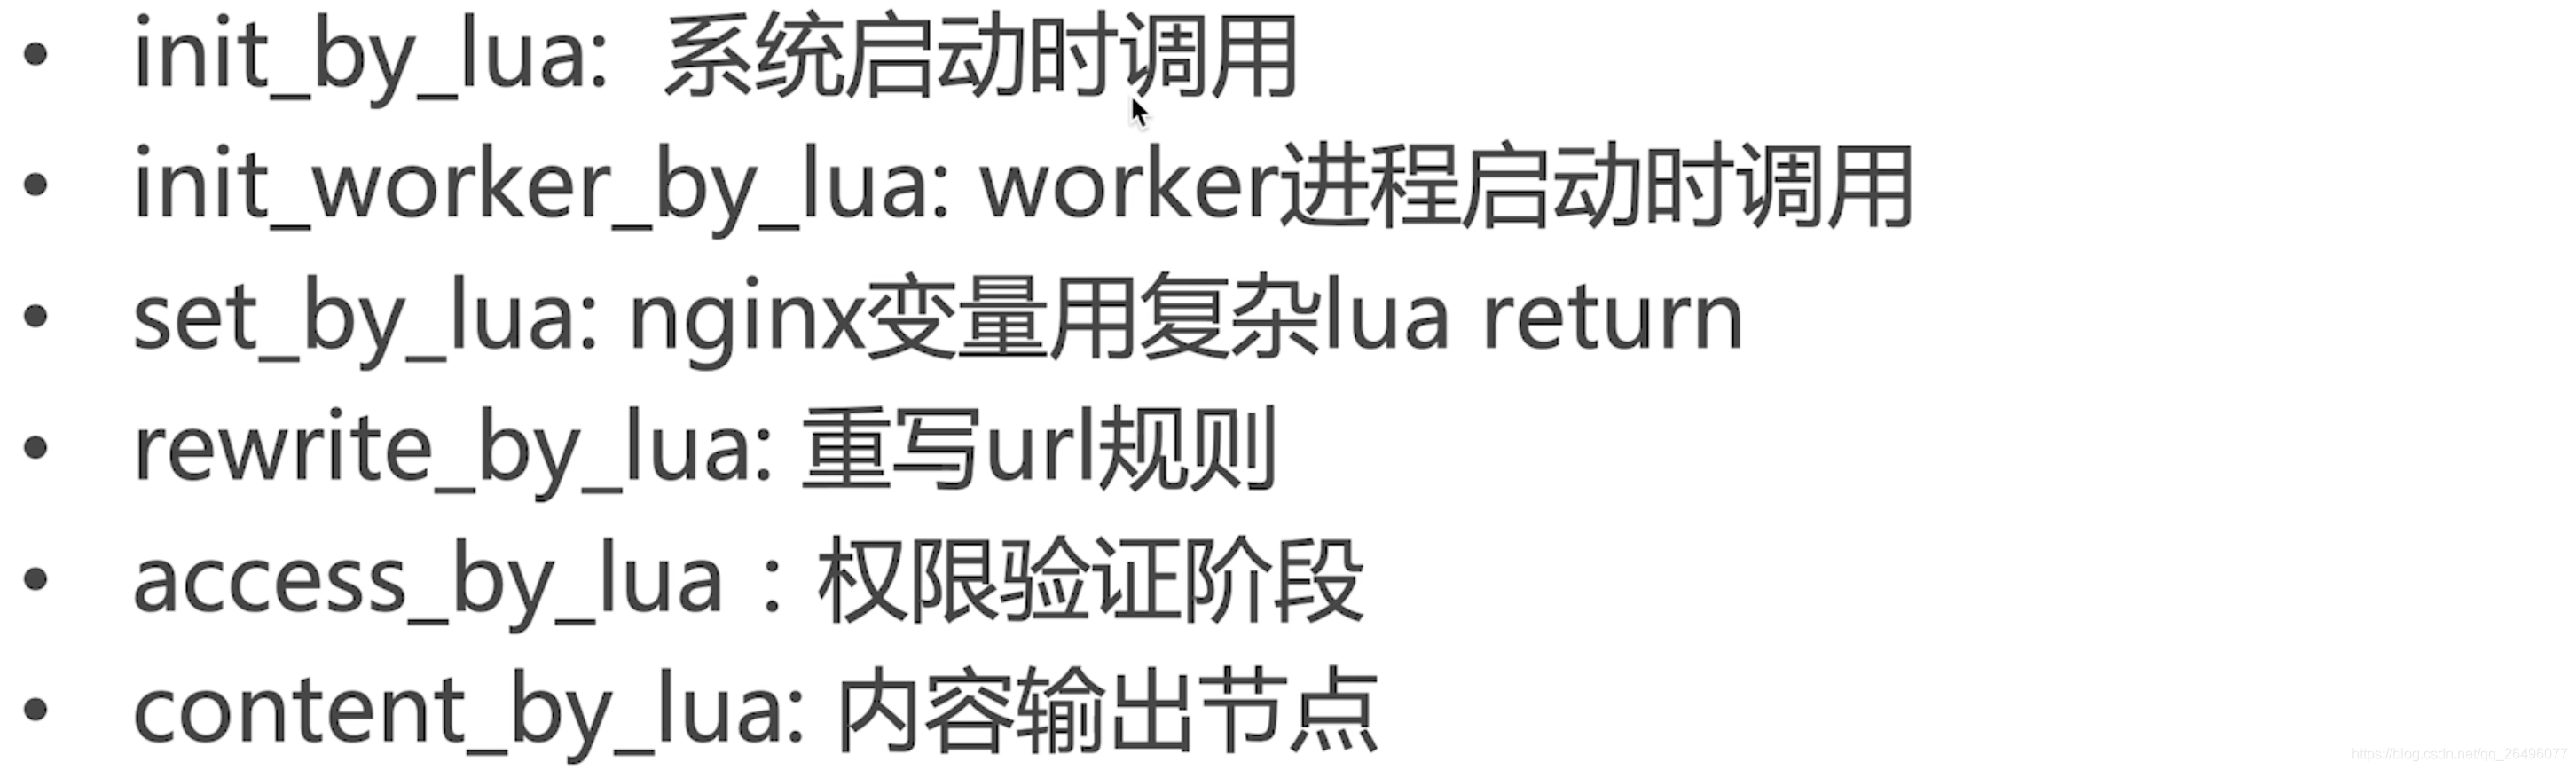
init_by_lua: 系统启动时调用
-
在openresty下新建lua目录,并在lua目录下新建init.lua脚本文件,并写如下内容:
-- ngx.log(): lua脚本内用来操作nginx日志的方法 -- 下面操作就会在ngx.ERR中看到"init lua success"这句话 ngx.log(ngx.ERR, "init lua success"); -
修改nginx.conf
http{ # 当nginx master进程在加载nginx配置文件时运行指定的lua脚本, 通常用来注册lua的全局变量或在服务器启动时预加载lua模块 init_by_lua_file ../lua/init.lua; } -
启动nginx

可看出打印出init.lua脚本文件中init lua success这句话.
-
-
content_by_lua: 内容输出节点
-
lua目录中创建staticitem.lua
ngx.say("hello static item lua"); -
修改nginx.conf
server { location /staticitem/get{ default_type "text/html"; content_by_lua_file ../lua/staticitem.lua; } -
重新启动nginx
-
测试(可见成功打印)

-
- OpenResty
- OpenResty由nginx核心加很多第三方模块组成,默认集成了lua开发环境,使得nginx可以作为一个web server使用.
- 借助于nginx的事件驱动模型和非堵塞IO(即epoll的多路复用),可以实现高性能的web应用程序.
- 事件驱动模型
事件驱动编程是一种编程范式,这里程序的执行流由外部事件来决定。它的特点是包含一个事件循环,当外部事件发生时使用回调机制来触发相应的处理
- 事件驱动模型
- OpenResty提供了大量组件如mysql、redis、memcached等,使得nginx上开发web应用更方便更简单.
- OpenResty入门实战之helloworld
-
功能: 转发请求
-
OpenResty/lua目录下新建helloworld.lua
ngx.exec("/item/get?id=1"); -
修改nginx.conf
location /helloworld{ content_by_lua_file ../lua/helloworld.lua; } -
启动/重启nginx
-
效果展示

- OpenResty入门实战之shared dic(共享内存字典),所有worker进程可见,lru淘汰策略
-
前提
要先把nginx.conf中关于nginx proxy cache的配置注释掉,否则会从缓存中读取. -
修改nginx.conf
http{ # 声明一个共享内存字典name及上限 lua_shared_dict my_cache 128m; # 将/luaitem/get请求转发到lua脚本处理 location /luaitem/get{ default_type "application/json"; content_by_lua_file ../lua/itemsharedic.lua; } } -
在OpenResty/lua目录下新建itemsharedic.lua文件
function get_from_cache(key) -- 定义一个cache_ngx变量,my_cache在nginx.conf文件中定义,my_cache 是 Nginx 所有 worker 之间共享的 local cache_ngx = ngx.shared.my_cache -- 获取key对应的value local value = cache_ngx:get(key) return value end function set_to_cache(key, value, expiretime) if not expiretime then expiretime = 0 end local cache_ngx = ngx.shared.my_cache -- 将key-value放入缓存中,并设定过期时间。有多个返回值: 是否success、是否error,是否forcible(可行) local success, err, forcible = cache_ngx:set(key, value, expiretime) -- 只关注是否成功 return success end -- main方法 -- 获取get请求uri上的参数 local args = ngx.req.get_uri_args() local id = args["id"] -- ..在lua中是字符串拼接 local item_model = get_from_cache("item_"..id) -- 如果缓存中取不到,则将请求转发到应用服务器 if item_model == nil then local resp = ngx.location.capture("/item/get?id="..id) item_model = resp.body -- 将请求的数据放入缓存中,有效时间为1分钟 set_to_cache("item_"..id, item_model, 1*60) -- 如果缓存中取到了则直接输出 end ngx.say(item_model) -
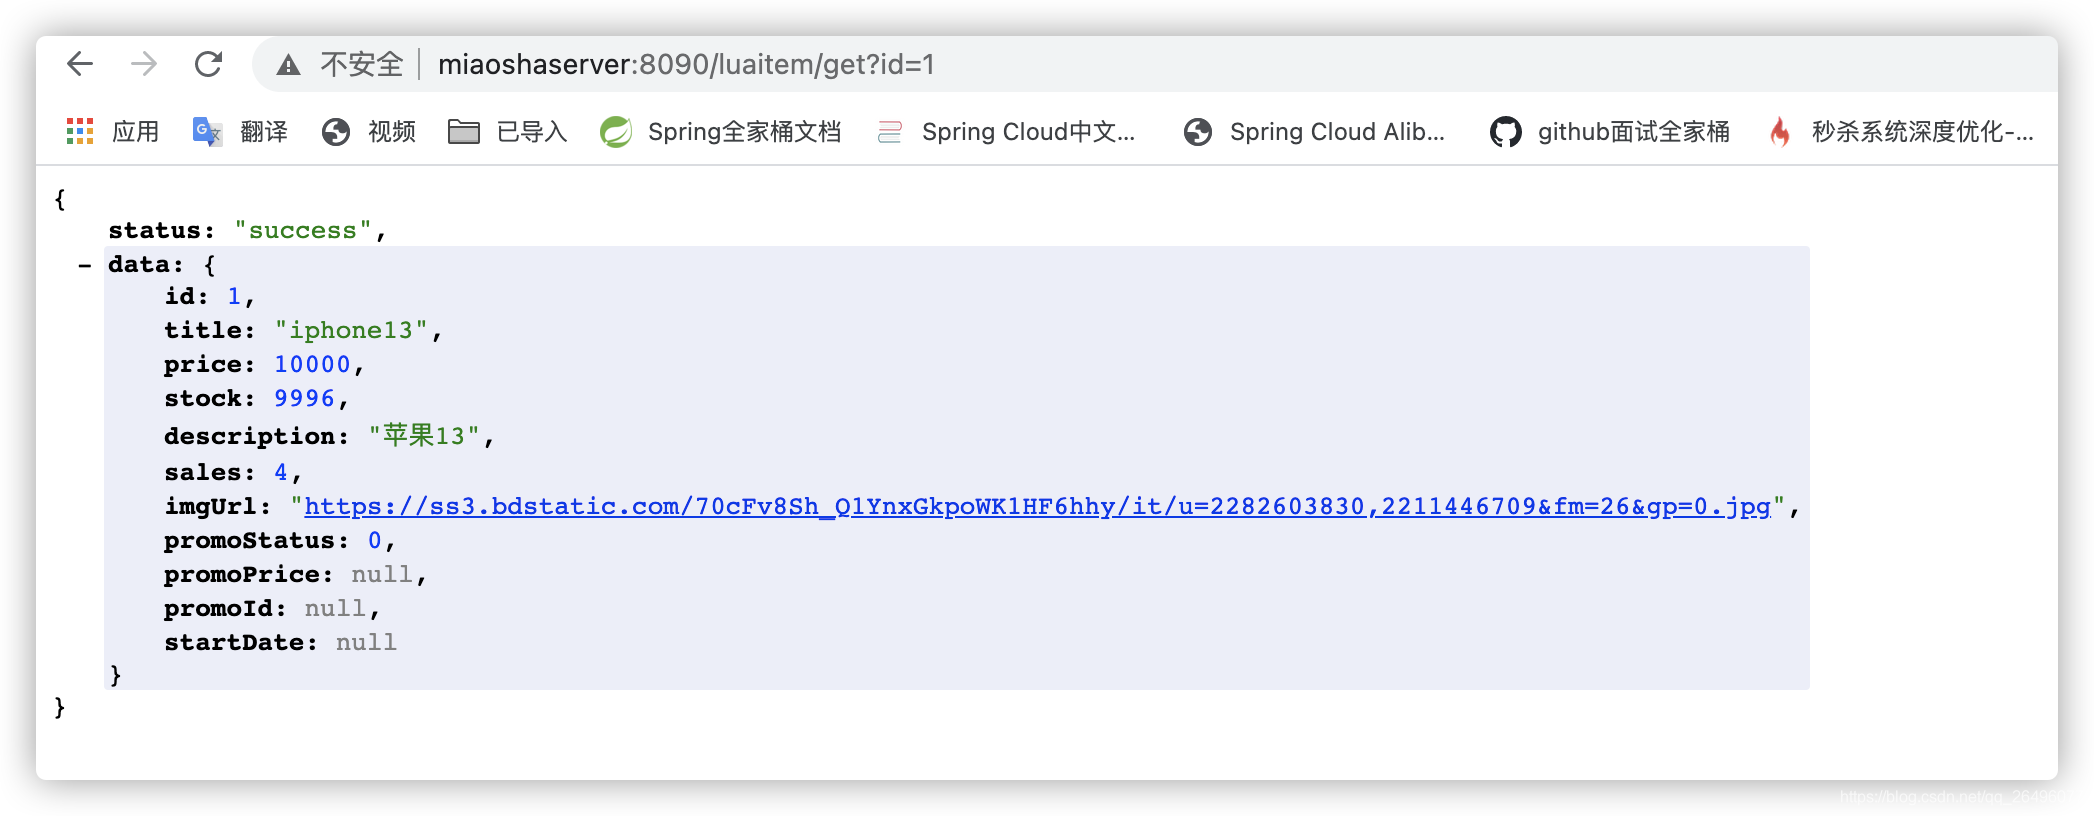
访问测试(显示google正常显示json只需在扩展应用程序中添加jsonview即可)
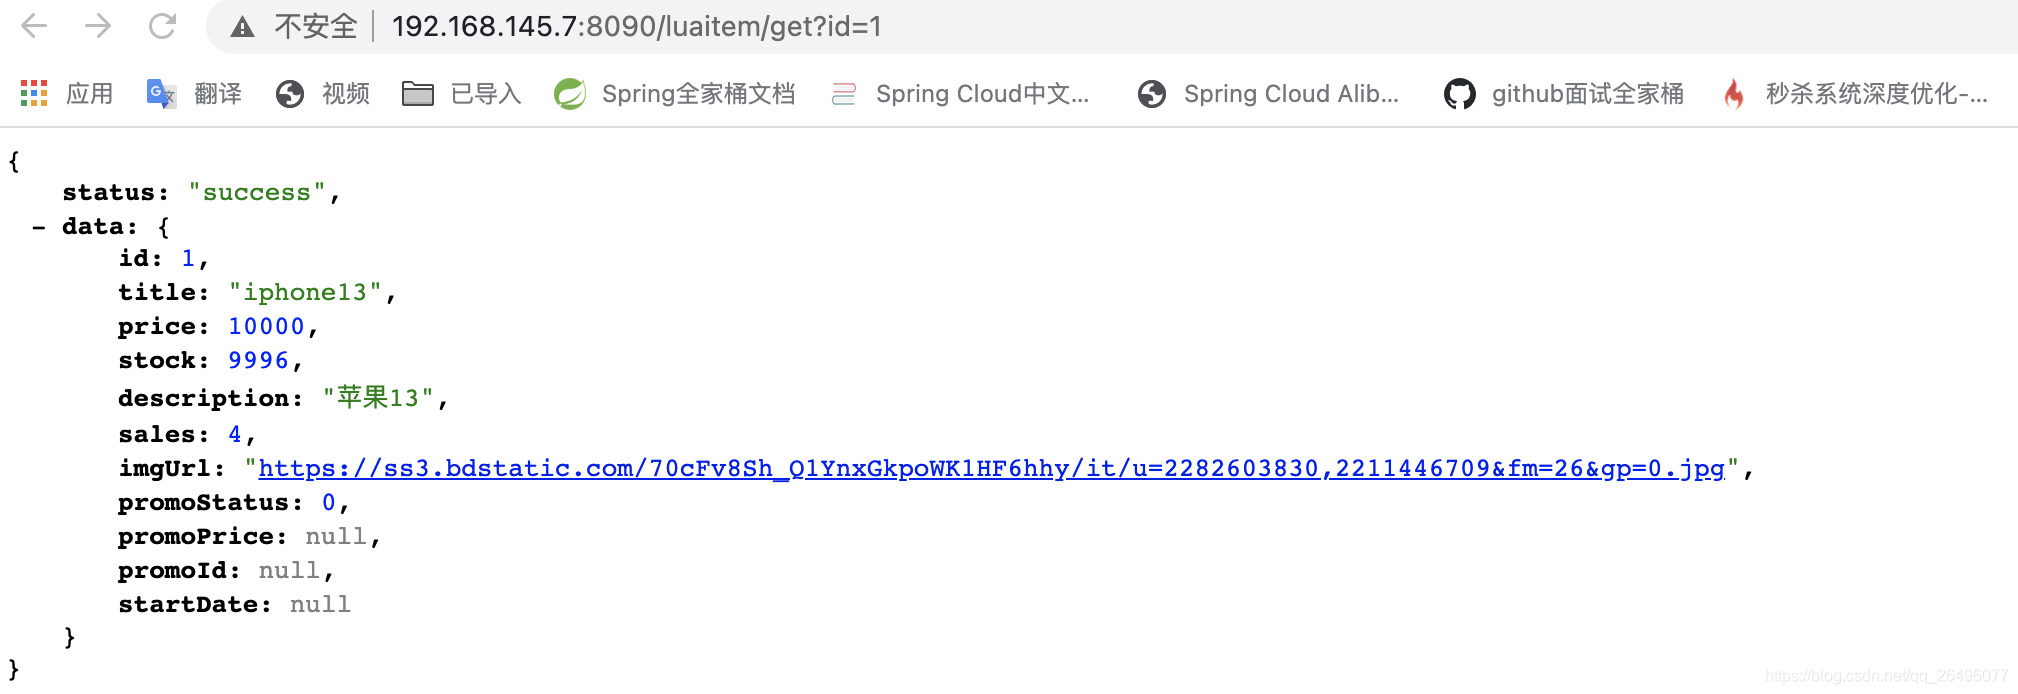
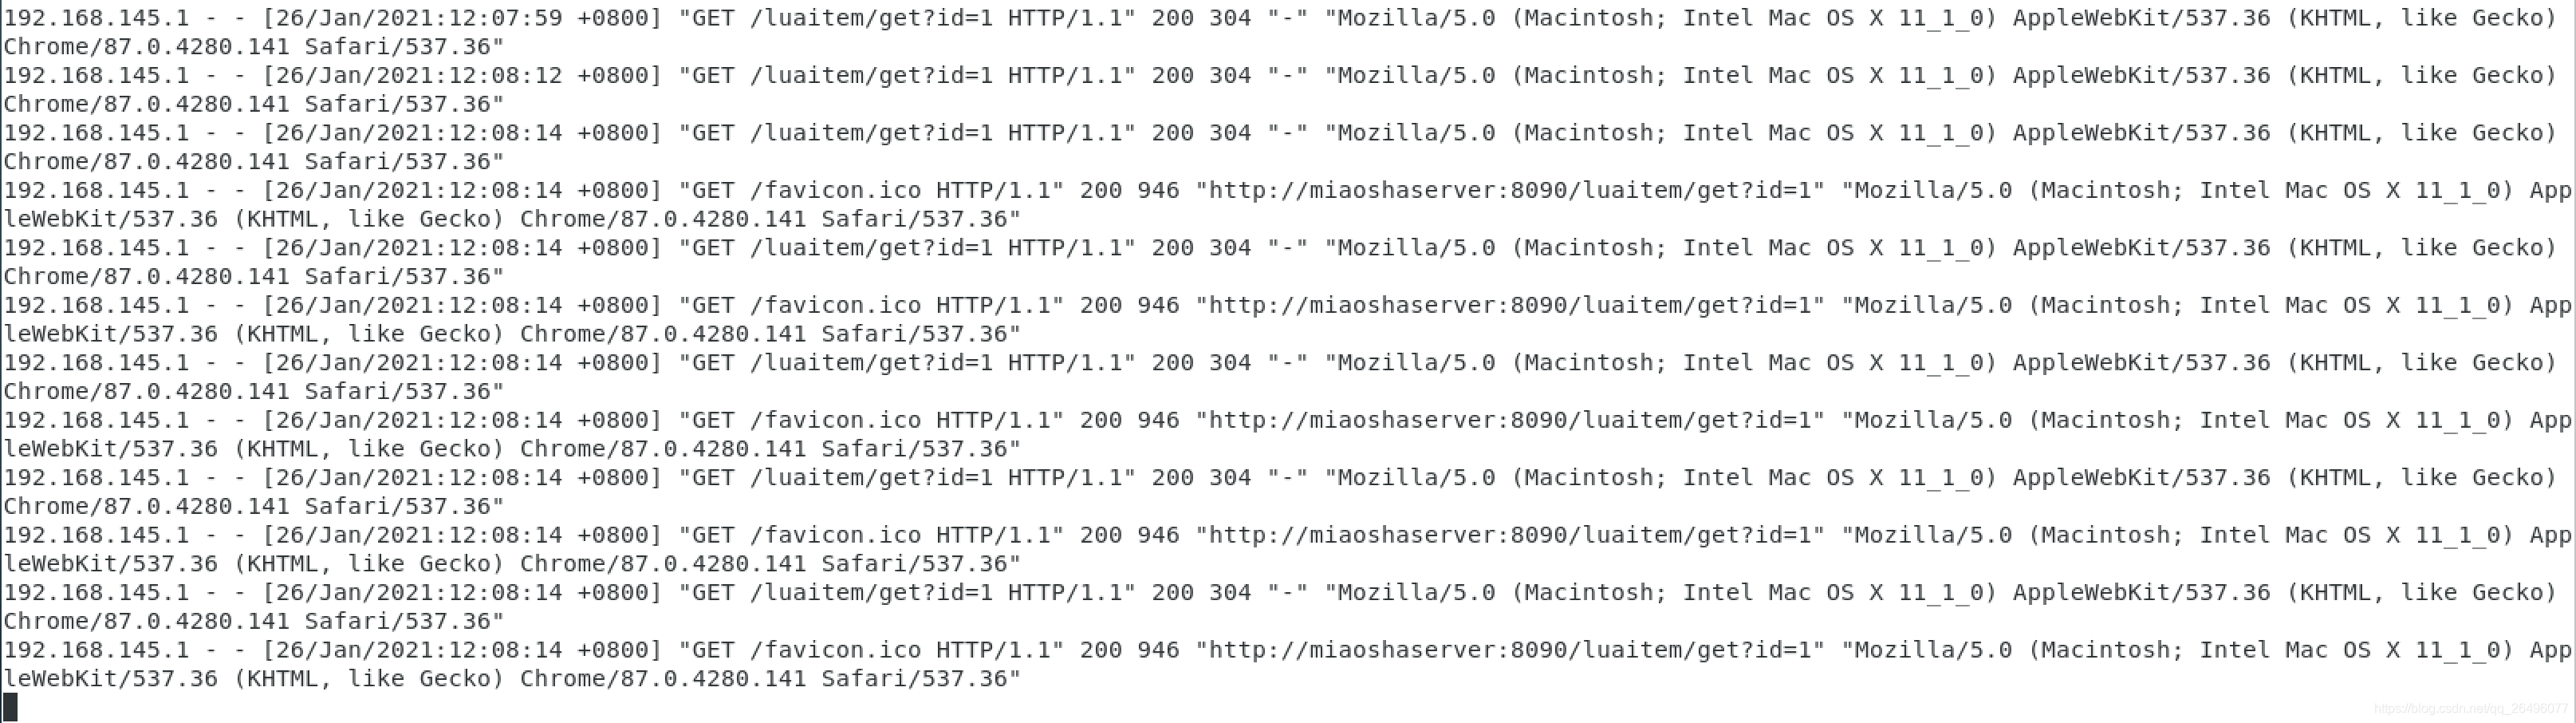
当多次请求时,应用服务器只有一次请求记录(favicon.ico是访问某个网页的图标)

第一次请求时,也会将请求信息放入redis中

多次请求nginx的access.log.在一分钟内,第二次及之后的请求会直接从共享内存字典中获取.
- nginx proxy cache和nginx共享内存字典的区别
- nginx proxy cache缓存的数据放在磁盘中,key(比如将请求的url作为key)放在内存中,nginx取这个key的md5作为缓存文件,从后往前取相应的位数作为缓存目录.从而根据访问的uri得到请求数据具体存放的位置.
- nginx共享内存字典中都放在内存中
- OpenResty实战之redis支持
-
目的
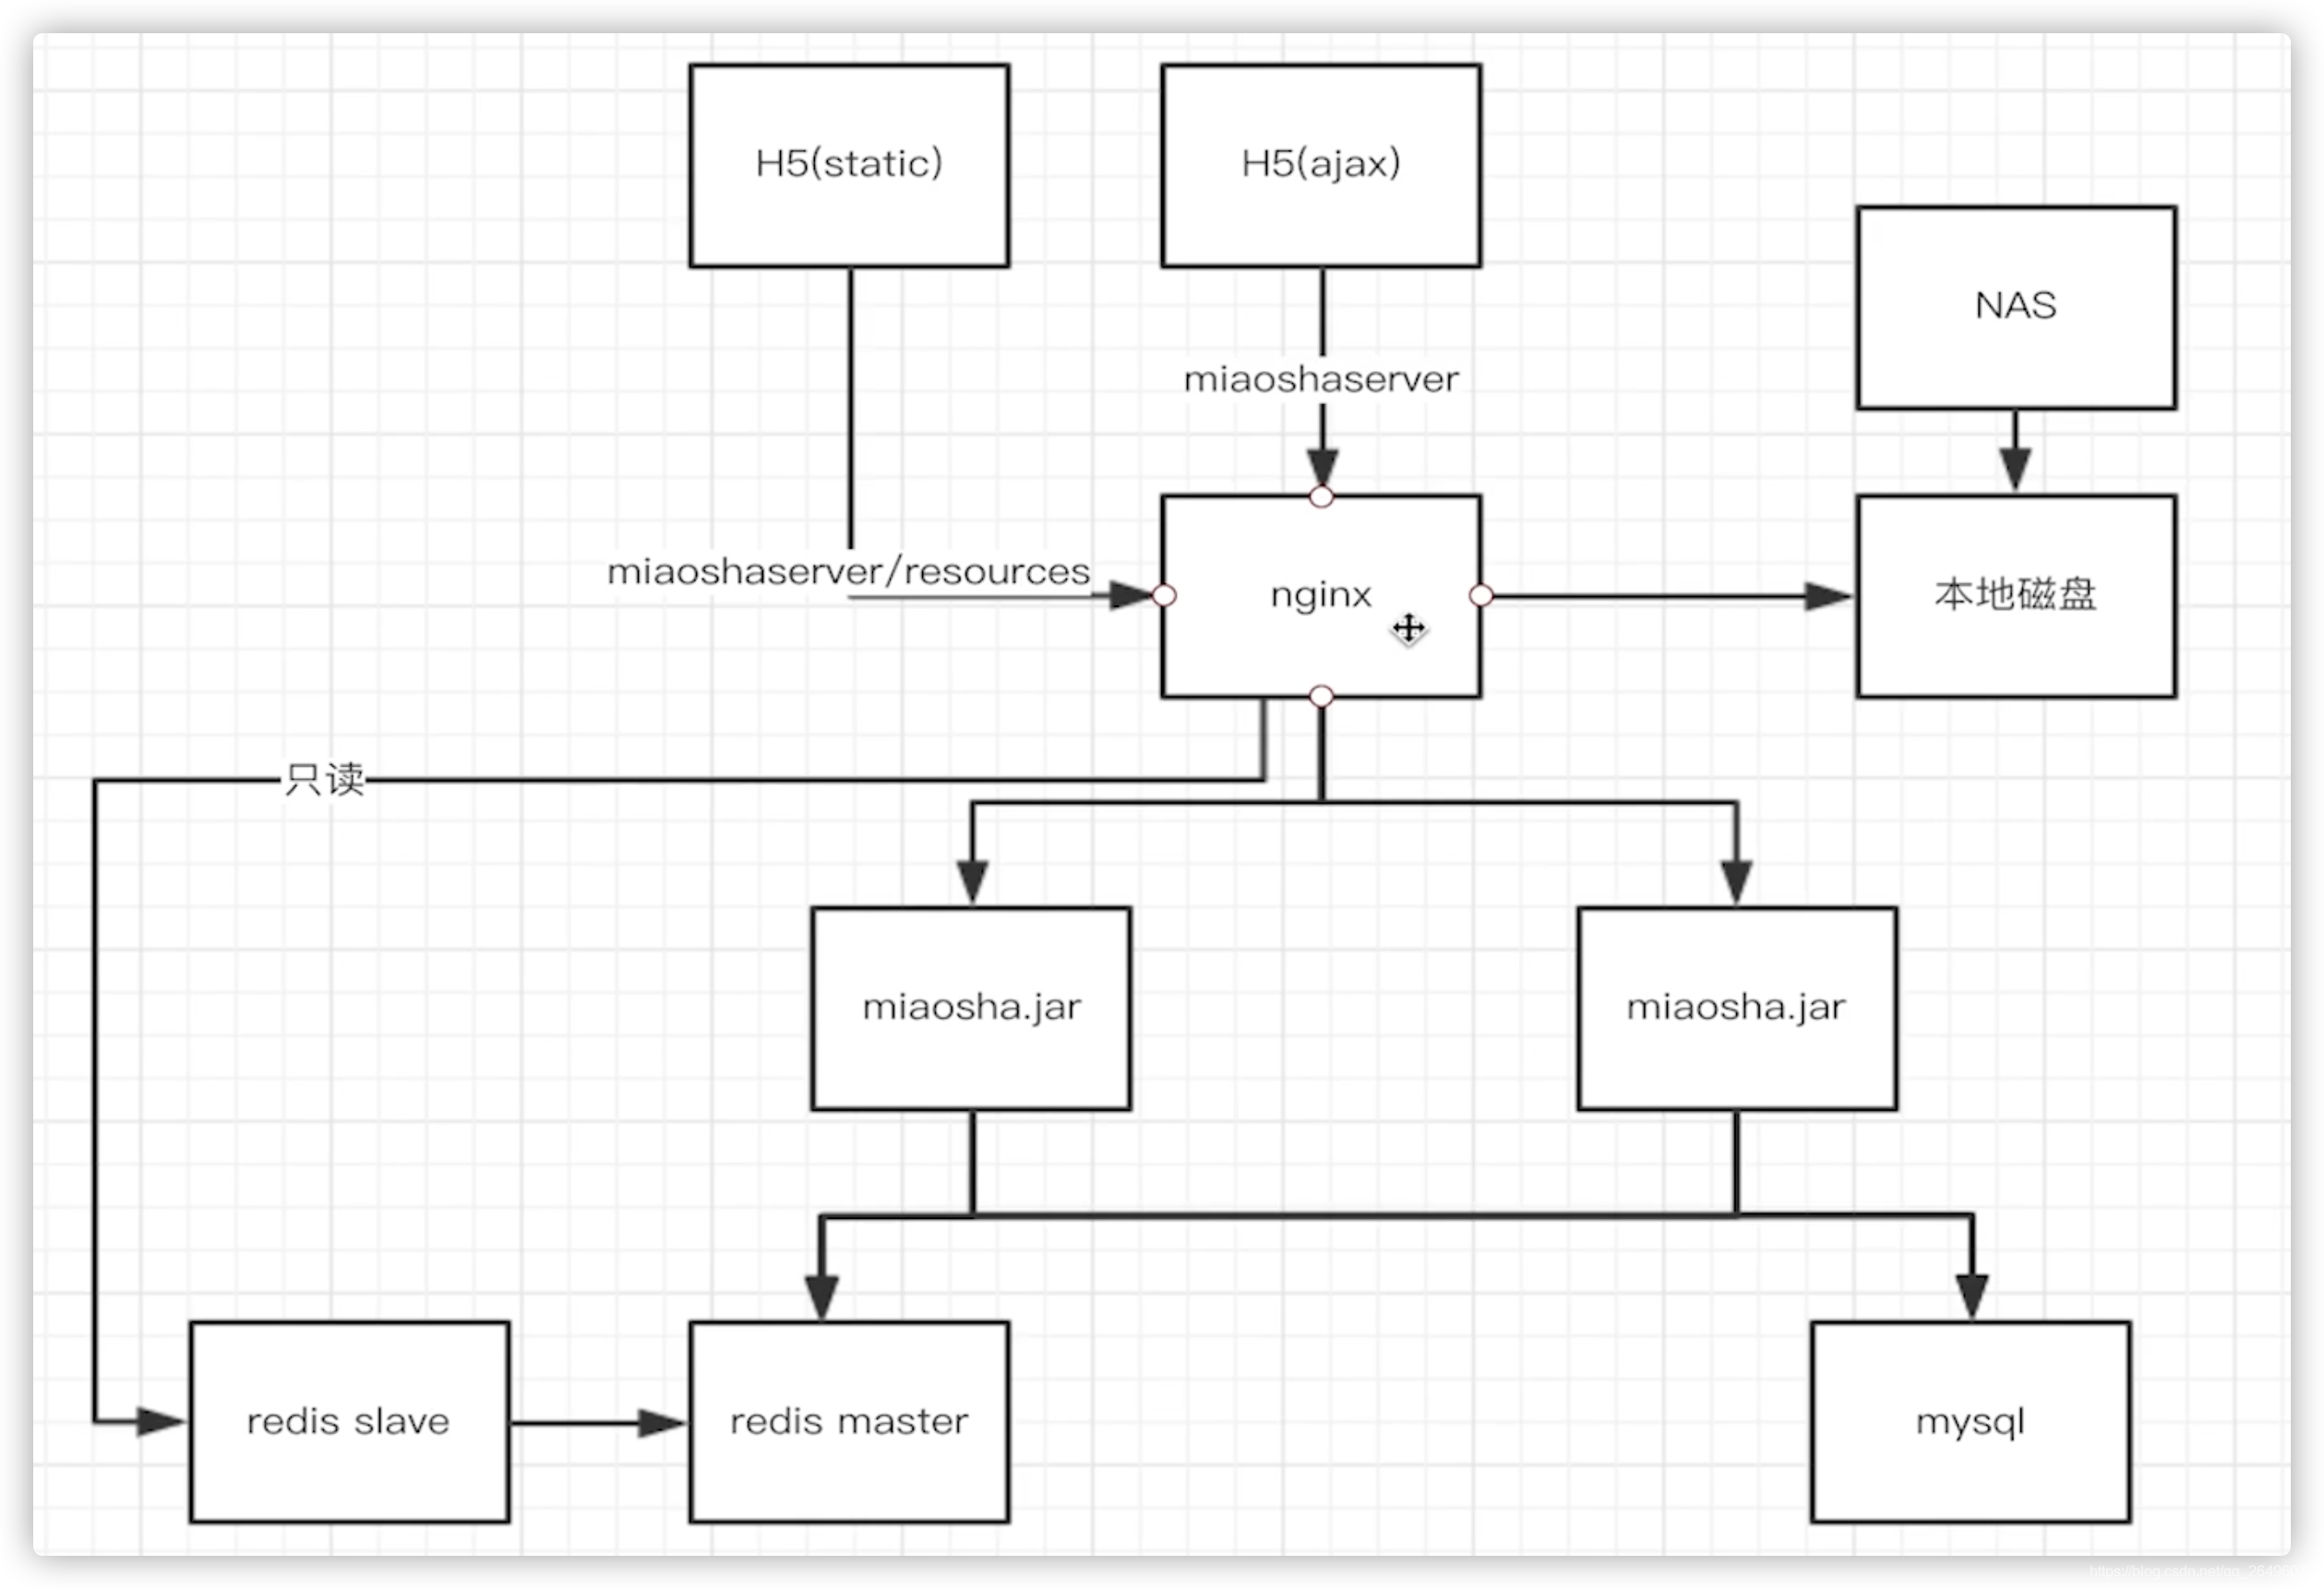
nginx只从redis slave中读取数据,更新数据交给应用服务器.以前使用redis是通过应用服务器读取redis,比通过nginx直接读取redis slave慢很多. -
在OpenResty/lua目录下新建itemredis.lua文件(实现功能是从redis从服务器中只读)
-- 获取请求uri参数 local args = ngx.req.get_uri_args() local id = args["id"] -- 引入resty.redis文件 local redis = require "resty.redis" -- 创建一个reids对象,连接到redis服务器 local cache = redis:new() local ok,err = cache:connect("192.168.145.8", 6379) -- 选择第10个数据库 cache:select(10) if not ok then ngx.say("failed to connect: ", err) return end local item_model, err = cache:get("item_"..id) -- 如果不能从redis中获取到,则请求转发到/item/get?id= if item_model == ngx.null or item_model == nil then ngx.say("failed to get item_"..id.."from redis slave cache: ", err) local resp = ngx.location.capture("/item/get?id="..id) item_model = resp.body end ngx.say(item_model) -
修改nginx.conf文件
# 将/luaitem/get请求转发到lua脚本处理 location /luaitem/get{ default_type "application/json"; content_by_lua_file ../lua/itemredis.lua; } -
启动/重启nginx
-
效果展示
- 第一次请求(redis中没有请求数据)

- 多次请求效果:
- 虽然请求多次,但是应用服务器1在31分钟处只有一条请求记录

- 虽然请求多次,但是应用服务器2在31分钟处没有记录

- redis中有一条记录

- 向nginx上请求了多次

- 综上所述
第一次访问时,redis slave服务器没有请求信息,所以通过应用服务器从数据库中获取,然后将数据存储在redis slave缓存中,之后的请求只要在消息存活时间内,都是nginx从redis slave服务器获取.
- 第一次请求(redis中没有请求数据)
-
压测
- 访问路径: /luaitem/get?id=1
- 实验环境: 线程数2000, ramp-up:10, 循环次数20
- 压测效果: 平均值422ms, 95值217ms, 吞吐量TPS: 1678/sec.

- 总结: 效果还不错