首先 对比优化前后的效果(本地部署nginx)
优化前浏览器显示 大小2.0MB
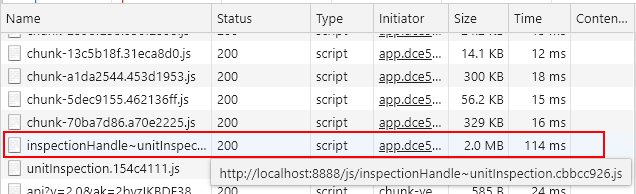
优化后浏览器显示 大小732kb

dist 的js文件夹
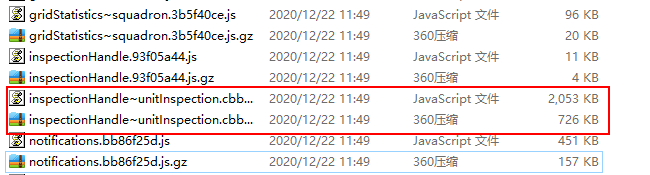
第一步 vue压缩文件
vue先进行压缩,这样做nginx处理时dist有js文件和js的压缩包,nginx会直接使用压缩包,而不会把js进行压缩,减少nginx处理js过程所需时间,静态文件的处理也可以减少每次请求进行gzip压缩的CPU资源消耗。
首先安装依赖
npm install compression-webpack-plugin -s
我的compression-webpack-plugin版本是4.0.1
然后是配置vue.config.js
// gzip压缩插件
const CompressionWebpackPlugin = require('compression-webpack-plugin')
module.exports 里面配置
let plugins = [
   // 把js 与css 打包成压缩包 搭配 Nginx使用
     new CompressionWebpackPlugin({


       filename: '[path].gz[query]',
       algorithm: 'gzip',
       test: new RegExp(
         '\\.(' + ['js', 'css'].join('|') +
         ')$',
       ),
       threshold: 10240,
       // deleteOriginalAssets:true, //删除源文件
       minRatio: 0.8,
     })
   ]
   if (process.env.NODE_ENV !== 'development') {

      //是否为生产模式
     config.plugins = [ ...plugins]
   }
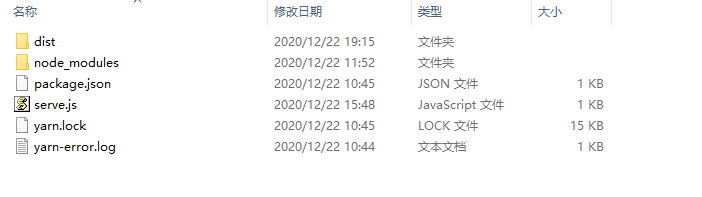
第二步 启动服务器模拟
把vue的dist文件与serve.js放在同一个文件夹下
serve.js代码
var express =require('express');
var app = require('express')(),server =require('http').createServer(app);

server.listen(8889);
app.use(express.static("./dist"));
app.get('/',function(req,res){


    res.sendFile(__dirname + '/index.html');
});
// 终端打印如下信息
console.log('Server running at http://127.0.0.1:8889/');
安装依赖express
npm install express -s
启动serve.js
//cmd下
node serve.js
//Server running at http://127.0.0.1:8889/
浏览器打开http://localhost:8889/即可看见页面
第三步Nginx配置(Windows)
首先 安装nginx
我的是 nginx-1.12.2
下载解压后,
压缩文件的根目录下
1、可以双击nginx.exe启动nginx
2、可以使用命令 start nginx
第一次启动 可能会出现弹窗,以后启动nginx,弹窗会一闪而过;
nginx 重启命令nginx -s reload
nginx 停止命令 nginx -s stop
nginx 退出命令 nginx -s quit
taskkill 停止 nginx命令 taskkill /f /t /im nginx.exe
启动nginx 后,打开http://localhost:80,出现Welcome to nginx 页面表示启动成功;
也可以使用命令nginx -t查看进程 看是否出错;
启动成功后,打开conf文件夹下的nginx.conf配置文件
http下添加
		# 寻找是否存在 js.zip文件
		gzip_static on;
		# 开启gzip
		gzip on;
		# 启用gzip压缩的最小文件,小于设置值的文件将不会压缩
		gzip_min_length 2048;
		# 设置压缩所需要的缓冲区大小
		gzip_buffers 16 64k;
		# 设置gzip压缩针对的HTTP协议版本 默认1.1,前端如果是squid2.5请使用1.0
		gzip_http_version 1.0;
		# gzip 压缩级别,1-9,数字越大压缩的越好,也越占用CPU时间
		gzip_comp_level 5;
		#对于以下类型数据进行压缩
		gzip_types text/plain application/x-javascript application/javascript text/javascript text/css application/xml application/x-httpd-php image/jpeg image/gif image/png;
		# gzip_types *;
		#gzip_disable "MSIE [1-6]\.";
		# 是否在http header中添加Vary: Accept-Encoding,建议开启
		gzip_vary on;
server下修改监听端口与名称
        listen 5001 default_server;
        server_name  192.168.1.192;#localhost
server下的location内添加代理地址,也就是代理页面的地址(server.js设置的地址),http://localhost:8889
       	#设置后端代理服务器的协议和地址
       	proxy_pass  http://localhost:8889 ;# 192.168.1.192:8888;
修改后的nginx.conf
#user  nobody;
worker_processes  1;

#error_log  logs/error.log;
#error_log  logs/error.log  notice;
#error_log  logs/error.log  info;

#pid        logs/nginx.pid;


events {


    worker_connections  1024;
}


http {


    include       mime.types;
    default_type  application/octet-stream;

    #log_format  main  '$remote_addr - $remote_user [$time_local] "$request" '
    #                  '$status $body_bytes_sent "$http_referer" '
    #                  '"$http_user_agent" "$http_x_forwarded_for"';

    #access_log  logs/access.log  main;

    sendfile        on;
    #tcp_nopush     on;

    #keepalive_timeout  0;
    keepalive_timeout  65;

    #gzip  on;

	# 寻找是否存在 js.zip文件
		gzip_static on;
		# 开启gzip
		gzip on;
		# 启用gzip压缩的最小文件,小于设置值的文件将不会压缩
		gzip_min_length 2048;
		# 设置压缩所需要的缓冲区大小
		gzip_buffers 16 64k;
		# 设置gzip压缩针对的HTTP协议版本 默认1.1,前端如果是squid2.5请使用1.0
		gzip_http_version 1.0;
		# gzip 压缩级别,1-9,数字越大压缩的越好,也越占用CPU时间
		gzip_comp_level 5;
		#对于以下类型数据进行压缩
		gzip_types text/plain application/x-javascript application/javascript text/javascript text/css application/xml application/x-httpd-php image/jpeg image/gif image/png;
		# gzip_types *;
		#gzip_disable "MSIE [1-6]\.";
		# 是否在http header中添加Vary: Accept-Encoding,建议开启
		gzip_vary on;
    server {


        listen 5001 default_server;
        server_name  192.168.1.192;#localhost

        #charset koi8-r;

        #access_log  logs/host.access.log  main;

		#location ~ \.(gif|jpg|jpeg|png|bmp|ico|js|css)$ {


		#  # gzip_static on; # 寻找是否存在 js.zip文件
		#  # expires max;
		#}

       location / {


           root   html;
           index  index.html index.htm;
       	#设置后端代理服务器的协议和地址
       	proxy_pass  http://localhost:8889 ;# 192.168.1.192:8888;
       }

        #error_page  404              /404.html;

        # redirect server error pages to the static page /50x.html
        #
        error_page   500 502 503 504  /50x.html;
        location = /50x.html {


            root   html;
        }

        # proxy the PHP scripts to Apache listening on 127.0.0.1:80
        #
        #location ~ \.php$ {


        #    proxy_pass   http://127.0.0.1;
        #}

        # pass the PHP scripts to FastCGI server listening on 127.0.0.1:9000
        #
        #location ~ \.php$ {


        #    root           html;
        #    fastcgi_pass   127.0.0.1:9000;
        #    fastcgi_index  index.php;
        #    fastcgi_param  SCRIPT_FILENAME  /scripts$fastcgi_script_name;
        #    include        fastcgi_params;
        #}

        # deny access to .htaccess files, if Apache's document root
        # concurs with nginx's one
        #
        #location ~ /\.ht {


        #    deny  all;
        #}
    }


    # another virtual host using mix of IP-, name-, and port-based configuration
    #
    #server {


    #    listen       8000;
    #    listen       somename:8080;
    #    server_name  somename  alias  another.alias;

    #    location / {


    #        root   html;
    #        index  index.html index.htm;
    #    }
    #}


    # HTTPS server
    #
    #server {


    #    listen       443 ssl;
    #    server_name  localhost;

    #    ssl_certificate      cert.pem;
    #    ssl_certificate_key  cert.key;

    #    ssl_session_cache    shared:SSL:1m;
    #    ssl_session_timeout  5m;

    #    ssl_ciphers  HIGH:!aNULL:!MD5;
    #    ssl_prefer_server_ciphers  on;

    #    location / {


    #        root   html;
    #        index  index.html index.htm;
    #    }
    #}

}
修改完成后 重启nginx nginx -s reload
打开网页 nginx设置的地址http://localhost:5001
可以看见与页面http://localhost:8889显示一致 说明代理成功
浏览器打开f12调试工具
设置查看 Content-Encoding

中转地址页面http://localhost:5001对比代理页面http://localhost:8889
可以发现中转地址页面的js文件被压缩了


注意!因为是本地跑的服务器所以没压缩的反而比压缩的快;
到了这一步基本完成了所有配置过程!
第四 查看是否使用静态文件的压缩包;
vue压缩与nginx压缩,最好就是直接使用vue进行压缩的文件,上面已经提到原因。
但是如何知道nginx是动态压缩的还是自己获取的?
1.首先vue压缩文件夹dist下有相同命名后缀为.gz的压缩包;

2.查看nginx是否支持gzip_static on配置,使用命令nginx -V查看,如果有--with-http_gzip_static_module模块表示支持;

3.查看ETag相应头,如果存在W/开头则表示是经过nginx进行压缩的,而不是直接获取到的压缩包;
4.也可以对比文件大小来查看
修改gzip_comp_level的压缩等级比较dist打包好的gz压缩包


可以发现没有使用静态文件的压缩包。
最终发现以上步骤配置gzip_static on不生效!目前暂未找到原因,找到后会及时更改文章;