一、理论概述
1、Android数据存储方式

2、测试用例
3、测试用例的准备
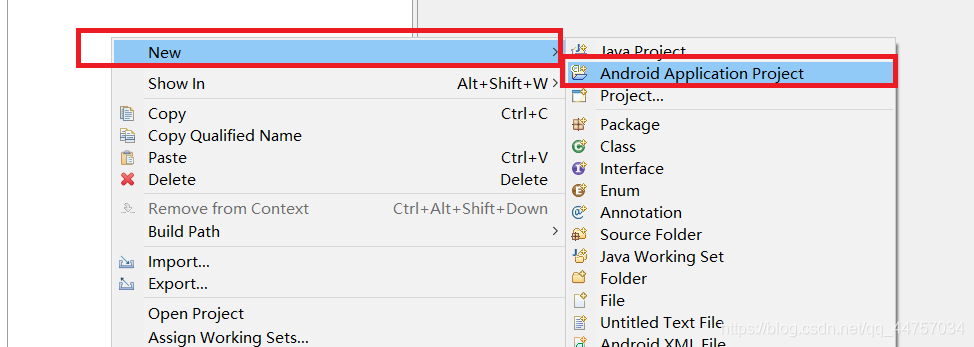
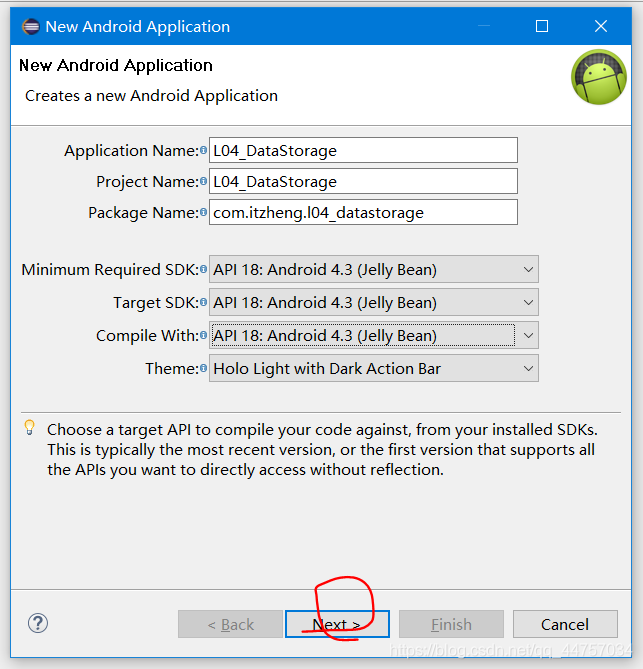
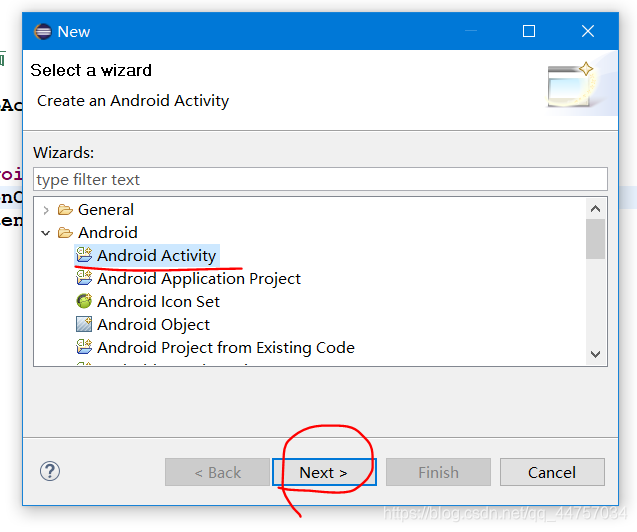
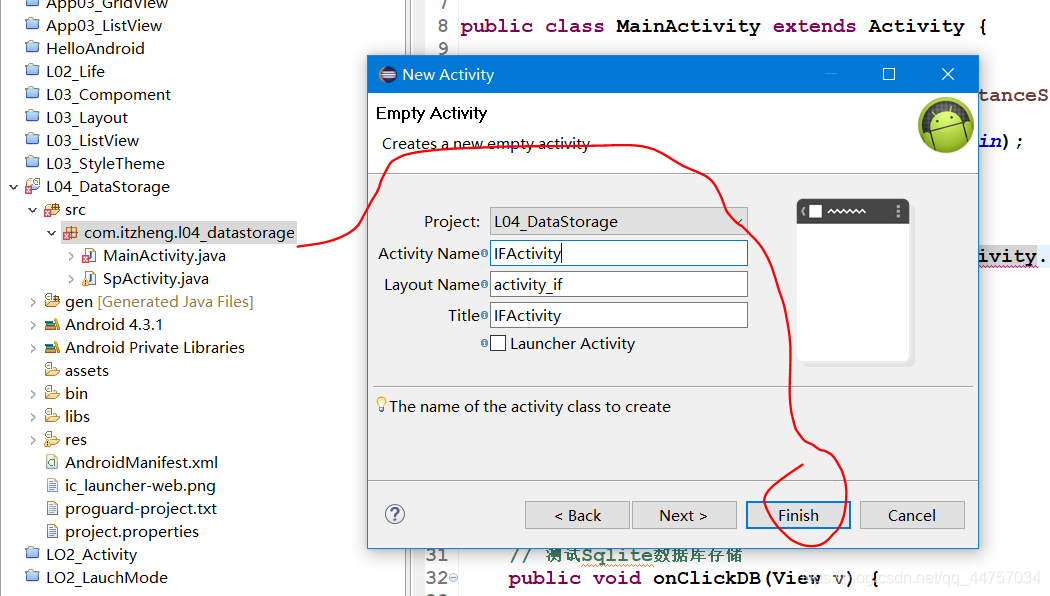
(1)创建新的安卓项目

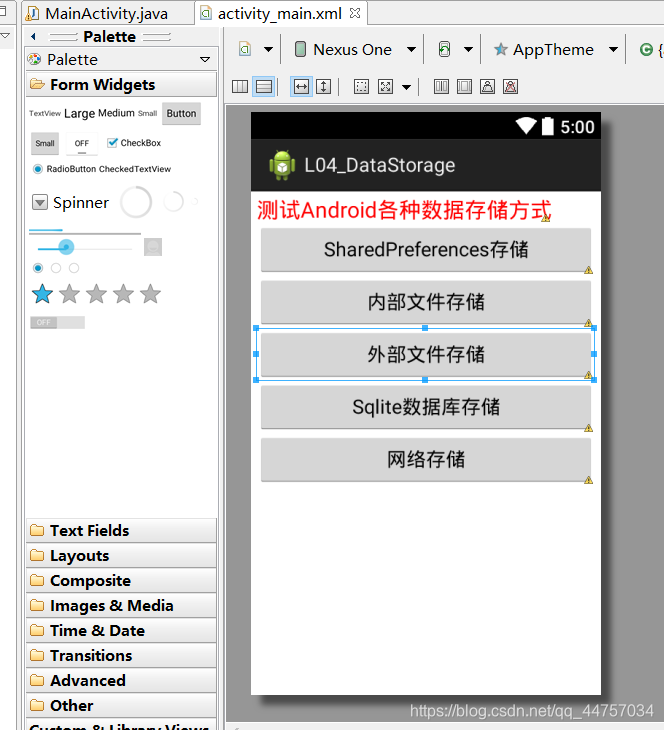
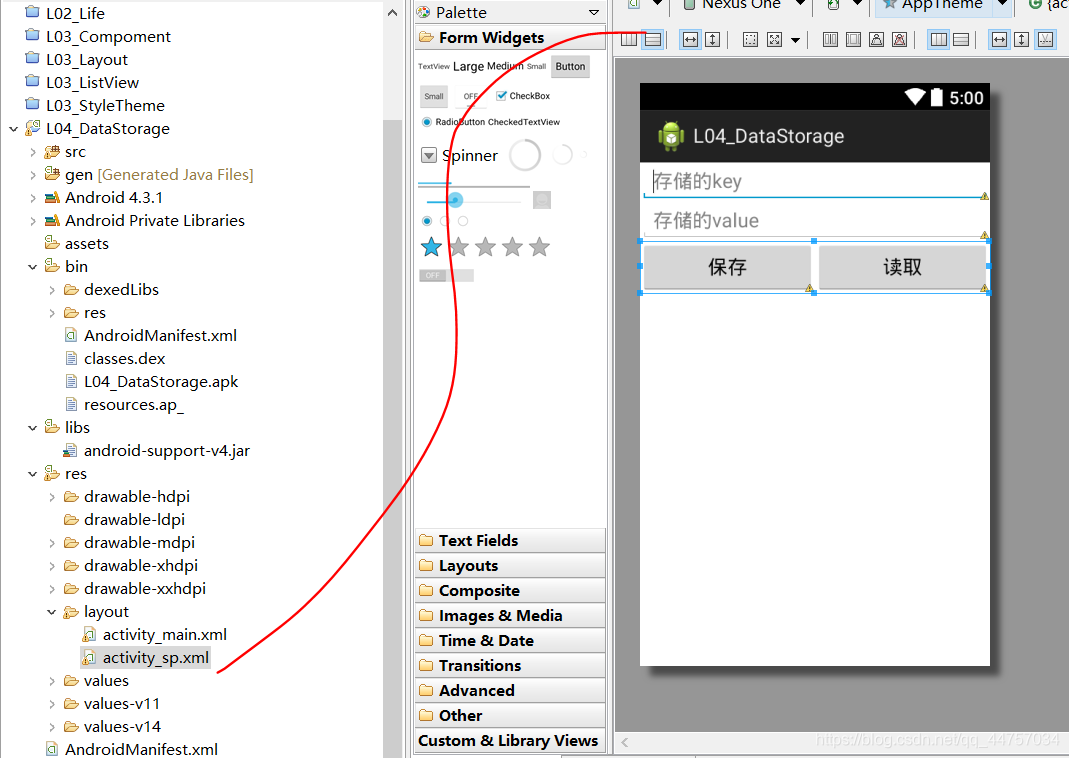
(2)页面搭建
<LinearLayout xmlns:android="http://schemas.android.com/apk/res/android"
android:layout_width="fill_parent"
android:layout_height="fill_parent"
android:orientation="vertical"
android:padding="5dp"
>
<TextView
android:id="@+id/textView1"
android:layout_width="wrap_content"
android:layout_height="wrap_content"
android:textSize="20sp"
android:textColor="#ff0000"
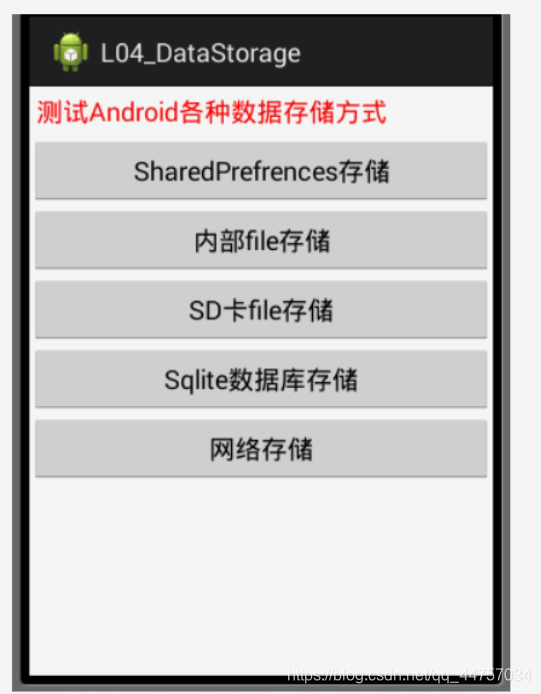
android:text="测试Android各种数据存储方式" />
<Button
android:layout_width="fill_parent"
android:layout_height="wrap_content"
android:onClick="onClickSP"
android:text="SharedPreferences存储" />
<Button
android:layout_width="fill_parent"
android:layout_height="wrap_content"
android:onClick="onClickIF"
android:text="内部文件存储" />
<Button
android:layout_width="fill_parent"
android:layout_height="wrap_content"
android:onClick="onClickOF"
android:text="外部文件存储" />
<Button
android:layout_width="fill_parent"
android:onClick="onClickDB"
android:layout_height="wrap_content"
android:text="Sqlite数据库存储" />
<Button
android:layout_width="fill_parent"
android:layout_height="wrap_content"
android:onClick="onClickNW"
android:text="网络存储" />
</LinearLayout>
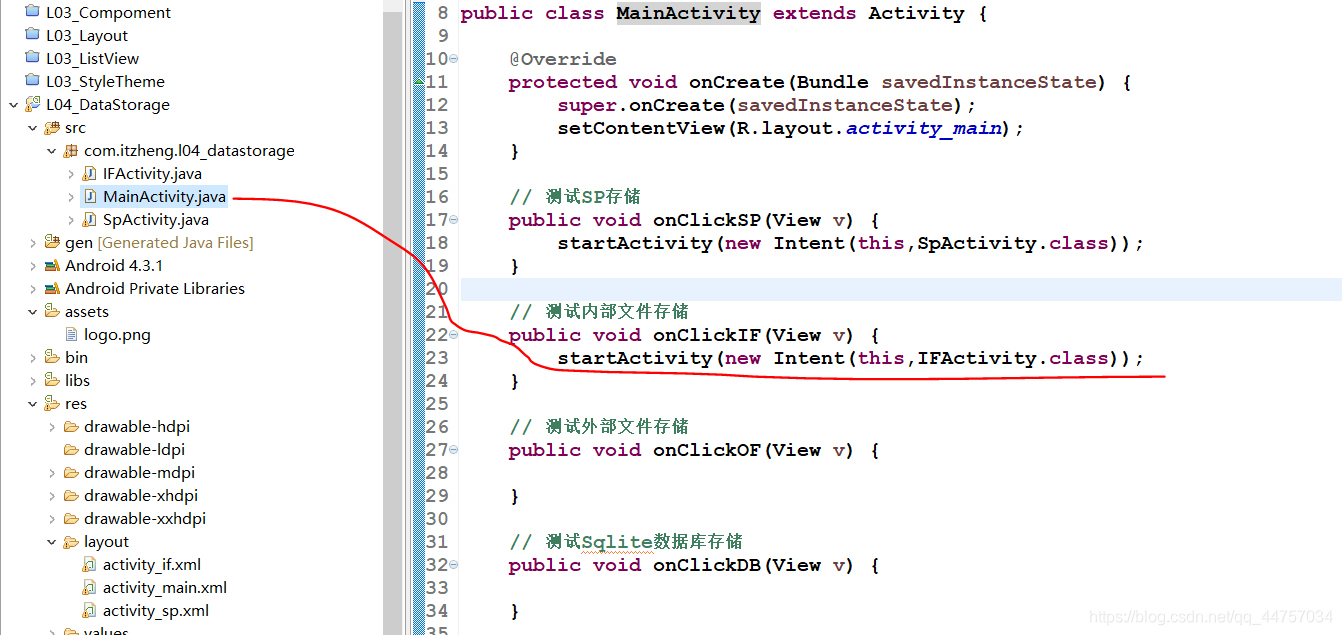
(3)创建点击后跳转到对应的页面的Activity
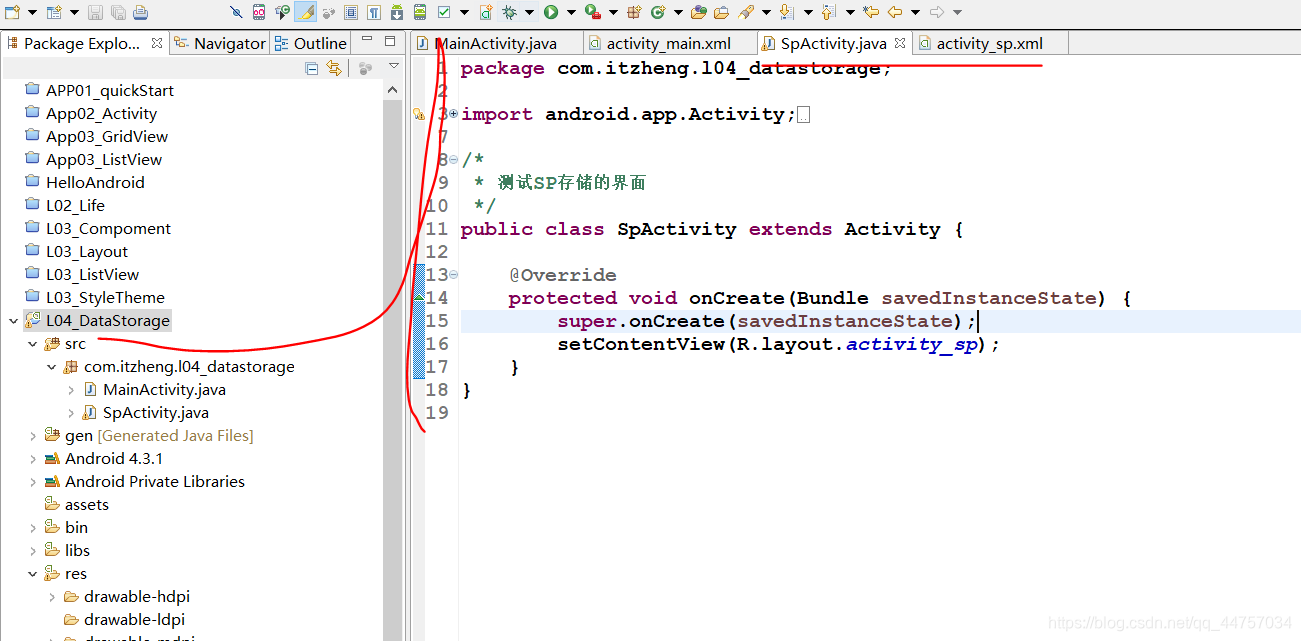
SpActivity
(4)在MainActivity当中对每一个按钮设置Onclick方法
二、数据存储开发
1、SharedPreferences存储
(1)说明

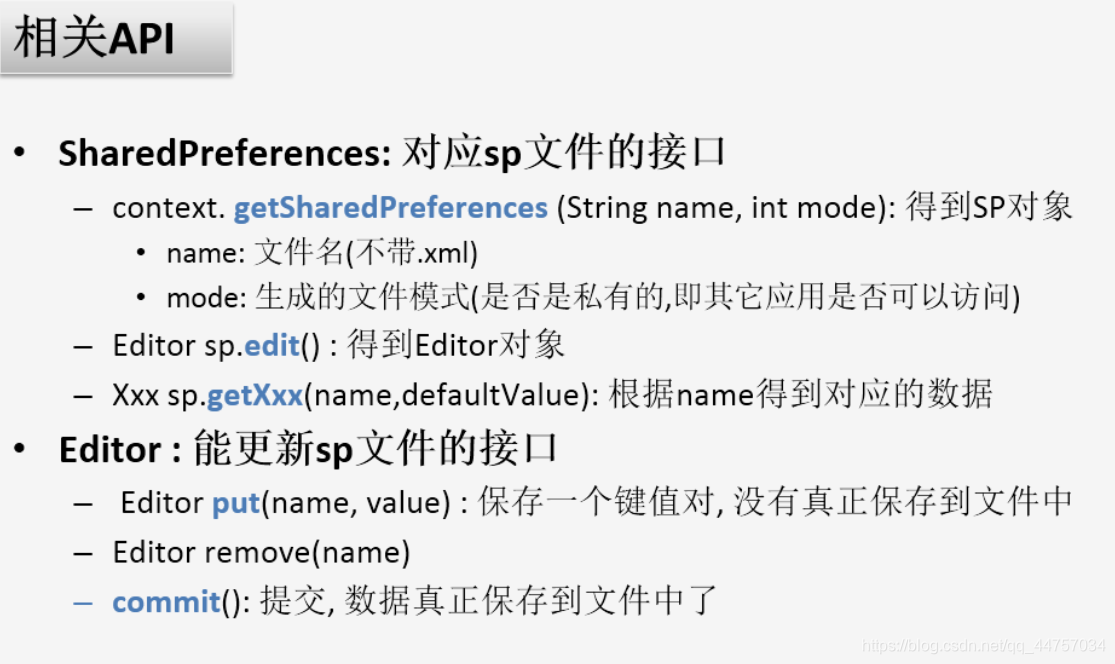
(2)相关API
(3)对应的布局
<LinearLayout xmlns:android="http://schemas.android.com/apk/res/android"
    android:layout_width="fill_parent"
    android:layout_height="fill_parent"
    android:orientation="vertical" >

    <EditText
        android:id="@+id/et_sp_key"
        android:layout_width="match_parent"
        android:layout_height="wrap_content"
        android:ems="10"
        android:hint="存储的key"
         >
        <requestFocus />
    </EditText>
    <EditText
        android:id="@+id/et_sp_value"
        android:layout_width="match_parent"
        android:layout_height="wrap_content"
        android:ems="10"
        android:hint="存储的value"
        />
    <LinearLayout
        android:layout_width="match_parent"
        android:layout_height="wrap_content" >
        <Button
            android:layout_width="0dp"
            android:layout_height="wrap_content"
            android:layout_weight="1"
            android:onClick="save"
            android:text="保存" />
        <Button
            android:layout_width="0dp"
            android:layout_height="wrap_content"
            android:layout_weight="1"
            android:onClick="read"
            android:text="读取" />
    </LinearLayout>
</LinearLayout>
(4)完善SpActivity,实现存储和保存数据
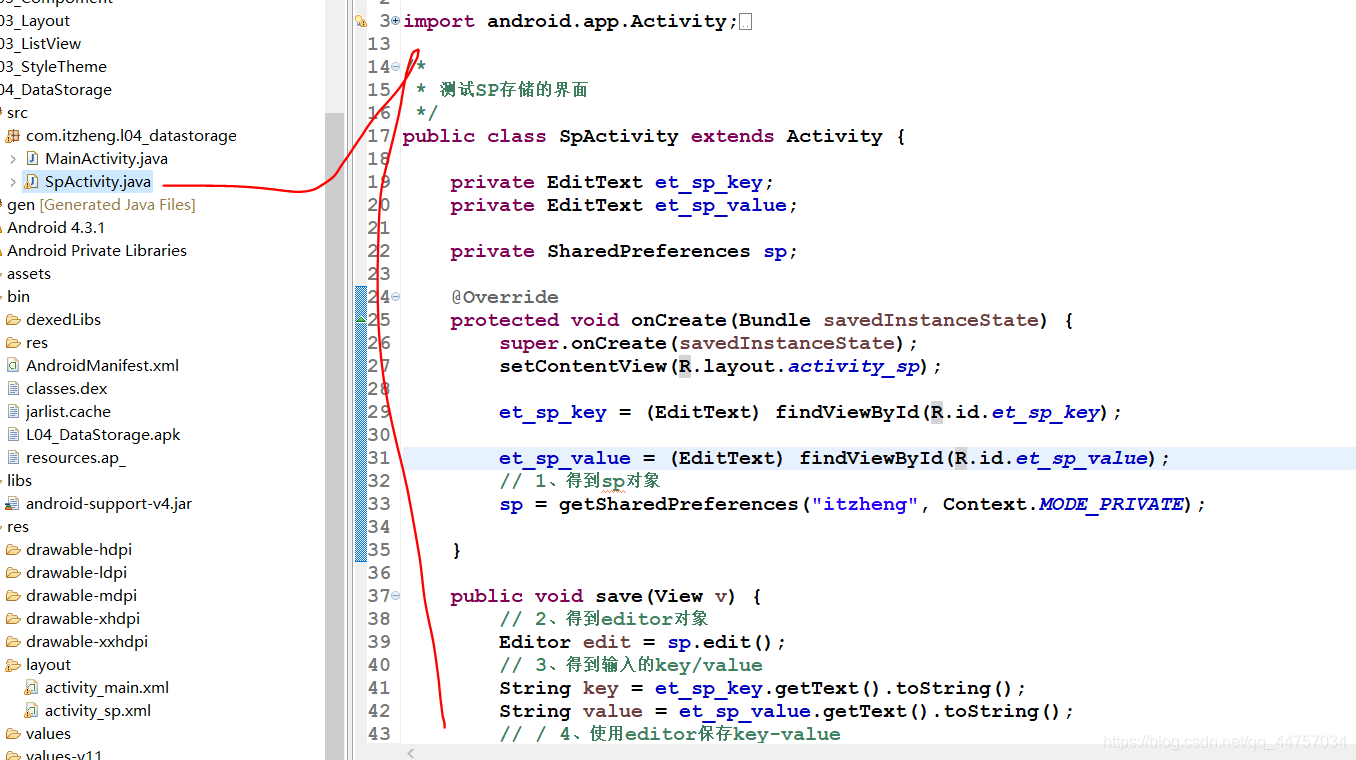
package com.itzheng.l04_datastorage;

import android.app.Activity;
import android.content.Context;
import android.content.SharedPreferences;
import android.content.SharedPreferences.Editor;
import android.os.Bundle;
import android.view.Menu;
import android.view.MenuItem;
import android.view.View;
import android.widget.EditText;
import android.widget.Toast;

/*
 * 测试SP存储的界面
 */
public class SpActivity extends Activity {


	private EditText et_sp_key;
	private EditText et_sp_value;
	private SharedPreferences sp;
	@Override
	protected void onCreate(Bundle savedInstanceState) {


		super.onCreate(savedInstanceState);
		setContentView(R.layout.activity_sp);

		et_sp_key = (EditText) findViewById(R.id.et_sp_key);

		et_sp_value = (EditText) findViewById(R.id.et_sp_value);
		// 1、得到sp对象
		sp = getSharedPreferences("itzheng", Context.MODE_PRIVATE);

	}

	public void save(View v) {


		// 2、得到editor对象
		Editor edit = sp.edit();
		// 3、得到输入的key/value
		String key = et_sp_key.getText().toString();
		String value = et_sp_value.getText().toString();
		// / 4、使用editor保存key-value
		edit.putString(key, value).commit();
		// 5、提示
		Toast.makeText(this, "保存完成!", 0).show();

	}

	public void read(View v) {


		//1、得到输入的key
		String key = et_sp_key.getText().toString();
		//2、根据key读取value
		String value = sp.getString(key, null);
		//3、显示

		if(value == null){


			Toast.makeText(this, "没有找到对应的value的值", 0).show();
		}else{


			et_sp_value.setText(value);
		}
	}
}
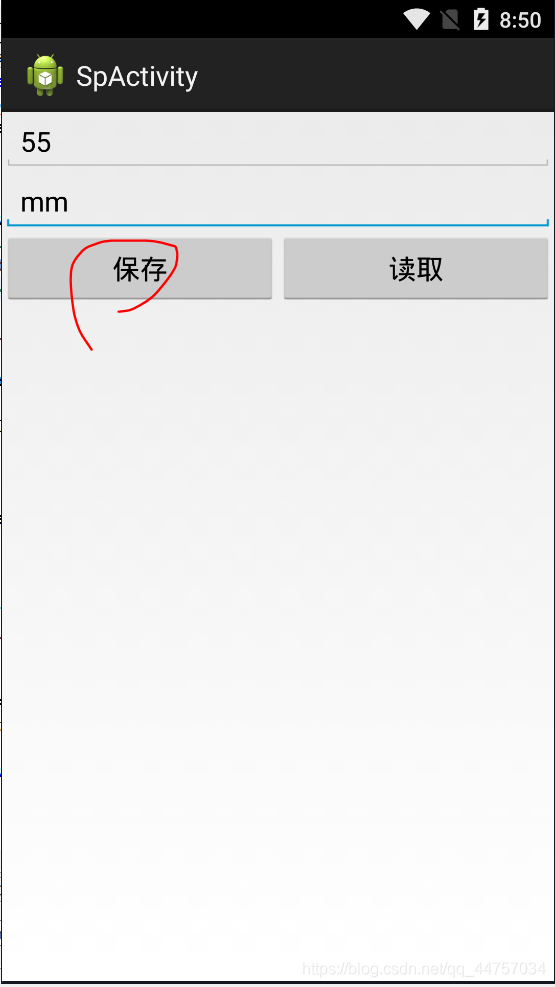
(5)输入对应的键和值后保存,单独输入键后就可以得到对应的值
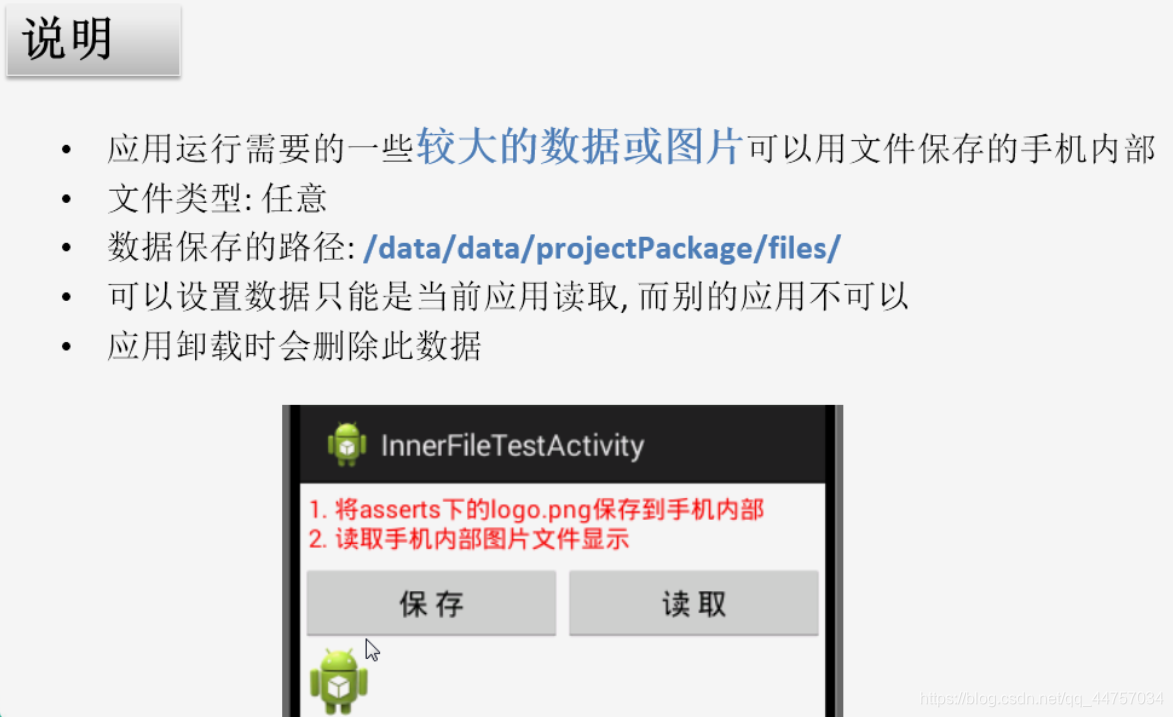
2、手机内部file存储
(1)说明
(2)相关API

(3)创建IFActivity
修改MainActivity
(4)完善布局:修改activity_if.xml
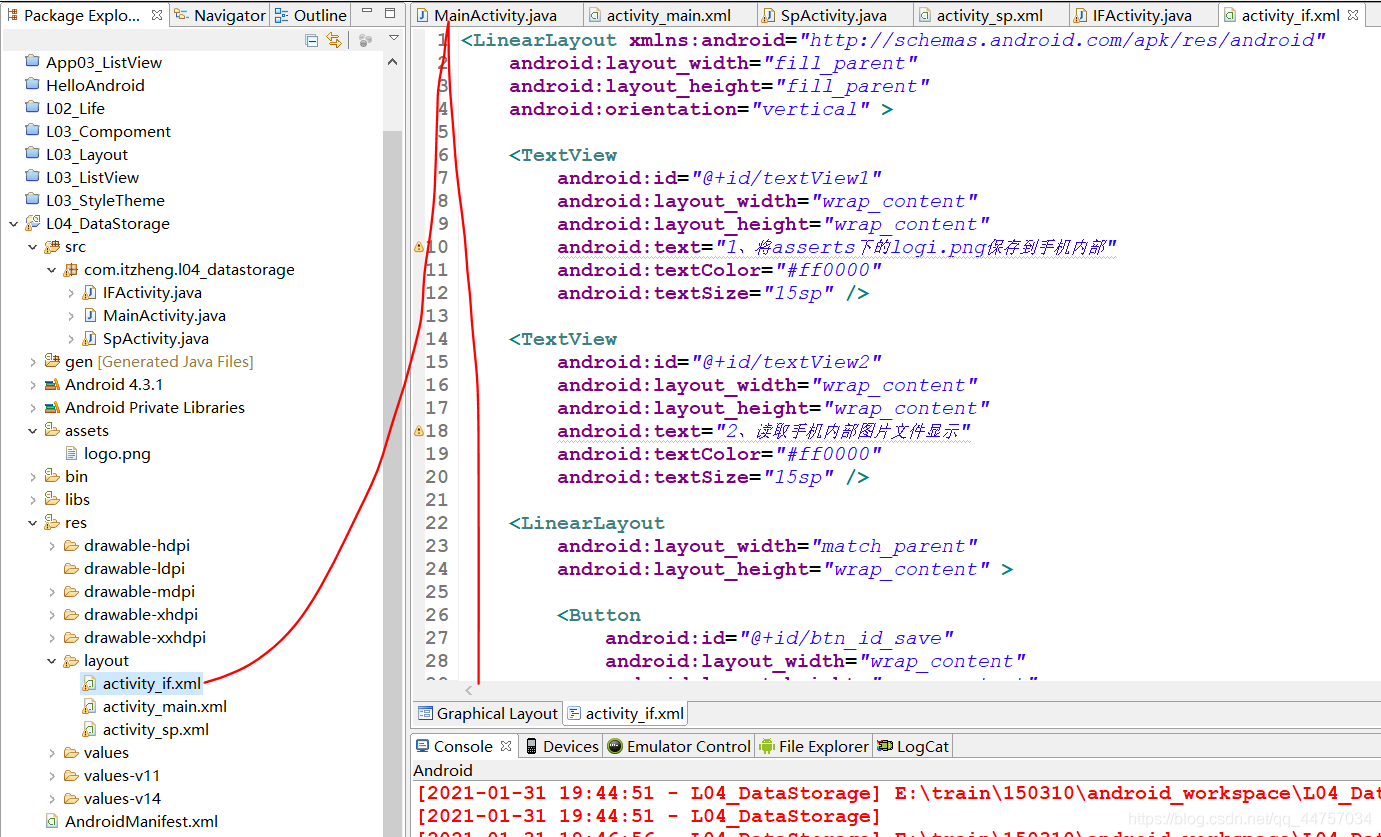
<LinearLayout xmlns:android="http://schemas.android.com/apk/res/android"
android:layout_width="fill_parent"
android:layout_height="fill_parent"
android:orientation="vertical" >
<TextView
android:id="@+id/textView1"
android:layout_width="wrap_content"
android:layout_height="wrap_content"
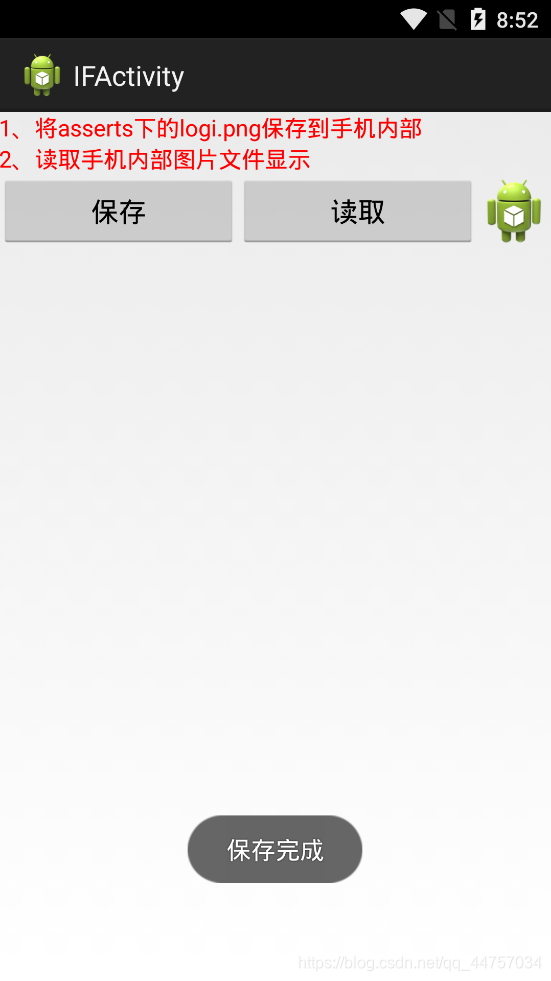
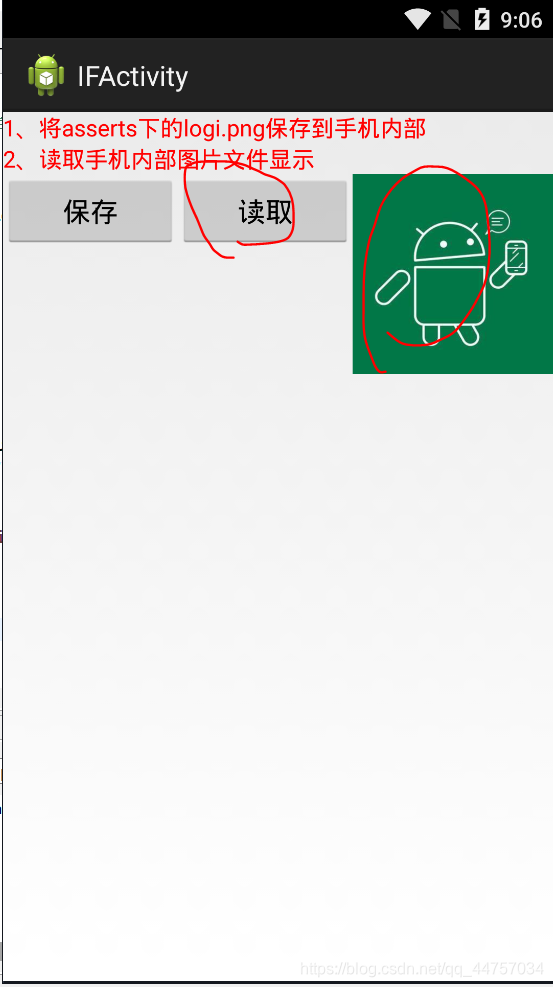
android:text="1、将asserts下的logi.png保存到手机内部"
android:textColor="#ff0000"
android:textSize="15sp" />
<TextView
android:id="@+id/textView2"
android:layout_width="wrap_content"
android:layout_height="wrap_content"
android:text="2、读取手机内部图片文件显示"
android:textColor="#ff0000"
android:textSize="15sp" />
<LinearLayout
android:layout_width="match_parent"
android:layout_height="wrap_content" >
<Button
android:id="@+id/btn_id_save"
android:layout_width="wrap_content"
android:layout_height="wrap_content"
android:layout_weight="1"
android:onClick="save"
android:text="保存" />
<Button
android:id="@+id/btn_id_read"
android:layout_width="wrap_content"
android:layout_height="wrap_content"
android:layout_weight="1"
android:onClick="read"
android:text="读取" />
<ImageView
android:id="@+id/iv_if"
android:layout_width="wrap_content"
android:layout_height="wrap_content"
android:src="@drawable/ic_launcher" />
</LinearLayout>
</LinearLayout>
(5)将logo.png复制到assets
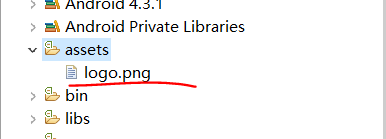
logo.png

(6)完善IFActivity,实现功能
1)完善save方法

private ImageView iv_if;

	@Override
	protected void onCreate(Bundle savedInstanceState) {


		super.onCreate(savedInstanceState);
		setContentView(R.layout.activity_if);

		iv_if = (ImageView) findViewById(R.id.iv_if);
	}

	public void save(View v) throws IOException {


		// 保存
		// 1、得到InputStream-->读取assets下的logo.png图片
		// 得到AssetManager
		AssetManager manager = getAssets();
		// 读取文件
		InputStream is = manager.open("logo.png");
		// 2、得到OutputStream-->/data/data/packageName/files/logo.png
		FileOutputStream fos = openFileOutput("logo.png", Context.MODE_PRIVATE);
		// 3、边读边写
		byte[] buffer = new byte[1024];
		int len = -1;
		// is.read(buffer)将图片的数据读取到buffer数组当中,并同时放入到fos输出流当中去
		while ((len = is.read(buffer)) != -1) {


			fos.write(buffer, 0, len);
		}
		fos.close();
		// 4、提示
		Toast.makeText(this, "保存完成", 0).show();
	}
测试
2)完善read方法:读取并显示
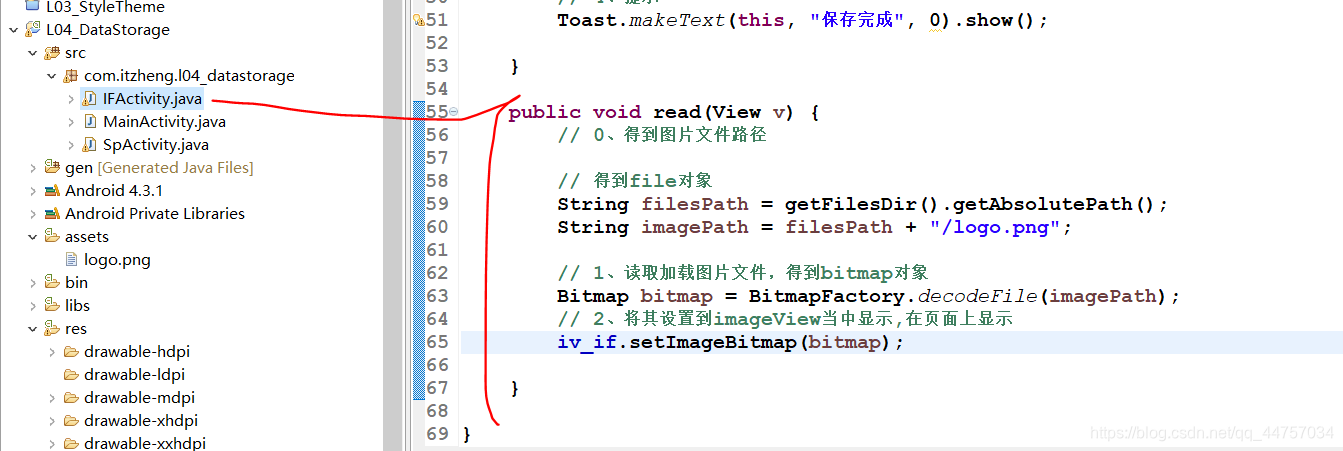
public void read(View v) {


		// 0、得到图片文件路径

		// 得到file对象
		String filesPath = getFilesDir().getAbsolutePath();
		String imagePath = filesPath + "/logo.png";

		// 1、读取加载图片文件,得到bitmap对象
		Bitmap bitmap = BitmapFactory.decodeFile(imagePath);
		// 2、将其设置到imageView当中显示,在页面上显示
		iv_if.setImageBitmap(bitmap);

	}
测试
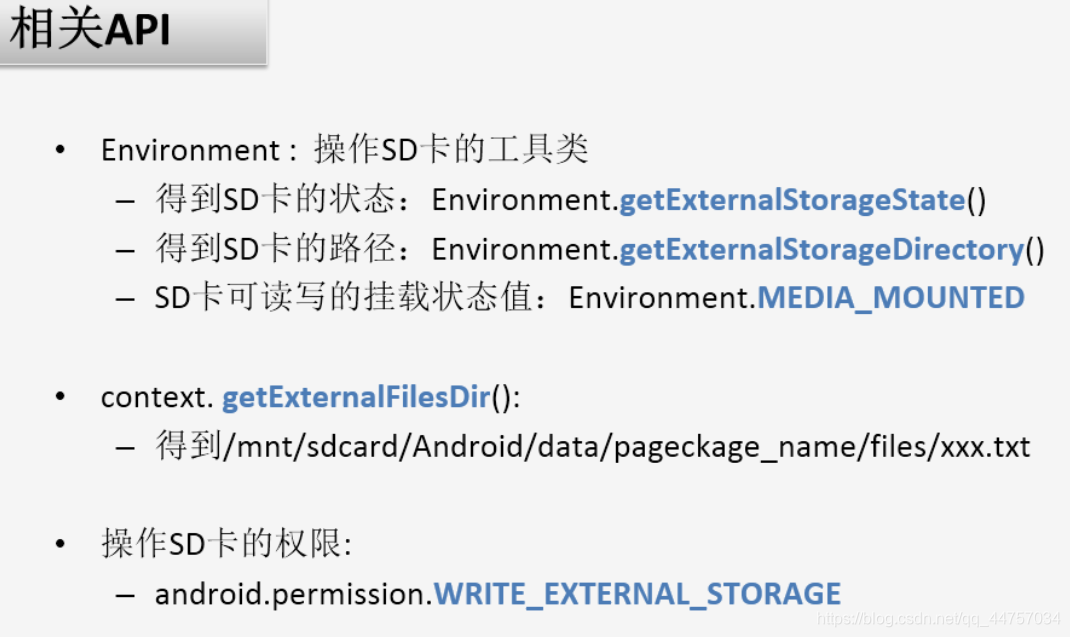
3、手机外部file存储:SD卡外部file存储
1)读取
(1)说明
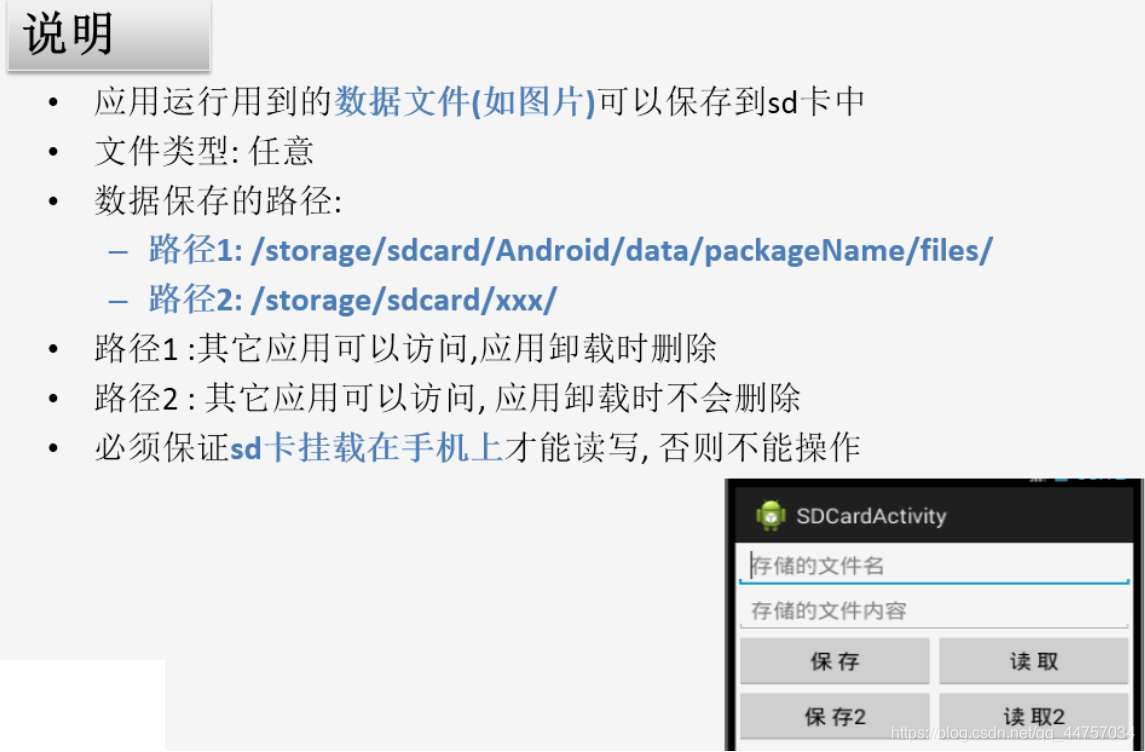
(2)相关API
2)保存(卸载后数据消失)
(1)修改MainActivity的onClickOF方法

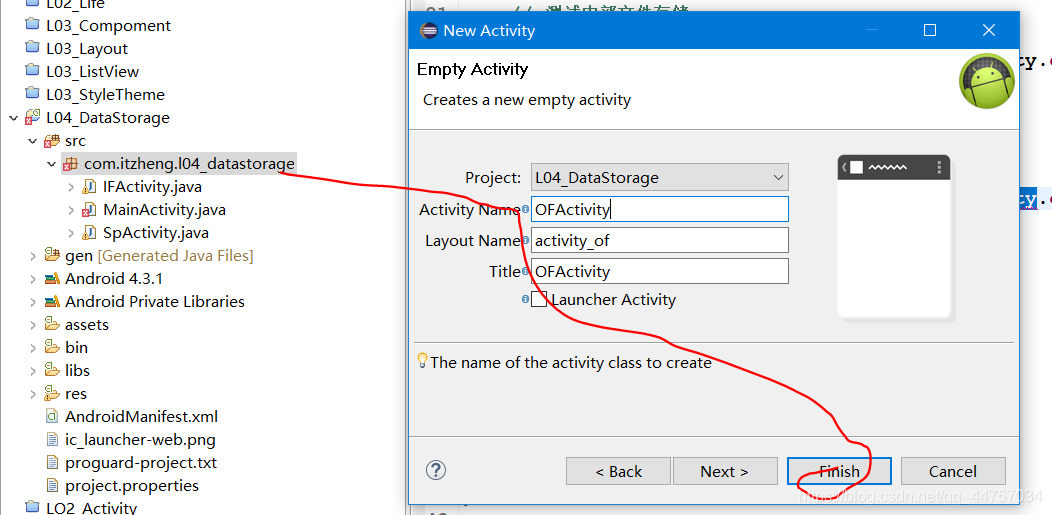
(2)创建OFActivity
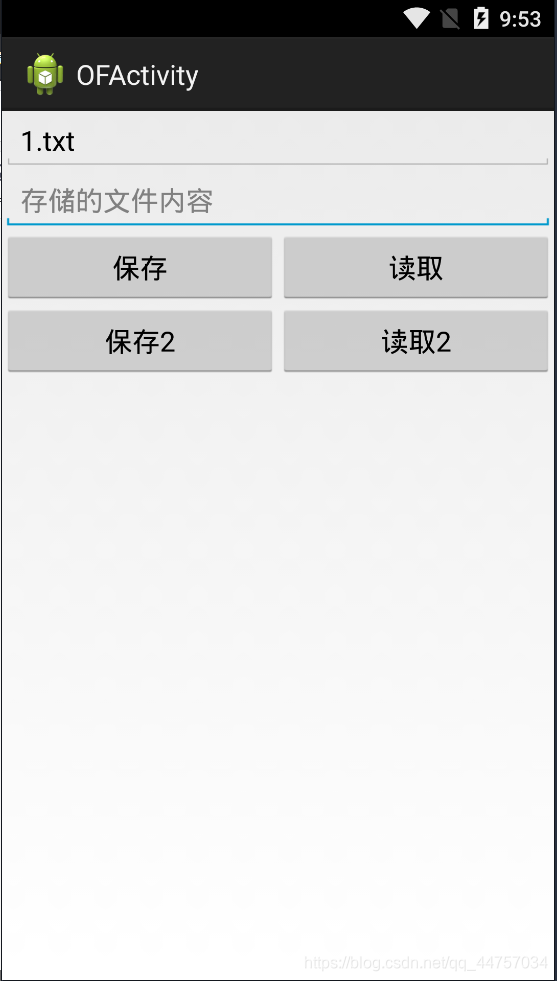
(3)完善布局修改activity_of.xml

<LinearLayout xmlns:android="http://schemas.android.com/apk/res/android"
    android:layout_width="fill_parent"
    android:layout_height="fill_parent"
    android:orientation="vertical" >
    <EditText
        android:id="@+id/et_of_name"
        android:layout_width="match_parent"
        android:layout_height="wrap_content"
        android:ems="10"
        android:hint="存储的文件名"
         >
        <requestFocus />
    </EditText>
    <EditText
        android:id="@+id/et_of_content"
        android:layout_width="match_parent"
        android:layout_height="wrap_content"
        android:ems="10"
        android:hint="存储的文件内容"
        />
    <LinearLayout
        android:layout_width="match_parent"
        android:layout_height="wrap_content" >
        <Button
            android:layout_width="0dp"
            android:layout_height="wrap_content"
            android:layout_weight="1"
            android:onClick="save"
            android:text="保存" />
        <Button
            android:layout_width="0dp"
            android:layout_height="wrap_content"
            android:layout_weight="1"
            android:onClick="read"
            android:text="读取" />
    </LinearLayout>
     <LinearLayout
        android:layout_width="match_parent"
        android:layout_height="wrap_content" >
        <Button
            android:layout_width="0dp"
            android:layout_height="wrap_content"
            android:layout_weight="1"
            android:onClick="save2"
            android:text="保存2" />
        <Button
            android:layout_width="0dp"
            android:layout_height="wrap_content"
            android:layout_weight="1"
            android:onClick="read2"
            android:text="读取2" />
    </LinearLayout>
</LinearLayout>
(4)完善OFActivity
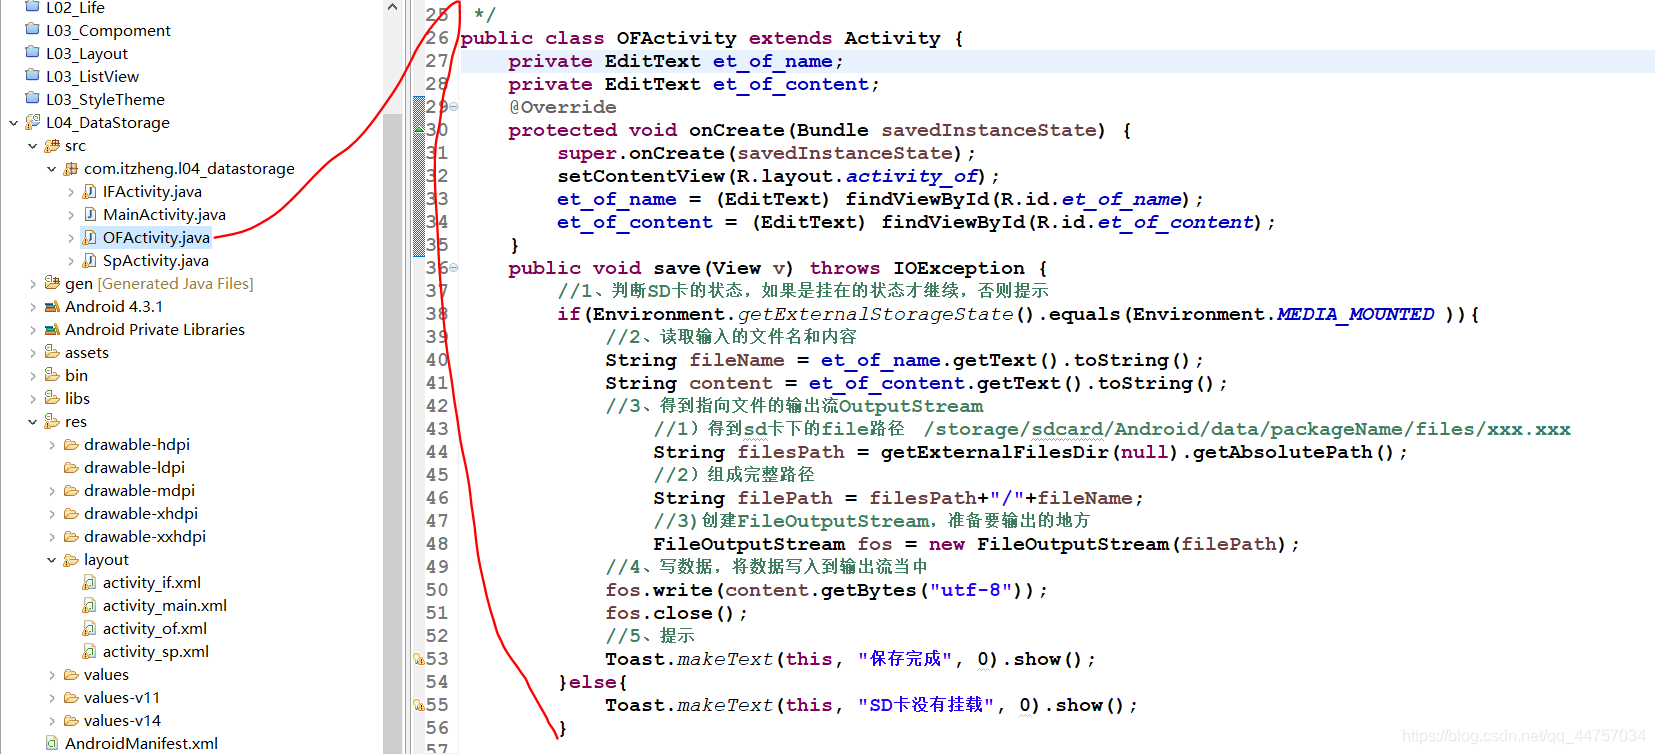
private EditText et_of_name;
	private EditText et_of_content;
	@Override
	protected void onCreate(Bundle savedInstanceState) {


		super.onCreate(savedInstanceState);
		setContentView(R.layout.activity_of);
		et_of_name = (EditText) findViewById(R.id.et_of_name);
		et_of_content = (EditText) findViewById(R.id.et_of_content);
	}
	public void save(View v) throws IOException {


		//1、判断SD卡的状态,如果是挂在的状态才继续,否则提示
		if(Environment.getExternalStorageState().equals(Environment.MEDIA_MOUNTED )){


			//2、读取输入的文件名和内容
			String fileName = et_of_name.getText().toString();
			String content = et_of_content.getText().toString();
			//3、得到指向文件的输出流OutputStream
				//1)得到sd卡下的file路径   /storage/sdcard/Android/data/packageName/files/xxx.xxx
				String filesPath = getExternalFilesDir(null).getAbsolutePath();
				//2)组成完整路径
				String filePath = filesPath+"/"+fileName;
				//3)创建FileOutputStream,准备要输出的地方
				FileOutputStream fos = new FileOutputStream(filePath);
			//4、写数据,将数据写入到输出流当中
			fos.write(content.getBytes("utf-8"));
			fos.close();
			//5、提示
			Toast.makeText(this, "保存完成", 0).show();
		}else{


			Toast.makeText(this, "SD卡没有挂载", 0).show();
		}
	}
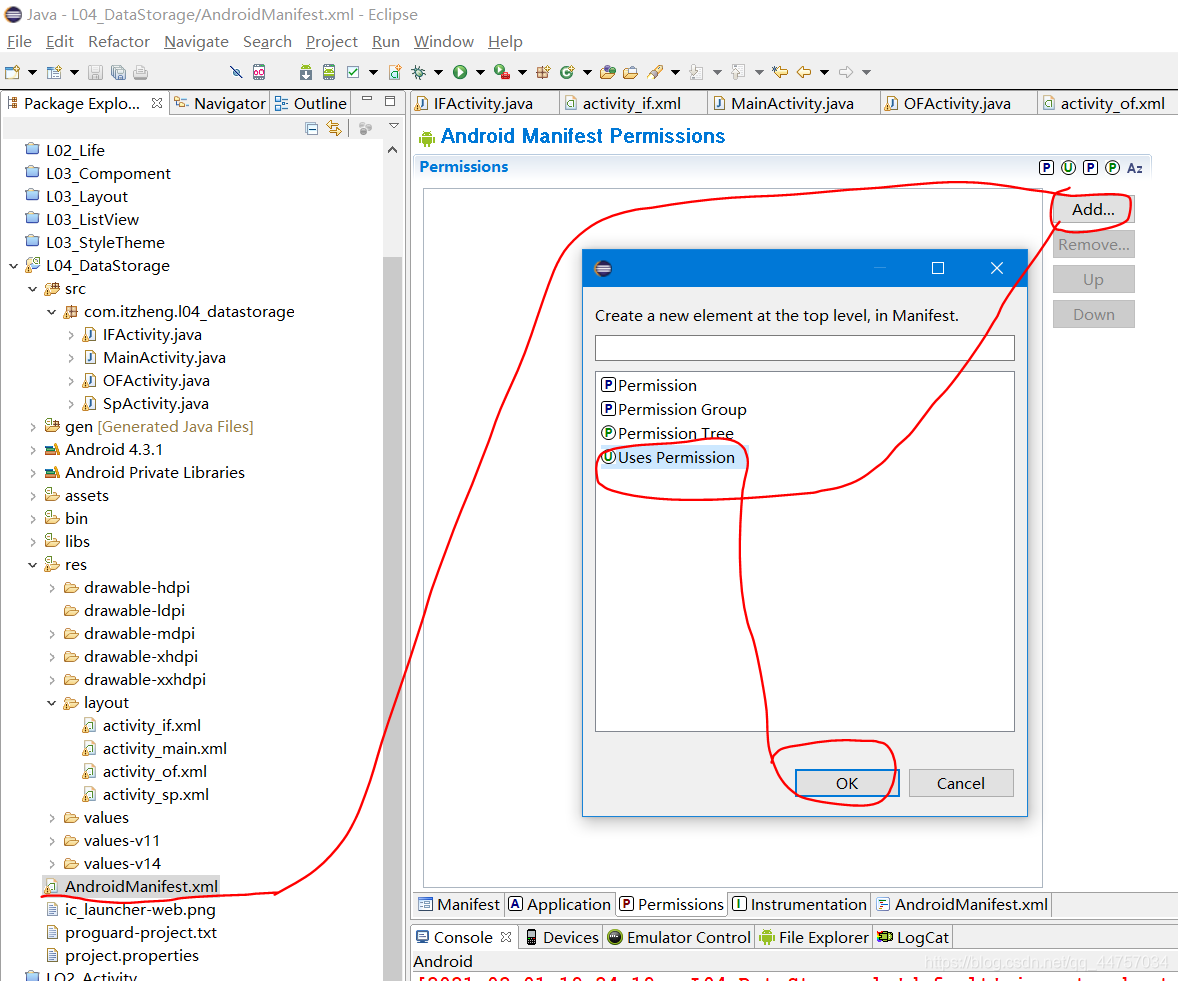
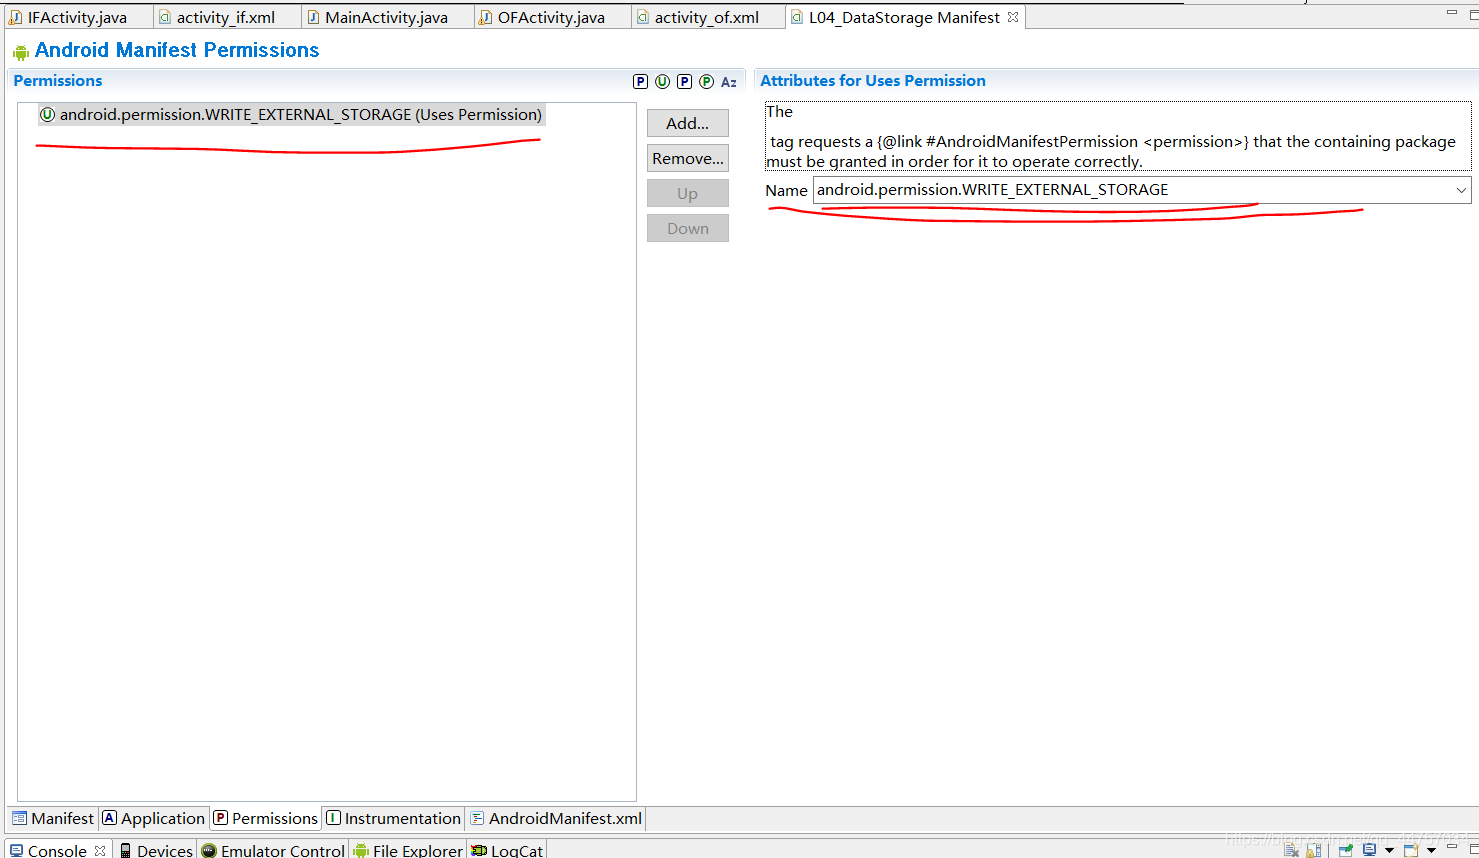
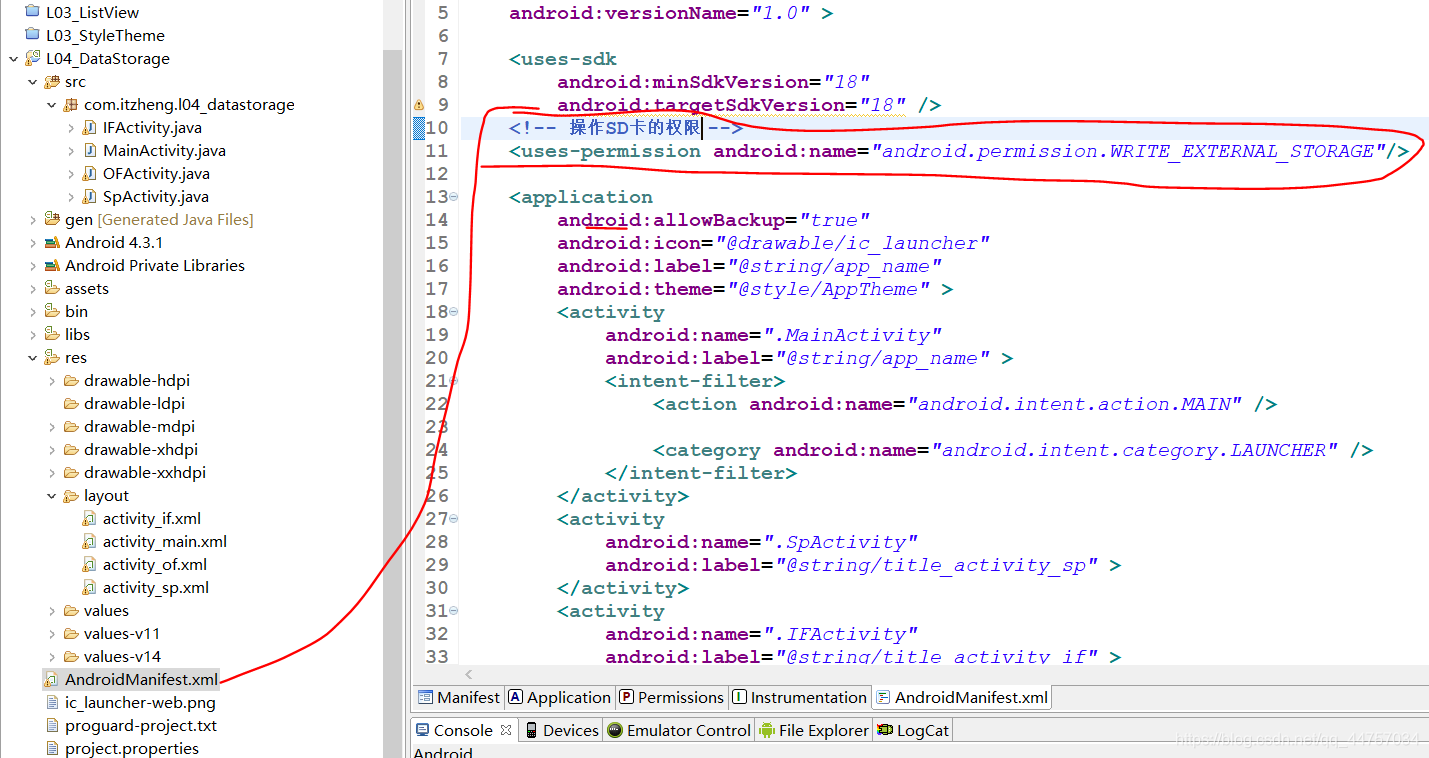
(5)添加权限
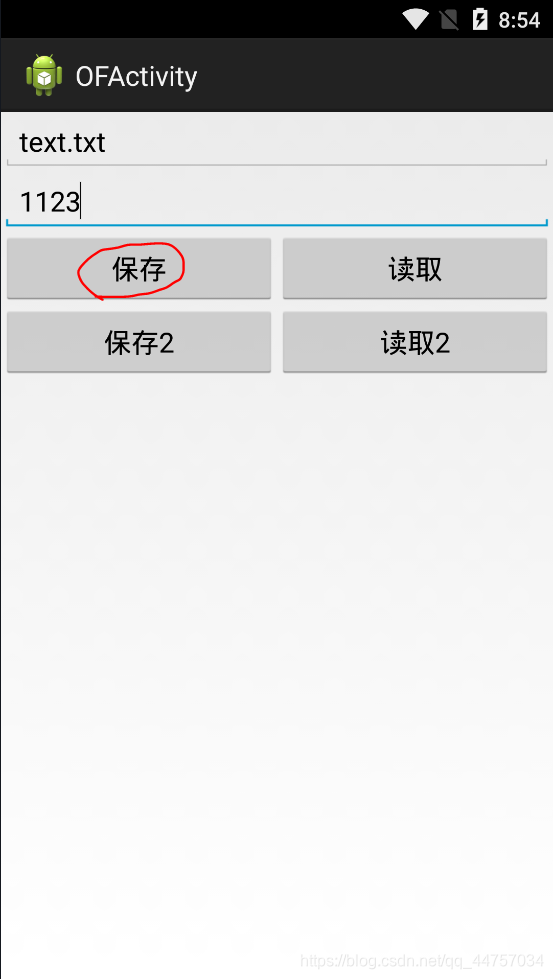
(6)测试
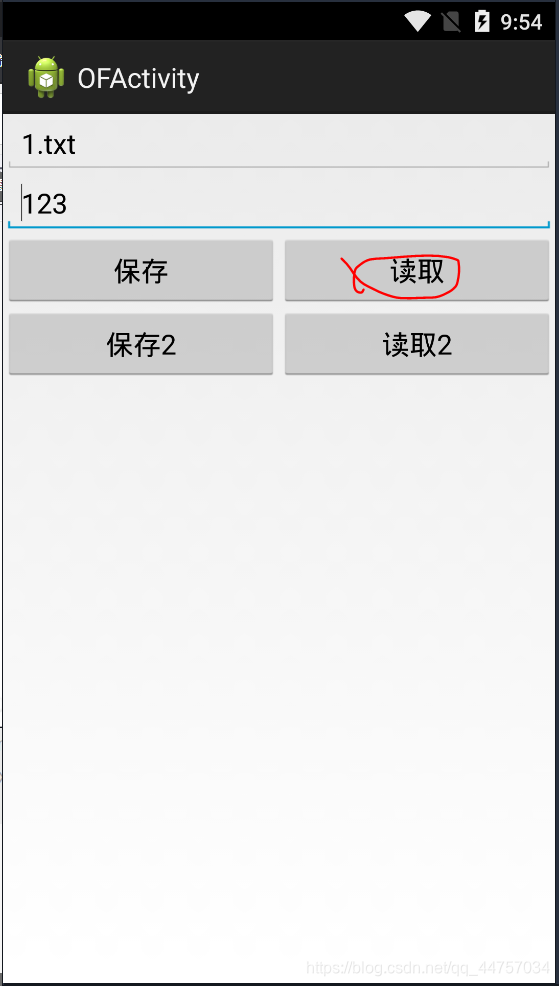
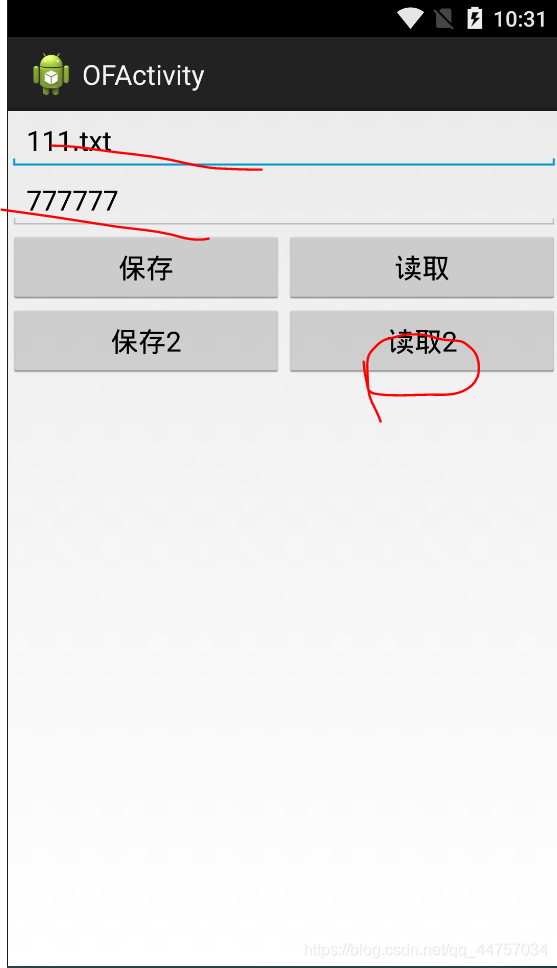
3)读取:通过文件名将内容读取到页面上:
(1)完善OFActivity当中的read方法
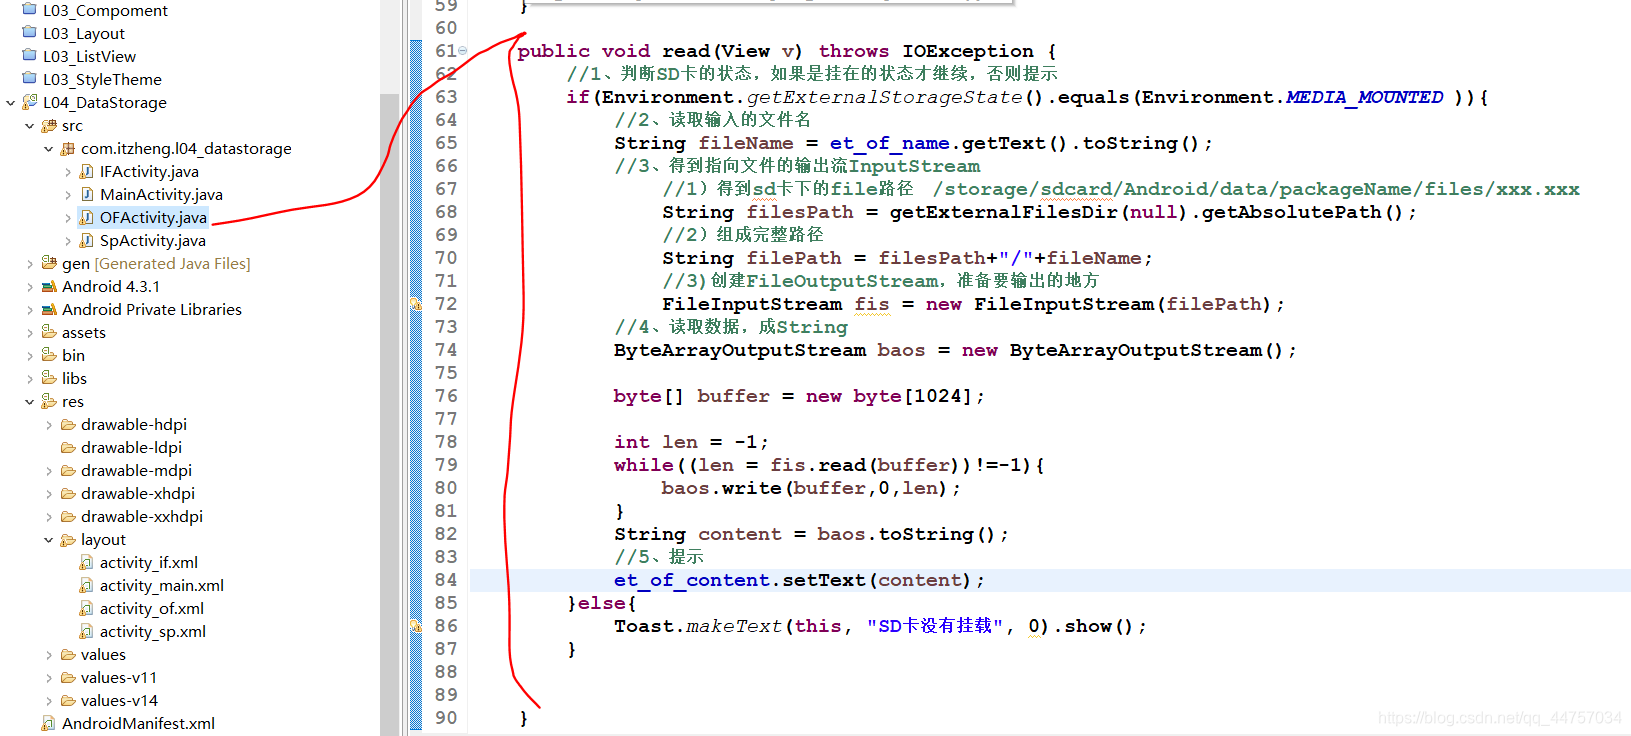
public void read(View v) throws IOException {


		//1、判断SD卡的状态,如果是挂在的状态才继续,否则提示
		if(Environment.getExternalStorageState().equals(Environment.MEDIA_MOUNTED )){


			//2、读取输入的文件名
			String fileName = et_of_name.getText().toString();
			//3、得到指向文件的输出流InputStream
				//1)得到sd卡下的file路径   /storage/sdcard/Android/data/packageName/files/xxx.xxx
				String filesPath = getExternalFilesDir(null).getAbsolutePath();
				//2)组成完整路径
				String filePath = filesPath+"/"+fileName;
				//3)创建FileOutputStream,准备要输出的地方
				FileInputStream fis = new FileInputStream(filePath);
			//4、读取数据,成String
			ByteArrayOutputStream baos = new ByteArrayOutputStream();

			byte[] buffer = new byte[1024];

			int len = -1;
			while((len = fis.read(buffer))!=-1){


				baos.write(buffer,0,len);
			}
			String content = baos.toString();
			//5、提示
			et_of_content.setText(content);
		}else{


			Toast.makeText(this, "SD卡没有挂载", 0).show();
		}
	}
(2)测试
4)手机外部文件保存(卸载后数据保存)
(1)OFActivity当中的save2
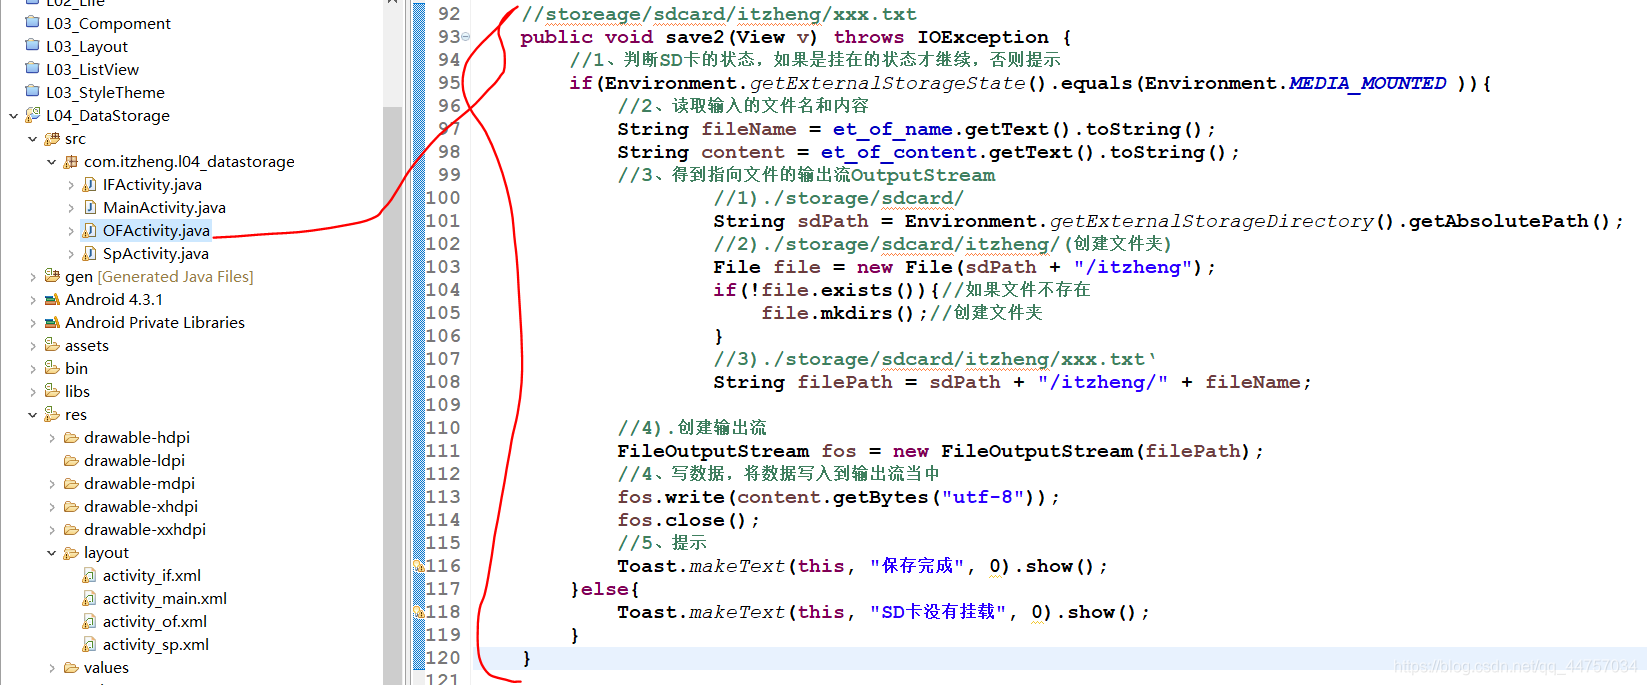
//storeage/sdcard/itzheng/xxx.txt
	public void save2(View v) throws IOException {


		//1、判断SD卡的状态,如果是挂在的状态才继续,否则提示
		if(Environment.getExternalStorageState().equals(Environment.MEDIA_MOUNTED )){


			//2、读取输入的文件名和内容
			String fileName = et_of_name.getText().toString();
			String content = et_of_content.getText().toString();
			//3、得到指向文件的输出流OutputStream
					//1)./storage/sdcard/
					String sdPath = Environment.getExternalStorageDirectory().getAbsolutePath();
					//2)./storage/sdcard/itzheng/(创建文件夹)
					File file = new File(sdPath + "/itzheng");
					if(!file.exists()){

    //如果文件不存在
						file.mkdirs();//创建文件夹
					}
					//3)./storage/sdcard/itzheng/xxx.txt‘
					String filePath = sdPath + "/itzheng/" + fileName;

			//4).创建输出流
			FileOutputStream fos = new FileOutputStream(filePath);
			//4、写数据,将数据写入到输出流当中
			fos.write(content.getBytes("utf-8"));
			fos.close();
			//5、提示
			Toast.makeText(this, "保存完成", 0).show();
		}else{


			Toast.makeText(this, "SD卡没有挂载", 0).show();
		}
	}
(2)测试
5)手机外部文件读取
(1)修改OFActivity当中的read2
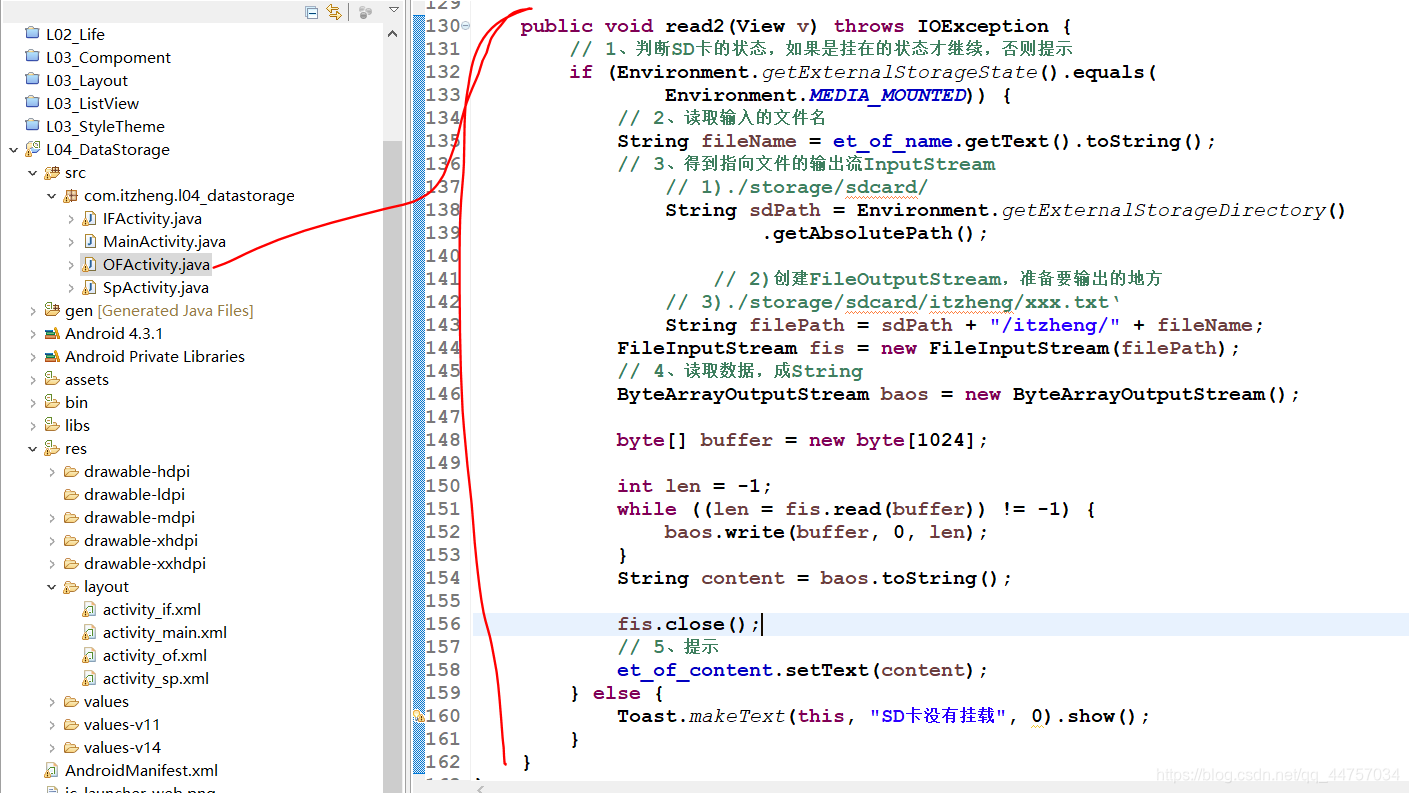
public void read2(View v) throws IOException {


		// 1、判断SD卡的状态,如果是挂在的状态才继续,否则提示
		if (Environment.getExternalStorageState().equals(
				Environment.MEDIA_MOUNTED)) {


			// 2、读取输入的文件名
			String fileName = et_of_name.getText().toString();
			// 3、得到指向文件的输出流InputStream
				// 1)./storage/sdcard/
				String sdPath = Environment.getExternalStorageDirectory()
						.getAbsolutePath();

					// 2)创建FileOutputStream,准备要输出的地方
				// 3)./storage/sdcard/itzheng/xxx.txt‘
				String filePath = sdPath + "/itzheng/" + fileName;
			FileInputStream fis = new FileInputStream(filePath);
			// 4、读取数据,成String
			ByteArrayOutputStream baos = new ByteArrayOutputStream();

			byte[] buffer = new byte[1024];

			int len = -1;
			while ((len = fis.read(buffer)) != -1) {


				baos.write(buffer, 0, len);
			}
			String content = baos.toString();

			fis.close();
			// 5、提示
			et_of_content.setText(content);
		} else {


			Toast.makeText(this, "SD卡没有挂载", 0).show();
		}
	}
(2)测试
三、应用练习
1、修改防盗名称
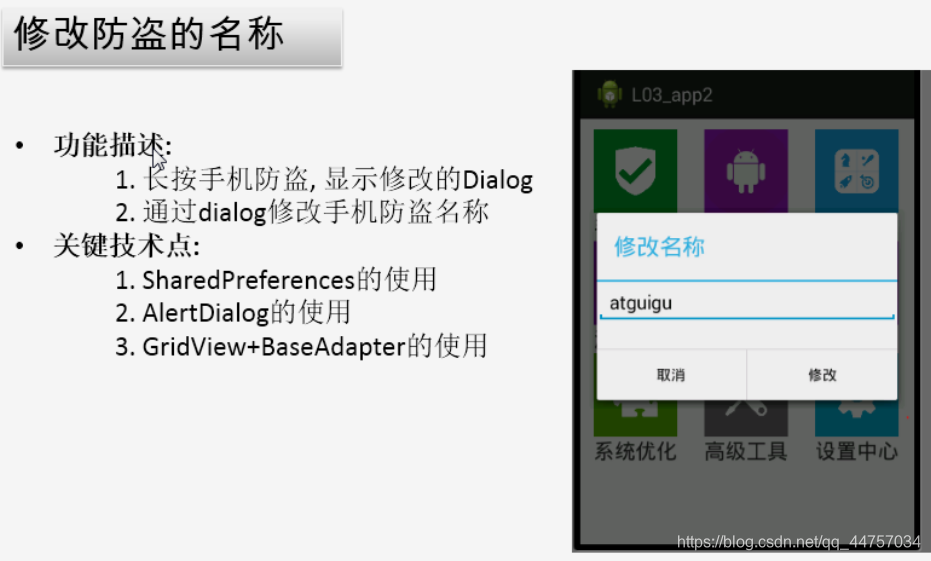
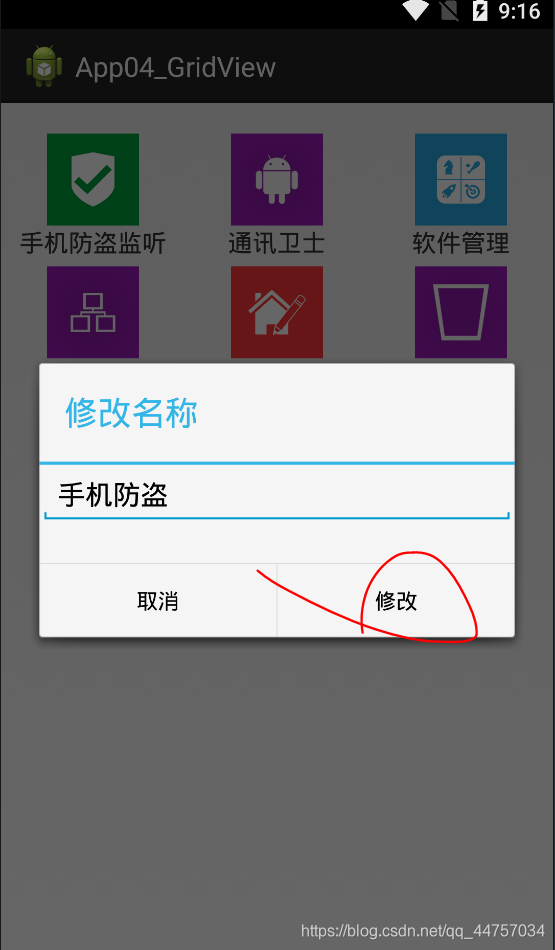
(1)给gridView的item添加长按监听(只能第一个有响应)
(2)在回调方法当中显示AlertDialog
(3)处理点击修改
1)界面更新
2)将名称保存到sp当中
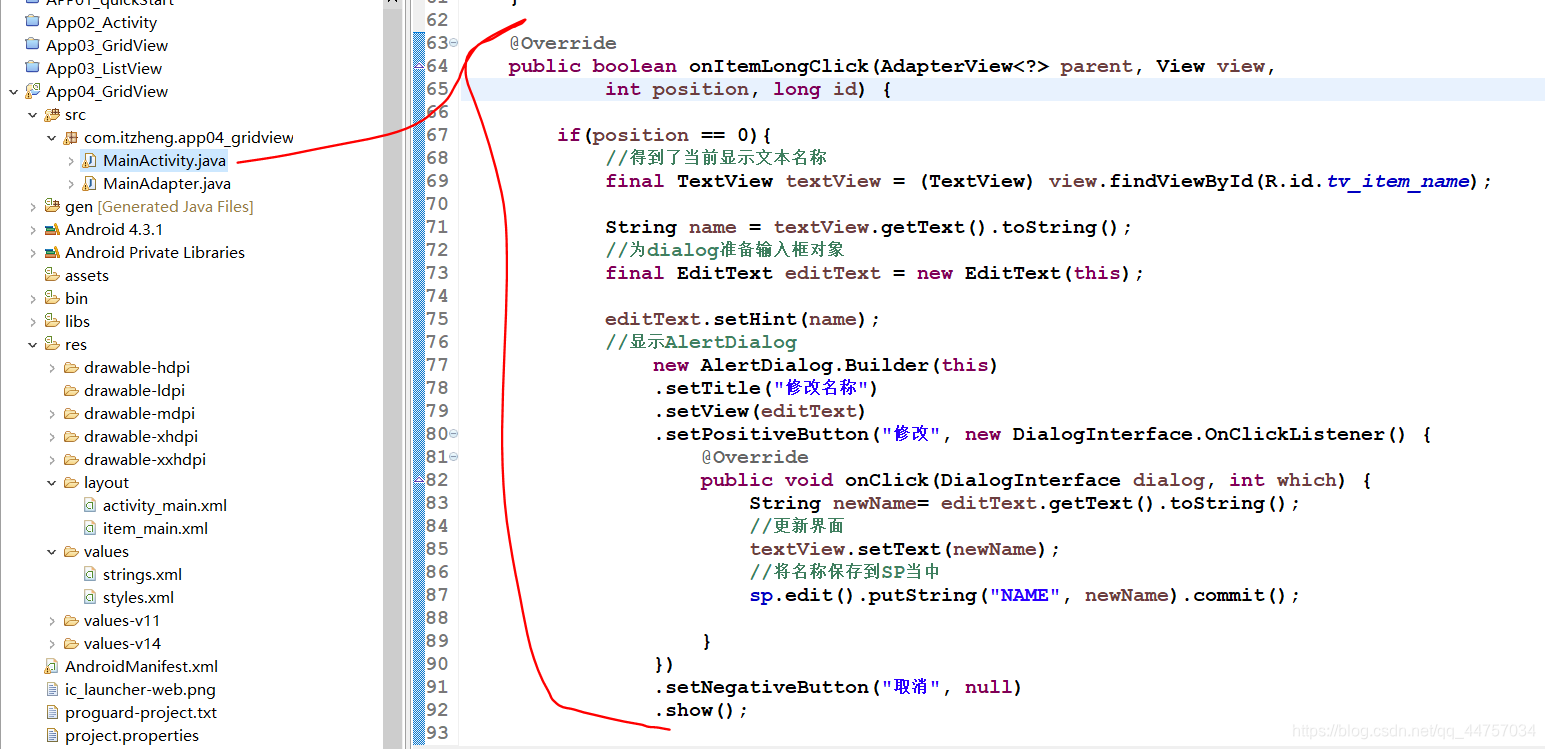
下面是源代码完善MainActivity当中的onItemLongClick
package com.itzheng.app04_gridview;
import android.app.Activity;
import android.app.AlertDialog;
import android.content.Context;
import android.content.DialogInterface;
import android.content.SharedPreferences;
import android.os.Bundle;
import android.view.View;
import android.widget.AdapterView;
import android.widget.AdapterView.OnItemClickListener;
import android.widget.AdapterView.OnItemLongClickListener;
import android.widget.EditText;
import android.widget.GridView;
import android.widget.TextView;
import android.widget.Toast;
public class MainActivity extends Activity implements OnItemLongClickListener {
private GridView gv_main;
private MainAdapter adapter;
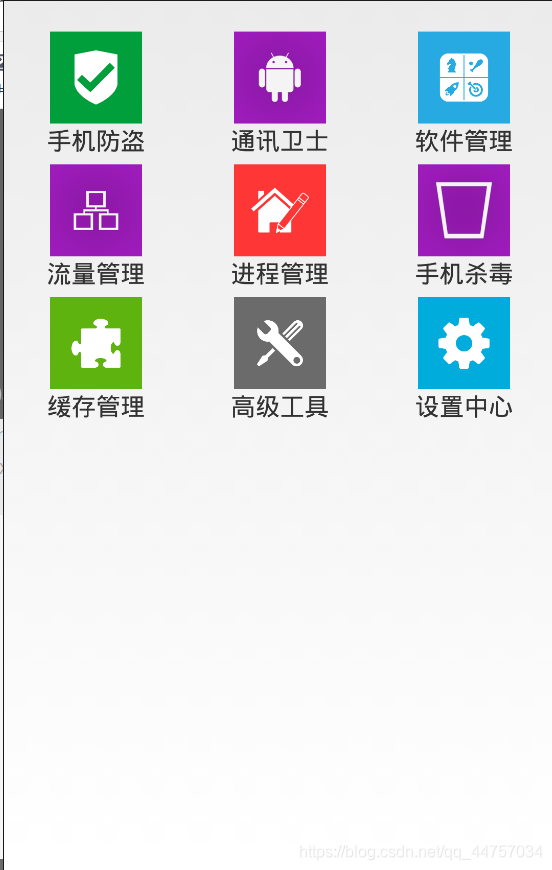
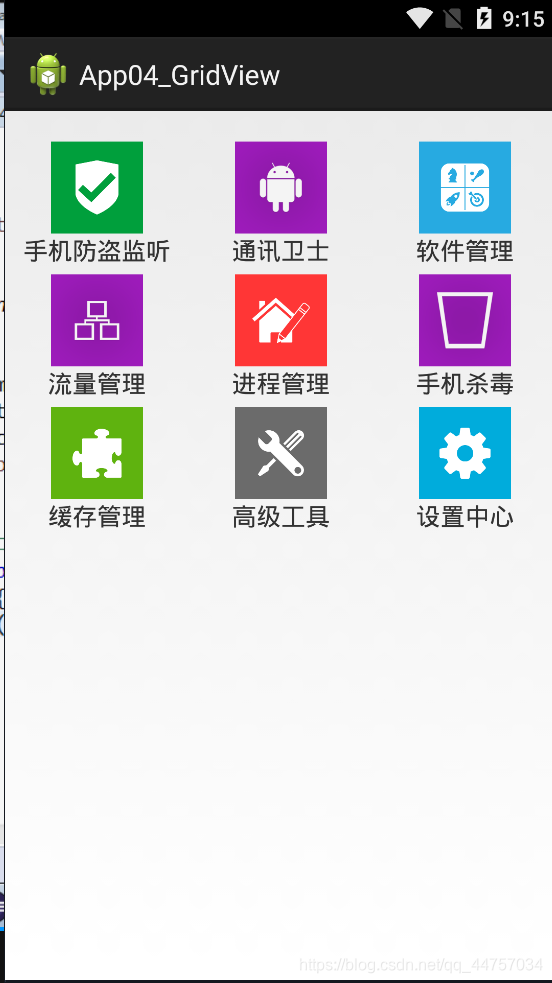
String[] names = new String[] {
"手机防盗", "通讯卫士", "软件管理", "流量管理", "进程管理",
"手机杀毒", "缓存管理", "高级工具", "设置中心" };
int[] icons = new int[] {
R.drawable.widget01, R.drawable.widget02,
R.drawable.widget03, R.drawable.widget04, R.drawable.widget05,
R.drawable.widget06, R.drawable.widget07, R.drawable.widget08,
R.drawable.widget09 };
private SharedPreferences sp;
@Override
protected void onCreate(Bundle savedInstanceState) {
super.onCreate(savedInstanceState);
setContentView(R.layout.activity_main);
// 获取主界面
gv_main = (GridView) findViewById(R.id.gv_main);
// 获取item也就是页面上的元件
adapter = new MainAdapter(this, names, icons);
// 将元件设置到页面上
gv_main.setAdapter(adapter);
// 给gridView 的Item设置点击监听
gv_main.setOnItemClickListener(new OnItemClickListener() {
@Override
public void onItemClick(AdapterView<?> parent, View view,
int position, long id) {
// 得到当前点击item的名称
String name = names[position];
// 提示
Toast.makeText(MainActivity.this, name, 1).show();
}
});
// 给元件设置长按监听
gv_main.setOnItemLongClickListener(this);
sp = getSharedPreferences("itzheng", Context.MODE_PRIVATE);
}
@Override
public boolean onItemLongClick(AdapterView<?> parent, View view,
int position, long id) {
if(position == 0){
//得到了当前显示文本名称
final TextView textView = (TextView) view.findViewById(R.id.tv_item_name);
String name = textView.getText().toString();
//为dialog准备输入框对象
final EditText editText = new EditText(this);
editText.setHint(name);
//显示AlertDialog
new AlertDialog.Builder(this)
.setTitle("修改名称")
.setView(editText)
.setPositiveButton("修改", new DialogInterface.OnClickListener() {
@Override
public void onClick(DialogInterface dialog, int which) {
String newName= editText.getText().toString();
//更新界面
textView.setText(newName);
//将名称保存到SP当中
sp.edit().putString("NAME", newName).commit();
}
})
.setNegativeButton("取消", null)
.show();
}
return true;
}
}
(4)保证退出后再进入显示修改过的名称:完善MainAdapter当中的getView方法
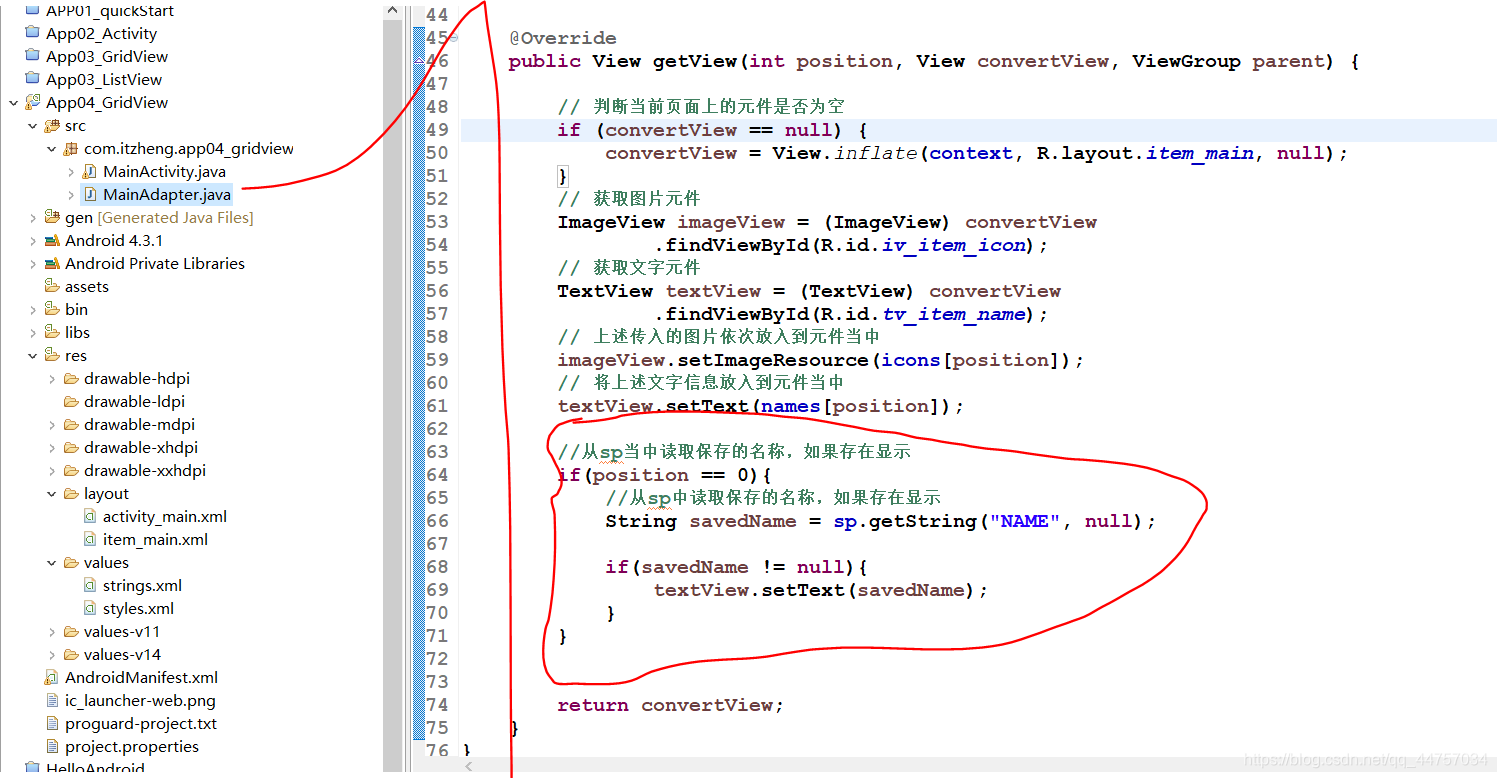
@Override
	public View getView(int position, View convertView, ViewGroup parent) {


		// 判断当前页面上的元件是否为空
		if (convertView == null) {


			convertView = View.inflate(context, R.layout.item_main, null);
		}
		// 获取图片元件
		ImageView imageView = (ImageView) convertView
				.findViewById(R.id.iv_item_icon);
		// 获取文字元件
		TextView textView = (TextView) convertView
				.findViewById(R.id.tv_item_name);
		// 上述传入的图片依次放入到元件当中
		imageView.setImageResource(icons[position]);
		// 将上述文字信息放入到元件当中
		textView.setText(names[position]);
		//从sp当中读取保存的名称,如果存在显示
		if(position == 0){


			//从sp中读取保存的名称,如果存在显示
			String savedName = sp.getString("NAME", null);

			if(savedName != null){


				textView.setText(savedName);
			}
		}
		return convertView;
	}
(5)测试
长按