nginx 访问控制
一、nginx 访问控制模块
基于IP的访问控制:http_access_module
1、配置语法
Syntax:allow address | CIDR | unix: | all;
default:默认无
Context:http,server,location

Syntax:deny address | CIDR | unix: | all;
default:默认无
Context:http,server,location
===================================================
allow    允许     //ip或者网段
deny    拒绝     //ip或者网段
2、配置测试
编辑/etc/nginx/conf.d/access_mod.conf内容如下:
[root@192 ~]# vim /etc/nginx/conf.d/access_mod.conf
server {
listen 80;
server_name localhost;
location / {
root /usr/share/nginx/html;
index index.html index.hml;
deny 192.168.1.8;
allow all;
}
}
[root@192 ~]# nginx -t
[root@192 ~]# nginx -s reload
#需要注意:
1.按顺序匹配,已经被匹配的ip或者网段,后面不再被匹配。
2.如果先允许所有ip访问,在定义拒绝访问。那么拒绝访问不生效。
deny 1.11.1.1
allow all;
3.默认为allow all
宿主机IP为`192.168.1.8`,虚拟机IP为`192.168.1.11`,故这里禁止宿主机访问,允许其他所有IP访问。
宿主机访问`http://192.168.1.11`,显示`403 Forbidden`。
当然也可以反向配置,同时也可以使用IP网段的配置方式,如`allow 192.168.1.0/24;`,表示满足此网段的IP都可以访问。
指定`location`拒绝所有请求
如果你想拒绝某个指定URL地址的所有请求,只需要在`location`块中配置`deny` **all**指令:
```shell
[root@192 ~]# vim /etc/nginx/conf.d/access_mod.conf
server {
listen 80;
server_name localhost;
location / {
root /usr/share/nginx/html;
index index.html index.hml;
deny all; #拒绝所有
}
}
[root@192 ~]# nginx -t
[root@192 ~]# nginx -s reload
二、nginx 变量
1、nginx安装echo模块
查看已经安装的nginx的版本
[root@192 ~]# nginx -V
上传或者下载一个相同版本的nginx包
[root@192 ~]# ls
anaconda-ks.cfg  nginx-1.16.0.tar.gz
下载echo模块的安装包
[root@192 ~]# wget https://github.com/openresty/echo-nginx-module/archive/v0.61.tar.gz
[root@192 ~]# ls
anaconda-ks.cfg  nginx-1.16.0.tar.gz  v0.61.tar.gz
解压到相同路径下:
[root@192 ~]# tar xzf nginx-1.16.0.tar.gz -C /usr/local/
[root@192 ~]# tar xzf v0.61.tar.gz -C /usr/local/
安装编译工具
[root@192 ~]# cd /usr/local/
[root@192 local]# yum -y install pcre pcre-devel openssl openssl-devel gcc gcc-c++   zlib zlib-devel gd-devel
添加模块:
[root@192 local]# cd nginx-1.16.0/
添加上原来已经有的参数和新添加的模块:
[root@192 nginx-1.16.0]# ./configure --prefix=/etc/nginx --sbin-path=/usr/sbin/nginx --modules-path=/usr/lib64/nginx/modules --conf-path=/etc/nginx/nginx.conf --error-log-path=/var/log/nginx/error.log --http-log-path=/var/log/nginx/access.log --pid-path=/var/run/nginx.pid --lock-path=/var/run/nginx.lock --http-client-body-temp-path=/var/cache/nginx/client_temp --http-proxy-temp-path=/var/cache/nginx/proxy_temp --http-fastcgi-temp-path=/var/cache/nginx/fastcgi_temp --http-uwsgi-temp-path=/var/cache/nginx/uwsgi_temp --http-scgi-temp-path=/var/cache/nginx/scgi_temp --user=nginx --group=nginx --with-compat --with-file-aio --with-threads --with-http_addition_module --with-http_auth_request_module --with-http_dav_module --with-http_flv_module --with-http_gunzip_module --with-http_gzip_static_module --with-http_mp4_module --with-http_random_index_module --with-http_realip_module --with-http_secure_link_module --with-http_slice_module --with-http_ssl_module --with-http_stub_status_module --with-http_sub_module --with-http_v2_module --with-mail --with-mail_ssl_module --with-stream --with-stream_realip_module --with-stream_ssl_module --with-stream_ssl_preread_module --with-cc-opt='-O2 -g -pipe -Wall -Wp,-D_FORTIFY_SOURCE=2 -fexceptions -fstack-protector-strong --param=ssp-buffer-size=4 -grecord-gcc-switches -m64 -mtune=generic -fPIC' --with-ld-opt='-Wl,-z,relro -Wl,-z,now -pie' --add-module=/usr/local/echo-nginx-module-0.61
[root@192 nginx-1.16.0]# make   #编译,不要make install 否则会覆盖原来的文件
[root@192 nginx-1.16.0]# mv /usr/sbin/nginx /usr/sbin/nginx_bak #将原来的nignx备份
[root@192 nginx-1.16.0]# cp objs/nginx /usr/sbin/  拷贝nignx
[root@192 nginx-1.16.0]# systemctl restart nginx  #启动
[root@192 nginx-1.16.0]# nginx -V  查看模块是否添加成功
nginx version: nginx/1.16.0
built by gcc 4.8.5 20150623 (Red Hat 4.8.5-36) (GCC)
built with OpenSSL 1.0.2k-fips  26 Jan 2017
TLS SNI support enabled
configure arguments: --prefix=/etc/nginx --sbin-path=/usr/sbin/nginx --modules-path=/usr/lib64/nginx/modules --conf-path=/etc/nginx/nginx.conf --error-log-path=/var/log/nginx/error.log --http-log-path=/var/log/nginx/access.log --pid-path=/var/run/nginx.pid --lock-path=/var/run/nginx.lock --http-client-body-temp-path=/var/cache/nginx/client_temp --http-proxy-temp-path=/var/cache/nginx/proxy_temp --http-fastcgi-temp-path=/var/cache/nginx/fastcgi_temp --http-uwsgi-temp-path=/var/cache/nginx/uwsgi_temp --http-scgi-temp-path=/var/cache/nginx/scgi_temp --user=nginx --group=nginx --with-compat --with-file-aio --with-threads --with-http_addition_module --with-http_auth_request_module --with-http_dav_module --with-http_flv_module --with-http_gunzip_module --with-http_gzip_static_module --with-http_mp4_module --with-http_random_index_module --with-http_realip_module --with-http_secure_link_module --with-http_slice_module --with-http_ssl_module --with-http_stub_status_module --with-http_sub_module --with-http_v2_module --with-mail --with-mail_ssl_module --with-stream --with-stream_realip_module --with-stream_ssl_module --with-stream_ssl_preread_module --with-cc-opt='-O2 -g -pipe -Wall -Wp,-D_FORTIFY_SOURCE=2 -fexceptions -fstack-protector-strong --param=ssp-buffer-size=4 -grecord-gcc-switches -m64 -mtune=generic -fPIC' --with-ld-opt='-Wl,-z,relro -Wl,-z,now -pie' --add-module=/usr/local/echo-nginx-module-0.61
2、配置 $foo=hello
[root@192 ~]# cd /etc/nginx/conf.d/
[root@192 conf.d]# vim echo.conf
server {


        listen 80;
        server_name     localhost;
        location /test {


                set $foo hello;
                echo "foo: $foo";
        }
}
输出
[root@192 conf.d]# nginx -s reload
[root@192 conf.d]# curl localhost/test
foo: hello
Nginx 变量的创建只能发生在 Nginx 配置加载的时候,或者说 Nginx 启动的时候。而赋值操作则只会发生在请求实际处理的时候。这意味着不创建而直接使用变量会导致启动失败。
3、自定义变量
1、声明变量
可以在sever,location等标签中使用set命令声明变量,语法如下
set $变量名 变量值
注意:
- nginx 中的变量必须都以$开头
- nginx 的配置文件中所有使用的变量都必须是声明过的,否则 nginx 会无法启动并打印相关异常日志
内置预定义变量
内置预定义变量即无需声明就可以使用的变量,通常包括一个http请求或响应中一部分内容的值,以下为一些常用的内置预定义变量
| 变量名 | 定义 |
|---|---|
| $arg_PARAMETER | GET请求中变量名PARAMETER参数的值。 |
| $args | 这个变量等于GET请求中的参数。例如,foo=123&bar=blahblah;这个变量只可以被修改 |
| $binary_remote_addr | 二进制码形式的客户端地址。 |
| $body_bytes_sent | 传送页面的字节数 |
| $content_length | 请求头中的Content-length字段。 |
| $content_type | 请求头中的Content-Type字段。 |
| $cookie_COOKIE | cookie COOKIE的值。 |
| $document_root | 当前请求在root指令中指定的值。 |
| $document_uri | 与$uri相同。 |
| $host | 请求中的主机头(Host)字段,如果请求中的主机头不可用或者空,则为处理请求的server名称(处理请求的server的server_name指令的值)。值为小写,不包含端口。 |
| $hostname | 机器名使用 gethostname系统调用的值 |
| $http_HEADER | HTTP请求头中的内容,HEADER为HTTP请求中的内容转为小写,-变为_(破折号变为下划线),例如:$http_user_agent(Uaer-Agent的值); |
| $sent_http_HEADER | HTTP响应头中的内容,HEADER为HTTP响应中的内容转为小写,-变为_(破折号变为下划线),例如: $sent_http_cache_control, $sent_http_content_type…; |
| $is_args | 如果$args设置,值为"?",否则为""。 |
| $limit_rate | 这个变量可以限制连接速率。 |
| $nginx_version | 当前运行的nginx版本号。 |
| $query_string | 与$args相同。 |
| $remote_addr | 客户端的IP地址。 |
| $remote_port | 客户端的端口。 |
| $remote_user | 已经经过Auth Basic Module验证的用户名。 |
| $request_filename | 当前连接请求的文件路径,由root或alias指令与URI请求生成。 |
| $request_body | 这个变量(0.7.58+)包含请求的主要信息。在使用proxy_pass或fastcgi_pass指令的location中比较有意义。 |
| $request_body_file | 客户端请求主体信息的临时文件名。 |
| $request_completion | 如果请求成功,设为"OK";如果请求未完成或者不是一系列请求中最后一部分则设为空。 |
| $request_method | 这个变量是客户端请求的动作,通常为GET或POST。包括0.8.20及之前的版本中,这个变量总为main request中的动作,如果当前请求是一个子请求,并不使用这个当前请求的动作。 |
| $request_uri | 这个变量等于包含一些客户端请求参数的原始URI,它无法修改,请查看$uri更改或重写URI。 |
| $scheme | 所用的协议,比如http或者是https,比如rewrite ^(.+)$ $scheme://example.com$1 redirect; |
| $server_addr | 服务器地址,在完成一次系统调用后可以确定这个值,如果要绕开系统调用,则必须在listen中指定地址并且使用bind参数。 |
| $server_name | 服务器名称。 |
| $server_port | 请求到达服务器的端口号。 |
| $server_protocol | 请求使用的协议,通常是HTTP/1.0或HTTP/1.1。 |
| $uri | 请求中的当前URI(不带请求参数,参数位于args),不同于浏览器传递的args),不同于浏览器传递的args),不同于浏览器传递的request_uri的值,它可以通过内部重定向,或者使用index指令进行修改。不包括协议和主机名,例如/foo/bar.html |
三、nginx 监控
1、nginx的基础监控
- 进程监控
- 端口监控
注意: 这两个是必须要加在zabbix监控,加触发器有问题及时告警。
nginx 提供了 ngx_http_stub_status_module.这个模块提供了基本的监控功能
2、监控的指标
1 基本活跃指标
Accepts(接受)、Handled(已处理)、Requests(请求数)是一直在增加的计数器。Active(活跃)、Waiting(等待)、Reading(读)、Writing(写)随着请求量而增减。
2 每秒请求数 – QPS
通过持续的 QPS 监控,可以立刻发现是否被恶意攻击或对服务的可用性进行评估。虽然当问题发生时,通过 QPS 不能定位到确切问题的位置,但是他可以在第一时间提醒你环境可能出问题了
3 服务器错误率
通过监控固定时间间隔内的错误代码(4XX代码表示客户端错误,5XX代码表示服务器端错误)。
4 请求处理时间
请求处理时间也可以被记录在 access log 中,通过分析 access log,统计请求的平均响应时间。 ----$request_time 变量
3、指标的收集
通过在编译时加入 nginx 的 ngx_http_stub_status_module 模块我们可以实时监控以下基本的指标:
1 nginx Stub Status 监控模块安装
先使用命令查看是否已经安装这个模块:
# -V大写会显示版本号和模块等信息、v小写仅显示版本信息
[root@localhost ~]# nginx -V
注意:如果没有此模块,需要重新安装,编译命令如下:
./configure –with-http_stub_status_module
具体的使用方法是在执行 ./configure 时,指定 --with-http_stub_status_module,然后通过配置:
将如下内容添加到默认的虚拟主机的在 server 配置块内
        location /nginx-status {


                stub_status     on;
                access_log      on;
        }
2、nginx 状态查看
配置完成后在浏览器中输入http://10.0.105.207/nginx-status 查看显示信息如下:
Active connections: 2
server accepts handled requests
          26    26      48
Reading: 0 Writing: 1 Waiting: 1
[外链图片转存失败,源站可能有防盗链机制,建议将图片保存下来直接上传(img-Sd5FEQhR-1609056437063)(C:\Users\admin\Pictures\其他图\1567697012994.png)]
3、Stub Status 参数说明

connection    #连接数,tcp连接
request       #http请求,GET/POST/DELETE/UPLOAD

nginx总共处理了26个连接,成功创建26次握手,也就是成功的连接数connection. 总共处理了48个请求
失败连接=(总连接数(accepts)-成功连接数(handled))(相等表示中间没有失败的),
Reading : nginx读取到客户端的Header信息数。请求头 -----速度快。
Writing :nginx返回给客户端的Header信息数。响应头

Waiting :开启keep-alive的情况下,意思就是Nginx说已经处理完正在等候下一次请求指令的驻留连接。
也可以通过ngx_req_status_module能够统计Nginx中请求的状态信息。需要安装第三方模块
安装模块:
tengine官方说req-status模块默认安装。但是并没有。从github引入第三方模块解决该问题
yum与编译安装的nginx扩展模块安装:
[root@nginx-server ~]# yum install -y unzip
1. 安装,先查看一下当前编译安装nginx的版本
[root@localhost nginx-1.16.0]# nginx -V
下载或者上传一个和当前的nginx版本一样的nginx的tar包。
[root@nginx-server ~]# tar xzf nginx-1.16.0.tar.gz -C /usr/local/
2.下载ngx_req_status_module 模块, 这是第三方模块需要添加
[root@nginx-server ~]# wget https://github.com/zls0424/ngx_req_status/archive/master.zip -O ngx_req_status.zip
[root@nginx-server ~]# unzip ngx_req_status.zip
[root@nginx-server ~]# cp -r ngx_req_status-master/ /usr/local/ #与解压的nginx在同一级目录下
[root@nginx-server ~]# cd /usr/local/nginx-1.16.0/
[root@nginx-server nginx-1.16.0]# yum -y install pcre pcre-devel openssl openssl-devel gcc gcc-c++   zlib zlib-devel
[root@nginx-server nginx-1.16.0]# yum -y install patch.x86_64
[root@nginx-server nginx-1.16.0]# patch -p1 < ../ngx_req_status-master/write_filter-1.7.11.patch
[root@localhost nginx-1.16.0]# ./configure 添加上原来的参数 --add-module=/usr/local/ngx_req_status-master
[root@localhost nginx-1.16.0]# make -j2
由于原先已有nginx,所以不能执行make install,否则会覆盖掉以前的配置文件及内容
[root@localhost nginx-1.16.0]# mv /usr/sbin/nginx /usr/sbin/nginx_bak
[root@localhost nginx-1.16.0]# cp objs/nginx /usr/sbin/
[root@localhost nginx-1.16.0]# systemctl restart nginx
[root@localhost nginx-1.16.0]# nginx -V
如果发现编译的配置文件有变化就成功了!
=========================
指令介绍
 req_status_zone
语法: req_status_zone name string size
默认值: None
配置块: http
# 定义请求状态ZONE,请求按照string分组来排列,例如:
req_status_zone server_url  $server_name$uri 256k;
#域名+uri将会形成一条数据,可以看到所有url的带宽,流量,访问数

#在location中启用请求状态,你可以指定更多zones。
req_status
语法: req_status zone1[ zone2]
默认值: None
配置块: http, server, location

#在当前位置启用请求状态处理程序
req_status_show
语法: req_status_show on
默认值: None
配置块: location

=============================================
配置如下: 需要在http里面配置。
[root@localhost ~]# vim /etc/nginx/nginx.conf
    req_status_zone server_name $server_name 256k;
    req_status_zone server_addr $server_addr 256k;
    req_status_zone server_url  $server_name$uri 256k;

创建配置文件:
[root@localhost ~]# vim /etc/nginx/conf.d/rep_stat.conf
 server {


        listen 80;
        server_name localhost;
        req_status server_name server_addr server_url;

        location /req-status {


        req_status_show on;
        }
}

[root@localhost ~]# nginx -t
[root@localhost ~]# nginx -s reload
请求状态信息包括以下字段:
- zone_name - 利用req_status_zone定义的分组标准。例如,按照服务器名称对请求进行分组后;
- key - 请求按分组标准分组后的分组标识(即组名)。例如按服务器名称分组时,组名可能是localhost;
- max_active - 该组的最大并发连接数;
- max_bw - 该组的最大带宽;
- traffic - 该组的总流量;
- requests - 该组的总请求数;
- active - 该组当前的并发连接数;
- bandwidth - 该组当前带宽。
四、Nginx 的平滑升级 [编译安装]
upstream_check 模块 https://github.com/yaoweibin/nginx_upstream_check_module
1.master 模块下载
wget https://pd.zwc365.com/seturl/https://github.com/yaoweibin/nginx_upstream_check_module/archive/master.zip
2.nginx下载
wget http://nginx.org/download/nginx-1.19.5.tar.gz
tar -xf nginx-1.19.5.tar.gz
3.安装软件
yum -y install patch
4.去原来的配置参数指定、模块
[root@localhost ~]# cd nginx-1.19.5
[root@localhost nginx-1.19.5]# patch -p1 < ../nginx_upstream_check_module-master/check_1.16.1+.patch
5.修改参数
查看原来的参数
[root@localhost ~]# /usr/local/nginx/sbin/nginx -V
在原来的参数基础上加上
--add-module=../nginx_upstream_check_module-master/
[root@localhost nginx-1.19.5]# ./configure --prefix=/usr/local/nginx --group=nginx --user=nginx --sbin-path=/usr/local/nginx/sbin/nginx --conf-path=/etc/nginx/nginx.conf --error-log-path=/var/log/nginx/error.log --http-log-path=/var/log/nginx/access.log --http-client-body-temp-path=/tmp/nginx/client_body --http-proxy-temp-path=/tmp/nginx/proxy --http-fastcgi-temp-path=/tmp/nginx/fastcgi --pid-path=/var/run/nginx.pid --lock-path=/var/lock/nginx --with-http_stub_status_module --with-http_ssl_module --with-http_gzip_static_module --with-pcre --with-http_realip_module --with-stream --add-module=../nginx_upstream_check_module-master/
6.编译
[root@localhost nginx-1.19.5]# make
查看新的参数
[root@localhost nginx-1.19.5]# ./objs/nginx -V
nginx version: nginx/1.19.5
built by gcc 4.8.5 20150623 (Red Hat 4.8.5-44) (GCC)
built with OpenSSL 1.0.2k-fips  26 Jan 2017
TLS SNI support enabled
configure arguments: --prefix=/usr/local/nginx --group=nginx --user=nginx --sbin-path=/usr/local/nginx/sbin/nginx --conf-path=/etc/nginx/nginx.conf --error-log-path=/var/log/nginx/error.log --http-log-path=/var/log/nginx/access.log --http-client-body-temp-path=/tmp/nginx/client_body --http-proxy-temp-path=/tmp/nginx/proxy --http-fastcgi-temp-path=/tmp/nginx/fastcgi --pid-path=/var/run/nginx.pid --lock-path=/var/lock/nginx --with-http_stub_status_module --with-http_ssl_module --with-http_gzip_static_module --with-pcre --with-http_realip_module --with-stream --add-module=../nginx_upstream_check_module-master/
7.启动nginx
/usr/local/nginx/sbin/nginx
备份原 nginx 二进制文件
备份二进制文件和 nginx 的配置文件(期间nginx不会停止服务)
这里以原来的 Nginx 是编译安装的方式进行实验
[root@localhost nginx-1.19.5]# /usr/local/nginx/sbin/nginx
[root@localhost nginx-1.19.5]# mv /usr/local/nginx/sbin/nginx /usr/local/nginx/sbin/nginx20201221
[root@localhost nginx-1.19.5]# pwd
/tmp/nginx-1.19.5
假如出现如下错误
cp: 无法创建普通文件"/usr/local/nginx/sbin/nginx": 文本文件忙
执行:
cp -f objs/nginx /usr/local/nginx/sbin/
8.复制新的nginx二进制文件,进入新的nginx源码包
[root@localhost nginx-1.19.5]# cp objs/nginx /usr/local/nginx/sbin/
9.测试新版本nginx是否正常
[root@localhost nginx-1.19.5]# /usr/local/nginx/sbin/nginx -t
nginx: the configuration file /etc/nginx/nginx.conf syntax is ok
nginx: configuration file /etc/nginx/nginx.conf test is successful
此时可以执行快速升级
在编译目录中执行如下命令
[root@localhost nginx-1.19.5]# make upgrade
/usr/local/nginx/sbin/nginx -t
nginx: the configuration file /etc/nginx/nginx.conf syntax is ok
nginx: configuration file /etc/nginx/nginx.conf test is successful
kill -USR2 `cat /var/run/nginx.pid`
sleep 1
test -f /var/run/nginx.pid.oldbin
kill -QUIT `cat /var/run/nginx.pid.oldbin`
验证
[root@localhost nginx-1.19.5]# ps -ef | grep nginx
root      35483      1  0 02:10 ?        00:00:00 nginx: master process /usr/local/nginx/sbin/nginx
nginx     35484  35483  0 02:10 ?        00:00:00 nginx: worker process
root      55722   1159  0 02:29 pts/0    00:00:00 grep --color=auto nginx
[root@localhost nginx-1.19.5]# cat /var/run/nginx.pid
57979
给nginx发送平滑迁移信号(若不清楚pid路径,请查看nginx配置文件)
find / -name "nginx.pid"

[root@shark nginx-1.18.0]# kill -USR2  `cat /var/run/nginx.pid
假如没有产生新的进程,检查错误日志是否出现了如下报错
最好将错误日志级别设置为 debug
execve() failed while executing new binary process "nginx" (2: No such file or directory
产生错误的原因是老的nginx进程启动的时候没有使用绝对路径。
解决办法,重新使用绝对路径启动 nginx
此时执行如下命令,可以看到新旧进程同时存在
[root@localhost nginx-1.19.5]# ps -ef | grep ngin[x]
root      57979      1  0 02:32 ?        00:00:00 nginx: master process /usr/local/nginx/sbin/nginx
nginx     57980  57979  0 02:32 ?        00:00:00 nginx: worker process
root      97153  57979  0 03:08 ?        00:00:00 nginx: master process /usr/local/nginx/sbin/nginx
nginx     97154  97153  0 03:08 ?        00:00:00 nginx: worker process
查看nginx pid,会出现一个nginx.pid.oldbin
[root@localhost nginx-1.19.5]# ll /usr/local/nginx/logs/nginx.pid*
-rw-r--r-- 1 root root 6 12月 21 03:08 /var/run/nginx.pid
-rw-r--r-- 1 root root 6 12月 21 02:32 /var/run/nginx.pid.oldbin
关闭旧的Nginx进程
[root@localhost nginx-1.19.5]# cd
[root@localhost ~]# kill -WINCH `cat /var/run/nginx.pid.oldbin`
此时再次观察 nginx 进程,会发现旧的工作进程已经没有了,只要新旧的主进程和新的工作进程
[root@localhost ~]# ps -ef |grep nginx
root      57979      1  0 02:32 ?        00:00:00 nginx: master process /usr/local/nginx/sbin/nginx
root      97153  57979  0 03:08 ?        00:00:00 nginx: master process /usr/local/nginx/sbin/nginx
nginx     97154  97153  0 03:08 ?        00:00:00 nginx: worker process
root     104863   1159  0 03:15 pts/0    00:00:00 grep --color=auto nginx
结束工作进程,完成此次升级
[root@localhost ~]# kill -QUIT `cat /var/run/nginx.pid.oldbin`
[root@localhost ~]# ps -ef |grep nginx
root      97153      1  0 03:08 ?        00:00:00 nginx: master process /usr/local/nginx/sbin/nginx
nginx     97154  97153  0 03:08 ?        00:00:00 nginx: worker process
root     107618   1159  0 03:18 pts/0    00:00:00 grep --color=auto nginx
10.添加监控
将如下内容添加到默认的虚拟主机的在 server 配置块内
[root@localhost ~]# vim /etc/nginx/nginx.conf
        location /nginx-status {


                stub_status     on;
                access_log      on;
        }
[root@localhost ~]# /usr/local/nginx/sbin/nginx -t
nginx: the configuration file /etc/nginx/nginx.conf syntax is ok
nginx: configuration file /etc/nginx/nginx.conf test is successful
[root@localhost ~]# /usr/local/nginx/sbin/nginx -s reload
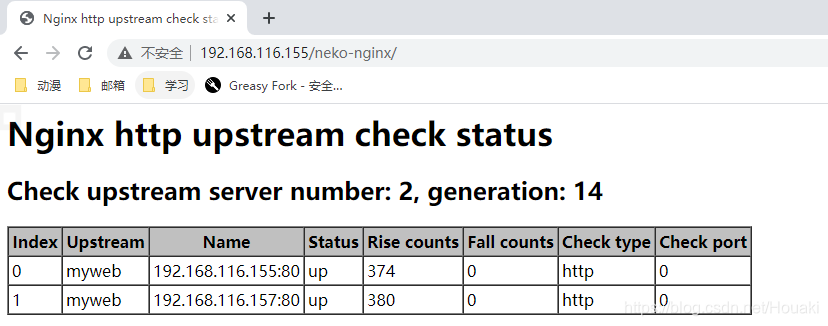
11.自身状态监控
[root@localhost ~]# vim /etc/nginx/nginx.conf
     upstream myweb {


         server 192.168.116.155;
         server 192.168.116.157;
     check  interval=3000 rise=2 fall=5 timeout=1000 type=http;
     check_http_send "HEAD / HTTP/1.0\r\n\r\n";
     check_http_expect_alive http_2xx http_3xx;
}

server {


    listen       80;
    server_name  localhost;

    location / {


        proxy_pass http://myweb;
        proxy_set_header X-Real-IP $remote_addr;
    }

    location /neko-nginx/ {


            check_status;
            access_log  off;
            allow 192.168.116.1;  #虚拟机没开桥接接这里写1,如不是则写需要访问的IP地址
            deny  all;            #拒绝所有
    }
[root@localhost ~]# /usr/local/nginx/sbin/nginx -t
[root@localhost ~]# /usr/local/nginx/sbin/nginx -s reload
浏览器访问 http://192.168.116.155/neko-nginx/
[外链图片转存失败,源站可能有防盗链机制,建议将图片保存下来直接上传(img-AQ9VM2qx-1609056437076)(C:\Users\admin\Pictures\其他图\bdd15a29255d32758d748a20670b026.png)]
12.Nginx编译安装,字体高亮方法
[root@localhost ~]# cd nginx-1.19.5
[root@localhost nginx-1.19.5]# cp -r contrib/vim/ /root/.vim/
[root@localhost ~]# ls -a
.                .bash_profile            nginx-1.19.5                        .vim