最新一些学妹问起,所以抽点时间来写的,适合入门级别的swift 与 OC 混编 的程序猿。
本文章将从两个方向分别介绍 OC 与 swift 混编
1. 第一个方向从 swift工程 中引入 oc类
1. 1 如何在swift的类中使用oc类
1.2 如何在swift中实现oc的代理方法
1.3 如何在swift中实现oc的Block回调
2. 第二个方向从OC工程中引入swift类
2.1 如何在OC类中使用swift类
2.2 如何在OC中实现swift的代理方法
2.3 如何在OC中实现swift中类似Block回调
下面是具体的实现过程:
1.1 如何在swift的类中使用oc类?
1. swift工程中引入OC类。 具体实现过程。
1.1 新建一个swift工程类。 取名 swiftOrOC
1.2 实现的功能为 : 从swift. viewController.swift 中 push到 OC语言 secondViewController 控制器
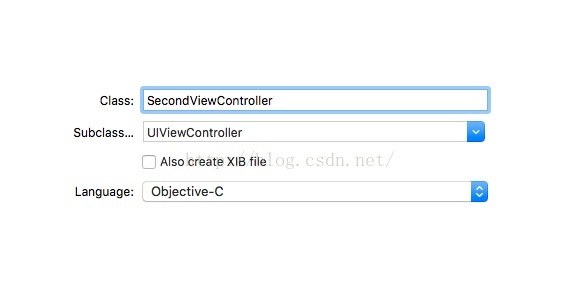
1.2.1 新建SecondViewController 类 。
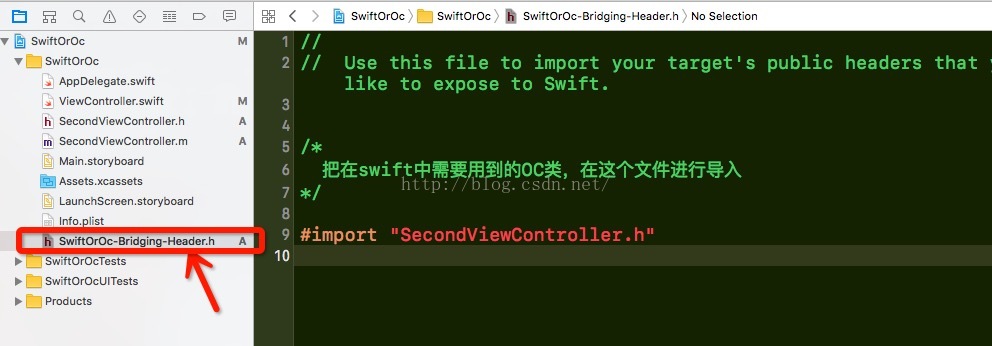
1.2.2 建立桥接文件。 (很重要)
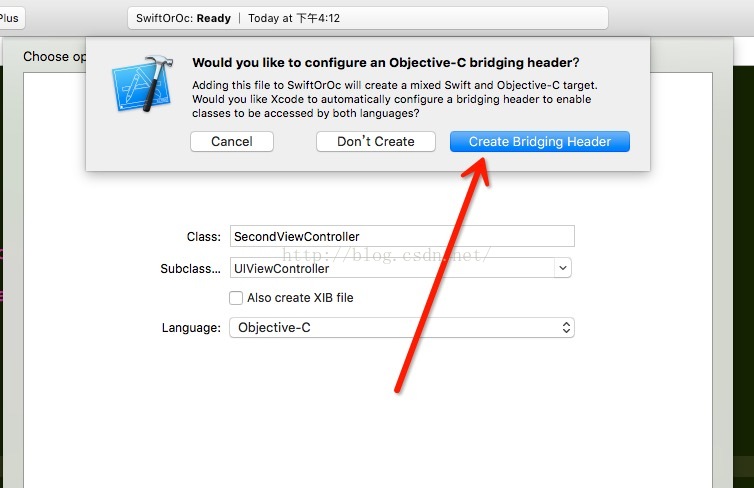
一定要记得点击这个按钮。
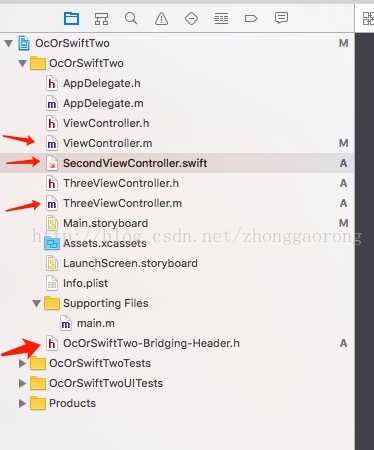
1.2.3 接下来工程目录如下:
1.2.4 接下来就可以实现具体的跳转功能了。
ViewController.swift中具体实现
import UIKit

class ViewController: UIViewController {

    @IBOutlet weak var hintLabel: UILabel!  //稍后用来显示回调

    // push 到 oc controller
    @IBAction func pushAction(_ sender: AnyObject) {
        let secondVC = SecondViewController.init()
        self.navigationController?.pushViewController(secondVC, animated: true)
    }

    override func viewDidLoad() {
        super.viewDidLoad()
        // Do any additional setup after loading the view, typically from a nib.
    }

    override func didReceiveMemoryWarning() {
        super.didReceiveMemoryWarning()
        // Dispose of any resources that can be recreated.
    }


}
1.2 如何在swift中实现oc的代理方法
1.2.1 首先在 SecondViewController.h 中声明一个协议。具体代码
#import <UIKit/UIKit.h>

@protocol SecondDelegate <NSObject>

-(void)refreshHintLabel:(NSString *)hintString;

@end

@interface SecondViewController : UIViewController

@property (nonatomic,weak)id<SecondDelegate> secondDelegate;
@end
#import "SecondViewController.h"
#import "UIViewController+BackButtonHandler.h"

@interface SecondViewController ()
{
    UITextField *textField;
}
@end

@implementation SecondViewController

- (void)viewDidLoad {
    [super viewDidLoad];
    self.title = @"oc";

    self.view.backgroundColor  = [UIColor whiteColor];

    textField = [[UITextField alloc]initWithFrame:CGRectMake(100, 100, 200, 200)];
    textField.placeholder = @"请输入用户名";
    [self.view addSubview:textField];
    [textField.layer setBorderColor:[UIColor blackColor].CGColor];
    [textField.layer setBorderWidth:1.0];


}

-(void)touchesBegan:(NSSet<UITouch *> *)touches withEvent:(UIEvent *)event{
    [self.view endEditing:YES];
}
#pragma mark 返回上一页回调 ,将用户输入的用户名传回给 ViewController.swift
-(BOOL)navigationShouldPopOnBackButton{
    if ([_secondDelegate respondsToSelector:@selector(refreshHintLabel:)]) {
        [_secondDelegate refreshHintLabel: textField.text];
    }

    return YES;
}


- (void)didReceiveMemoryWarning {
    [super didReceiveMemoryWarning];
    // Dispose of any resources that can be recreated.
}

/*
#pragma mark - Navigation

// In a storyboard-based application, you will often want to do a little preparation before navigation
- (void)prepareForSegue:(UIStoryboardSegue *)segue sender:(id)sender {
    // Get the new view controller using [segue destinationViewController].
    // Pass the selected object to the new view controller.
}
*/

@end
1.2.3.1 遵循协议

1.2.3.2 成为代理,并实现协议方法,更改controller.swift中hintLabel的text。
    // push 到 oc controller
    @IBAction func pushAction(_ sender: AnyObject) {
        let secondVC = SecondViewController.init()
        secondVC.secondDelegate = self;
        self.navigationController?.pushViewController(secondVC, animated: true)
    }

    // SecondViewControll的代理方法
    func refreshHintLabel(_ hintString: String!) {
        hintLabel.text = "secondView textView.text = " + hintString;
    }
1.3 如何在swift中实现oc的Block回调
1.3.1 具体过程与1.2小节一样。 直接上代码。1.3.2 声明block;
typedef void(^RefreshHintLabelBlock)(NSString *hintString);

@interface SecondViewController : UIViewController
@property (nonatomic, copy) RefreshHintLabelBlock hintBlock;
@end
1.3.3 block的回调。 SecondViewController.m中
#pragma mark 返回上一页回调 ,将用户输入的用户名传回给 ViewController.swift
-(BOOL)navigationShouldPopOnBackButton{
    if (_hintBlock) {
        _hintBlock(textField.text);
    }
    return YES;
}
1.3.4 在swift类中调用 oc的block.
    // push 到 oc controller
    @IBAction func pushAction(_ sender: AnyObject) {
        let secondVC = SecondViewController.init()
//        secondVC.secondDelegate = self;
        secondVC.hintBlock = {(t:String?)in
            self.hintLabel.text = "secondView textView.text = " + t!
        }
        self.navigationController?.pushViewController(secondVC, animated: true)
    }
工程已上传到git上,git地址: https://github.com/zhonggaorong/SwiftOrOc/tree/master
2. OC工程中引入swift类。 具体实现过程。
耽误了不少时间, 今天才开始写oc工程中引入swift类。
demo地址:
2.1 如何在OC类中使用swift类
2.1.1 新建一个基于OC语言的工程 ,取名 OcOrSwiftTwo
2.1. 2 实现的功能为 : 从oc类 viewcontroller中, push 至 swift语言 SecondViewController ,然后SecondViewController可以通过代理或者swift闭包把值传回viewcontroller.
2.1.3 当前文件目录看下图: (第四个箭头: 桥接文件)
2.2 如何在OC中实现swift的代理与闭包Block方法
2.2.1 如何在oc中引入swift类。#import "工程名-swift.h"
#import "OcOrSwiftTwo-swift.h"
注意: @objc(代理名) 才能在外部可见这个代理
import UIKit
import Foundation

// 必须加上@objc 代理才能在oc类中可见。
@objc(EditTextFieldDelegate)
protocol EditTextFieldDelegate:NSObjectProtocol {
    func editTextField(_ str: String) -> Void
}

@objc(SecondViewController)
class SecondViewController: UIViewController {

    var editorDelegate:EditTextFieldDelegate?
    var textField:UITextField?
    var addButton:UIButton?
    var pushButton:UIButton?

    typealias editorBlock = (_ t:String) -> Void
    var myEidtorBlock:editorBlock?

    override func viewDidLoad() {
        super.viewDidLoad()
        self.view.backgroundColor = UIColor.white
        textField = UITextField.init(frame: CGRect.init(x: 50, y: 60, width: 200, height: 50))
        textField?.placeholder = "输入返回首页的内容"
        self.view.addSubview(textField!)

        addButton = UIButton.init(type: .custom)
        addButton?.setTitleColor(UIColor.black, for: .normal)
        addButton?.setTitle("pop", for: .normal)
        addButton?.frame = CGRect.init(x: 50, y: 150, width: 200, height: 50)
        addButton?.layer.borderColor = UIColor.black.cgColor
        addButton?.layer.borderWidth = 1.0
        addButton?.addTarget(self, action: #selector(popAction), for: .touchUpInside)
        self.view.addSubview(addButton!)


        pushButton = UIButton.init(type: .custom)
        pushButton?.setTitleColor(UIColor.black, for: .normal)
        pushButton?.setTitle("push", for: .normal)
        pushButton?.frame = CGRect.init(x: 50, y: 250, width: 200, height: 50)
        pushButton?.layer.borderColor = UIColor.black.cgColor
        pushButton?.layer.borderWidth = 1.0
        pushButton?.addTarget(self, action: #selector(pushAction), for: .touchUpInside)
        self.view.addSubview(pushButton!)

    }

    func popAction() -> Void {

        if editorDelegate != nil {
            editorDelegate?.editTextField((textField?.text)!)
        }

        if ((self.myEidtorBlock) != nil){
            self.myEidtorBlock!((textField?.text!)!)
        }

        self.navigationController?.popViewController(animated: true)
    }


    func pushAction() -> Void {
        let three = ThreeViewController.init()
        self.navigationController?.pushViewController(three, animated: true)

    }
2.2.3 在oc类中viewcontroller.m 文件中实现SecondviewController.swift的相关代理与闭包(block). 代码如下:
#import "ViewController.h"
#import "OcOrSwiftTwo-swift.h"

@interface ViewController ()<EditTextFieldDelegate>
@property (nonatomic, strong) UITextField *showTextField;
@property (nonatomic, strong) UIButton *pushButton;

@end

@implementation ViewController

- (void)viewDidLoad {
    [super viewDidLoad];
    _showTextField = [[UITextField alloc]initWithFrame:CGRectMake(50, 100 , 200, 50)];
    _showTextField.placeholder = @"swift传回的文本内容";
    _showTextField.adjustsFontSizeToFitWidth = YES;
    _showTextField.enabled = NO;
    [self.view addSubview:_showTextField];

    _pushButton = [UIButton buttonWithType:UIButtonTypeCustom];
    [_pushButton.layer setBorderColor:[UIColor blackColor].CGColor];
    [_pushButton.layer setBorderWidth:1.0];
    [_pushButton setFrame:CGRectMake(50, 200, 200, 50)];
    [_pushButton setTitleColor:[UIColor blackColor] forState:UIControlStateNormal];
    [_pushButton setTitle:@"push" forState:UIControlStateNormal];
    [_pushButton addTarget:self action:@selector(pushAction) forControlEvents:UIControlEventTouchUpInside];

    [self.view addSubview:_pushButton];
}


-(void)pushAction{
    SecondViewController *second = [[SecondViewController alloc]init];
    // second.editorDelegate = self;

    /*
      swift中的闭包回滴
     */
    second.myEidtorBlock = ^(NSString *str) {
        _showTextField.text = [NSString stringWithFormat:@"second传回信息: %@",str];
    };
    [self.navigationController pushViewController:second animated:YES];
}

#pragma mark swift中的代理
-(void)editTextField:(NSString *)str{
    _showTextField.text = [NSString stringWithFormat:@"second传回信息: %@",str];
}

- (void)didReceiveMemoryWarning {
    [super didReceiveMemoryWarning];
    // Dispose of any resources that can be recreated.
}