文章来自:http://blog.csdn.net/intbird 转载请说明出处
源码github: https://github.com/intbird/maven-publish
主要内容为:
封装以下两个插件为自有gradle插件并发布到自有仓库
apply plugin: ‘maven’
uploadArchives
apply plugin: ‘maven-publish’
publishing
1.仓库搭建
1.linux私有仓库的搭建nexus
1.下载:
wget https://download.sonatype.com/nexus/nexus-professional-bundle-latest.tar.gz
2.解压:
tar -xzvf nexus-latest-bundle.tar.gz
3.运行
export RUN_AS_USE=root
sh nexus-2.14.17-01/bin/nexus start
2.mac私有仓库的搭建nexus
比较简单,直接下载包后解压即可
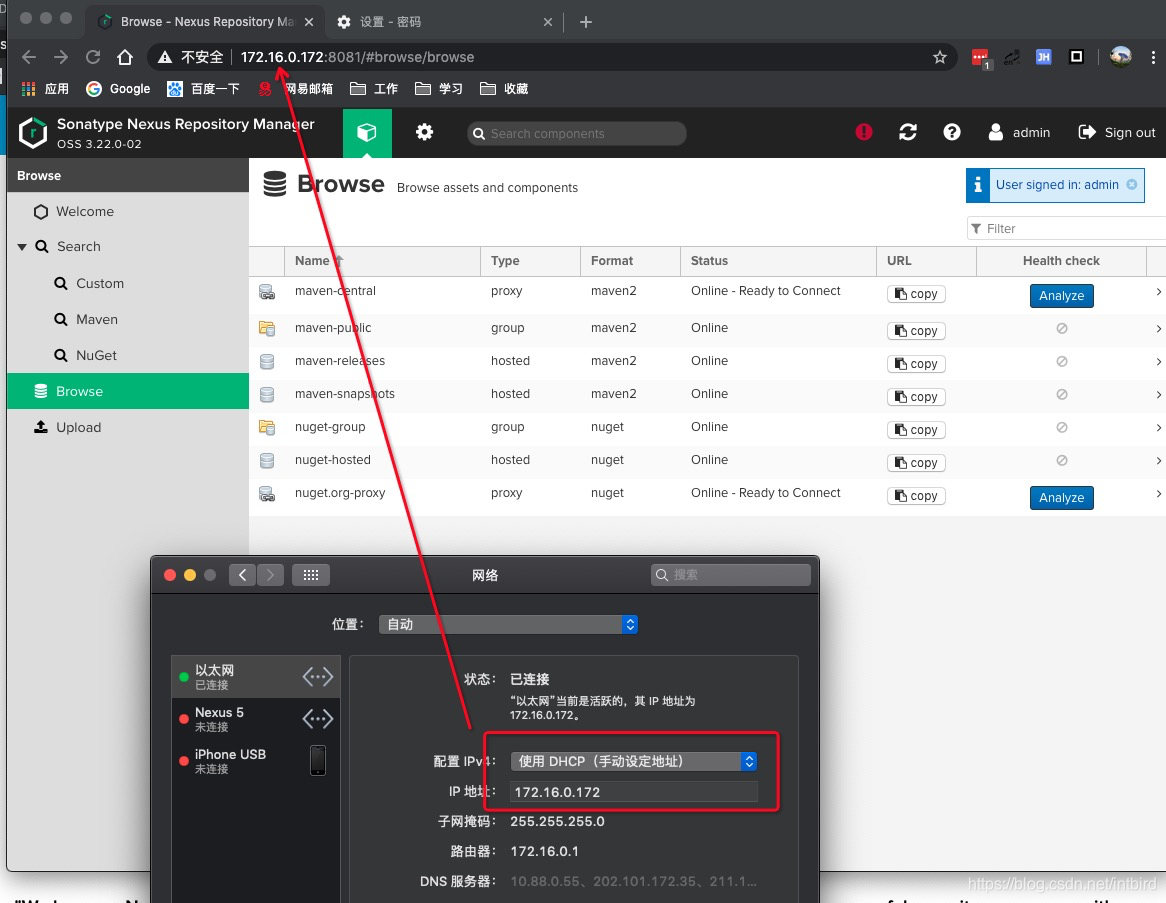
如果是个人机器搭建话,因为没有公有ip,所以
1, 将电脑ip固定为局域网地址,方便域内访问,见下图
2,使用ngwork进行内网穿透,如果要固定地址,则收费
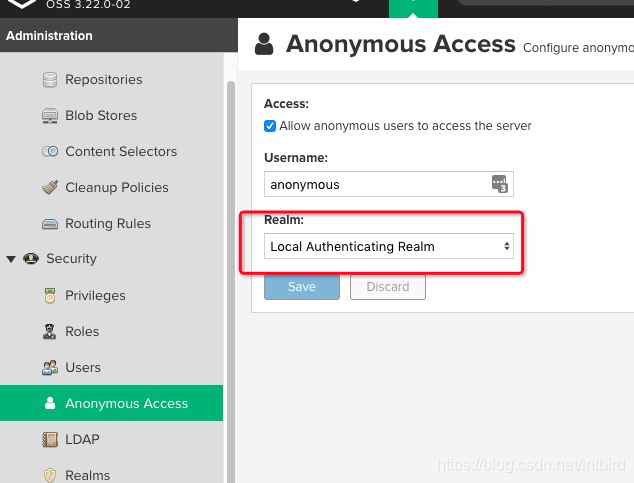
2.私有仓库允许匿名用户登录
1.访问仓库:
1.地址: http://intbird.world:8081/nexus/
2.用户名: admin
3.密码: admin123
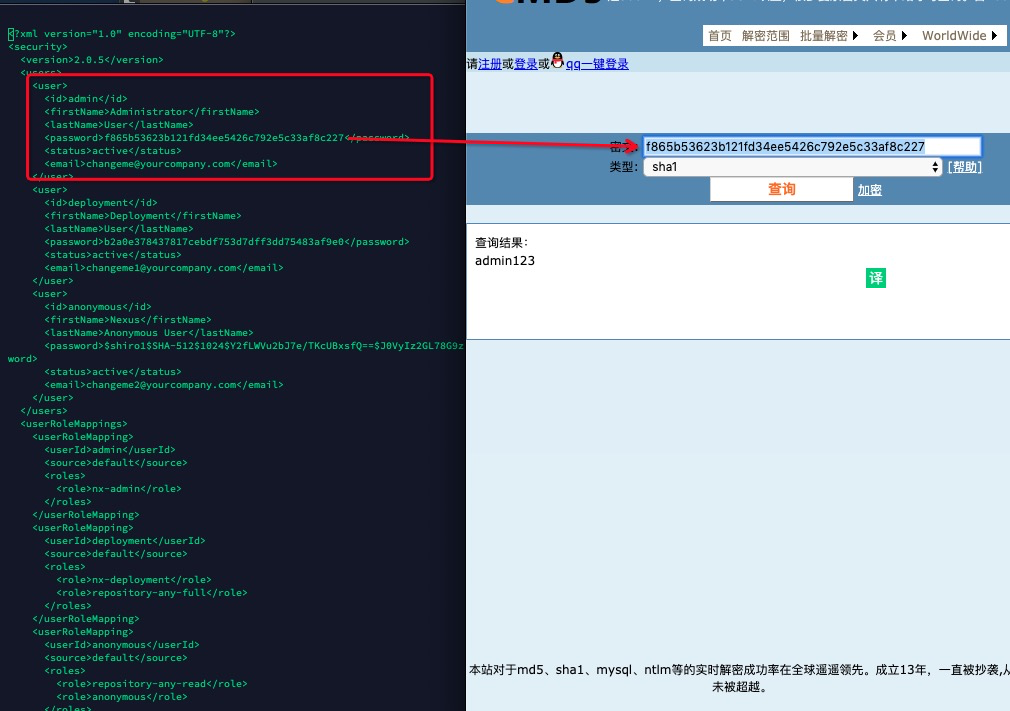
4.密码配置: nexus/sonatype-work/nexus/conf/security.xml
linux配置: 一个md5后的字符串,反解一下得到密码: admin123
mac配置: 第一次登陆页面会提示admin密码在哪个目录下面,复制登陆即可
2.public仓库添加releases和snapshots
这样在项目里引入一个 public地址即可
如 引入一个public即可:
3.允许匿名用户登陆
如果不设置,则再androidstudio中无法下载该pom
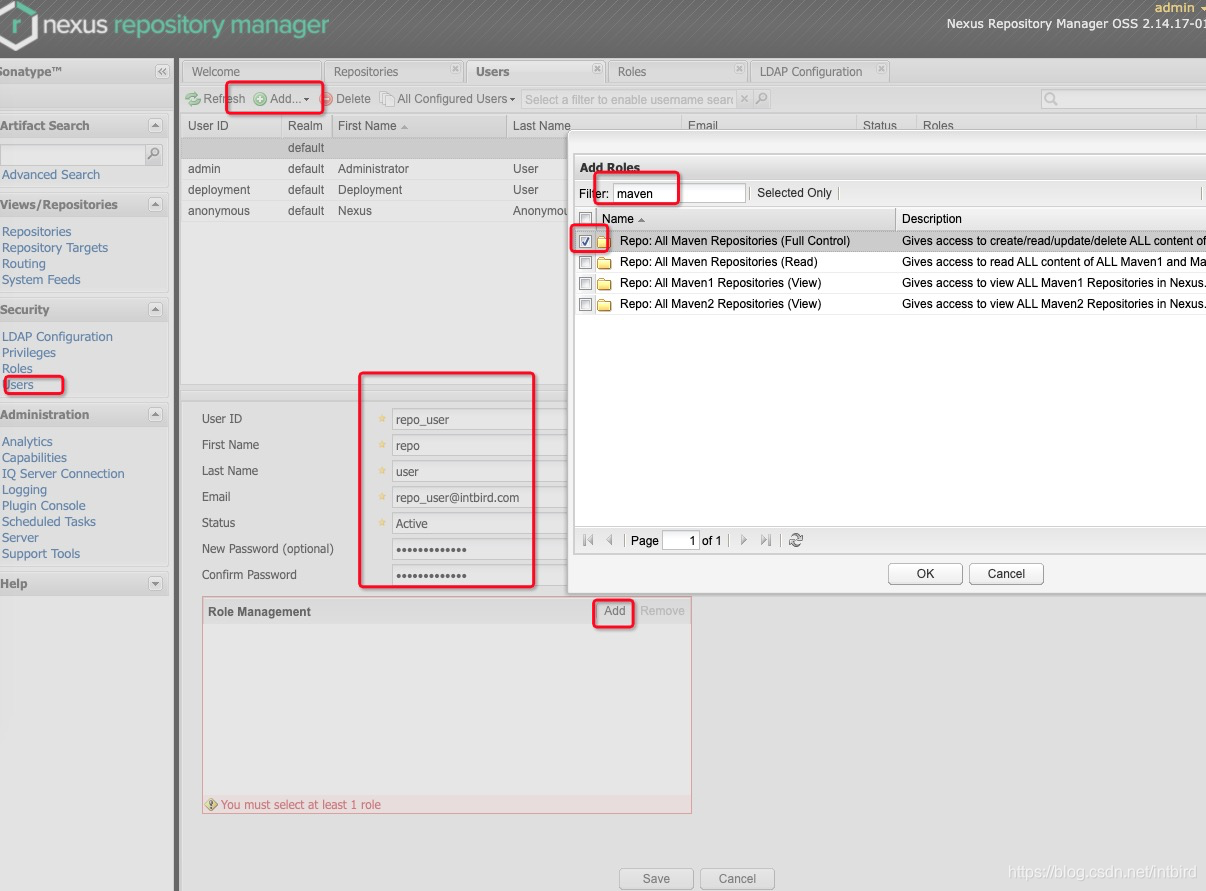
4.新建一个repo_user用户
将使用此用户,而非admin, 在后续android studio中发布进行认证
如:
3.如何发布到jcenter
网络资源过多,这里也无需多言
文章来自:http://blog.csdn.net/intbird 转载请说明出处
2.插件发布
后续做成插件也是对这两个官方插件进行封装而已
0. maven upload 插件用法
apply plugin: 'maven'

uploadArchives {
    repositories {
        mavenDeployer {
            def hostUrl = "172.16.0.172:8081"
            def url = version.endsWith('SNAPSHOT') ?
                    "http://$hostUrl/repository/maven-snapshots/" :
                    "http://$hostUrl/repository/maven-releases/"
            repository(url: url) {
                authentication(userName: "seal", password: "dingtone123")
            }
        }
    }
}
1. maven-publish 在主项目中的写法和用法
apply plugin: 'maven-publish'

def GroupId = 'intbird.soft.gradle'
def ArtifactId = 'maven-publish'
def Version = '1.0.0-SNAPSHOT'

def userName = "repo_user"
def passWord = "repo_password"

afterEvaluate {
    publishing {
        publications {
            release(MavenPublication) {
                // Applies the component for the release build variant.
                from components.release

                // You can then customize attributes of the publication as shown below.
                groupId = GroupId
                artifactId = ArtifactId
                version = Version

                pom {
                    name = "SimpleLibPom"
                    description = "Simple Lib Project Pom."
                    url = 'http://intbird.world'
                }
            }
            debug(MavenPublication) {
                // Applies the component for the debug build variant.
                from components.debug

                groupId = GroupId
                artifactId = ArtifactId
                version = Version
            }
        }

        repositories {
            maven {
                def releasesRepoUrl = "http://172.16.66.172:8081/repository/maven-releases/"
                def snapshotsRepoUrl = "http://172.16.66.172:8081/repository/maven-snapshots/"
                url = project.hasProperty('release') ? releasesRepoUrl : snapshotsRepoUrl
                credentials {
                    username = userName
                    password = passWord
                }
            }
        }
    }
}
2.封装publish-maven为自定义的gradle插件
每次引入gradle文件看起来也专业,所以封装一下, 方便后续lib项目引入
注意:新建的项目为groovy项目,且添加的是.groovy结尾的文件,不要添加java文件
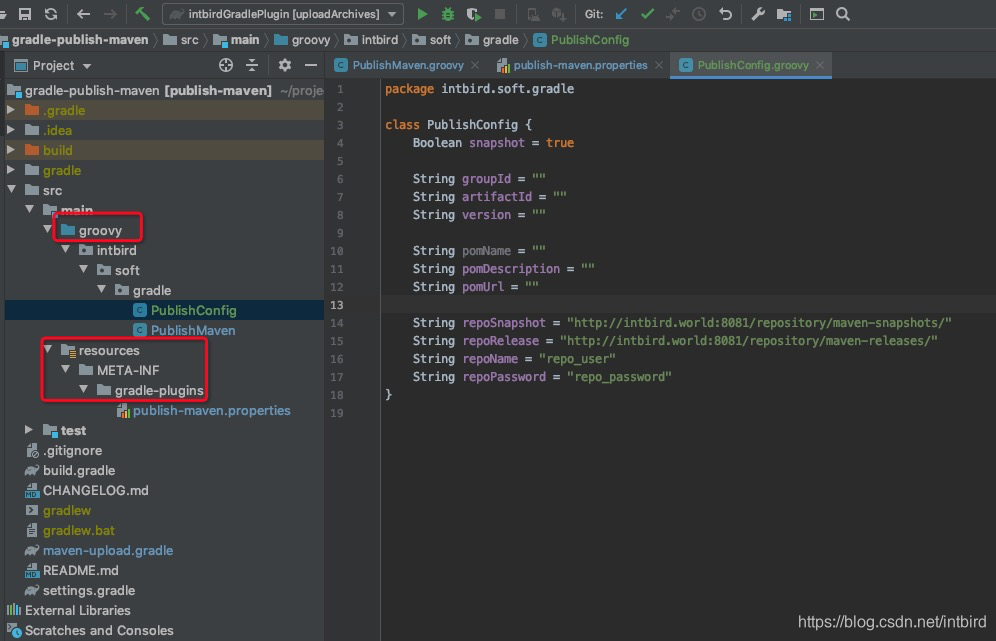
代码封装1: PublishConfig发布时的一些外部配置
class PublishConfig {
    Boolean snapshot = true

    String groupId = ""
    String artifactId = ""
    String version = ""

    String pomName = ""
    String pomDescription = ""
    String pomUrl = ""

    String repoSnapshot = "http://intbird.world:8081/nexus/content/repositories/snapshots/"
    String repoRelease = "http://intbird.world:8081/nexus/content/repositories/releases/"
    String repoName = "repo_user"
    String repoPassword = "repo_password"
}
代码封装2: PublishMaven 发布主代码
class PublishMaven implements Plugin<Project> {

    def publishConfig = "publishConfig"

    @Override
    void apply(Project project) {
        def publishingConfig = project.extensions.create(publishConfig, PublishConfig)

        project.plugins.apply MavenPublishPlugin
        PublishingExtension publishing = project.extensions.getByType(PublishingExtension)

        project.afterEvaluate {
            for (SoftwareComponent components : project.components) {
                publishing.publications({ publications ->
                    publications.create(components.name, MavenPublication.class, { MavenPublication publication ->
                        publication.groupId = publishingConfig.groupId
                        publication.artifactId = publishingConfig.artifactId
                        publication.version = publishingConfig.version
                        publication.from(components)
                        publication.pom {
                            mavenPom -> configPom(mavenPom, publishingConfig)
                        }
                    })
                })
            }

            publishing.repositories { artifactRepositories ->
                artifactRepositories.maven { mavenArtifactRepository ->
                    mavenArtifactRepository.url = publishingConfig.snapshot ? publishingConfig.repoSnapshot : publishingConfig.repoRelease
                    mavenArtifactRepository.credentials {
                        credentials ->
                            credentials.username = publishingConfig.repoName
                            credentials.password = publishingConfig.repoPassword
                    }
                }
            }
        }
    }

    static void configPom(MavenPom mavenPom, PublishConfig config) {
        mavenPom.name = config.pomName
        mavenPom.description = config.pomDescription
        mavenPom.url = config.pomUrl
    }
}
代码封装3: 将插件发布到私有maven
使用maven upload
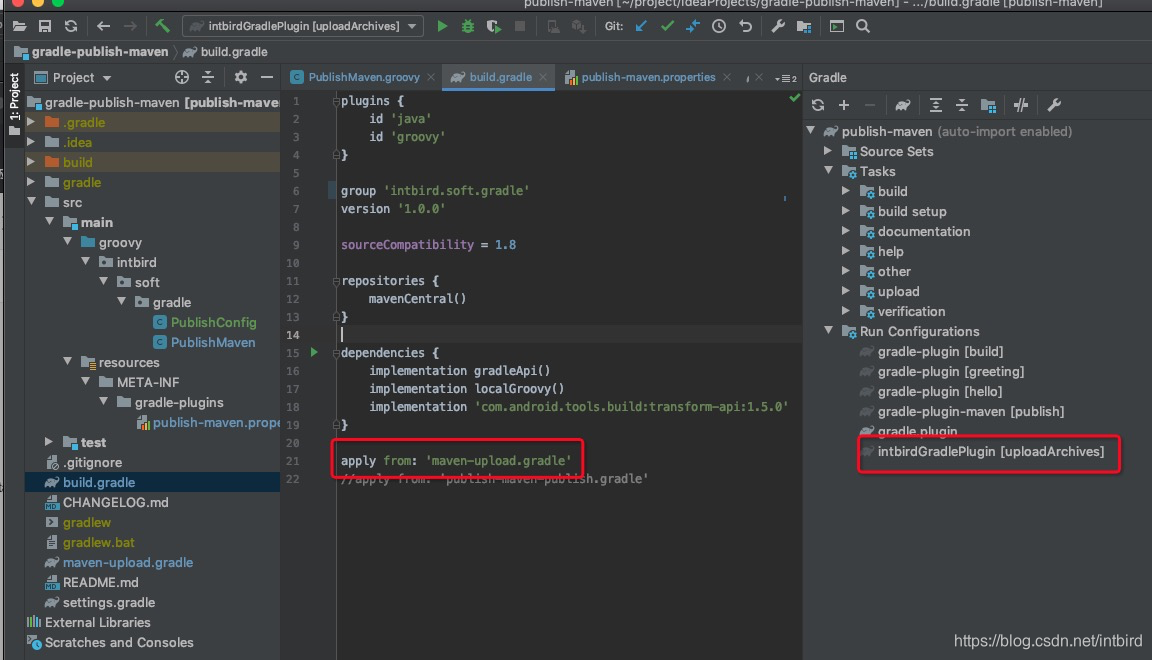
3.将自定义的插件和需要的配置引入到主项目
并测试发布snapshot
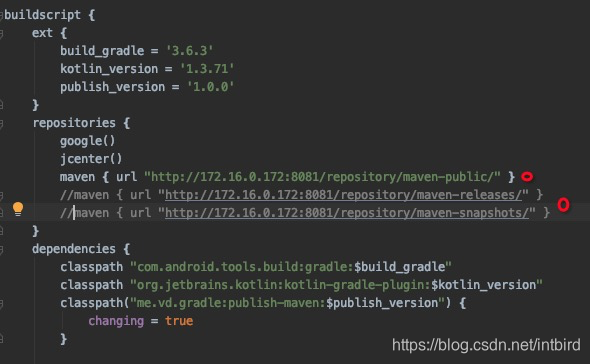
1.add maven url in root project build.gradle file
buildscript {
    ext {
        publish_version = '1.0.0'
    }
    repositories {
        maven { url "http://intbird.world:8081/nexus/content/repositories/public/" }
    }
    ...
}
文章来自:http://blog.csdn.net/intbird 转载请说明出处
2 add plugin in your lib project(you want to publish) build.gradle file
apply plugin: 'publish-maven'

android {
   ...
}

publishConfig {
    groupId = 'intbird.soft.lib'
    artifactId = '$your-lib-name' // use '-' connect
    version = "1.0.0-SNAPSHOT"

    // if you want publish to your own repository, mdf the flow config
    repoSnapshot = "http://intbird.world:8081/nexus/content/repositories/snapshots/"
    repoRelease = "http://intbird.world:8081/nexus/content/repositories/releases/"
    repoName = "repo_user"
    repoPassword = "repo_password"
}
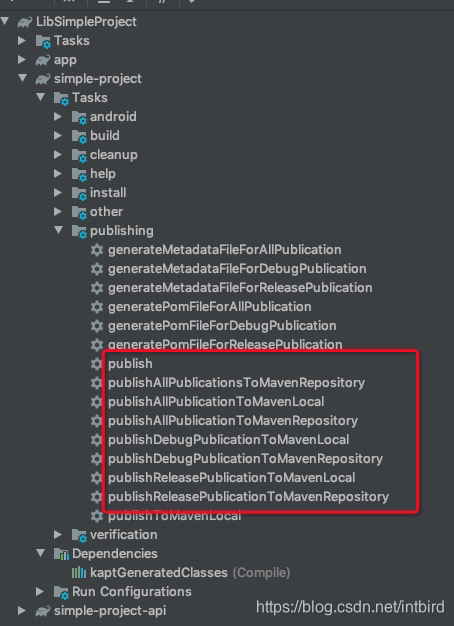
3.查看和运行发布task
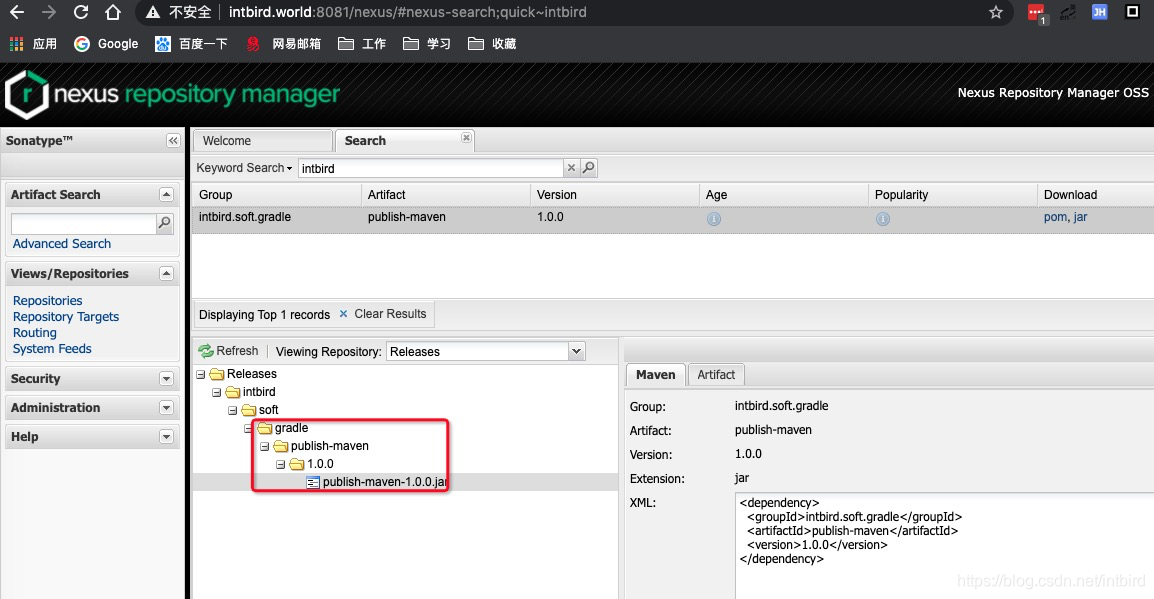
4.查看是否发布成功(文件是否存在)
4,pom和sign
待补充
5.源码:
源码github: https://github.com/intbird/maven-publish
文章来自:http://blog.csdn.net/intbird 转载请说明出处