Android 入门第九讲03-动画(帧动画(点击开始,停止)+补间动画(透明度动画,缩放动画,位移动画,旋转动画,组合动画))
Android 入门第九讲02-视频(本地视频播放,暂停,获取播放时间,重新播放,播放到指定位置,MediaController类(实现进度条,快进,播放暂停),播放网络视频)
Android 中一共有三种方式来播放动画:
1.帧动画,像一般的 gif 图我们就可以把它看作一个帧动画的过程
2.补间动画,实际上安卓的大部分动画效果以前都是用补间动画来完成的
3.属性动画,可以说是完全替代了补间动画我们平时常见的动画:
抖音店点赞出现的小红心,微信发生日快乐掉落下来的小蛋糕
1.帧动画
概念:在Android中,帧动画实际上就是把一组图片循环的去播放, 造成一种动画的效果,很类似我们平时看到的gif图
第一步,导入素材
把准备好的图片素材复制到drawable目录下
为什么不放到drawable-v24下:图片资源放到drawable-v24里面,导致7.0以下不能找到图片 不同的drawable文件夹用于为设备兼容性和不同的Android版本提供不同的屏幕密度。同理mipmap-anydpi-v26 API 26(安卓8.0)也是一样的道理,注意不同的文件对应的不同的版本。
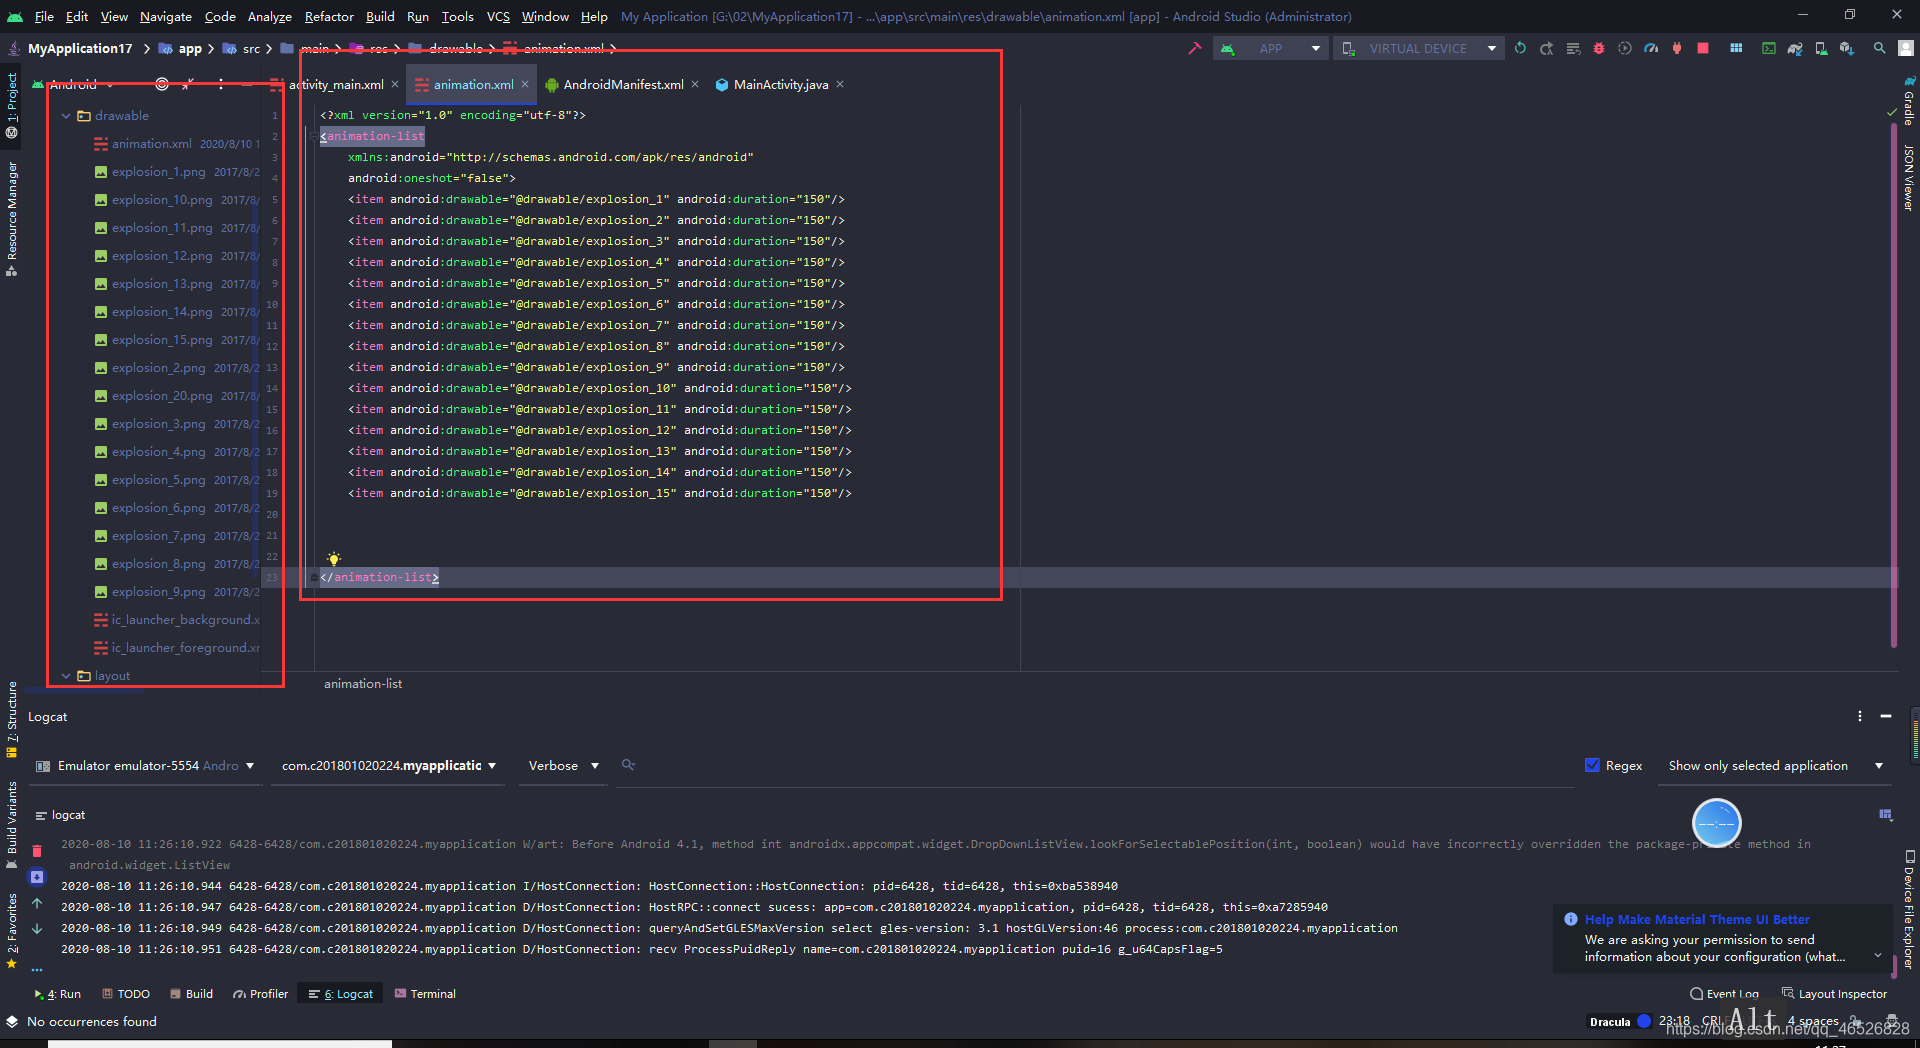
第二步,创建一个帧动画文件
在drawable目录下创建一个animation.xml的文件,
这个帧动画文件有很多图片,每一张图片会显示一个固定的时间,这里设置的是150ms,当开始播放动画的时候,这个背景图会循环的切换图片来造成一种动画的效果
添加代码
<?xml version="1.0" encoding="utf-8"?>
<animation-list
    xmlns:android="http://schemas.android.com/apk/res/android"
    android:oneshot="false">
    <item android:drawable="@drawable/explosion_1" android:duration="150"/>
    <item android:drawable="@drawable/explosion_2" android:duration="150"/>
    <item android:drawable="@drawable/explosion_3" android:duration="150"/>
    <item android:drawable="@drawable/explosion_4" android:duration="150"/>
    <item android:drawable="@drawable/explosion_5" android:duration="150"/>
    <item android:drawable="@drawable/explosion_6" android:duration="150"/>
    <item android:drawable="@drawable/explosion_7" android:duration="150"/>
    <item android:drawable="@drawable/explosion_8" android:duration="150"/>
    <item android:drawable="@drawable/explosion_9" android:duration="150"/>
    <item android:drawable="@drawable/explosion_10" android:duration="150"/>
    <item android:drawable="@drawable/explosion_11" android:duration="150"/>
    <item android:drawable="@drawable/explosion_12" android:duration="150"/>
    <item android:drawable="@drawable/explosion_13" android:duration="150"/>
    <item android:drawable="@drawable/explosion_14" android:duration="150"/>
    <item android:drawable="@drawable/explosion_15" android:duration="150"/>


</animation-list>
这里我之前放20张的时候,会报一个内存不足的错误
在Mainifest添加
android:largeHeap=“true”
android:hardwareAccelerated=“false”
也没有用以后,于是我只好把加载的图片减少到了15张

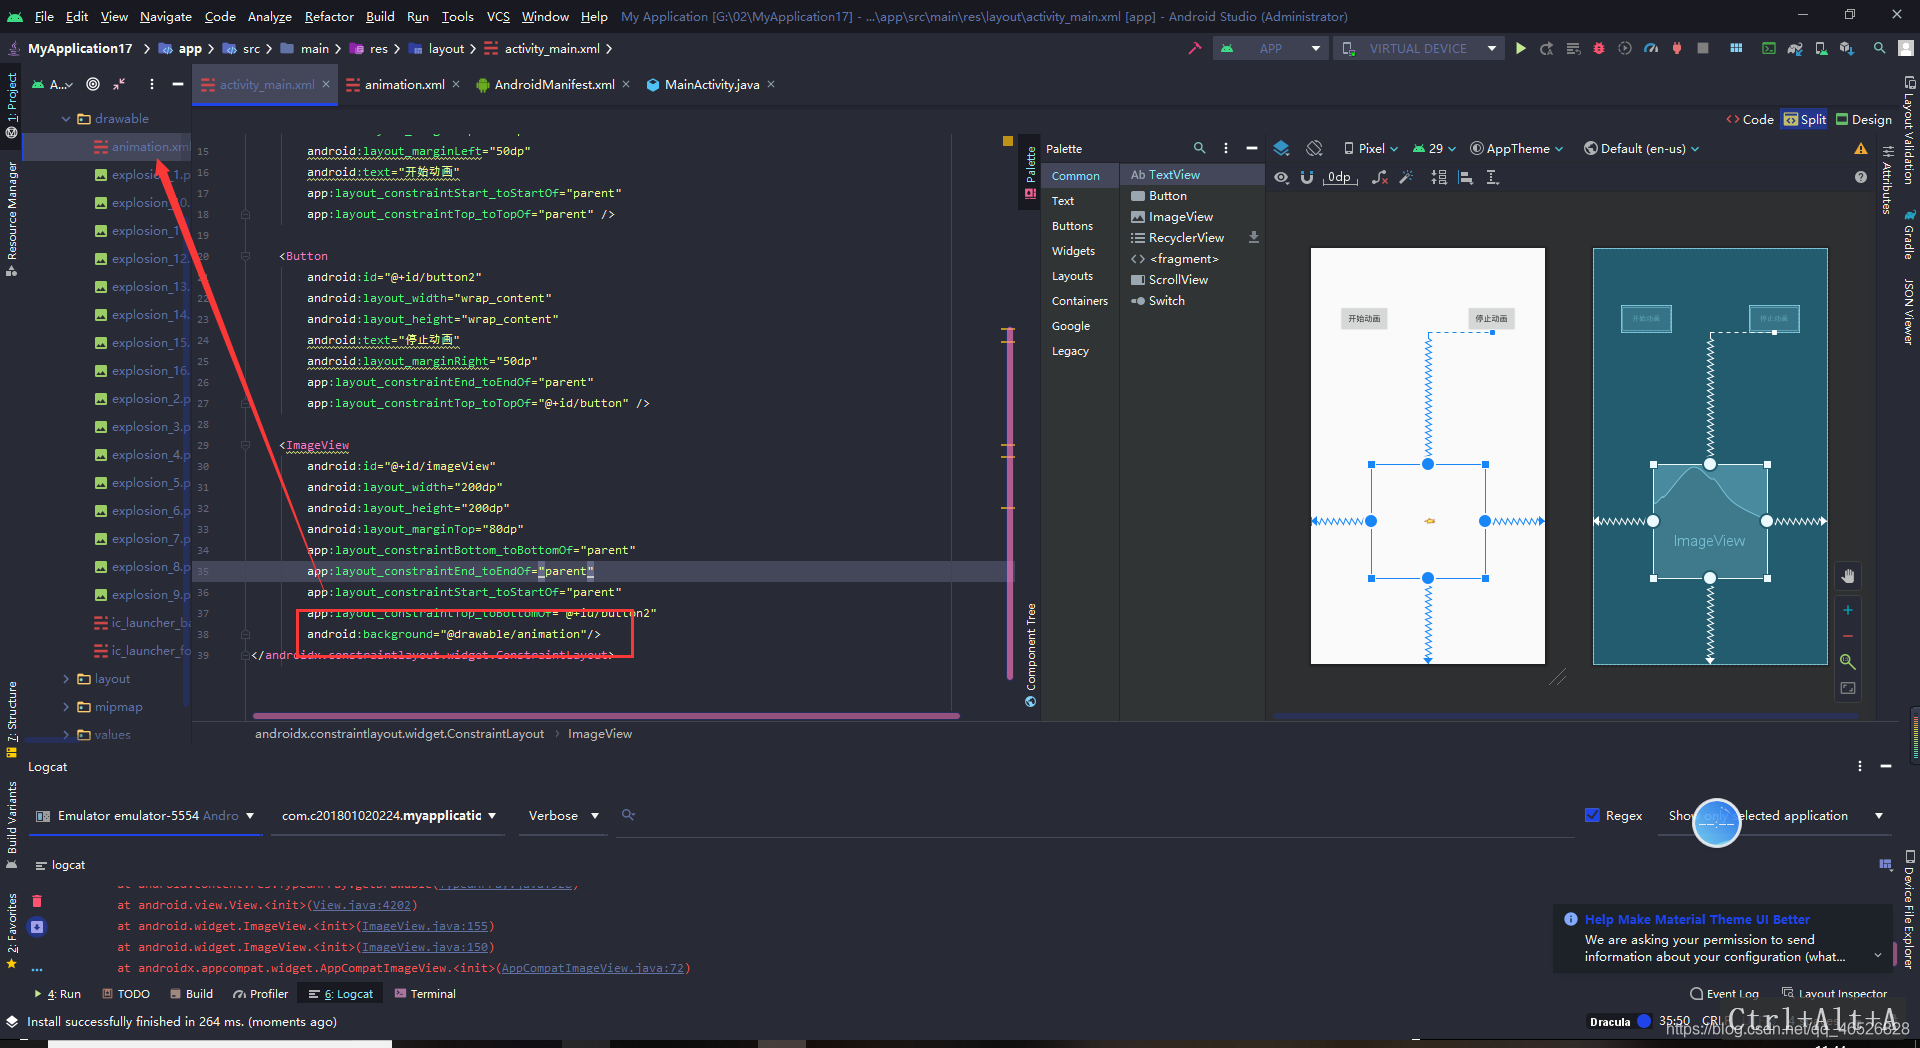
第三步,添加布局文件
<?xml version="1.0" encoding="utf-8"?>
<androidx.constraintlayout.widget.ConstraintLayout xmlns:android="http://schemas.android.com/apk/res/android"
    xmlns:app="http://schemas.android.com/apk/res-auto"
    xmlns:tools="http://schemas.android.com/tools"
    android:layout_width="match_parent"
    android:layout_height="match_parent"
    tools:context=".MainActivity">


    <Button
        android:id="@+id/button"
        android:layout_width="wrap_content"
        android:layout_height="wrap_content"
        android:layout_marginTop="100dp"
        android:layout_marginLeft="50dp"
        android:text="开始动画"
        app:layout_constraintStart_toStartOf="parent"
        app:layout_constraintTop_toTopOf="parent" />

    <Button
        android:id="@+id/button2"
        android:layout_width="wrap_content"
        android:layout_height="wrap_content"
        android:text="停止动画"
        android:layout_marginRight="50dp"
        app:layout_constraintEnd_toEndOf="parent"
        app:layout_constraintTop_toTopOf="@+id/button" />

    <ImageView
        android:id="@+id/imageView"
        android:layout_width="200dp"
        android:layout_height="200dp"
        android:layout_marginTop="80dp"
        app:layout_constraintBottom_toBottomOf="parent"
        app:layout_constraintEnd_toEndOf="parent"
        app:layout_constraintStart_toStartOf="parent"
        app:layout_constraintTop_toBottomOf="@+id/button2"
        android:background="@drawable/animation"/>
</androidx.constraintlayout.widget.ConstraintLayout>
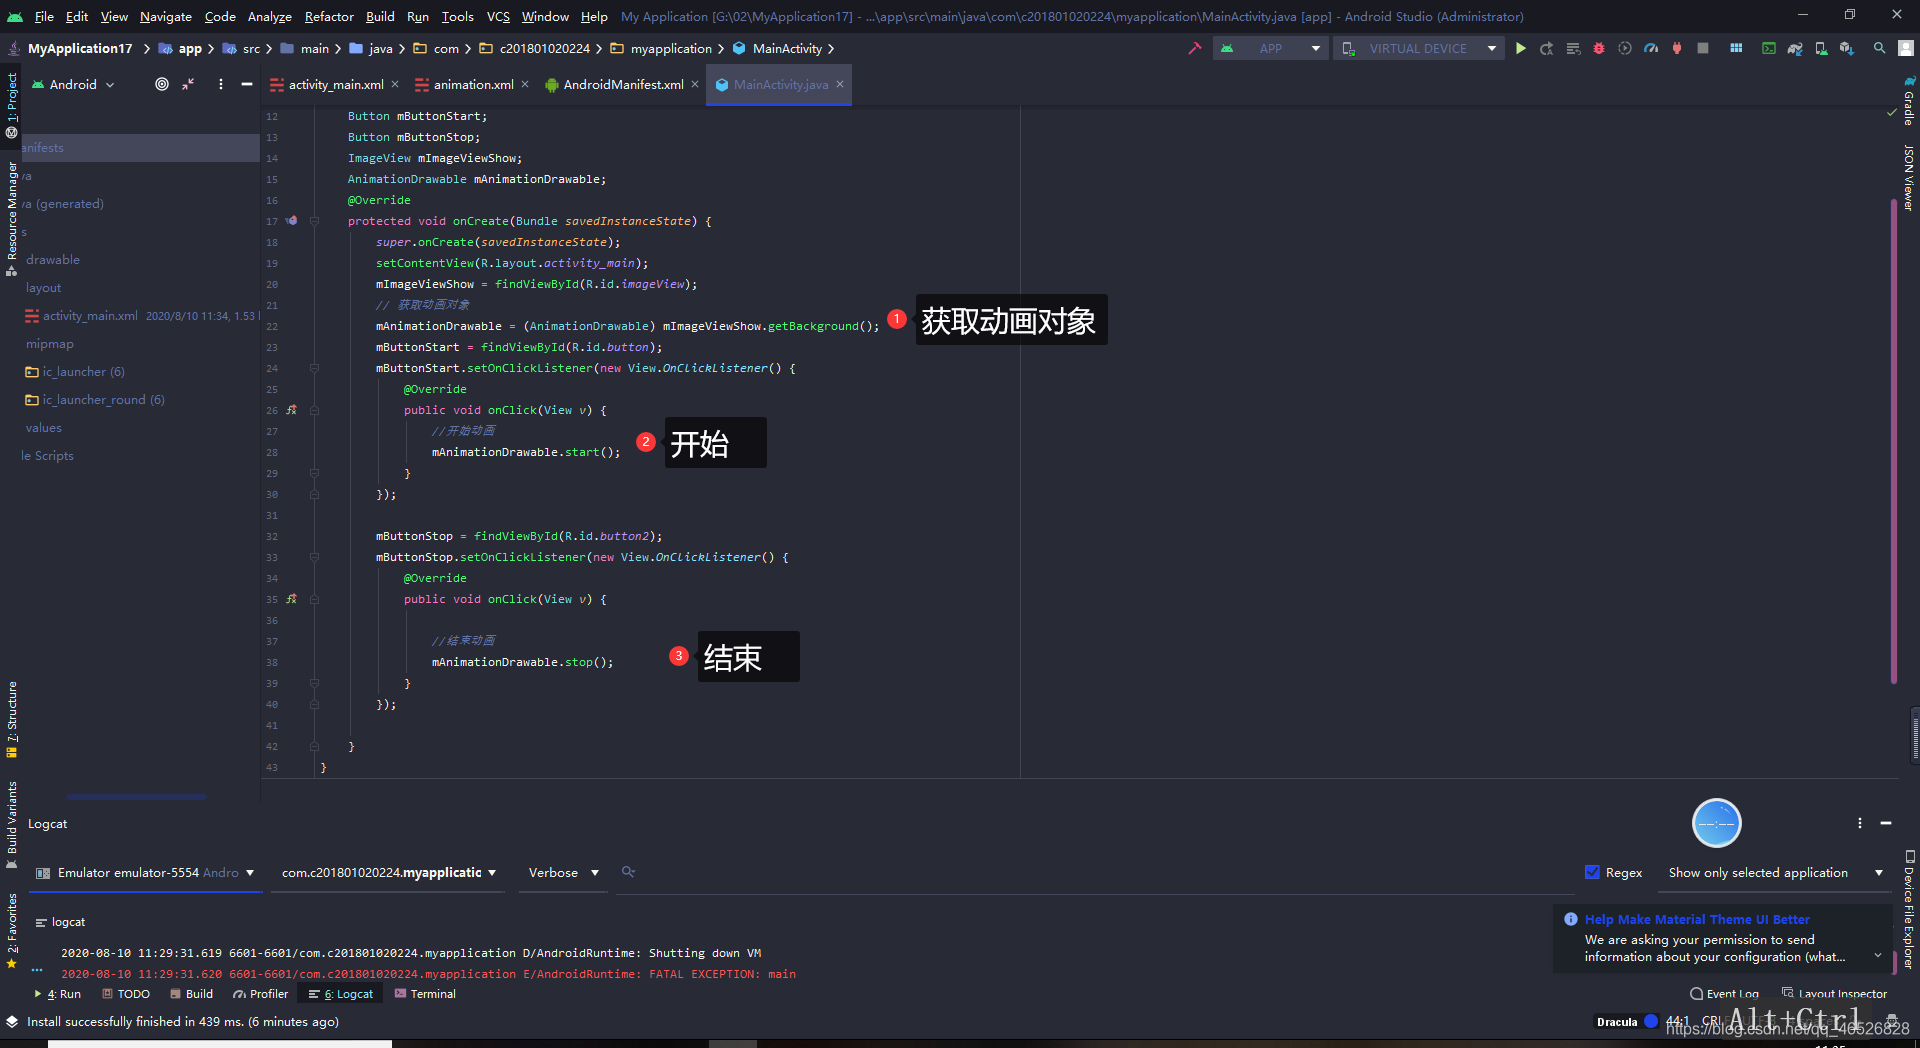
第四步,Activity添加启动暂停动画代码
public class MainActivity extends AppCompatActivity {
    Button mButtonStart;
    Button mButtonStop;
    ImageView mImageViewShow;
    AnimationDrawable mAnimationDrawable;
    @Override
    protected void onCreate(Bundle savedInstanceState) {
        super.onCreate(savedInstanceState);
        setContentView(R.layout.activity_main);
        mImageViewShow = findViewById(R.id.imageView);
        // 获取动画对象
        mAnimationDrawable = (AnimationDrawable) mImageViewShow.getBackground();
        mButtonStart = findViewById(R.id.button);
        mButtonStart.setOnClickListener(new View.OnClickListener() {
            @Override
            public void onClick(View v) {
                //开始动画
                mAnimationDrawable.start();
            }
        });

        mButtonStop = findViewById(R.id.button2);
        mButtonStop.setOnClickListener(new View.OnClickListener() {
            @Override
            public void onClick(View v) {

                //结束动画
                mAnimationDrawable.stop();
            }
        });

    }
}
运行(和gif图片原理类似)
2.补间动画
第一步,创建 anim文件夹
在res目录下创建anim文件夹,必须命名为anim
第二步,设置布局文件
第一步,先放入我们要操作的图片
第二步,布局文件
接下来我们会实现五个功能,所以我们需要添加五个按钮+一个图片控件
1.透明度动画(渐变直至消失)
2.缩放动画
3.位移动画
4.旋转动画
5.动画组合

<?xml version="1.0" encoding="utf-8"?>
<androidx.constraintlayout.widget.ConstraintLayout xmlns:android="http://schemas.android.com/apk/res/android"
    xmlns:app="http://schemas.android.com/apk/res-auto"
    xmlns:tools="http://schemas.android.com/tools"
    android:layout_width="match_parent"
    android:layout_height="match_parent"
    tools:context=".MainActivity">


    <Button
        android:id="@+id/button"
        android:layout_width="wrap_content"
        android:layout_height="wrap_content"
        android:layout_marginTop="20dp"
        android:text="透明度动画"
        app:layout_constraintEnd_toEndOf="parent"
        app:layout_constraintStart_toStartOf="parent"
        app:layout_constraintTop_toTopOf="parent" />

    <Button
        android:id="@+id/button2"
        android:layout_width="wrap_content"
        android:layout_height="wrap_content"
        android:layout_marginTop="10dp"
        android:text="缩放动画"
        app:layout_constraintEnd_toEndOf="parent"
        app:layout_constraintStart_toStartOf="parent"
        app:layout_constraintTop_toBottomOf="@+id/button" />

    <ImageView
        android:id="@+id/imageView"
        android:layout_width="200dp"
        android:layout_height="200dp"
        android:background="@drawable/a1"
        app:layout_constraintBottom_toBottomOf="parent"
        app:layout_constraintEnd_toEndOf="parent"
        app:layout_constraintHorizontal_bias="0.497"
        app:layout_constraintStart_toStartOf="parent"
        app:layout_constraintTop_toBottomOf="@+id/button5" />

    <Button
        android:id="@+id/button3"
        android:layout_width="wrap_content"
        android:layout_height="wrap_content"
        android:layout_marginTop="10dp"
        android:text="位移动画"
        app:layout_constraintEnd_toEndOf="parent"
        app:layout_constraintStart_toStartOf="parent"
        app:layout_constraintTop_toBottomOf="@+id/button2" />

    <Button
        android:id="@+id/button4"
        android:layout_width="wrap_content"
        android:layout_height="wrap_content"
        android:layout_marginTop="10dp"
        android:text="旋转动画"
        app:layout_constraintEnd_toEndOf="parent"
        app:layout_constraintStart_toStartOf="parent"
        app:layout_constraintTop_toBottomOf="@+id/button3" />

    <Button
        android:id="@+id/button5"
        android:layout_width="wrap_content"
        android:layout_height="wrap_content"
        android:layout_marginTop="10dp"
        android:text="组合动画"
        app:layout_constraintEnd_toEndOf="parent"
        app:layout_constraintStart_toStartOf="parent"
        app:layout_constraintTop_toBottomOf="@+id/button4" />
</androidx.constraintlayout.widget.ConstraintLayout>
1.透明度动画-AlphaAnimation
第一步,在anim文件夹下创建一个动画的资源文件夹,命名为 aplha

添加代码
<?xml version="1.0" encoding="utf-8"?>
<alpha xmlns:android="http://schemas.android.com/apk/res/android"
    android:interpolator="@android:anim/accelerate_decelerate_interpolator"
    android:fromAlpha="1.0"
    android:toAlpha="0.1"
    android:duration="2000"/>
表示控件在2000ms内透明度从1变到0.1

| 属性 | 含义 |
|---|---|
| fromAlpha | 动画开始时透明度(透明度的范围为:0-1,完全透明为0,完全不透明为1) |
| toAlpha | 动画结束时透明度 |
| duration | 动画持续的时间(毫秒) |
第二步,给按钮添加点击事件,activity代码
public class MainActivity extends AppCompatActivity {
    Button mButton1;
    Button mButton2;
    Button mButton3;
    Button mButton4;
    Button mButton5;
    ImageView mImageView;

    @Override
    protected void onCreate(Bundle savedInstanceState) {
        super.onCreate(savedInstanceState);
        setContentView(R.layout.activity_main);
        mImageView = findViewById(R.id.imageView);


        mButton1 = findViewById(R.id.button);
        mButton1.setOnClickListener(new View.OnClickListener() {
            @Override
            public void onClick(View v) {
            //透明度动画
                Animation animation = AnimationUtils.loadAnimation(MainActivity.this,R.anim.aplha);
                mImageView.startAnimation(animation);

            }
        });


    }
}
运行

2.缩放动画-ScaleAnimation
第一步,在anim文件夹下创建一个动画的资源文件夹,命名为 scale
贴入代码
<?xml version="1.0" encoding="utf-8"?>
<scale xmlns:android="http://schemas.android.com/apk/res/android"
    android:interpolator="@android:anim/accelerate_interpolator"
    android:fromXScale="0.2"
    android:toXScale="1.5"
    android:fromYScale="0.2"
    android:toYScale="1.5"
    android:pivotX="50%"
    android:pivotY="50%"
    android:duration="2000"/>
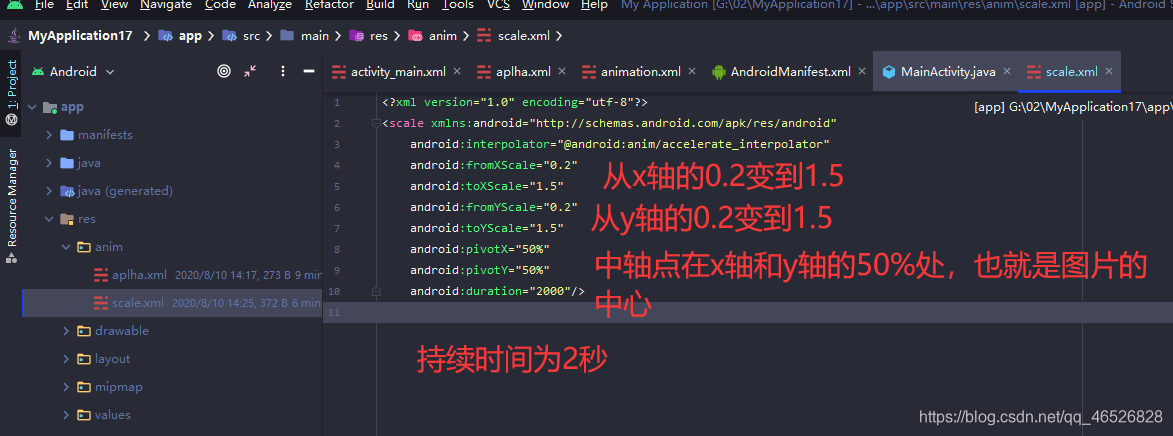
| 属性 | 含义 |
|---|---|
| fromXScale | 动画沿着X轴缩放的起始比例 |
| toXScale | 动画沿着X轴缩放的结束比例 |
| fromYScale | 动画沿着Y轴缩放的起始比例 |
| toYScale | 动画沿着Y轴缩放的结束比例 |
| pivotX | 动画缩放的中轴点X坐标,即距离自身左边缘的位置,比如50%就是以图像的 中心为中轴点 |
| pivotY | 动画缩放的中轴点Y坐标 |
| duration | 动画持续的时间 |
第二步,给按钮添加点击事件,activity代码
  mButton2 = findViewById(R.id.button2);
        mButton2.setOnClickListener(new View.OnClickListener() {
            @Override
            public void onClick(View v) {
                //缩放动画
                Animation  animation= AnimationUtils.loadAnimation(MainActivity.this,R.anim.scale);
                mImageView.startAnimation(animation);
            }
        });
运行

3.位移动画-TranslateAnimation
第一步,在anim文件夹下创建一个动画的资源文件夹,命名为 translate
贴入代码
<?xml version="1.0" encoding="utf-8"?>
<translate xmlns:android="http://schemas.android.com/apk/res/android"
    android:interpolator="@android:anim/accelerate_decelerate_interpolator"
    android:fromXDelta="0"
    android:toXDelta="320"
    android:fromYDelta="0"
    android:toYDelta="0"
    android:duration="2000"/>
表示图片从原来的位置沿着x轴向右移动320像素,y轴不变

| 属性 | 含义 |
|---|---|
| fromXDelta | 动画起始位置的X坐标 |
| fromYDelta | 动画起始位置的Y坐标 |
| toXDelta | 动画结束位置的X坐标 |
| toYDelta | 动画结束位置的Y坐标 |
| duration | 动画持续的时间 |
第二步,给按钮添加点击事件,activity代码
 mButton3 = findViewById(R.id.button3);
        mButton3.setOnClickListener(new View.OnClickListener() {
            @Override
            public void onClick(View v) {
            //位移动画
                Animation  animation = AnimationUtils.loadAnimation(MainActivity.this,R.anim.translate);
                mImageView.startAnimation(animation);
            }
        });
运行
4.旋转动画-RotateAnimation
第一步,在anim文件夹下创建一个动画的资源文件夹,命名为 rotate
贴入代码
<?xml version="1.0" encoding="utf-8"?>
<rotate xmlns:android="http://schemas.android.com/apk/res/android"
    android:interpolator="@android:anim/accelerate_decelerate_interpolator"
    android:fromDegrees="0"
    android:toDegrees="360"
    android:duration="1000"
    android:repeatCount="1"
    android:repeatMode="reverse"/>
表示顺时针旋转一圈,逆时针旋转一圈,如果去掉android:repeatMode=“reverse”,表示顺时针旋转两圈

| 属性 | 含义 |
|---|---|
| fromDegrees | 动画旋转的起始角度 |
| toDegrees | 动画结束角度 |
| repeatCount | 旋转的次数,默认值为0,代表一次,假如是其他值,比如3,则旋转4次 另外,值为-1或者infinite时,表示动画永不停止 |
| repeatMode | 设置重复模式,默认restart,但只有当repeatCount大于0或者infinite或-1时 才有效。还可以设置成reverse,表示偶数次显示动画时会做方向相反的运动 |
| duration | 动画持续的时间 |
第二步,给按钮添加点击事件,activity代码
mButton4 = findViewById(R.id.button4);
        mButton4.setOnClickListener(new View.OnClickListener() {
            @Override
            public void onClick(View v) {
            //旋转动画
                Animation  animation = AnimationUtils.loadAnimation(MainActivity.this,R.anim.rotate);
                mImageView.startAnimation(animation);
            }
        });
运行(默认以左上角为圆心)
5.组合动画-AnimationSet
第一步,在anim文件夹下创建一个动画的资源文件夹,命名为 set
贴入代码
<?xml version="1.0" encoding="utf-8"?>
<set xmlns:android="http://schemas.android.com/apk/res/android"
    android:interpolator="@android:anim/decelerate_interpolator"
    android:shareInterpolator="true" >

    <scale
        android:duration="2000"
        android:fromXScale="0.2"
        android:fromYScale="0.2"
        android:pivotX="50%"
        android:pivotY="50%"
        android:toXScale="1.5"
        android:toYScale="1.5" />

    <rotate
        android:duration="1000"
        android:fromDegrees="0"
        android:repeatCount="1"
        android:repeatMode="reverse"
        android:toDegrees="360" />

    <translate
        android:duration="2000"
        android:fromXDelta="0"
        android:fromYDelta="0"
        android:toXDelta="320"
        android:toYDelta="0" />

    <alpha
        android:duration="2000"
        android:fromAlpha="1.0"
        android:toAlpha="0.1" />

</set>
第二步,给按钮添加点击事件,activity代码
 mButton5 = findViewById(R.id.button5);
        mButton5.setOnClickListener(new View.OnClickListener() {
            @Override
            public void onClick(View v) {
            //组合动画
                Animation animation = AnimationUtils.loadAnimation(MainActivity.this,R.anim.set);
                mImageView.startAnimation(animation);
            }
        });
运行
6.Activity全代码

public class MainActivity extends AppCompatActivity {
    Button mButton1;
    Button mButton2;
    Button mButton3;
    Button mButton4;
    Button mButton5;
    Animation animation =null;
    ImageView mImageView;

    @Override
    protected void onCreate(Bundle savedInstanceState) {
        super.onCreate(savedInstanceState);
        setContentView(R.layout.activity_main);
        mImageView = findViewById(R.id.imageView);


        mButton1 = findViewById(R.id.button);
        mButton1.setOnClickListener(new View.OnClickListener() {
            @Override
            public void onClick(View v) {
                 animation = AnimationUtils.loadAnimation(MainActivity.this,R.anim.aplha);
                mImageView.startAnimation(animation);

            }
        });
        mButton2 = findViewById(R.id.button2);
        mButton2.setOnClickListener(new View.OnClickListener() {
            @Override
            public void onClick(View v) {
                //缩放动画
                  animation= AnimationUtils.loadAnimation(MainActivity.this,R.anim.scale);
                mImageView.startAnimation(animation);
            }
        });
        mButton3 = findViewById(R.id.button3);
        mButton3.setOnClickListener(new View.OnClickListener() {
            @Override
            public void onClick(View v) {
            //位移动画
                  animation = AnimationUtils.loadAnimation(MainActivity.this,R.anim.translate);
                mImageView.startAnimation(animation);
            }
        });

        mButton4 = findViewById(R.id.button4);
        mButton4.setOnClickListener(new View.OnClickListener() {
            @Override
            public void onClick(View v) {
            //旋转动画
                  animation = AnimationUtils.loadAnimation(MainActivity.this,R.anim.rotate);
                mImageView.startAnimation(animation);
            }
        });
        mButton5 = findViewById(R.id.button5);
        mButton5.setOnClickListener(new View.OnClickListener() {
            @Override
            public void onClick(View v) {
            //组合动画
                 animation = AnimationUtils.loadAnimation(MainActivity.this,R.anim.set);
                mImageView.startAnimation(animation);
            }
        });

    }
}
关于帧动画和补间动画就讲到这里啦,谢谢您的阅读
今天的环境不错hhh(感谢狗哥请客)
