文章目录
一、查看网络配置
1.1 查看网络接口信息 ifconfig
- 主机的网络接口卡(网卡)通常称为"网络接口"。
查看所有活动的网络接口信息
- 执行ifconfig命令
查看指定网络接口信息
ifconfig 网络接口
- ifconfig命令不带任何选项和参数时,将显示当前主机中已启用(活动)的网络接口信息
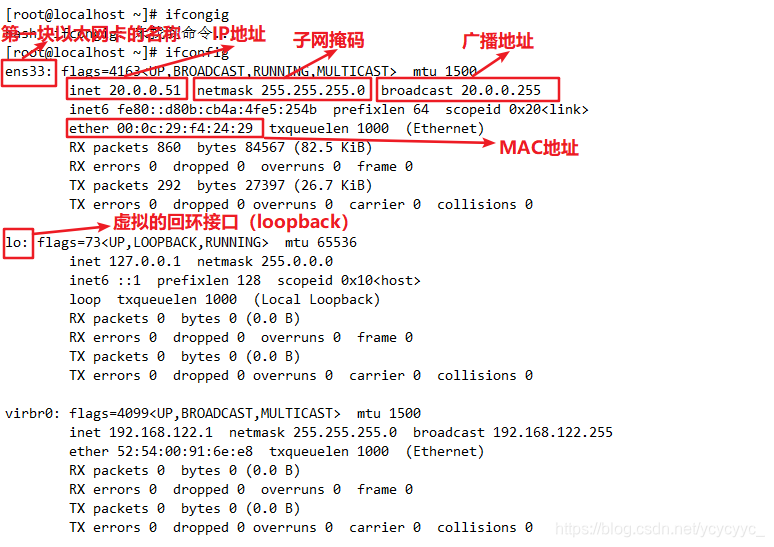
[root@localhost ~]# ifconfig
ens33: flags=4163<UP,BROADCAST,RUNNING,MULTICAST>  mtu 1500
        inet 20.0.0.51  netmask 255.255.255.0  broadcast 20.0.0.255
        inet6 fe80::d80b:cb4a:4fe5:254b  prefixlen 64  scopeid 0x20<link>
        ether 00:0c:29:f4:24:29  txqueuelen 1000  (Ethernet)
        RX packets 860  bytes 84567 (82.5 KiB)
        RX errors 0  dropped 0  overruns 0  frame 0
        TX packets 292  bytes 27397 (26.7 KiB)
        TX errors 0  dropped 0 overruns 0  carrier 0  collisions 0

lo: flags=73<UP,LOOPBACK,RUNNING>  mtu 65536
        inet 127.0.0.1  netmask 255.0.0.0
        inet6 ::1  prefixlen 128  scopeid 0x10<host>
        loop  txqueuelen 1000  (Local Loopback)
        RX packets 0  bytes 0 (0.0 B)
        RX errors 0  dropped 0  overruns 0  frame 0
        TX packets 0  bytes 0 (0.0 B)
        TX errors 0  dropped 0 overruns 0  carrier 0  collisions 0

virbr0: flags=4099<UP,BROADCAST,MULTICAST>  mtu 1500
        inet 192.168.122.1  netmask 255.255.255.0  broadcast 192.168.122.255
        ether 52:54:00:91:6e:e8  txqueuelen 1000  (Ethernet)
        RX packets 0  bytes 0 (0.0 B)
        RX errors 0  dropped 0  overruns 0  frame 0
        TX packets 0  bytes 0 (0.0 B)
        TX errors 0  dropped 0 overruns 0  carrier 0  collisions 0
说明
ens33:第一块以太网卡的名称
inet 192.168.197.161 :IP地址
netmask 255.255.255.0 :子网掩码
broadcast 192.168.197.255 :广播地址
ether 00:0c:29:c3:77:97 : MAC地址
lo:虚拟的回环接口,lo 是 loopback 的缩写,不是真正的网络接口,而是一个虚拟的网络接口,lo 的IP地址默认为 “127.0.0.1”,回环地址通常仅用于对本机的网络测试
TX RX 表示通过该网络接口发出和接收的数据包个数,流量等信息
- 查看所有网络接口信息
[root@localhost ~]# ifconfig -a
- 查看指定网络接口信息
[root@localhost ~]# ifconfig ens33
ens33: flags=4163<UP,BROADCAST,RUNNING,MULTICAST>  mtu 1500
        inet 20.0.0.51  netmask 255.255.255.0  broadcast 20.0.0.255
        inet6 fe80::d80b:cb4a:4fe5:254b  prefixlen 64  scopeid 0x20<link>
        ether 00:0c:29:f4:24:29  txqueuelen 1000  (Ethernet)
        RX packets 1162  bytes 113151 (110.4 KiB)
        RX errors 0  dropped 0  overruns 0  frame 0
        TX packets 352  bytes 36643 (35.7 KiB)
        TX errors 0  dropped 0 overruns 0  carrier 0  collisions 0
1.2 查看主机名称 hostname
hostname命令
- 查看或设置当前主机名
hostname [主机名]
示例:
[root@localhost ~]# hostname  '查看主机名'
localhost.localdomain
- 修改主机名(临时修改,重启后失效)
[root@localhost ~]# hostname yang

- 修改主机名(永久修改)
[root@localhost ~]# hostnamectl set-hostname yang
[root@localhost ~]# su
[root@yang ~]#
1.3 查看路由表条目 route
route命令
- 查看或设置主机中路由表信息
route [-n]
直接执行route命令可以查看到当前主机中的路由表信息
[root@localhost ~]# route
Kernel IP routing table
Destination     Gateway         Genmask         Flags Metric Ref    Use Iface
default         gateway         0.0.0.0         UG    100    0        0 ens33
20.0.0.0        0.0.0.0         255.255.255.0   U     100    0        0 ens33
192.168.122.0   0.0.0.0         255.255.255.0   U     0      0        0 virbr0
Destination列对应目标网段的地址
Gateway列对应下一跳路由器地址
Genmask列对应子网掩码
Iface列对应发送数据的网络接口
目标网段为default时,表示此行时默认网关记录
- -n 以数字形式表示
[root@localhost ~]# route -n
Kernel IP routing table
Destination     Gateway         Genmask         Flags Metric Ref    Use Iface
0.0.0.0         20.0.0.2        0.0.0.0         UG    100    0        0 ens33
20.0.0.0        0.0.0.0         255.255.255.0   U     100    0        0 ens33
192.168.122.0   0.0.0.0         255.255.255.0   U     0      0        0 virbr0
1.4 查看网络连接情况 netstat
netstat命令(并发连接不过万)
- 查看系统的网络连接状态、路由表、接口统计等信息
netstat [选项]
常用选项
-a:查看所有的信息.
-n:以数字形式进行显示
-p:显示进程号PID
-t:查看tcp协议连接
-u:查看udp协议连接
-r:查看route路由表
- 通常使用“-ntap”组合选项,以数字形式显示当前系统中所有的TCP连接信息,同时显示对应的进程信息。
- 结合管道符号使用“grep”命令,还可以在结果中过滤出所需要的特定记录。
[root@localhost ~]# netstat -ntap  '以数字形式显示当前系统中所有的TCP连接信息,同时显示对应的进程信息。'
Active Internet connections (servers and established)
Proto Recv-Q Send-Q Local Address           Foreign Address         State       PID/Program name
tcp        0      0 0.0.0.0:111             0.0.0.0:*               LISTEN      1/systemd
tcp        0      0 0.0.0.0:6000            0.0.0.0:*               LISTEN      10176/X
tcp        0      0 192.168.122.1:53        0.0.0.0:*               LISTEN      9910/dnsmasq
tcp        0      0 0.0.0.0:22              0.0.0.0:*               LISTEN      9490/sshd
tcp        0      0 127.0.0.1:631           0.0.0.0:*               LISTEN      9488/cupsd
tcp        0      0 127.0.0.1:25            0.0.0.0:*               LISTEN      9830/master
tcp        0      0 127.0.0.1:6010          0.0.0.0:*               LISTEN      9654/sshd: root@pts
tcp        0      0 20.0.0.51:43204         59.111.0.251:80         TIME_WAIT   -
tcp        0      0 20.0.0.51:43200         59.111.0.251:80         TIME_WAIT   -
tcp        0      0 20.0.0.51:43206         59.111.0.251:80         TIME_WAIT   -
tcp        0     52 20.0.0.51:22            20.0.0.1:50178          ESTABLISHED 9654/sshd: root@pts
tcp        0      0 20.0.0.51:43202         59.111.0.251:80         TIME_WAIT   -
tcp6       0      0 :::111                  :::*                    LISTEN      1/systemd
tcp6       0      0 :::6000                 :::*                    LISTEN      10176/X
tcp6       0      0 :::22                   :::*                    LISTEN      9490/sshd
tcp6       0      0 ::1:631                 :::*                    LISTEN      9488/cupsd
tcp6       0      0 ::1:25                  :::*                    LISTEN      9830/master
tcp6       0      0 ::1:6010                :::*                    LISTEN      9654/sshd: root@pts
[root@localhost ~]# netstat -ntap | grep 22     '过滤出22端口'
tcp        0      0 192.168.122.1:53        0.0.0.0:*               LISTEN      9910/dnsmasq
tcp        0      0 0.0.0.0:22              0.0.0.0:*               LISTEN      9490/sshd
tcp        0     52 20.0.0.51:22            20.0.0.1:50178          ESTABLISHED 9654/sshd: root@pts
tcp6       0      0 :::22                   :::*                    LISTEN      9490/sshd
[root@localhost ~]# netstat -r   '显示路由信息'
Kernel IP routing table
Destination     Gateway         Genmask         Flags   MSS Window  irtt Iface
default         gateway         0.0.0.0         UG        0 0          0 ens33
20.0.0.0        0.0.0.0         255.255.255.0   U         0 0          0 ens33
192.168.122.0   0.0.0.0         255.255.255.0   U         0 0          0 virbr0
1.5 获取socket统计信息 ss
ss命令(高并发,并发连接过万)
- 查看系统的网络连接情况,获取socket统计信息(默认查看已连接的信息)
ss [选项]
常用选项
-t:查看tcp协议===>tcp
-u:查看udp协议===>udp
-n:取消了服务名称改换了端口号
-l:监听状态的信息===>listen
-p:查看进程号PID
-a:查看所有
-r:显示服务名称===>默认不敲就是r
二、测试网络连接
2.1 测试网络连接 ping
ping命令
- 测试网络连通性
ping [选项] 目标主机 (按Ctrl+c终止测试)
示例:
[root@localhost ~]# ping 20.0.0.2
PING 20.0.0.2 (20.0.0.2) 56(84) bytes of data.
64 bytes from 20.0.0.2: icmp_seq=1 ttl=128 time=0.067 ms
64 bytes from 20.0.0.2: icmp_seq=2 ttl=128 time=0.086 ms
64 bytes from 20.0.0.2: icmp_seq=3 ttl=128 time=0.111 ms
64 bytes from 20.0.0.2: icmp_seq=4 ttl=128 time=0.097 ms
^C
--- 20.0.0.2 ping statistics ---
4 packets transmitted, 4 received, 0% packet loss, time 3000ms
rtt min/avg/max/mdev = 0.067/0.090/0.111/0.017 ms
2.2 跟踪数据包 traceroute
traceroute命令
- 测试从当前主机到目的主机之间经过的网络节点
traceroute 目标主机地址
示例:(第一步先找网关)
[root@localhost ~]# traceroute 192.168.1.112
traceroute to 192.168.1.112 (192.168.1.112), 30 hops max, 60 byte packets
 1  gateway (20.0.0.2)  0.064 ms  0.044 ms  0.039 ms
 2  * * *
 3  * * *
 4  * * *
2.3 域名解析 nslookup
nslookup命令(nameserver)
- 测试DNS域名解析
nslookup 目标主机地址 [DNS服务器地址]
示例:
[root@localhost ~]# nslookup www.baidu.com
Server:		8.8.8.8
Address:	8.8.8.8#53

Non-authoritative answer:
www.baidu.com	canonical name = www.a.shifen.com.
www.a.shifen.com	canonical name = www.wshifen.com.
Name:	www.wshifen.com
Address: 104.193.88.123   'DNS服务器地址'
Name:	www.wshifen.com
Address: 104.193.88.77    '解析的IP地址'
- DNS端口:53
- TCP 53:连接DNS服务器
- UDP 53:用于解析
三、使用网络配置命令
3.1 设置网络参数的方式
临时配置------使用命令调整网络参数
- 简单、快速、可直接修改运行中的网络参数
- 一般只适合在调试网络的过程中使用
- 系统重启以后,所做的修改将会失效
固定设置------通过配置文件修改网络参数
- 修改各项网络参数的配置文件
- 适合对服务其设置固定参数时使用
- 需要重载网络服务或重启以后才会生效
3.2 设置网络接口参数 ifconfig
设置网络接口的IP地址、子网掩码(临时更改)
- ifconfig 网络接口 ip地址 [netmask 子网掩码]
- ifconfig 网络接口 ip地址 [/子网掩码长度]
禁用或者重新激活网卡(只能跟物理接口:ens33)
- ifconfig 网络接口 up
- ifconfig 网络接口 down
ifup ens33
ifdown ens33
设置虚拟网络接口
- ifconfig 网络接口:序号 IP地址
举例:
临时加一个物理网卡
[root@localhost ~]# ifconfig ens33:0 20.0.0.100
[root@localhost ~]# ifconfig
ens33: flags=4163<UP,BROADCAST,RUNNING,MULTICAST>  mtu 1500
        inet 20.0.0.51  netmask 255.255.255.0  broadcast 20.0.0.255
        inet6 fe80::d80b:cb4a:4fe5:254b  prefixlen 64  scopeid 0x20<link>
        ether 00:0c:29:f4:24:29  txqueuelen 1000  (Ethernet)
        RX packets 8259  bytes 7550898 (7.2 MiB)
        RX errors 0  dropped 0  overruns 0  frame 0
        TX packets 3151  bytes 360446 (351.9 KiB)
        TX errors 0  dropped 0 overruns 0  carrier 0  collisions 0

ens33:0: flags=4163<UP,BROADCAST,RUNNING,MULTICAST>  mtu 1500
        inet 20.0.0.100  netmask 255.0.0.0  broadcast 20.255.255.255
        ether 00:0c:29:f4:24:29  txqueuelen 1000  (Ethernet)

lo: flags=73<UP,LOOPBACK,RUNNING>  mtu 65536
        inet 127.0.0.1  netmask 255.0.0.0
        inet6 ::1  prefixlen 128  scopeid 0x10<host>
        loop  txqueuelen 1000  (Local Loopback)
        RX packets 76  bytes 6792 (6.6 KiB)
        RX errors 0  dropped 0  overruns 0  frame 0
        TX packets 76  bytes 6792 (6.6 KiB)
        TX errors 0  dropped 0 overruns 0  carrier 0  collisions 0
......
3.3 设置路由记录 route
添加到指定网段的路由记录
route add -net 网段地址/24 gw IP地址
删除到指定网段的路由记录
route del -net 网段地址/24
向路由表中添加默认网关记录
route add default gw IP地址
删除路由表中默认的网关记录
route del default gw IP地址
[root@localhost ~]# route   '查看原本的路由条目'
Kernel IP routing table
Destination     Gateway         Genmask         Flags Metric Ref    Use Iface
default         gateway         0.0.0.0         UG    100    0        0 ens33
20.0.0.0        0.0.0.0         255.255.255.0   U     100    0        0 ens33
20.0.0.0        0.0.0.0         255.0.0.0       U     0      0        0 ens33
192.168.122.0   0.0.0.0         255.255.255.0   U     0      0        0 virbr0
[root@localhost ~]# route add -net 192.168.100.0/24 gw 20.0.0.2   '添加静态路由,本机访问另一个网段192.168.100.0/24的数据都发给20.0.0.2'
[root@localhost ~]# route -n
Kernel IP routing table
Destination     Gateway         Genmask         Flags Metric Ref    Use Iface
0.0.0.0         20.0.0.2        0.0.0.0         UG    100    0        0 ens33
20.0.0.0        0.0.0.0         255.255.255.0   U     100    0        0 ens33
20.0.0.0        0.0.0.0         255.0.0.0       U     0      0        0 ens33
192.168.100.0   20.0.0.2        255.255.255.0   UG    0      0        0 ens33
192.168.122.0   0.0.0.0         255.255.255.0   U     0      0        0 virbr0
[root@localhost ~]# route del -net 192.168.100.0/24   '删除静态路由'
[root@localhost ~]# route -n
Kernel IP routing table
Destination     Gateway         Genmask         Flags Metric Ref    Use Iface
0.0.0.0         20.0.0.2        0.0.0.0         UG    100    0        0 ens33
20.0.0.0        0.0.0.0         255.255.255.0   U     100    0        0 ens33
20.0.0.0        0.0.0.0         255.0.0.0       U     0      0        0 ens33
192.168.122.0   0.0.0.0         255.255.255.0   U     0      0        0 virbr0
- 同一个主机的路由表中只应有一条默认网关记录,否则会导致主机的网络了解出现故障
四、修改网络配置文件
4.1 网络接口配置文件
/etc/sysconfig/network-scripts/目录下
- 文件名格式为“ifcfg-xxx”
ifcfg-ens33:第一块以太网卡的配置文件
…
回环接口lo的配置文件是“ifcfg-lo”
[root@localhost ~]# ls /etc/sysconfig/network-scripts/ifcfg-*
/etc/sysconfig/network-scripts/ifcfg-ens33  /etc/sysconfig/network-scripts/ifcfg-lo
[root@localhost ~]# vim /etc/sysconfig/network-scripts/ifcfg-ens33
..省略部分内容
BOOTPROTO="dhcp"		'设置网络接口的配置方式,值为 static 表示使用静态指定的IP地址,值为 dhcp 表示 通过dhcp的方式动态获取地址'
DEVICE="ens33"		'设置网络接口的名称'
ONBOOT="yes"		'设置网络接口是否在Linux系统启动时激活'
IPADDR="20.0.0.51"		'设置网络接口的IP地址'
NETMASK="255.255.255.0"		'设置网络接口的子网掩码'
GATEWAY="20.0.0.2"		'设置网络接口的默认网关地址'
4.2 启动、禁用网络接口配置
重启network网络服务
[root@localhost ~]# systemctl restart network
    或者
[root@localhost ~]# service network restart
禁用,启用网络接口
[root@localhost ~]# ifdown ens33		'关闭网卡'
成功断开设备 'ens33'。
[root@localhost ~]# ifup ens33		'启用网卡'
4.3 主机名称配置文件
-
/etc/sysconfig/network文件 , centos6系统中再这
- 保存全局网络设置,主要包括主机名信息
-
/etc/hostname文件,centos7系统中在这
4.4 域名解析配置文件
/etc/resolv.conf文件
-
保存本机需要使用的DNS服务器的IP地址
-
对该文件所做的修改会立刻生效
-
Linux系统中最多可以指定3个(第三个以后将被忽略)不同的DNS服务器地址,优先使用第一个DNS服务器
[root@localhost ~]# vim /etc/resolv.conf
search localdomain		'默认的搜索域(域名后缀),即,当访问主机localhost 时,相当于访问 localhost.localdomain'
nameserver 100.100.1.30
nameserver 100.100.100.30
4.5 本地主机映射文件
/etc/hosts文件(必须要对应填写很多IP不建议使用)
-
保存主机名与IP地址的映射记录
-
一般用来保存经常需要访问的主机的信息
hosts文件和DNS服务器的比较
-
默认情况下,系统首先从hosts文件查找解析记录
-
当访问一个未知的域名时,先查找该文件中是否有相应的映射记录,如果找不到在去向DNS服务器查询
-
hosts文件只对当前的主机有效
-
因为hosts文件只保存在本地
-
hosts文件可减少DNS查询过程,从而加快访问速度
-
在/etc/hosts文件中添加正确的映射记录(经常访问的一些网站),减少了DNS查询,提高了上网速度
[root@localhost ~]# vim /etc/hosts
127.0.0.1   localhost localhost.localdomain localhost4 localhost4.localdomain4
::1         localhost localhost.localdomain localhost6 localhost6.localdomain6
6.6.6.6	www.baidu.com  '这是新添加的,当访问网站www.baidu.com时,就会直接向IP地址211.168.31.80发送web请求,省略了向DNS服务器解析IP地址的过程'