简介
Databinding是谷歌的一个官方支持库,它允许您使用声明性格式而不是通过编程方式将布局中的UI组件绑定到应用程序中的数据源。
通常在活动中使用调用UI框架方法的代码来定义布局。例如,调用findViewById()以查找TextView窗口小部件并将其绑定到变量。
因为它通过在布局文件中绑定组件,您可以删除活动中的许多UI框架调用,从而使它们更易于维护。这也可以提高应用程序的性能,并有助于防止内存泄漏和空指针异常。
Androidx集成Databinding
1、将dataBinding元素添加到 build.gradle应用程序模块中
android {
    ......
    dataBinding {
        enabled = true
    }
}
2、gradle编译会根据dataBinding设置自动引包,无需个人添加implementation等。因此,需要在项目中配置Androidx环境。
文件位置:项目根目录gradle.properties
android.useAndroidX=true
android.enableJetifier=true
Databinding使用
Databinding的改动主要涉及两个模块,一个模块为布局文件layout,另一个模块为数据提供方(Activity,Fragment,或者viewmodel,这里我们以Activity为例子)。
一、 layout模块变动,布局文件的最外层需要套一层layout标签。
<?xml version="1.0" encoding="utf-8"?>
<layout xmlns:android="http://schemas.android.com/apk/res/android"
    xmlns:app="http://schemas.android.com/apk/res-auto">
    <data>
        <variable
            name="productInfo"
            type="com.archie.mvvm.entity.ProductInfo" />
        <variable
            name="isLate"
            type="com.archie.mvvm.entity.ProductInfo" />
    </data>

    <LinearLayout
        android:layout_width="match_parent"
        android:layout_height="match_parent"
        android:orientation="vertical">
        // 利用TextView测试单向数据绑定
        <TextView
            android:layout_width="match_parent"
            android:layout_height="wrap_content"
            android:text="@{productInfo.name}" />
        // 利用CheckBox测试双向数据绑定
        <CheckBox
            android:layout_width="match_parent"
            android:layout_height="wrap_content"
            android:checked="@={productInfo.isLate}"
            android:onCheckedChanged="@{productInfo::onClickBox}" />
    </LinearLayout>
</layout>
二、layout布局文件的data标签绑定了类数据ProductInfo
public class ProductInfo {
    public String name;
    public boolean isLate;

    public ProductInfo(String name, boolean isLate) {
        this.name = name;
        this.isLate = isLate;
    }
}
三、数据提供方Activity代码
layout布局文件写完执行build->rebuild project会自动生成DataBindingActivityBinding对象
public class DataBindingActivity extends AppCompatActivity {

    @Override
    protected void onCreate(@Nullable Bundle savedInstanceState) {
        super.onCreate(savedInstanceState);
        DataBindingActivityBinding bindingActivityBinding =
                DataBindingUtil.setContentView(this, R.layout.data_binding_activity);

        bindingActivityBinding.setProductInfo(new ProductInfo("小米公交卡", true);
    }
}
如上,一个比较简单的Databinding使用,Databinding使用还包含自定义view、绑定表达式等,这里不着重讲了,可以参考如下文档:
绑定表达式:
https://developer.android.google.cn/topic/libraries/data-binding/expressions
通过BindingAdapters自定义view:
https://developer.android.google.cn/topic/libraries/data-binding/binding-adapters
概念以及APT自动生成的文件
一、概念讲解
首先陈述几个Databinding相关的概念
1、Java中的APT的工作过程
APT即Annotatino Processing Tool, 他的作用是处理代码中的注解, 用来生成代码, 换句话说, 这是用代码生成代码的工具。
2、双向绑定
数据变更可以通知到控件,控件的状态变更(例如checkbox的开关)会同步到绑定的数据对象。
3、Databinding跟mvvm模式的关系
Databinding本质跟mvvm并没有关系,它的出现因为屏蔽了findviewbyid,所以有助于防止内存泄漏和空指针异常。属于view层的优化。
4、使用双向数据绑定的无限循环
使用双向数据绑定时,请注意不要引入无限循环。当用户更改属性时,使用注释的方法将 @InverseBindingAdapter被调用,并将该值分配给属性。反过来,这将调用使用注释的方法 @BindingAdapter,这将触发对使用注释的方法的另一次调用@InverseBindingAdapter,依此类推。
因此,在使用注释的方法中,通过比较新值和旧值来打破可能的无限循环非常重要。
这里列一个防止无限循环的例子:
public class CompoundButtonBindingAdapter {
    @BindingAdapter("android:checked")
    public static void setChecked(CompoundButton view, boolean checked) {
    	// 这里通过比较新值和旧值来打破可能的无限循环
        if (view.isChecked() != checked) {
            view.setChecked(checked);
        }
    }
}
二、APT技术自动生成的文件
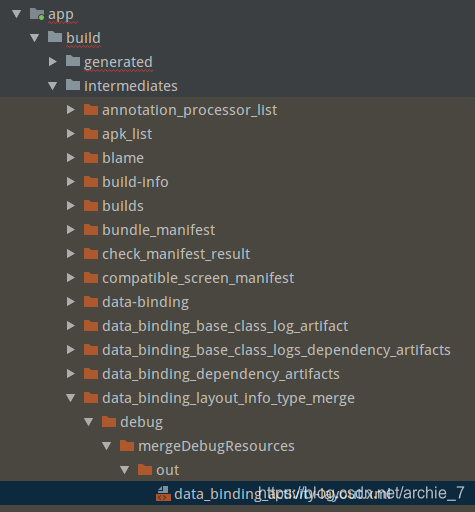
1、layout转换的文件
文件位置build/intermediates/下

文件内容
这里就不贴全部代码了,着重贴下双向绑定跟单向绑定的区别: TwoWay标签值不同
       <Target tag="binding_1" view="TextView">
            <Expressions>
                <Expression attribute="android:text" text="productInfo.name">
                    <TwoWay>false</TwoWay>
                </Expression>
            </Expressions>
         </Target>
        <Target tag="binding_2" view="CheckBox">
            <Expressions>
                <Expression attribute="android:checked" text="productInfo.isLate">
                    <TwoWay>true</TwoWay>
                </Expression>
            </Expressions>
            <location endLine="37" endOffset="67" startLine="33" startOffset="8" />
        </Target>
2、生成的Binding管理类
DataBindingActivityBindingImpl类,用户向布局文件下发数据,ui展示。

源码逻辑分析
一、Activity或者Fragment绑定layout
1、首先会通过DataBindingUtil拿到Binding类,同时会绑定layout
DataBindingActivityBinding bindingActivityBinding =
                DataBindingUtil.setContentView(this, R.layout.data_binding_activity);
2、DataBindingUtil的setContentView
	public static <T extends ViewDataBinding> T setContentView(@NonNull Activity 	activity,
            int layoutId, @Nullable DataBindingComponent bindingComponent) {
        activity.setContentView(layoutId);
        View decorView = activity.getWindow().getDecorView();
        ViewGroup contentView = (ViewGroup) decorView.findViewById(android.R.id.content);
        return bindToAddedViews(bindingComponent, contentView, 0, layoutId);
    }
3、bindToAddedViews最终会到DataBindingUtil.bind
	public static <T extends ViewDataBinding> T bind(@NonNull View root,
            DataBindingComponent bindingComponent) {
        T binding = getBinding(root);
        if (binding != null) {
            return binding;
        }
        Object tagObj = root.getTag();
        if (!(tagObj instanceof String)) {
            throw new IllegalArgumentException("View is not a binding layout");
        } else {
            String tag = (String) tagObj;
            int layoutId = sMapper.getLayoutId(tag);
            if (layoutId == 0) {
                throw new IllegalArgumentException("View is not a binding layout. Tag: " + tagObj);
            }
            return (T) sMapper.getDataBinder(bindingComponent, root, layoutId);
        }
    }
4、sMapper同样也是apt自动生成的类
类位置

看下DataBinderMapperImpl.getDataBinder()
	public ViewDataBinding getDataBinder(DataBindingComponent component, View view, int layoutId) {
    int localizedLayoutId = INTERNAL_LAYOUT_ID_LOOKUP.get(layoutId);
    if(localizedLayoutId > 0) {
      final Object tag = view.getTag();
      if(tag == null) {
        throw new RuntimeException("view must have a tag");
      }
      switch(localizedLayoutId) {
        case  LAYOUT_DATABINDINGACTIVITY: {
          if ("layout/data_binding_activity_0".equals(tag)) {
            return new DataBindingActivityBindingImpl(component, view);
          }
          throw new IllegalArgumentException("The tag for data_binding_activity is invalid. Received: " + tag);
        }
      }
    }
    return null;
  }
到这里DataBindingUtil关联layout同时获取Binding对象就完事了,最终通过DataBinderMapperImpl获取到DataBindingActivityBindingImpl。
二、单向数据绑定如何实现的
1、看下DataBindingActivityBindingImpl的构造方法
	private DataBindingActivityBindingImpl(androidx.databinding.DataBindingComponent bindingComponent, View root, Object[] bindings) {
        super(bindingComponent, root, 0
            );
        this.mboundView0 = (android.widget.LinearLayout) bindings[0];
        this.mboundView0.setTag(null);
        this.mboundView1 = (android.widget.TextView) bindings[1];
        this.mboundView1.setTag(null);
        this.mboundView2 = (android.widget.CheckBox) bindings[2];
        this.mboundView2.setTag(null);
        setRootTag(root);
        // listeners
        invalidateAll();
    }
这里可以看到把所有的子view都数字标记了
2、这里着重看下invalidateAll()方法做了什么
	public void invalidateAll() {
        synchronized(this) {
                mDirtyFlags = 0x10L;
        }
        requestRebind();
    }
requestRebind方法在它的父类ViewDataBinding中
    protected void requestRebind() {
        if (mContainingBinding != null) {
            mContainingBinding.requestRebind();
        } else {
            ......
            if (USE_CHOREOGRAPHER) {
                mChoreographer.postFrameCallback(mFrameCallback);
            } else {
            	// 这里使用了Handler启动了一个runnable任务
                mUIThreadHandler.post(mRebindRunnable);
            }
        }
    }
    private final Runnable mRebindRunnable = new Runnable() {
        @Override
        public void run() {
            ......
            executePendingBindings();
        }
    };
    public void executePendingBindings() {
        if (mContainingBinding == null) {
            executeBindingsInternal();
        } else {
            mContainingBinding.executePendingBindings();
        }
    }
    private void executeBindingsInternal() {
        ......
        if (!mRebindHalted) {
        	// 这里可以看到最终执行的executeBindings
            executeBindings();
            if (mRebindCallbacks != null) {
                mRebindCallbacks.notifyCallbacks(this, REBOUND, null);
            }
        }
        mIsExecutingPendingBindings = false;
    }
    // executeBindings是个抽象方法,子类需要实现它
    protected abstract void executeBindings();
这里可以看到通过Handler启动了一个runnable,执行子类的executeBindings()方法
3、所以最终回到了子类DataBindingActivityBindingImpl.executeBindings()
	protected void executeBindings() {
        long dirtyFlags = 0;
        synchronized(this) {
            dirtyFlags = mDirtyFlags;
            mDirtyFlags = 0;
        }
        java.lang.String productInfoName = null;
        boolean productInfoIsLate = false;
        com.archie.mvvm.entity.ProductInfo productInfo = mProductInfo;
        android.widget.CompoundButton.OnCheckedChangeListener productInfoOnClickBoxAndroidWidgetCompoundButtonOnCheckedChangeListener = null;
        if ((dirtyFlags & 0x18L) != 0) {
                if (productInfo != null) {
                    // read productInfo.name
                    productInfoName = productInfo.name;
                    // read productInfo.isLate
                    productInfoIsLate = productInfo.isLate;
                }
        }
        // batch finished
        if ((dirtyFlags & 0x18L) != 0) {
			androidx.databinding.adapters.TextViewBindingAdapter.setText(this.mboundView1, productInfoName);
            androidx.databinding.adapters.CompoundButtonBindingAdapter.setChecked(this.mboundView2, productInfoIsLate);
            androidx.databinding.adapters.CompoundButtonBindingAdapter.setListeners(this.mboundView2, (android.widget.CompoundButton.OnCheckedChangeListener)productInfoOnClickBoxAndroidWidgetCompoundButtonOnCheckedChangeListener, mboundView2androidCheckedAttrChanged);
        }
    }
4、我们看下androidx.databinding.adapters.TextViewBindingAdapter.setText()
	public static void setText(TextView view, CharSequence text) {
        final CharSequence oldText = view.getText();
        if (text == oldText || (text == null && oldText.length() == 0)) {
            return;
        }
        if (text instanceof Spanned) {
            if (text.equals(oldText)) {
                return; // No change in the spans, so don't set anything.
            }
        } else if (!haveContentsChanged(text, oldText)) {
            return; // No content changes, so don't set anything.
        }
        view.setText(text);
    }
这里我们可以看到最终调用了view.setText(text)给view设置了内容。
5、单向设置数据。DataBindingActivityBindingImpl会自动生成set方法
	public void setProductInfo(@Nullable com.archie.mvvm.entity.ProductInfo ProductInfo) {
        this.mProductInfo = ProductInfo;
        synchronized(this) {
            mDirtyFlags |= 0x8L;
        }
        notifyPropertyChanged(BR.productInfo);
        super.requestRebind();
    }
    public void setIsLate(@Nullable com.archie.mvvm.entity.ProductInfo IsLate) {
        this.mIsLate = IsLate;
    }
完结,这里可以总结下,所谓的单向数据绑定原理其实也是调用requestRebind()方法,通过Handler启动了runnable,检查数据变化;当通过set方法设置数据后,executeBindings会更新到相应的view。
三、双向数据绑定原理
双向绑定其实是在单向的基础上补充了反向数据,这里以CheckBox为例,其实上边的代码多少已经展示了,这里着重梳理下。
1、layout不同
需要使用@=标记
		<CheckBox
            android:layout_width="match_parent"
            android:layout_height="wrap_content"
            android:checked="@={productInfo.isLate}" />
2、看下InverseBindingListener
	public interface InverseBindingListener {
    /**
     * Notifies the data binding system that the attribute value has changed.
     */
    void onChange();
}
反向数据绑定是一个接口
3、看下他的实现类,代码在DataBindingActivityBindingImpl
	// Inverse Binding Event Handlers
    private androidx.databinding.InverseBindingListener mboundView2androidCheckedAttrChanged =
    	new androidx.databinding.InverseBindingListener() {
        @Override
        public void onChange() {
            // Inverse of productInfo.isLate
            //         is productInfo.isLate = (boolean) callbackArg_0
            boolean callbackArg_0 = mboundView2.isChecked();
            // localize variables for thread safety
            // productInfo.isLate
            boolean productInfoIsLate = false;
            // productInfo
            com.archie.mvvm.entity.ProductInfo productInfo = mProductInfo;
            // productInfo != null
            boolean productInfoJavaLangObjectNull = false;
            productInfoJavaLangObjectNull = (productInfo) != (null);
            if (productInfoJavaLangObjectNull) {
                productInfo.isLate = ((boolean) (callbackArg_0));
            }
        }
    };
这里可以看到onChange内部其实是对Product对象的赋值。这里大概就能体现出Java的神奇,因为Product是个对象,所以传递的是对象的引用,这里通过对象的引用变更了对象的属性,那么内存中的这个对象本质数据已经变更。
4、接下来看下怎么回调的onChange(),其实还DataBindingActivityBindingImpl.executeBindings()
protected void executeBindings() {
        ......
        // batch finished
        if ((dirtyFlags & 0x18L) != 0) {
            // api target 1
            androidx.databinding.adapters.TextViewBindingAdapter.setText(this.mboundView1, productInfoName);
            androidx.databinding.adapters.CompoundButtonBindingAdapter.setChecked(this.mboundView2, productInfoIsLate);

            androidx.databinding.adapters.CompoundButtonBindingAdapter
            .setListeners(this.mboundView2
            , (android.widget.CompoundButton.OnCheckedChangeListener)productInfoOnClickBoxAndroidWidgetCompoundButtonOnCheckedChangeListener
            , mboundView2androidCheckedAttrChanged);
        }
    }
这里可以看到androidx.databinding.adapters.CompoundButtonBindingAdapter.setListeners()设置了反向数据监听。
5、看下CompoundButtonBindingAdapter
	public class CompoundButtonBindingAdapter {

    @BindingAdapter("android:checked")
    public static void setChecked(CompoundButton view, boolean checked) {
        if (view.isChecked() != checked) {
            view.setChecked(checked);
        }
    }

    @BindingAdapter(value = {"android:onCheckedChanged", "android:checkedAttrChanged"},
            requireAll = false)
    public static void setListeners(CompoundButton view, final OnCheckedChangeListener listener,
            final InverseBindingListener attrChange) {
        if (attrChange == null) {
            view.setOnCheckedChangeListener(listener);
        } else {
            view.setOnCheckedChangeListener(new OnCheckedChangeListener() {
                @Override
                public void onCheckedChanged(CompoundButton buttonView, boolean isChecked) {
                    if (listener != null) {
                        listener.onCheckedChanged(buttonView, isChecked);
                    }
                    attrChange.onChange();
                }
            });
        }
    }

}
这里很清晰了,setListeners监听了button的点击事件,最终回传到了InverseBindingListener.onChange()。然后实现类会在onChange中对对象赋值,从而做到了反向数据绑定。
总结
一个新技术的使用,必然会有很多争论点,这里说下Databinding的优缺点
优点:
1、彻底去掉了findviewbyid,并有助于防止内存泄漏和空指针异常。
2、将View层代码抽象为了数据状态,极大减少了数据层和view层的代码耦合,同时也能减少model和view的回调处理。
3、 易于维护和测试
缺点:
1、通过源码我们可以看到,维护了view数组,造成内存占用。
2、使用了handler和looper循环。
3、apt技术会生成类文件,占用内存。
任何一个技术都有优缺点,在面向对象思维的背景下,减少逻辑调用显得格外重要。作为谷歌官方的架构组件,在历史的长河中必定证明了优点大于缺点。所以,盘它。