文章目录
一、 libjpeg-turbo 函数库下载与解压
在上一篇博客 【Android 内存优化】Android 原生 API 图片压缩原理 ( 哈夫曼编码开关 | 哈夫曼编码原理 | libjpeg-turbo 函数库 ) 对哈夫曼编码进行了介绍 , 如果需要在所有的 Android 手机上使用哈夫曼编码压缩图片, 那就需要使用 libjpeg-turbo 函数库 , 从 libjpeg-turbo/libjpeg-turbo GitHub 项目的 Release 发布版本页面 下载 Release 版本的源码 , 这里下载最新的 Source code (tar.gz) 源码 ;
拷贝源码到 Ubuntu : 源码下载完毕后 , 将源码 libjpeg-turbo-2.0.5.tar.gz 拷贝到 Ubuntu 虚拟机中 , 在 /root/ 目录下创建 picture_compress 目录 , 将源码拷贝到该目录下 ;
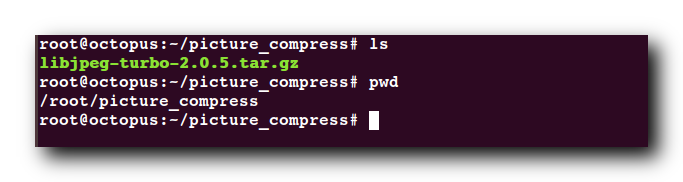
解压源码 : 执行 tar xvf libjpeg-turbo-2.0.5.tar.gz 命令 , 解压 libjpeg-turbo 函数库源码 ;
$ tar xvf libjpeg-turbo-2.0.5.tar.gz

二、 libjpeg-turbo 编译文档
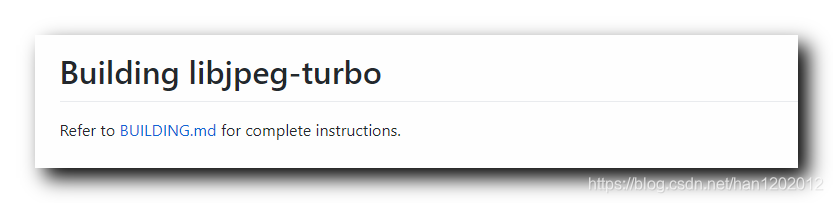
编译文档 :
查看 libjpeg-turbo 函数库的 ReadMe 信息 , 查找如何编译该函数库 ;
官方提示 , 让我们查看 BUILDING.md 文件 , 里面有详细的编译文档 ; ( 可以点击该链接 , 直接跳转查看该文件 )
三、 编译前环境准备
在 BUILDING.md 中提供了编译指导 , 在 Build Requirements 中说明了编译前应该准备好的环境 ;
编译前环境准备 :
① CMake 工具 : 安装 2.8.12 以上的 CMake 工具 ;
② 汇编工具 : 安装 NASM or YASM 工具 , 建议使用 2.10 版本以上的 NASM 工具 ;
④ GCC 编译器 : 4.1 以上的 GCC 工具 , 这里交叉编译使用 NDK 中的 GCC 工具即可 ;
⑤ JDK 工具 : 1.5 以上的 JDK , 用于生成 Java 调用库 , 此处只需要编译 C 语言部分即可 ;
四、 安装 NASM 汇编工具
1、 下载 NASM 汇编工具
下载 NASM 汇编工具 :
编译需要安装 NASM 或者 YASM , 这是汇编工具 ;
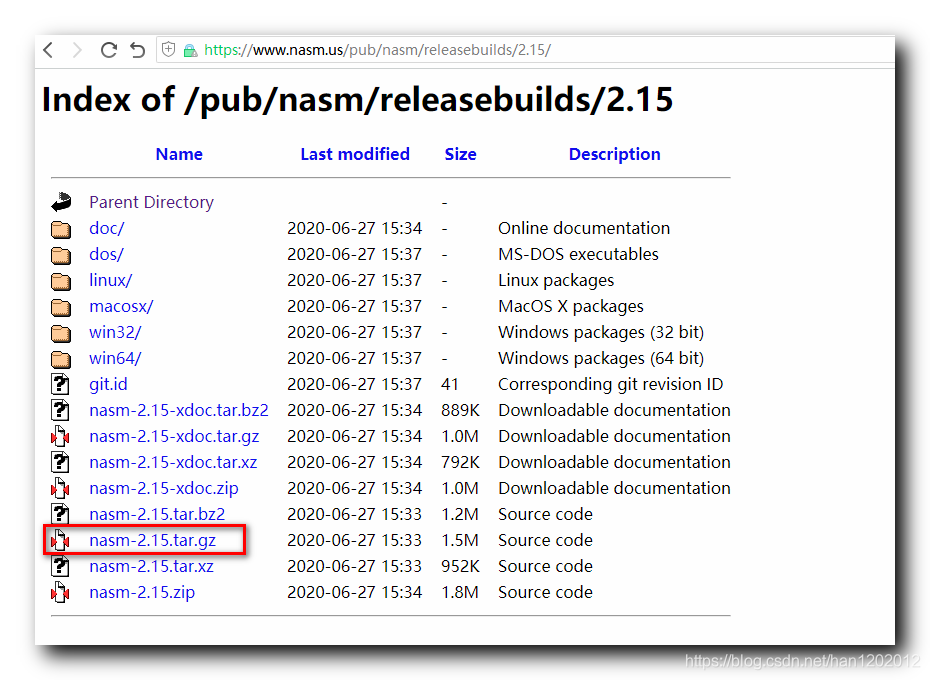
NASM 下载地址 : http://www.nasm.us/pub/nasm/releasebuilds
选择最新的发布版本 : 2.15 版本 , 昨天刚发布的 ;
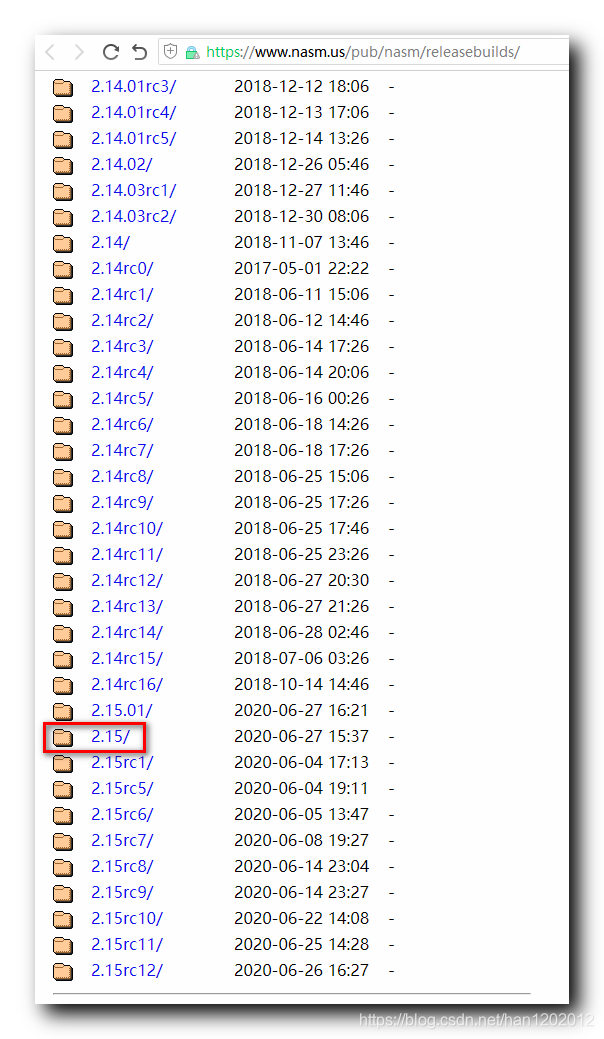
在 https://www.nasm.us/pub/nasm/releasebuilds/2.15/ 页面下载 nasm-2.15.tar.gz 压缩包 ; 也可以直接点击 此处连接下载 ;
2、 拷贝解压 NASM 源码
拷贝文件 : 将该文件拷贝到 Ubuntu 系统中的 /root/picture_compress 目录中 ;
解压该文件 : 调用 tar xvf nasm-2.15.tar.gz 命令 , 解压该文件 ;
$ tar xvf nasm-2.15.tar.gz

该目录中的文件情况 : 有 libjpeg-turbo-2.0.5 , libjpeg-turbo-2.0.5.tar.gz , nasm-2.15 , nasm-2.15.tar.gz 四个文件或目录 ;
root@octopus:~/picture_compress# ls
libjpeg-turbo-2.0.5  libjpeg-turbo-2.0.5.tar.gz  nasm-2.15  nasm-2.15.tar.gz
root@octopus:~/picture_compress#
3、 编译安装 nasm-2.15
编译 nasm-2.15 :
① 生成 Makefile 文件 : 进入 nasm-2.15 目录 , 执行 ./configure 命令 , 先生成 Makefile 文件 ;
$ ./configure
执行上述命令 , 最终会生成 Makefile 文件 ;
root@octopus:~/picture_compress/nasm-2.15# ./configure
checking for prefix by checking for nasm... no
checking build system type... x86_64-pc-linux-gnu
checking host system type... x86_64-pc-linux-gnu
checking for gcc... gcc

// ... 省略一万行

checking if gcc supports C99 external inlines... yes
configure: creating ./config.status
config.status: creating Makefile
config.status: creating doc/Makefile
config.status: creating config/config.h
root@octopus:~/picture_compress/nasm-2.15#
② 编译安装 : 在/root/picture_compress/nasm-2.15 目录下执行 make install 命令 , 编译安装 nasm-2.15 汇编工具 ;
$ make install
编译完成后 , 该工具即可使用 ;
root@octopus:~/picture_compress/nasm-2.15# make install
gcc -c  -g -O2 -fwrapv -U__STRICT_ANSI__ -fno-common -Werror=attributes -ffunction-sections -fdata-sections -fvisibility=hidden -Wall -W -pedantic -Wc90-c99-compat -Wno-long-long -Wno-shift-negative-value -Werror=implicit -Werror=missing-braces -Werror=return-type -Werror=trigraphs -Werror=pointer-arith -Werror=missing-prototypes -Werror=missing-declarations -Werror=comment -Werror=vla -DHAVE_CONFIG_H -I. -I. -I./include -I./include -I./x86 -I./x86 -I./asm -I./asm -I./disasm -I./disasm -I./output -I./output -o asm/nasm.o asm/nasm.c

// 省略 ...

I./output -I./output -Wl,--gc-sections -o ndisasm disasm/ndisasm.o libnasm.a
/bin/mkdir -p /usr/local/bin
/usr/bin/install -c nasm /usr/local/bin/nasm
/usr/bin/install -c ndisasm /usr/local/bin/ndisasm
/bin/mkdir -p /usr/local/share/man/man1
/usr/bin/install -c -m 644 ./nasm.1 /usr/local/share/man/man1/nasm.1
/usr/bin/install -c -m 644 ./ndisasm.1 /usr/local/share/man/man1/ndisasm.1
root@octopus:~/picture_compress/nasm-2.15#
下面的操作在老版本中才需要 , 新版本 , 不需要执行下面的操作 ; ( 非必要操作 , 仅做参考 )
安装 autoconf 工具 :
$ sudo apt install autoconf
进入 /root/picture_compress/libjpeg-turbo-xxx 目录 , 执行 autoreconf -fiv 命令 ;
$ autoreconf -fiv
五、 编译 Android 平台使用的 libjpeg-turbo 函数库参考 ( 官方提供 | 仅供参考 )
NDK 要求 : Android NDK , 必须使用 v13b 以上的版本 ;
下方的配置来源与 https://github.com/libjpeg-turbo/libjpeg-turbo/blame/master/BUILDING.md ;
下面的编译脚本仅做参考 , 实际编译时还是使用之前熟悉的 configure 配置生成 Makefile 文件 ; 这里仅参考其中的配置信息 ;
1、ARMv7 (32-bit)
交叉编译通用脚本 , 编译 ARMv7 (32-bit) CPU 架构函数库 ;
    # Set these variables to suit your needs
    NDK_PATH={full path to the NDK directory-- for example,
      /opt/android/android-ndk-r16b}
    TOOLCHAIN={"gcc" or "clang"-- "gcc" must be used with NDK r16b and earlier,
      and "clang" must be used with NDK r17c and later}
    ANDROID_VERSION={the minimum version of Android to support-- for example,
      "16", "19", etc.}

    cd {build_directory}
    cmake -G"Unix Makefiles" \
      -DANDROID_ABI=armeabi-v7a \
      -DANDROID_ARM_MODE=arm \
      -DANDROID_PLATFORM=android-${ANDROID_VERSION} \
      -DANDROID_TOOLCHAIN=${TOOLCHAIN} \
      -DCMAKE_ASM_FLAGS="--target=arm-linux-androideabi${ANDROID_VERSION}" \
      -DCMAKE_TOOLCHAIN_FILE=${NDK_PATH}/build/cmake/android.toolchain.cmake \
      [additional CMake flags] {source_directory}
    make
2、ARMv8 (64-bit)
交叉编译通用脚本 , 编译 ARMv8 (64-bit) CPU 架构函数库 ;
    # Set these variables to suit your needs
    NDK_PATH={full path to the NDK directory-- for example,
      /opt/android/android-ndk-r16b}
    TOOLCHAIN={"gcc" or "clang"-- "gcc" must be used with NDK r14b and earlier,
      and "clang" must be used with NDK r17c and later}
    ANDROID_VERSION={the minimum version of Android to support.  "21" or later
      is required for a 64-bit build.}

    cd {build_directory}
    cmake -G"Unix Makefiles" \
      -DANDROID_ABI=arm64-v8a \
      -DANDROID_ARM_MODE=arm \
      -DANDROID_PLATFORM=android-${ANDROID_VERSION} \
      -DANDROID_TOOLCHAIN=${TOOLCHAIN} \
      -DCMAKE_ASM_FLAGS="--target=aarch64-linux-android${ANDROID_VERSION}" \
      -DCMAKE_TOOLCHAIN_FILE=${NDK_PATH}/build/cmake/android.toolchain.cmake \
      [additional CMake flags] {source_directory}
    make
3、x86 (32-bit)
交叉编译通用脚本 , 编译 x86 (32-bit) CPU 架构函数库 ;
    # Set these variables to suit your needs
    NDK_PATH={full path to the NDK directory-- for example,
      /opt/android/android-ndk-r16b}
    TOOLCHAIN={"gcc" or "clang"-- "gcc" must be used with NDK r14b and earlier,
      and "clang" must be used with NDK r17c and later}
    ANDROID_VERSION={The minimum version of Android to support-- for example,
      "16", "19", etc.}

    cd {build_directory}
    cmake -G"Unix Makefiles" \
      -DANDROID_ABI=x86 \
      -DANDROID_PLATFORM=android-${ANDROID_VERSION} \
      -DANDROID_TOOLCHAIN=${TOOLCHAIN} \
      -DCMAKE_TOOLCHAIN_FILE=${NDK_PATH}/build/cmake/android.toolchain.cmake \
      [additional CMake flags] {source_directory}
    make
4、x86-64 (64-bit)
交叉编译通用脚本 , 编译 x86-64 (64-bit) CPU 架构函数库 ;
    # Set these variables to suit your needs
    NDK_PATH={full path to the NDK directory-- for example,
      /opt/android/android-ndk-r16b}
    TOOLCHAIN={"gcc" or "clang"-- "gcc" must be used with NDK r14b and earlier,
      and "clang" must be used with NDK r17c and later}
    ANDROID_VERSION={the minimum version of Android to support.  "21" or later
      is required for a 64-bit build.}

    cd {build_directory}
    cmake -G"Unix Makefiles" \
      -DANDROID_ABI=x86_64 \
      -DANDROID_PLATFORM=android-${ANDROID_VERSION} \
      -DANDROID_TOOLCHAIN=${TOOLCHAIN} \
      -DCMAKE_TOOLCHAIN_FILE=${NDK_PATH}/build/cmake/android.toolchain.cmake \
      [additional CMake flags] {source_directory}
    make