一、事前准备
1、VMware下CentOS7虚拟机(三台)
虚拟机的创建可以参考:看完肯定会系列之——VMware创建CentOS7虚拟机并使用MobaXterm连接
虚拟机的克隆和时间同步可以参考:看完肯定会系列之——VMware虚拟机的复制/克隆、解决虚拟机与主机时间同步
使用VMware的克隆功能克隆两个
使用命令:
hostnamectl set-hostname 主机别名
分别修改三台虚拟机的别名
我这里三台机器取的别名分别是hadoop1,hadoop2,hadoop3(之前做hadoop改的,你改成a1,a2,a3也行)
2、Zookeeper安装包
二、解压、改名
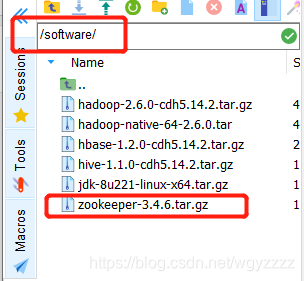
将下载的压缩包拖入根目录下的software目录下
解压:使用命令解压至opt目录下
tar -zxvf zookeeper-3.4.6.tar.gz -C /opt/
进入opt目录改名
cd /opt
mv zookeeper-3.4.6/ zookeeper

三台虚拟机都要操作
三、修改环境变量
vi /etc/profile
添加:
export ZOOKEEPER_HOME=/opt/zookeeper
export PATH=$PATH:$ZOOKEEPER_HOME/bin
三台虚拟机都要修改
输入:wq保存退出
source /etc/profile
四、修改配置文件
进入zookeeper的conf目录下
cd /opt/zookeeper/conf
将文件zoo_sample.cfg改名为zoo.cfg
进入配置文件进行修改
vi zoo.cfg
# The number of milliseconds of each tick
tickTime=2000
# The number of ticks that the initial
# synchronization phase can take
#最小进程数
initLimit=50
# The number of ticks that can pass between
# sending a request and getting an acknowledgement
syncLimit=5
# the directory where the snapshot is stored.
# do not use /tmp for storage, /tmp here is just
# example sakes.
#数据目录,zookeeperdata这个目录一会儿要自己创建
dataDir=/opt/zookeeper/zookeeperdata
# the port at which the clients will connect
clientPort=2181
# the maximum number of client connections.
# increase this if you need to handle more clients
#最大访问数,不限制
maxClientCnxns=0
#
# Be sure to read the maintenance section of the
# administrator guide before turning on autopurge.
#
# http://zookeeper.apache.org/doc/current/zookeeperAdmin.html#sc_maintenance
#
# The number of snapshots to retain in dataDir
#autopurge.snapRetainCount=3
# Purge task interval in hours
# Set to "0" to disable auto purge feature
#autopurge.purgeInterval=1
#集群配置,这里的主机名根据自己的修改,也可以用ip
#server.数字=主机名:2888:3888
server.1=hadoop1:2888:3888
server.2=hadoop2:2888:3888
server.3=hadoop3:2888:3888
完成后创建数据目录
mkdir /opt/zookeeper/zookeeperdata
cd /opt/zookeeper/zookeeperdata
创建myid文件,输入配置文件中server后面对应的数字,这台虚拟机是hadoop1,应该输入数字是1
echo 1 > myid
三台虚拟机都要操作,后面两台输入2和3
五、启动和关闭
zkServer.sh start 启动
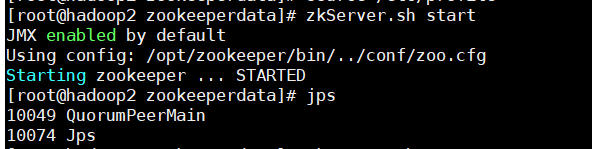
jps命令出现QuorumPeerMain进程表示启动成功
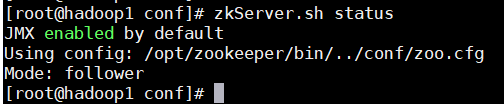
zkServer.sh status 查看状态
主机:leader

从机follower
zkServer.sh stop 关闭
可以百度一下zookeeper的选举机制,这里就不展开了
六、一键启动小脚本
由于每次启动关闭看状态都要打开每个虚拟机输一遍命令,太麻烦,搜了一下,发现一个小脚本分享给大家
原文地址:https://blog.csdn.net/ruilongxiao/article/details/84025342
vi zk.sh
#!/bin/bash
#              这里改成自己的主机名
for i in {"hadoop1 ","hadoop2","hadoop3"};
do
        echo "----------$1ing $i----------"
#                                   这里改成自己的安装地址
        ssh $i "source /etc/profile;/opt/zookeeper/bin/zkServer.sh $1"
done

sleep 5
#同上
for j in {"hadoop1","hadoop2","hadoop3"};
do
        echo "----------$j status----------"
        #同上
        ssh $j "source /etc/profile;/opt/zookeeper/bin/zkServer.sh status"
done
完成后赋权
chmod 777 zkManagement.sh
启动脚本:./zk.sh start

停止脚本:./zk.sh stop
