文章目录
关于什么是多线程,就不记录了,我随便百度都是一堆堆,主要是记录对自己有用处的笔记,在这里我主要是使用threading模块
多线程(复习)
一般创建方式(不常用)
注意:args参数为一个元组,如果只有一个参数别忘了后面的逗号
import threading
import time

def run(n):
    print("hello", n)
    time.sleep(1)

if __name__ == '__main__':
    t1 = threading.Thread(target=run, args=("threading1",))
    t2 = threading.Thread(target=run, args=("threading2",))
    t1.start()
    t2.start()
自定义线程(继承threading.Thread)
本质:重构run方法
import threading
import time

class MyThread(threading.Thread):
    def __init__(self, item):
        threading.Thread.__init__(self)
        self.item = item

    def run(self):
        print("threadingTask", self.item)
        time.sleep(1)


if __name__ == "__main__":
    t1 = MyThread("threading1")
    t2 = MyThread("threading2")
    t1.start()
    t2.start()
进阶知识
守护线程
这里使用setDaemon(True)把所有的子线程都变成了主线程的守护线程,因此当主进程结束后,子线程也会随之结束。所以当主线程结束后,整个程序就退出了。
import threading
import time


class MyThread(threading.Thread):
    def __init__(self, item,t):
        threading.Thread.__init__(self)
        self.item = item
        self.t = t

    def run(self):
        print("threadingTask", self.item)
        time.sleep(self.t)
        print(self.item+"结束")


if __name__ == "__main__":
    t1 = MyThread("threading1",1)
    t2 = MyThread("threading2",10)
    t3 = MyThread("threading3",100)
    t2.setDaemon(True)
    t3.setDaemon(True)
    t1.start()
    t2.start()
    t3.start()
运行结果:
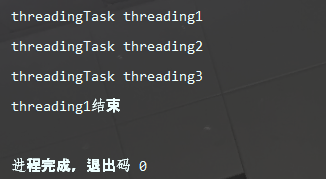
设置守护线程之后,当主线程结束时,子线程也将立即结束,不再执行
让主线程等待子线程结束
当然下面例子中设置线程守护意义不大,只是想强调一点,把子进程设置为守护线程,必须在start()之前设置
import threading
import time


class MyThread(threading.Thread):
    def __init__(self, item, t):
        threading.Thread.__init__(self)
        self.item = item
        self.t = t

    def run(self):
        print("threadingTask", self.item)
        time.sleep(self.t)
        print(self.item + "结束")


if __name__ == "__main__":
    t1 = MyThread("threading1", 1)
    t2 = MyThread("threading2", 2)
    t3 = MyThread("threading3", 3)
    t2.setDaemon(True)
    t3.setDaemon(True)
    t1.start()
    t2.start()
    t3.start()
    t1.join()
    t2.join()
    t3.join()
线程共享全局变量
线程是进程的执行单元,进程是系统分配资源的最小单位,所以在同一个进程中的多线程是共享资源的。而线程可以共享全局变量感觉没啥说的,网上抄来一个代码,复习用
import threading
import time
g_num = 100
def work1():
global g_num
for i in range(3):
g_num += 1
print(“in work1 g_num is : %d” % g_num)
def work2():
global g_num
print(“in work2 g_num is : %d” % g_num)
if name == ‘main’:
t1 = threading.Thread(target=work1)
t1.start()
time.sleep(1)
t2 = threading.Thread(target=work2)
t2.start()
线程同步
以下内容部分来自菜鸟教程
如果多个线程共同对某个数据修改,则可能出现不可预料的结果,为了保证数据的正确性,需要对多个线程进行同步。多线程的优势在于可以同时运行多个任务(至少感觉起来是这样)。但是当线程需要共享数据时,可能存在数据不同步的问题。
考虑这样一种情况:一个列表里所有元素都是0,线程"set"从后向前把所有元素改成1,而线程"print"负责从前往后读取列表并打印。
那么,可能线程"set"开始改的时候,线程"print"便来打印列表了,输出就成了一半0一半1,这就是数据的不同步。为了避免这种情况,引入了锁的概念。
锁有两种状态——锁定和未锁定。每当一个线程比如"set"要访问共享数据时,必须先获得锁定;如果已经有别的线程比如"print"获得锁定了,那么就让线程"set"暂停,也就是同步阻塞;等到线程"print"访问完毕,释放锁以后,再让线程"set"继续。
经过这样的处理,打印列表时要么全部输出0,要么全部输出1,不会再出现一半0一半1的尴尬场面。
互斥锁
#!/usr/bin/python3

import threading
import time


class myThread(threading.Thread):
    def __init__(self, threadID, name, counter):
        threading.Thread.__init__(self)
        self.threadID = threadID
        self.name = name
        self.counter = counter

    def run(self):
        print("开启线程: " + self.name)
        # 获取锁,用于线程同步
        threadLock.acquire()
        print_time(self.name, self.counter, 3)
        # 释放锁,开启下一个线程
        threadLock.release()


def print_time(threadName, delay, counter):
    while counter:
        time.sleep(delay)
        print("%s: %s" % (threadName, time.ctime(time.time())))
        counter -= 1


threadLock = threading.Lock()
threads = []

# 创建新线程
thread1 = myThread(1, "Thread-1", 1)
thread2 = myThread(2, "Thread-2", 2)

# 开启新线程
thread1.start()
thread2.start()

# 添加线程到线程列表
threads.append(thread1)
threads.append(thread2)

# 等待所有线程完成
for t in threads:
    t.join()
print("退出主线程")
递归锁
RLcok类的用法和Lock类一模一样,但它支持嵌套,在多个锁没有释放的时候一般会使用RLcok类。
#!/usr/bin/python3

import threading
import time


class myThread(threading.Thread):
    def __init__(self, threadID, name, counter):
        threading.Thread.__init__(self)
        self.threadID = threadID
        self.name = name
        self.counter = counter

    def run(self):
        print("开启线程: " + self.name)
        # 获取锁,用于线程同步
        threadLock.acquire()
        print_time(self.name, self.counter, 3)
        # 释放锁,开启下一个线程
        threadLock.release()


def print_time(threadName, delay, counter):
    while counter:
        time.sleep(delay)
        print("%s: %s" % (threadName, time.ctime(time.time())))
        counter -= 1


threadLock = threading.RLock()
threads = []

# 创建新线程
thread1 = myThread(1, "Thread-1", 1)
thread2 = myThread(2, "Thread-2", 2)

# 开启新线程
thread1.start()
thread2.start()

# 添加线程到线程列表
threads.append(thread1)
threads.append(thread2)

# 等待所有线程完成
for t in threads:
    t.join()
print("退出主线程")
BoundedSemaphore类
互斥锁同时只允许一个线程更改数据,而Semaphore是同时允许一定数量的线程更改数据
#!/usr/bin/python3

import threading
import time


class myThread(threading.Thread):
    def __init__(self, threadID, name, counter, semaphore):
        threading.Thread.__init__(self)
        self.threadID = threadID
        self.name = name
        self.counter = counter
        self.semaphore = semaphore

    def run(self):
        print("开启线程: " + self.name)
        semaphore.acquire()
        print_time(self.name, self.counter, 3)
        semaphore.release()


def print_time(threadName, delay, counter):
    while counter:
        time.sleep(delay)
        print("%s: %s" % (threadName, time.ctime(time.time())))
        counter -= 1


semaphore = threading.BoundedSemaphore(2)
threads = []

for i in range(3):
    t = myThread(i + 1, f"Thread-{i + 1}", i + 1,semaphore)
    threads.append(t)

for i in threads:
    i.start()


while threading.active_count() != 1:
    pass
else:
    print('-----all threads done-----')
事件(Event类)
本部分内容来自[博客],谢谢博主的博客(https://www.cnblogs.com/luyuze95/p/11289143.html#threading%E6%A8%A1%E5%9D%97)
python线程的事件用于主线程控制其他线程的执行,事件是一个简单的线程同步对象,其主要提供以下几个方法:
clear 将flag设置为“False”
set 将flag设置为“True”
is_set 判断是否设置了flag
wait 会一直监听flag,如果没有检测到flag就一直处于阻塞状态
事件处理的机制:全局定义了一个“Flag”,当flag值为“False”,那么event.wait()就会阻塞,当flag值为“True”,那么event.wait()便不再阻塞。
#利用Event类模拟红绿灯
import threading
import time

event = threading.Event()


def lighter():
    count = 0
    event.set()     #初始值为绿灯
    while True:
        if 5 < count <=10 :
            event.clear()  # 红灯,清除标志位
            print("\33[41;1mred light is on...\033[0m")
        elif count > 10:
            event.set()  # 绿灯,设置标志位
            count = 0
        else:
            print("\33[42;1mgreen light is on...\033[0m")

        time.sleep(1)
        count += 1

def car(name):
    while True:
        if event.is_set():      #判断是否设置了标志位
            print("[%s] running..."%name)
            time.sleep(1)
        else:
            print("[%s] sees red light,waiting..."%name)
            event.wait()
            print("[%s] green light is on,start going..."%name)

light = threading.Thread(target=lighter,)
light.start()

car = threading.Thread(target=car,args=("MINI",))
car.start()