文章目录
b站布局
1搭建安卓开发的环境
1.官网下载
Android Studio官网下载网址
2.无脑安装
2开发第一个HelloWorld安卓项目
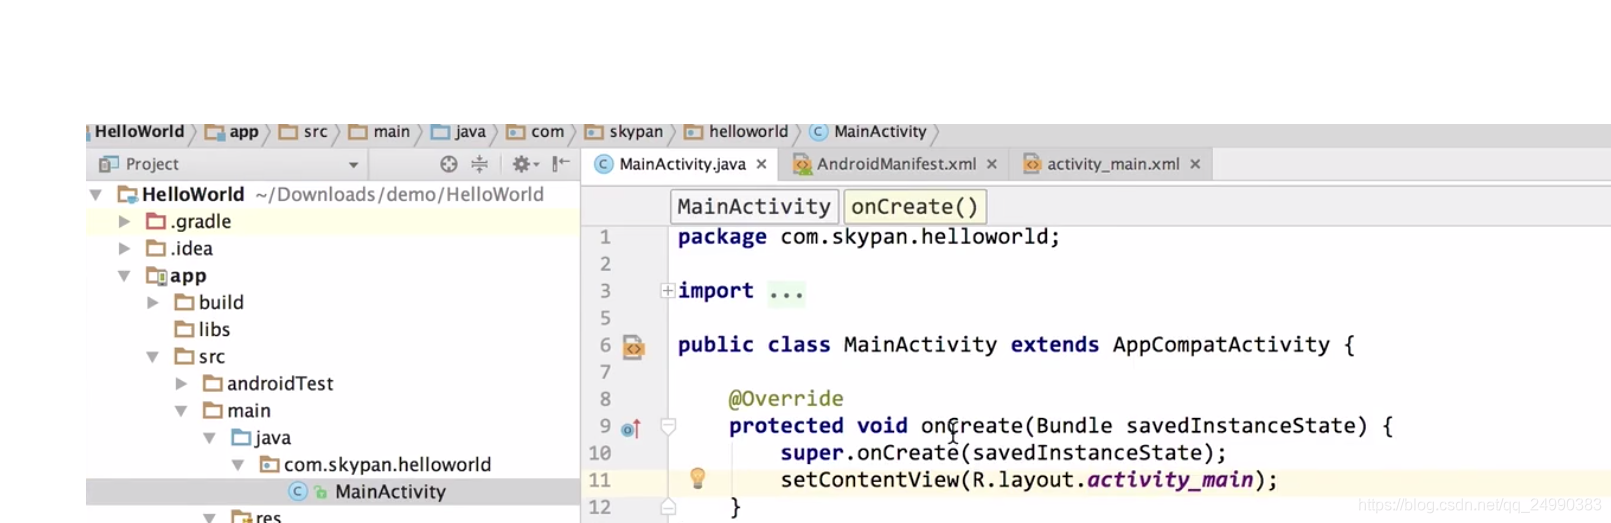
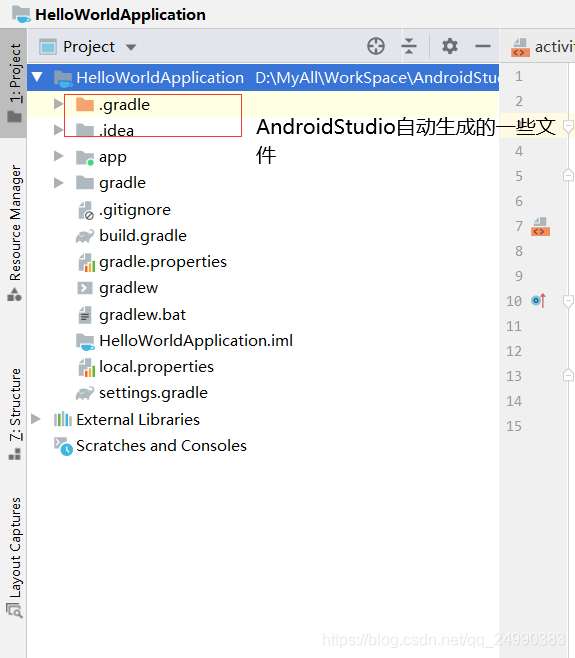
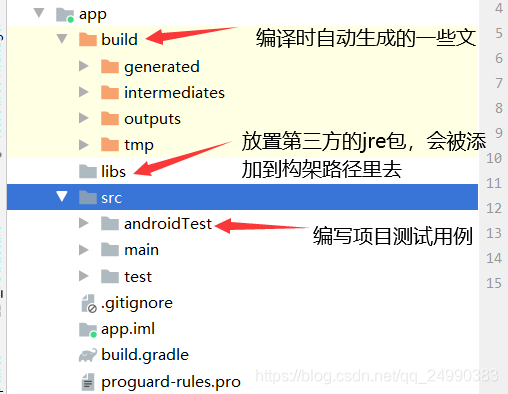
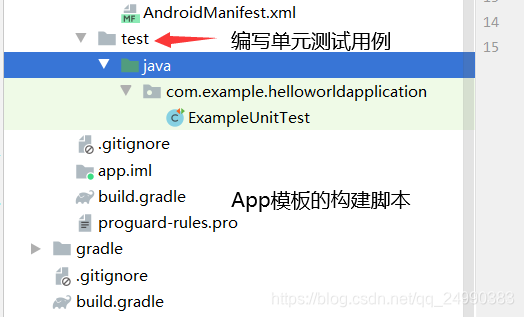
创建一个空项目,自动生成的文件内容
MainActivity.java文件中onCreate方法(比较重要的生命周期)中有一个入口setContentView(R.layout.activity_main);
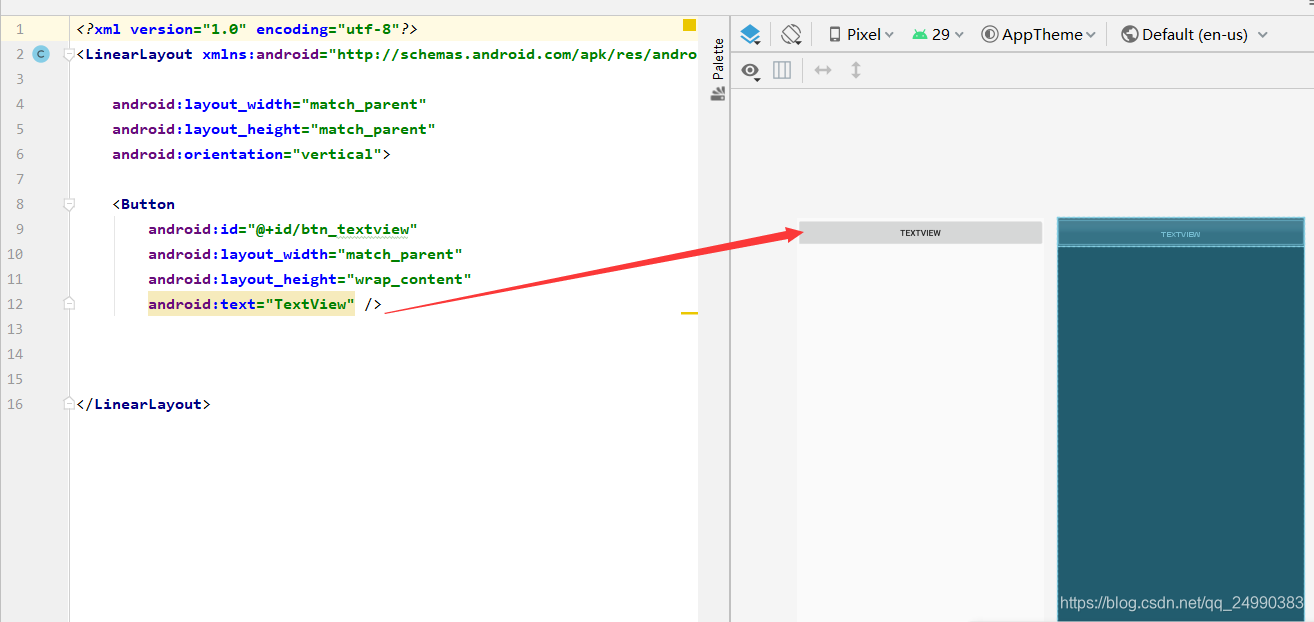
按住Ctrl点击activity_main可以查看效果布局
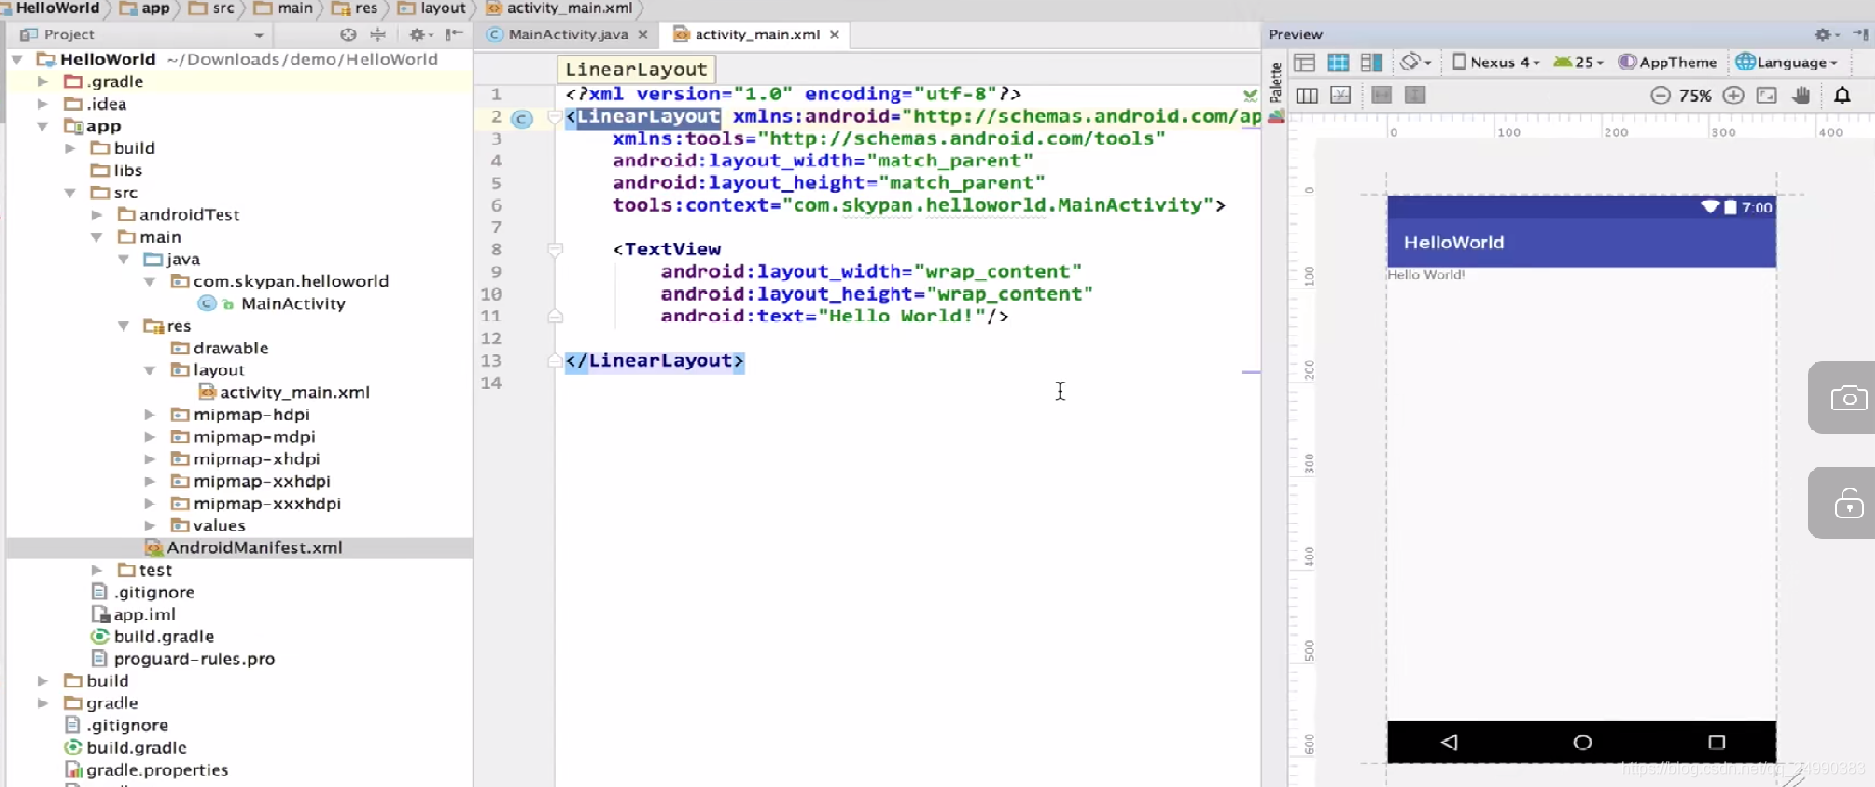
打开activity_main.xml为布局代码,右侧展示当前布局效果
根布局LinearLayout为一种线性布局
内部TextView为一个显示文本的控件,内部有一个属性值为“HelloWorld!”为默认值
<LinearLayout>
</LinearLayout>
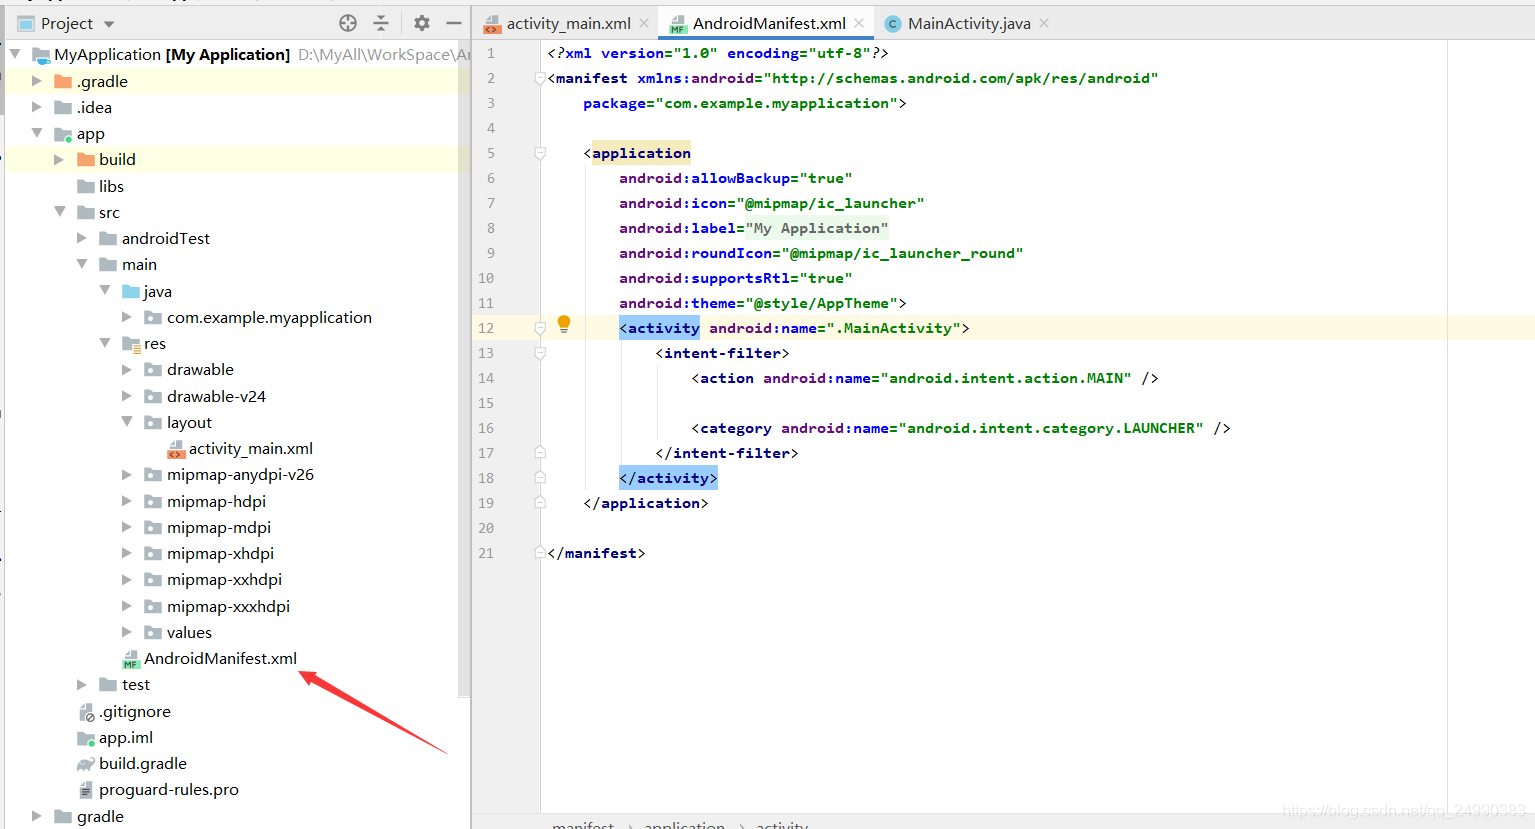 每一个activity都需要在AndroidMainfest.xml里注册
第一个activity已经默认注册好了为
<activity>
</activity>
内部的内容
3 UI组件
3.1布局管理器
3.1.1线性布局(LinearLayout)
练习代码
注意:代码部分的注释//只是为了方便做笔记,实际代码不可带注释
//activity.xml
<?xml version="1.0" encoding="utf-8"?>
<LinearLayout xmlns:android="http://schemas.android.com/apk/res/android" //根布局
xmlns:app="http://schemas.android.com/apk/res-auto"
xmlns:tools="http://schemas.android.com/tools"
android:layout_width="match_parent"
android:layout_height="match_parent"
android:orientation="vertical"
tools:context=".MainActivity">
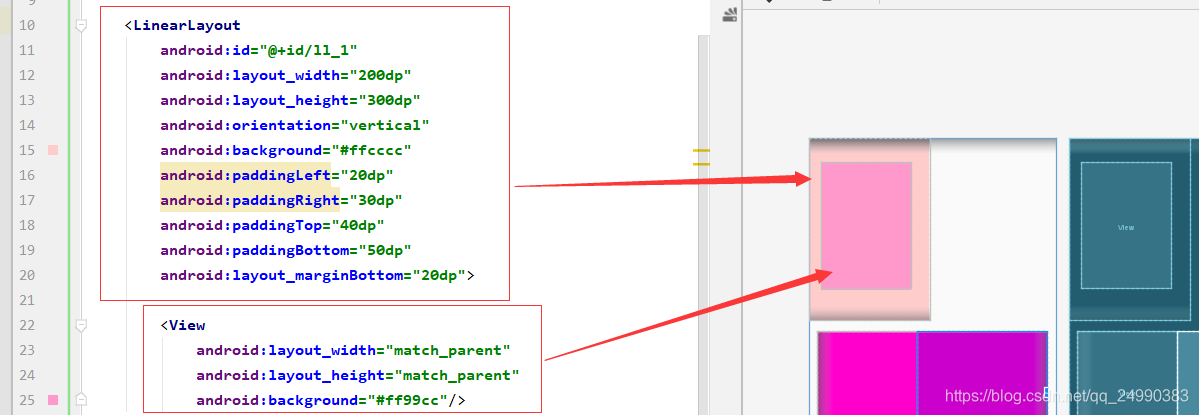
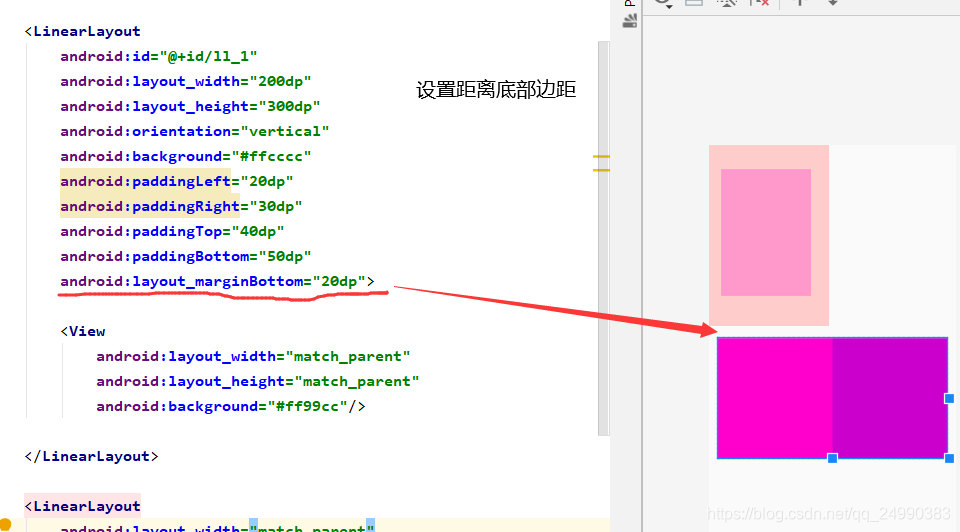
<LinearLayout //根线性布局内部的第一个线性子布局,对应图中最浅的粉色
android:id="@+id/ll_1" //布局本身就是一个控件,这句为控件id即标示
android:layout_width="200dp" //控件的宽,大小单位为dp比较适配因为分辨率较多的问题,字体单位为sp
android:layout_height="300dp" //控件的高
android:orientation="vertical" //竖直方向布局
android:background="#ffcccc" //背景颜色
android:paddingLeft="20dp" //我这个控件距离内部元素的左边距
android:paddingRight="30dp" //我这个控件距离内部元素的右边距
android:paddingTop="40dp" //我这个控件距离内部元素的上边距
android:paddingBottom="50dp" //我这个控件距离内部元素的下边距
android:layout_marginBottom="20dp">
<View //
android:layout_width="match_parent" //match_parent为匹配父控件的意思
android:layout_height="match_parent"
android:background="#ff99cc"/>
</LinearLayout>
<LinearLayout
android:layout_width="match_parent"
android:layout_height="200dp"
android:orientation="horizontal"
android:background="#ff66cc"
android:layout_marginLeft="15dp" //该控件距离外部控件的距离
android:layout_marginRight="15dp">
<View
android:layout_width="0dp"
android:layout_height="match_parent"
android:background="#ff00cc"
android:layout_weight="1"
/>
<View
android:layout_width="50dp"
android:layout_height="match_parent"
android:background="#cc00cc"
android:layout_weight="1"
/>
</LinearLayout>
</LinearLayout>
效果图


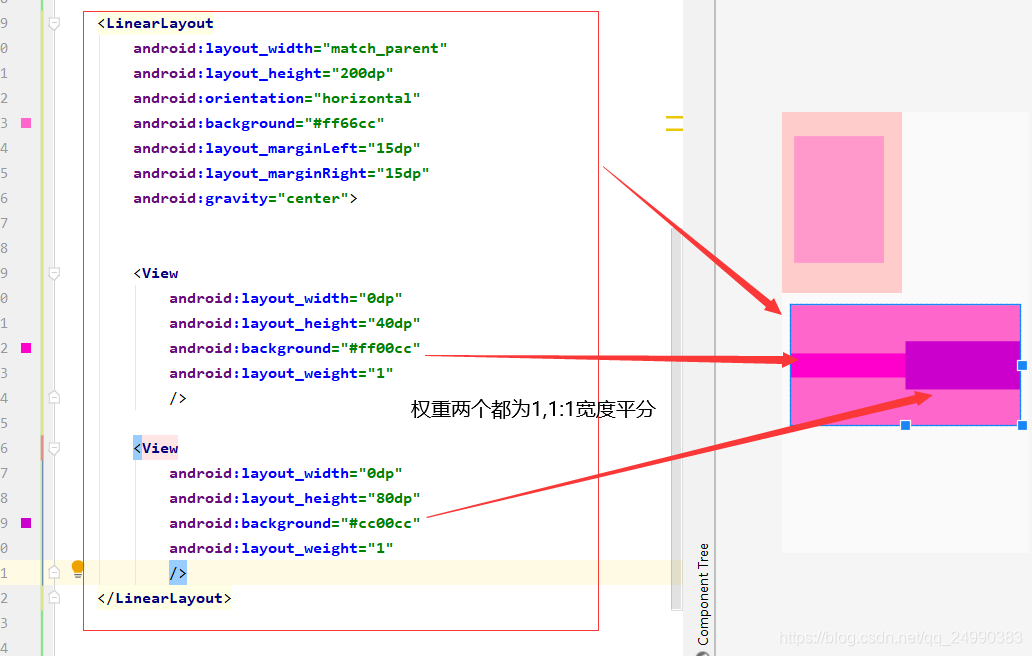
把剩余内容安装权重去分配,当android:orientation=“vertical”,为垂直排列,权重比也分配的是竖直方向的占比。同理android:orientation=“horizontal”,为水平排列,权重比也分配的是水平方向
3.1.2 相对布局(RelativeLayout)
最常用属性
- android:layout_toLeftOf //在谁的左边
- android:layout_toRightOf //在谁的右边
- android:layout_alignBottom //跟谁底部对齐
- android:layout_alignParentBottom //跟父控件底部对齐
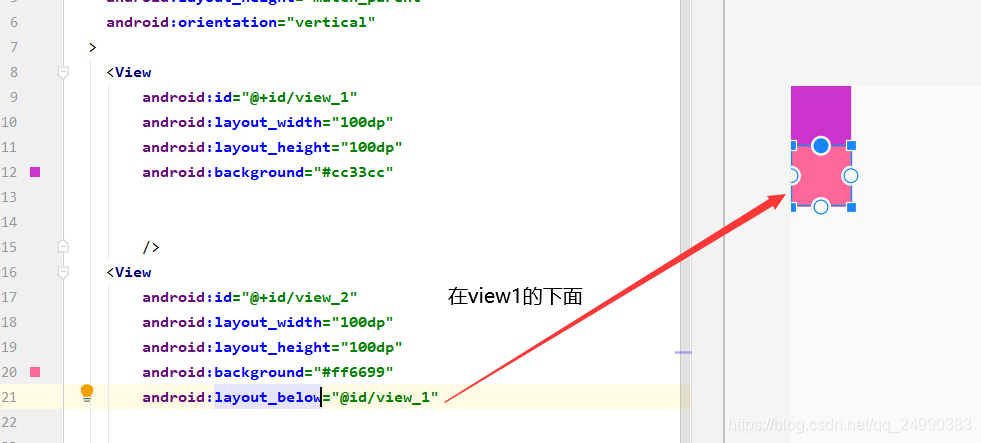
- android:layout_below //在谁的下面
换为线性布局

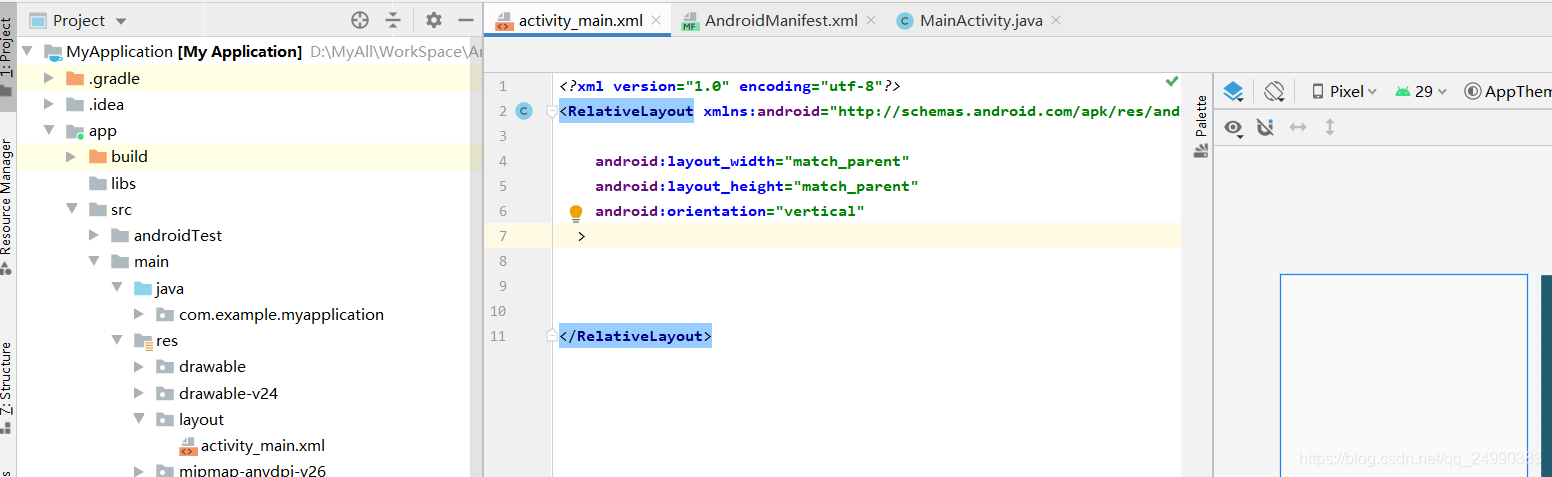
<?xml version="1.0" encoding="utf-8"?>
<RelativeLayout xmlns:android="http://schemas.android.com/apk/res/android"
android:layout_width="match_parent"
android:layout_height="match_parent"
android:orientation="vertical"
>
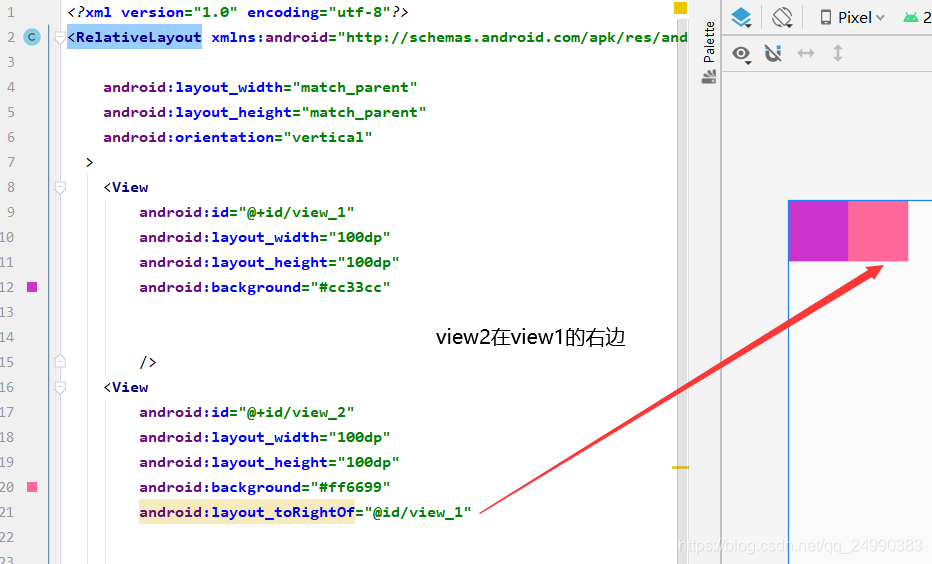
<View
android:id="@+id/view_1"
android:layout_width="100dp"
android:layout_height="100dp"
android:background="#cc33cc" />
<View
android:id="@+id/view_2"
android:layout_width="100dp"
android:layout_height="100dp"
android:background="#ff6699"
android:layout_below="@id/view_1" />
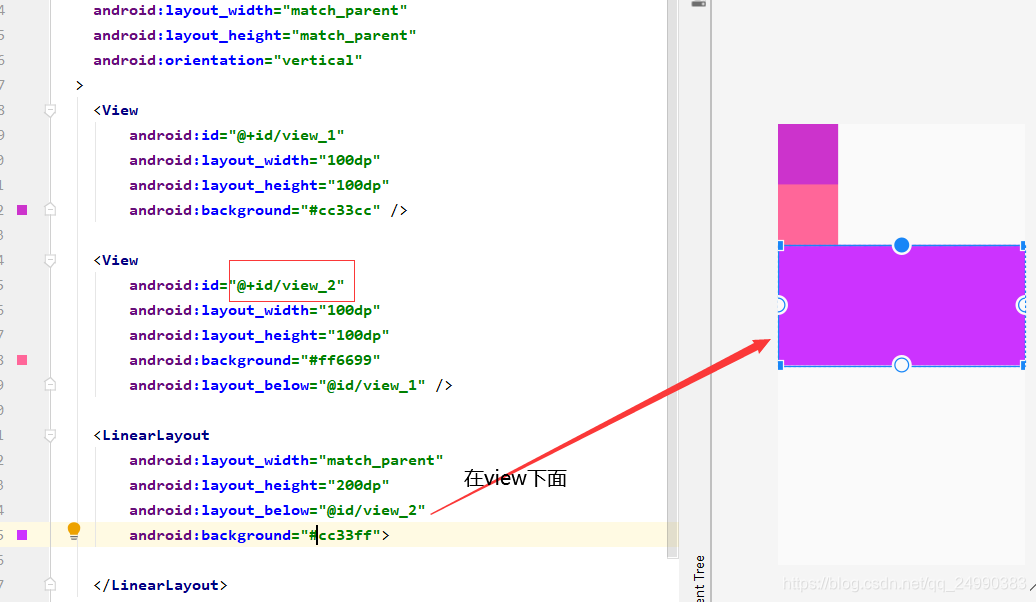
<LinearLayout
android:id="@+id/ll_1"
android:layout_width="match_parent"
android:layout_height="200dp"
android:layout_below="@id/view_2"
android:orientation="horizontal"
android:background="#cc33ff"
android:padding="25dp">
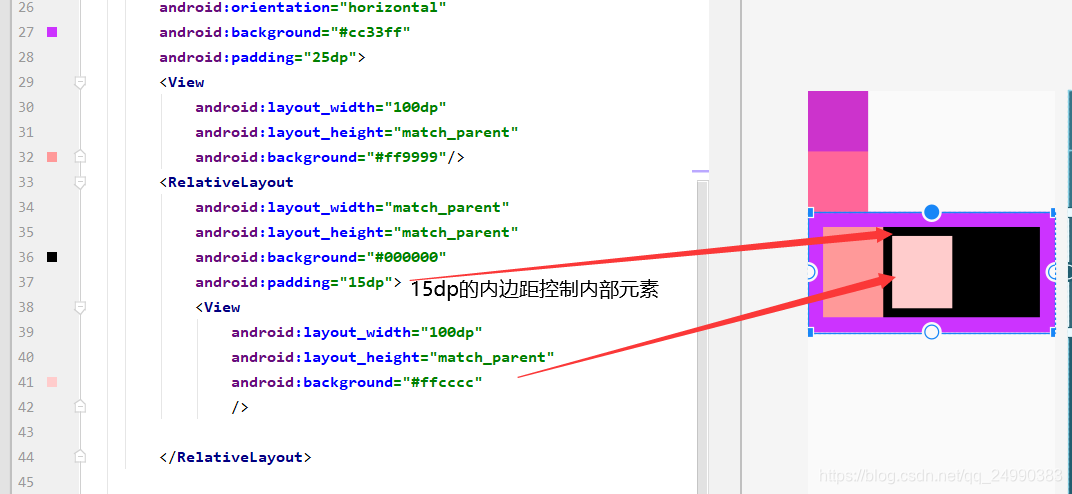
<View
android:layout_width="100dp"
android:layout_height="match_parent"
android:background="#ff9999"/>
<RelativeLayout
android:layout_width="match_parent"
android:layout_height="match_parent"
android:background="#000000"
android:padding="15dp">
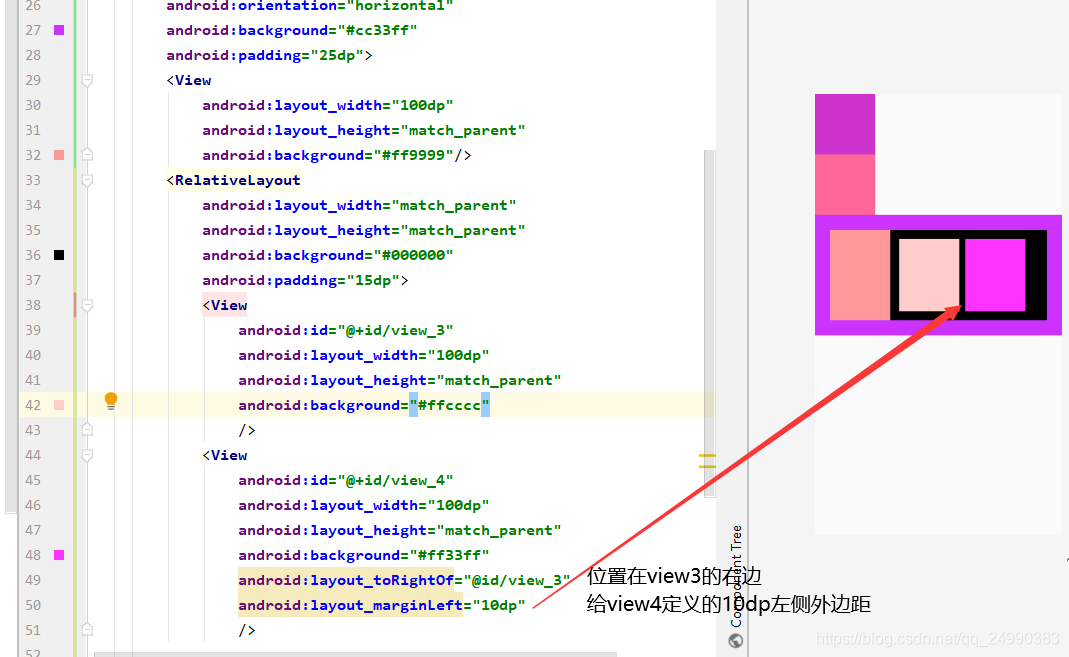
<View
android:id="@+id/view_3"
android:layout_width="100dp"
android:layout_height="match_parent"
android:background="#ffcccc"
/>
<View
android:id="@+id/view_4"
android:layout_width="100dp"
android:layout_height="match_parent"
android:background="#ff33ff"
android:layout_toRightOf="@id/view_3"
android:layout_marginLeft="10dp"
/>
</RelativeLayout>
</LinearLayout>
</RelativeLayout>
3.2 TextView
1.文字大小、颜色
2.显示不下使用…
3.文字+icon
4.中划线、下划线
5.跑马灯

MOOC
1 Android四层架构

应用框架层: 使用的是Java语法
系统库层使用的是C/C++语法
应用程序员编写的Android应用程序,主要是调用应用框架层提供的接口进行实现
Google于2007年11月5日正式发布的Andriod平台
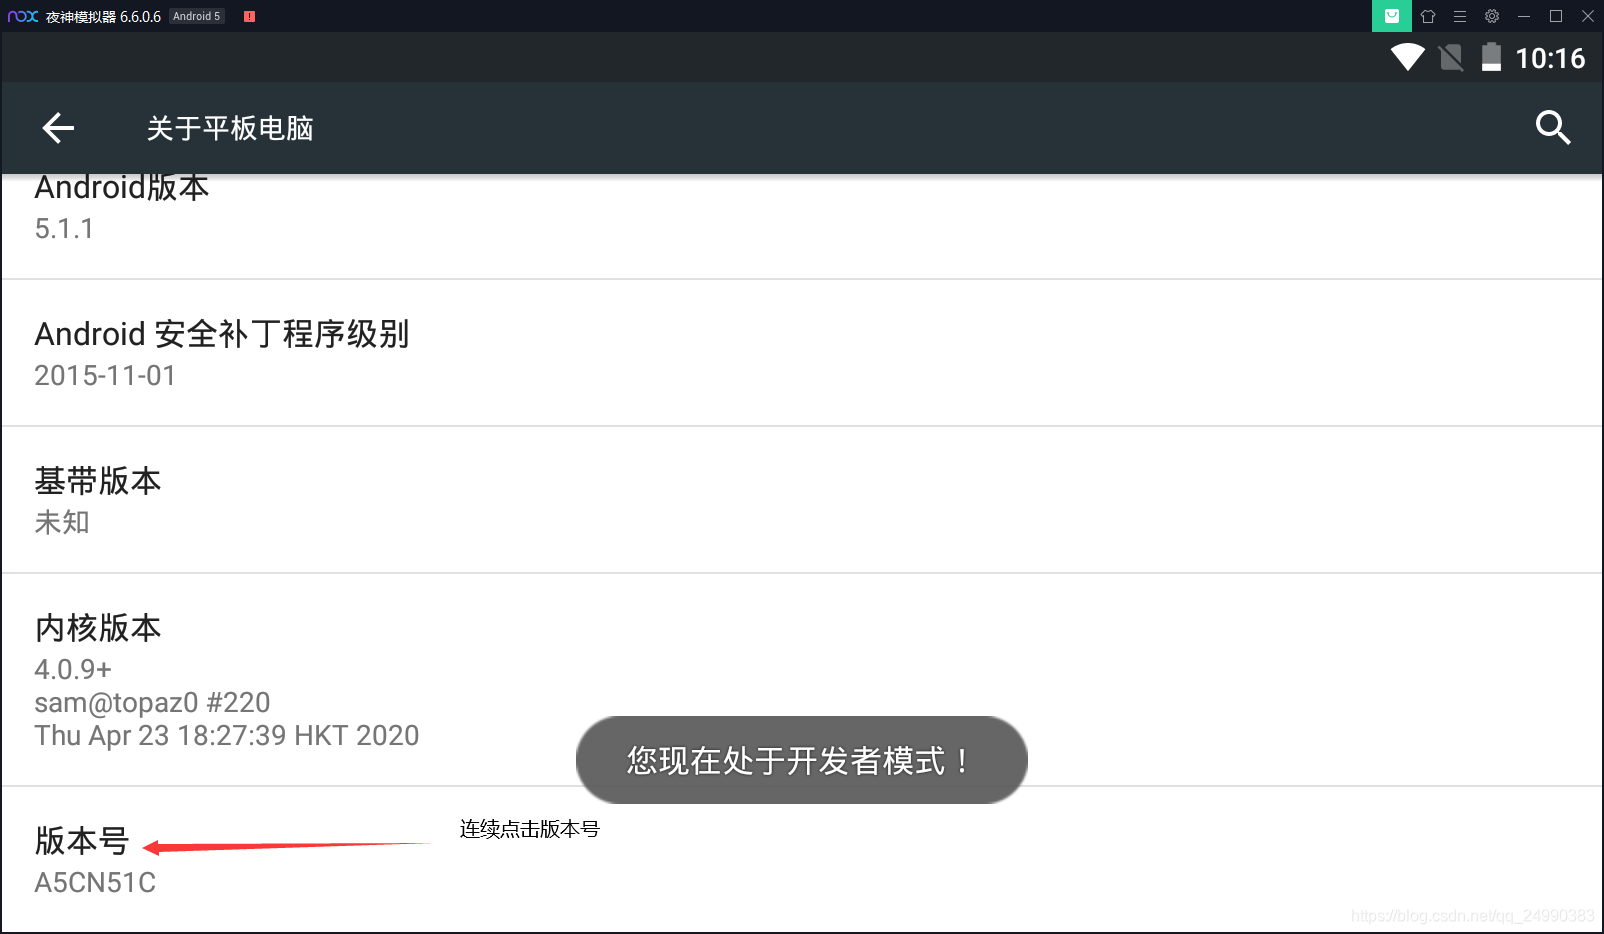
2 安装第三方模拟器
在该网址下下载夜神模拟器,比AndroidStudio自带的AMD模拟器跟稳定,AMD需要不同分辨率的手机,成本太高
https://www.yeshen.com/
安装过程很简单不再演示
AndroidStudio如何和夜神模拟器连接


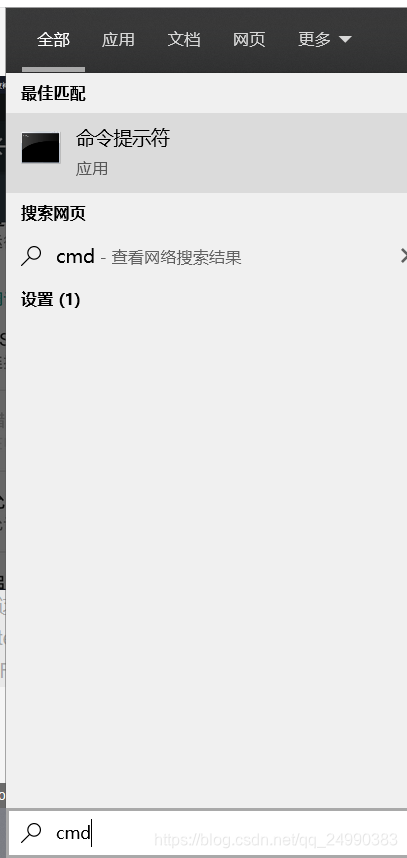
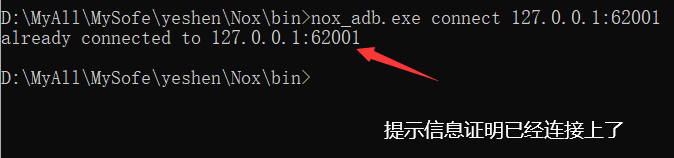
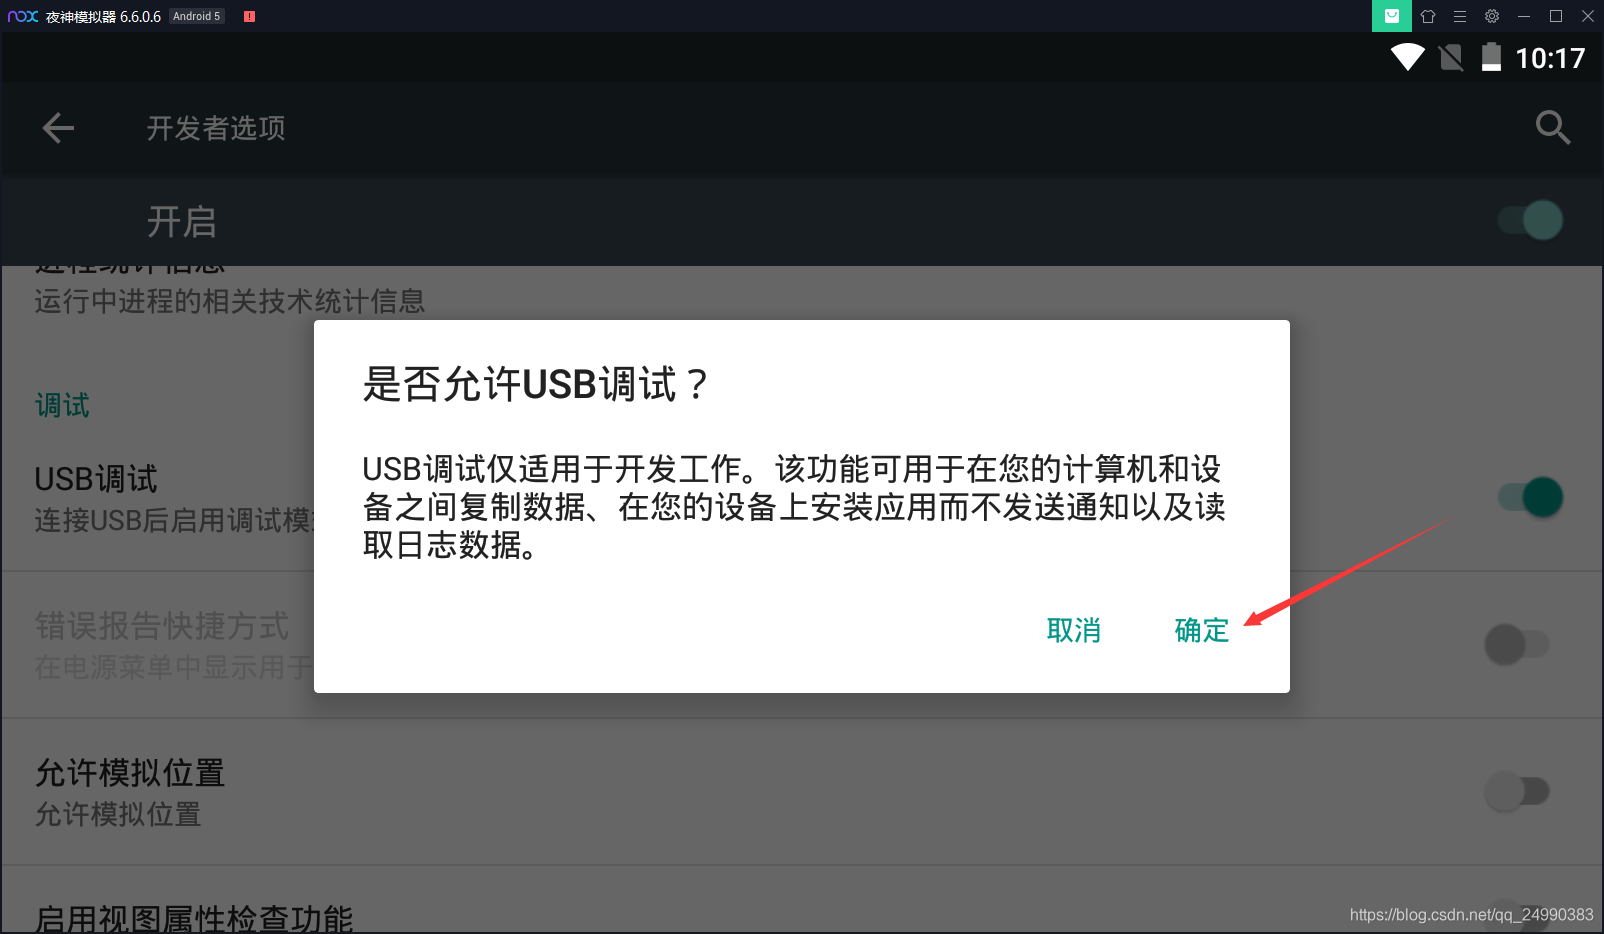 在搜索框输入cmd打开命令提示符来将夜神模拟器与AndroidStudio连接
找到夜神模拟器的安装路径


接着输入命令nox_adb.exe connect 127.0.0.1:62001
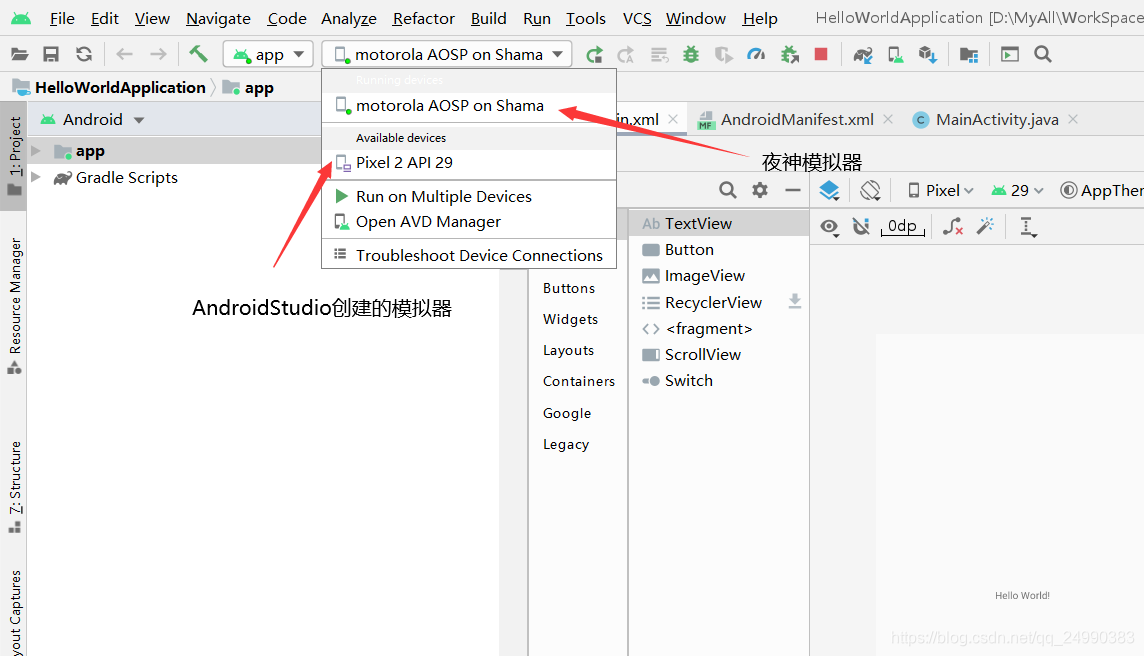
打开AndroidStudio
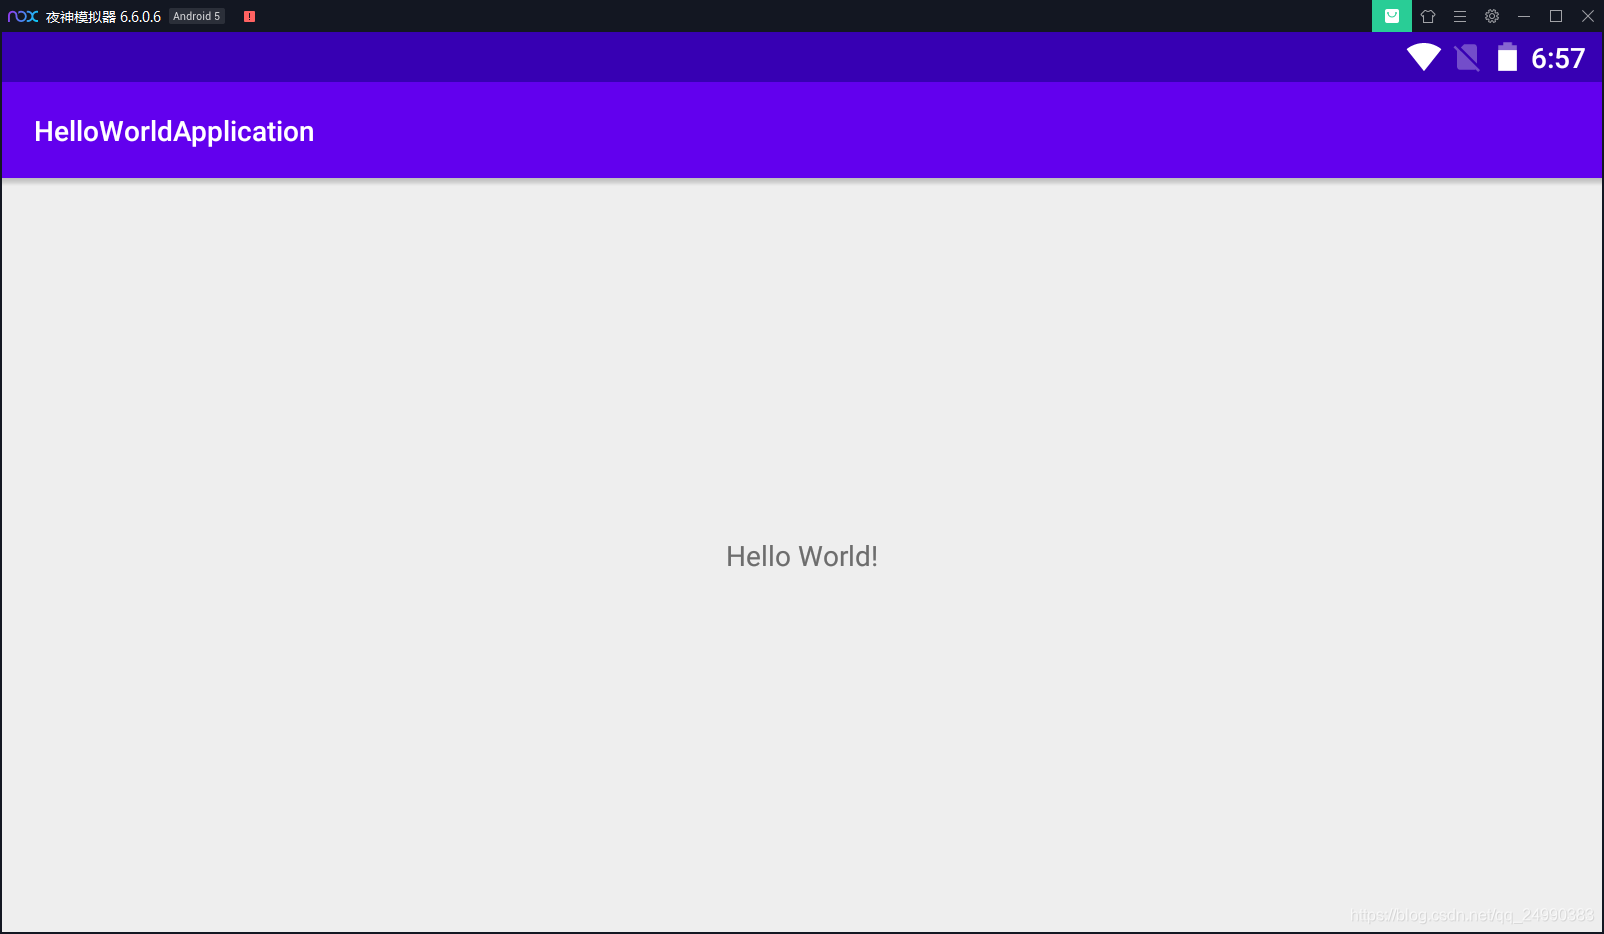
 在夜神模拟器上运行结果如图
如果在夜神模拟器上运行完成后,想在自带模拟器上运行,要关闭AndroidStudio并且删掉.lock文件
重新运行


3 APP调试运行
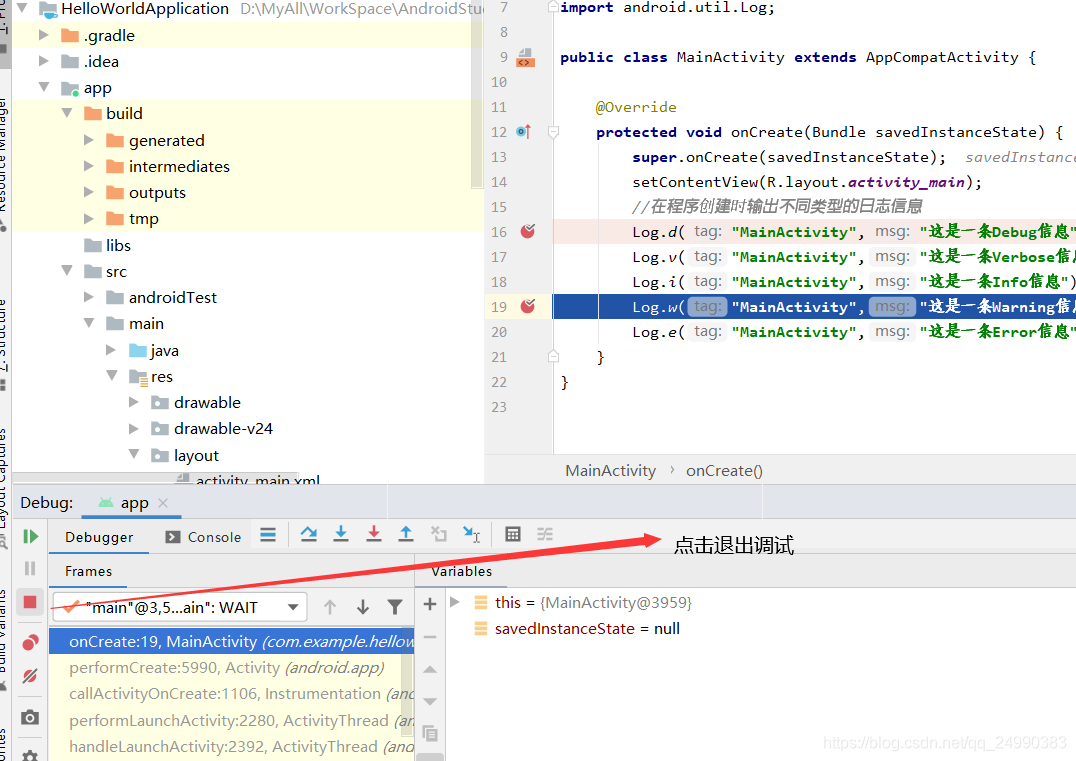
3.1 Log的使用
- Log类是Android中的日志工具类,用于获取程序从启动到关闭的日志信息
- Log类所输出的日志内容分为五个级别,分别对应Log类中的Log.v()、Log.d()、Log.i()、Log.w()、Log.e()静态方法。Android4.0新增加Assert比较特殊,没有对应的静态方法。
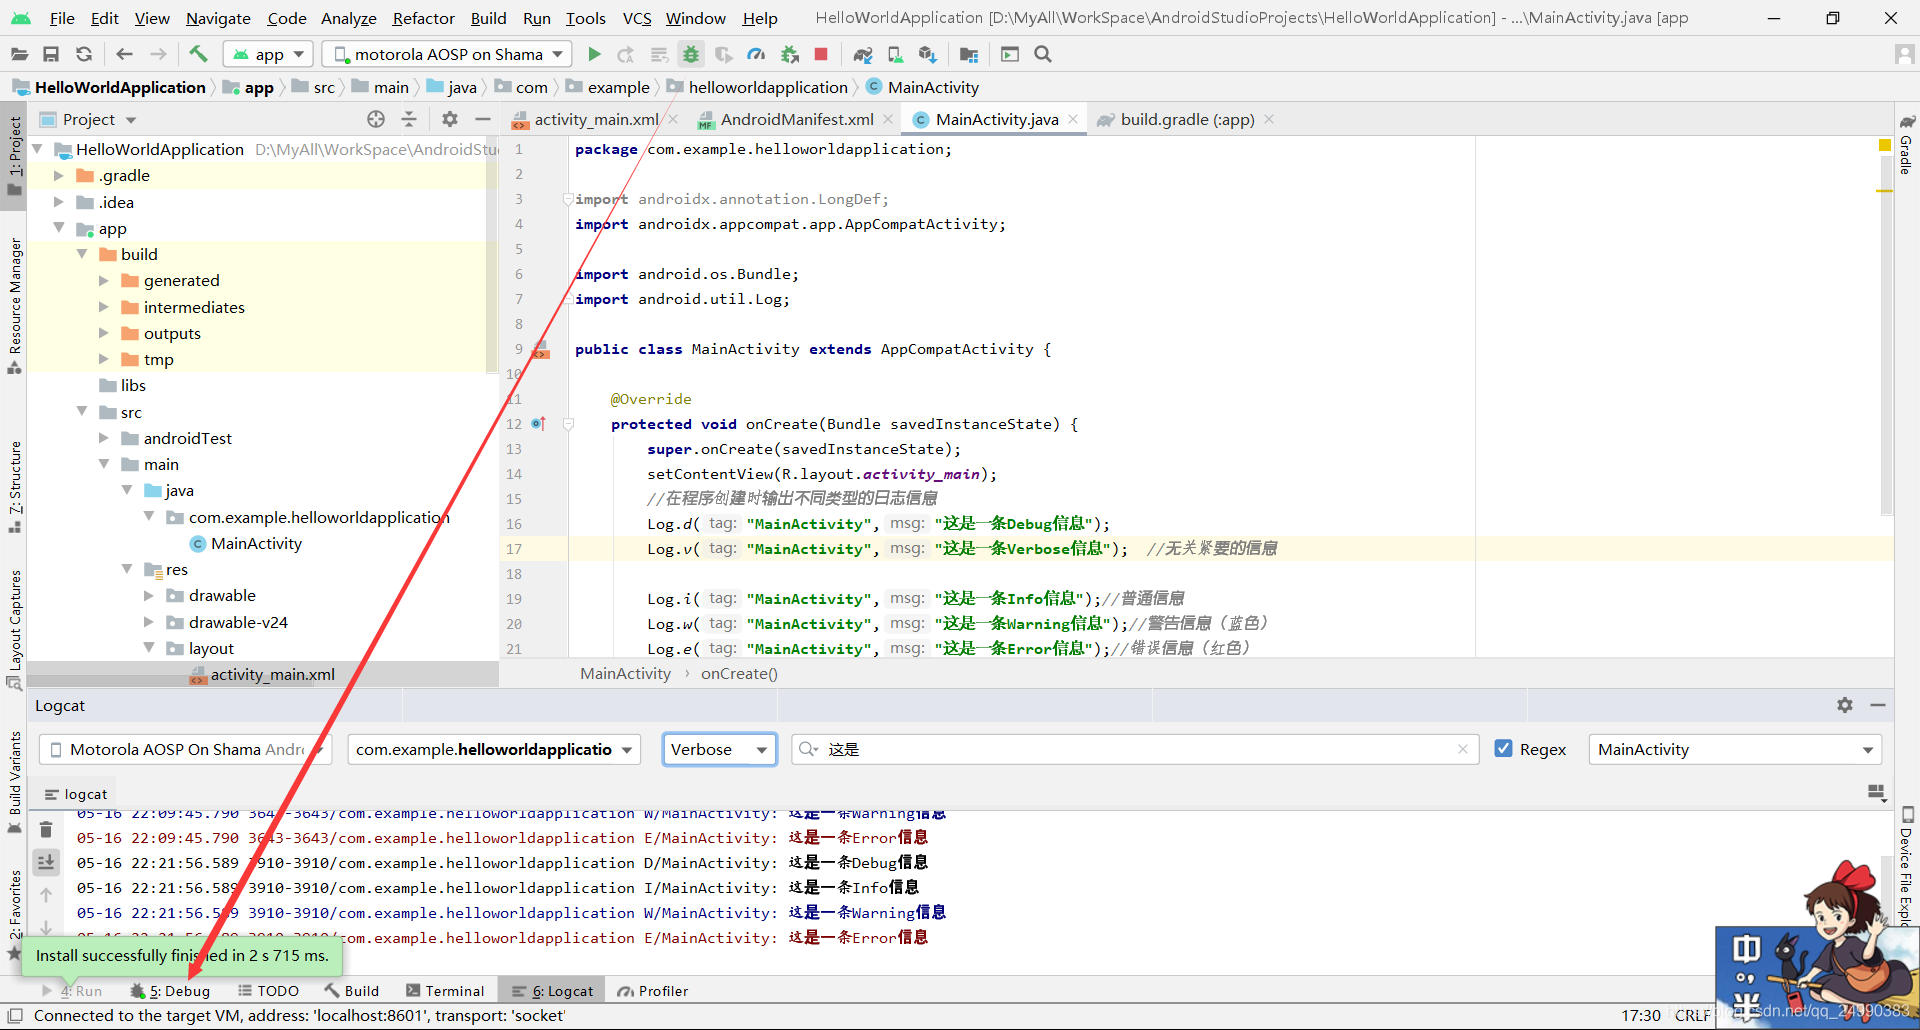
Log.v("MainActivity"//打印日志的标签,"Verbose"//打印日志的内容);  //无关紧要的信息,
Log.d("MainActivity","Debug");  //调试信息
Log.i("MainActivity","Info");//普通信息
Log.w("MainActivity","Warning");//警告信息(蓝色)
Log.e("MainActivity","Error");//错误信息(红色)
从上到下,等级依次变高
3.2 Log类实操
 设置过滤器
设置过滤器
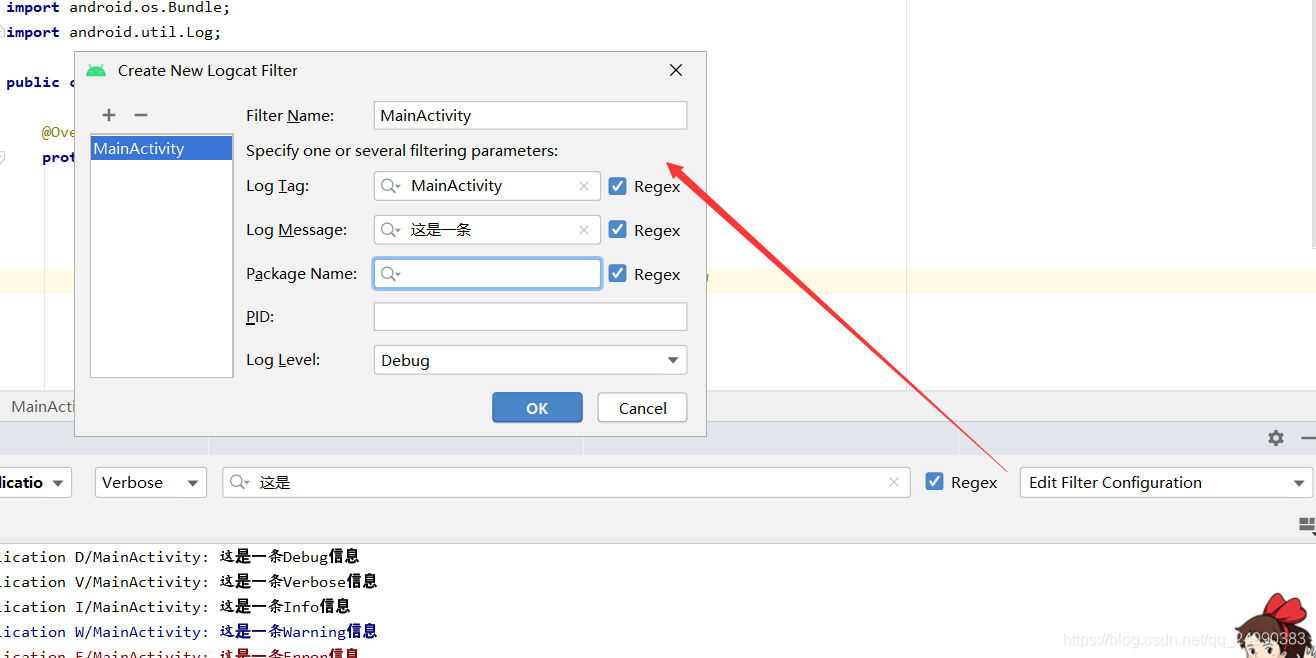 满足过滤器条件的,只显示Debug等级及以上

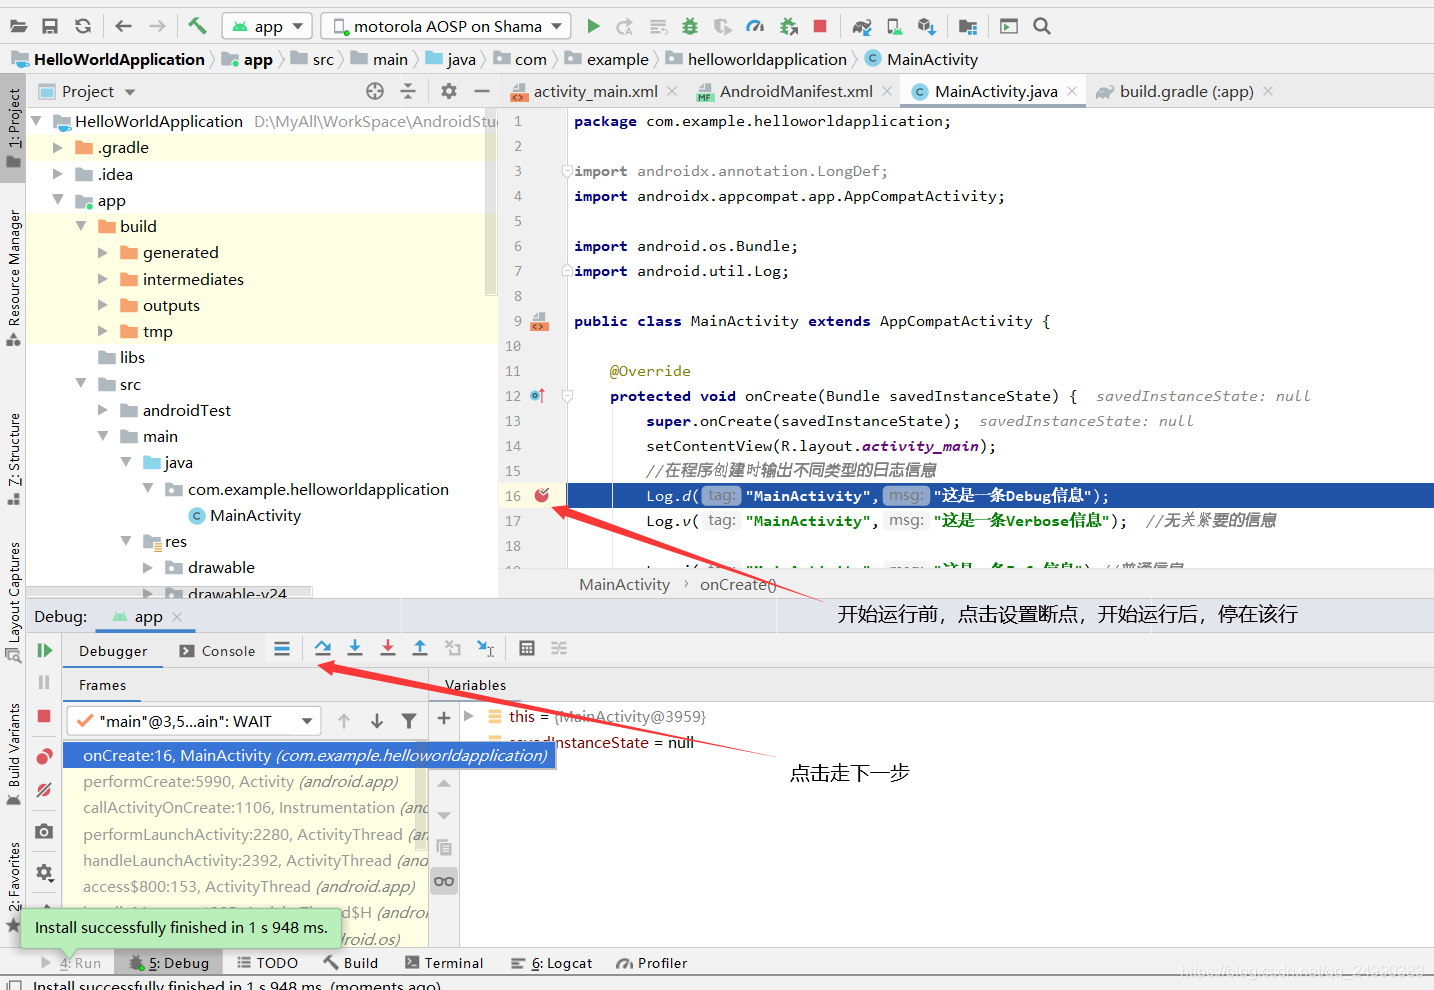
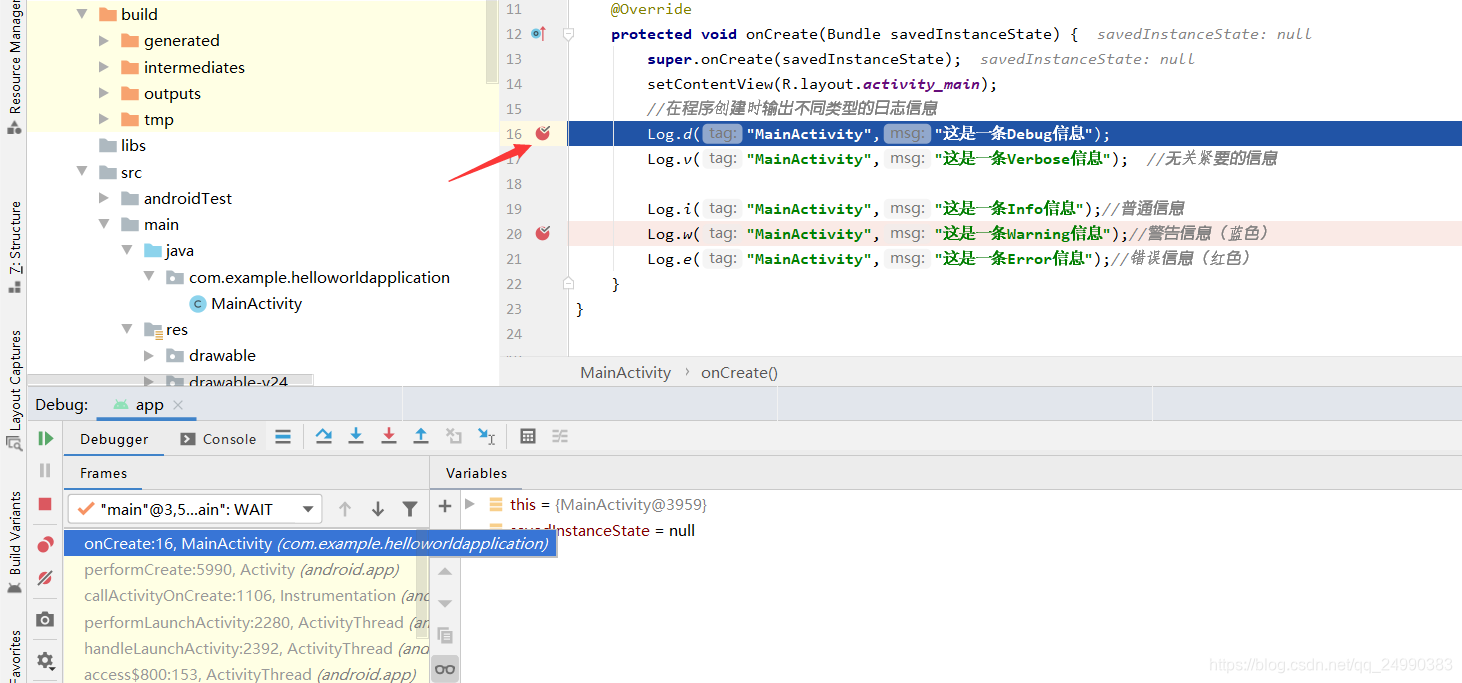
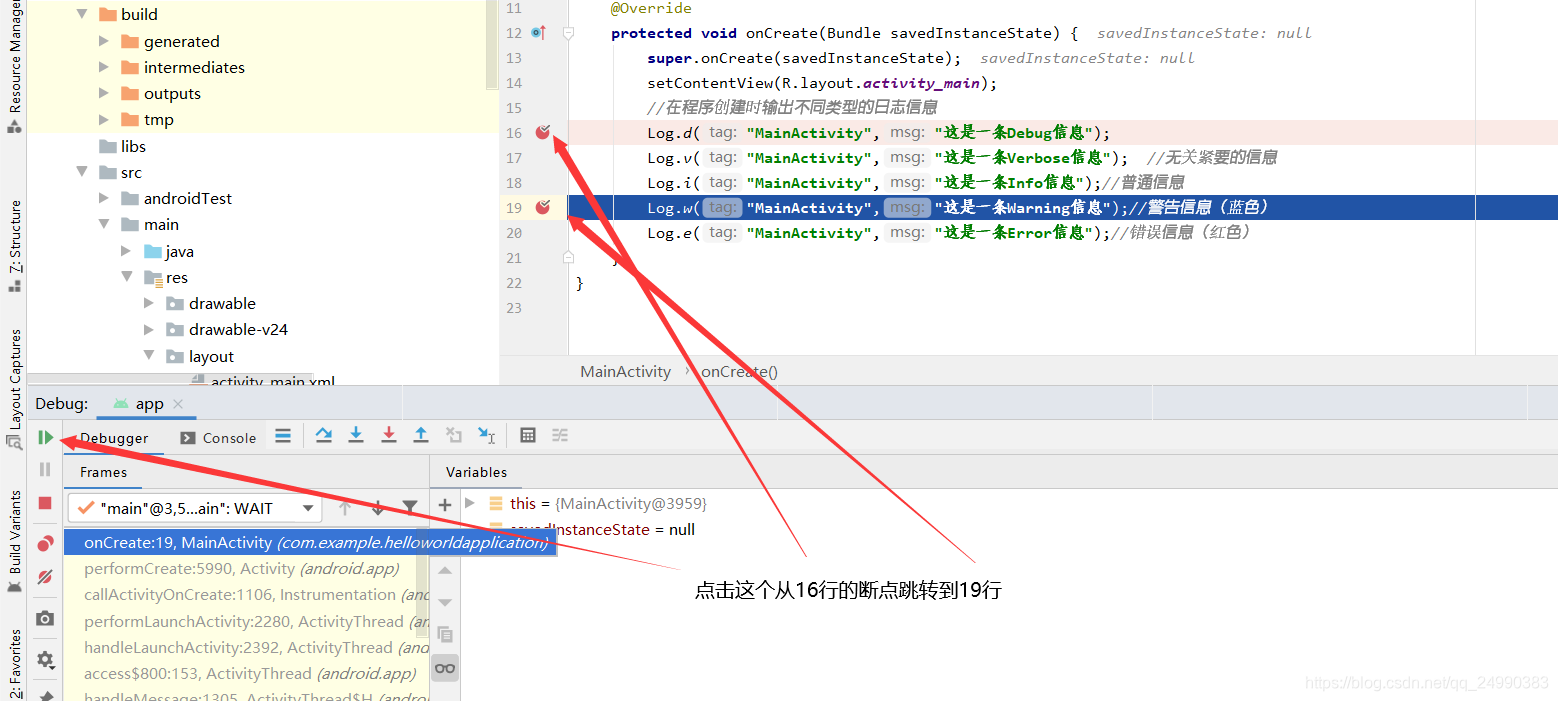
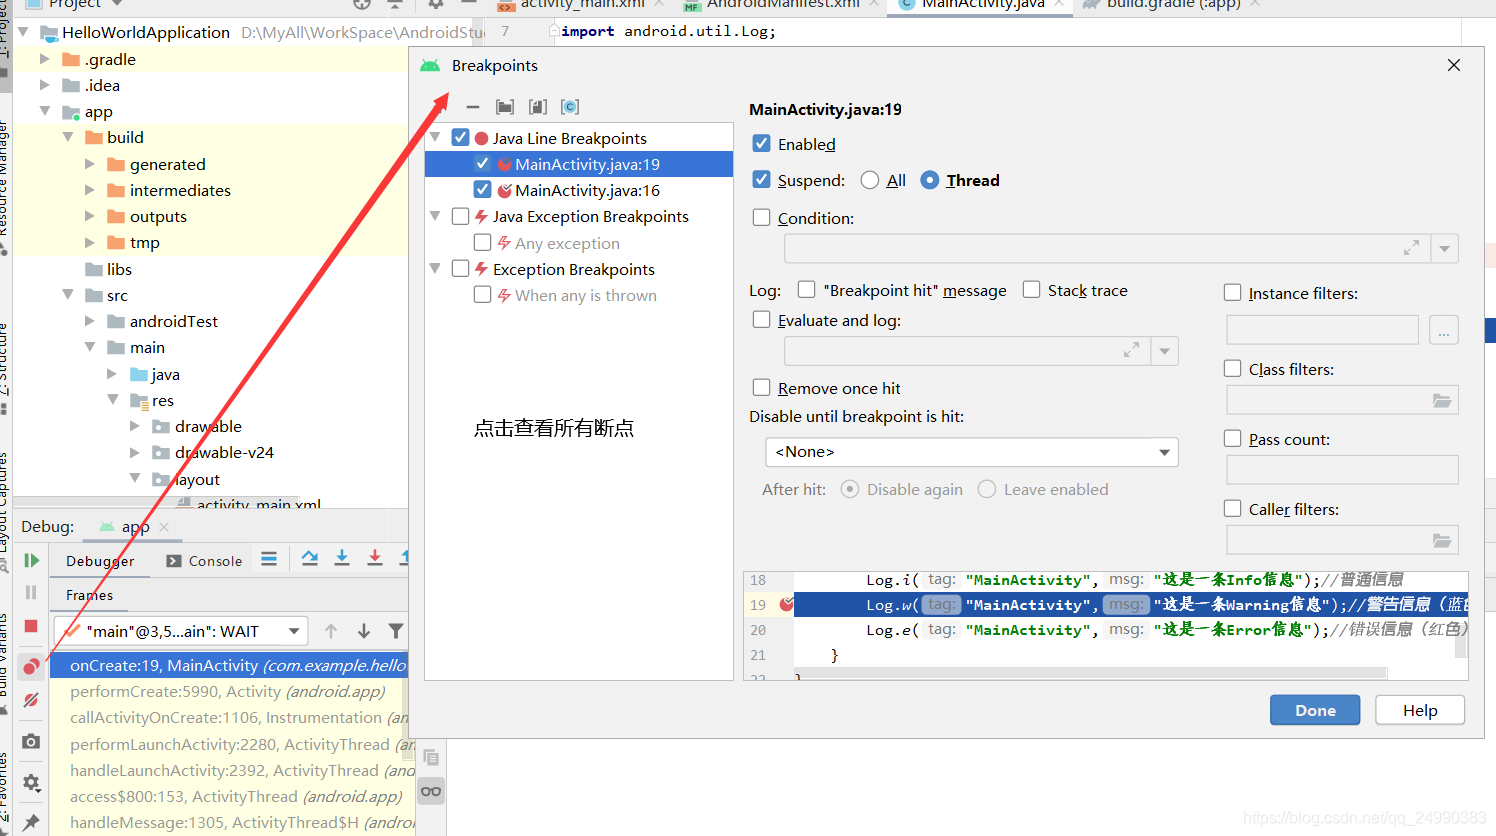
3.3 Debug的使用
- Debug是跟踪程序流程的一种模式,可以通过在代码处设置断点,再利用Debug窗口查看,所谓断点是在代码行加入停止点,当程序执行到该行时会暂停,开发者可以从中查看此行的变量,数值和内容等。

3.4 App项目发布
- 程序打包
- Android 程序开发完成后,如果要发布到互联网上供别人使用,就需要将自己的程序打包成正式的Android安装包文件(Android Package简称APK),其后缀名“.apk”。

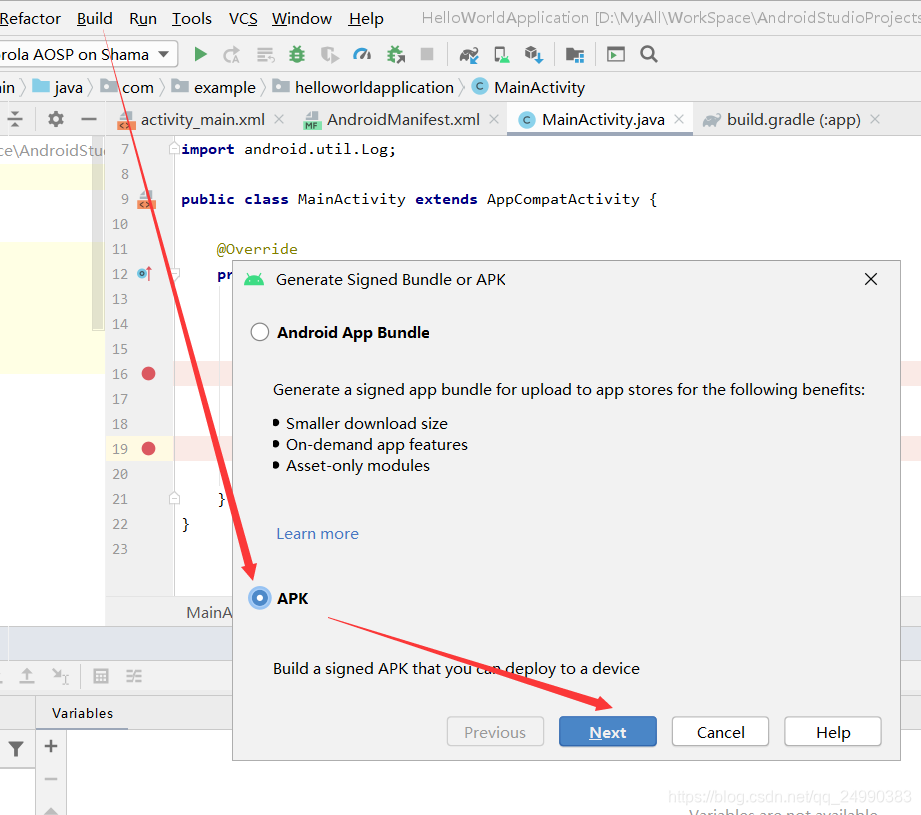
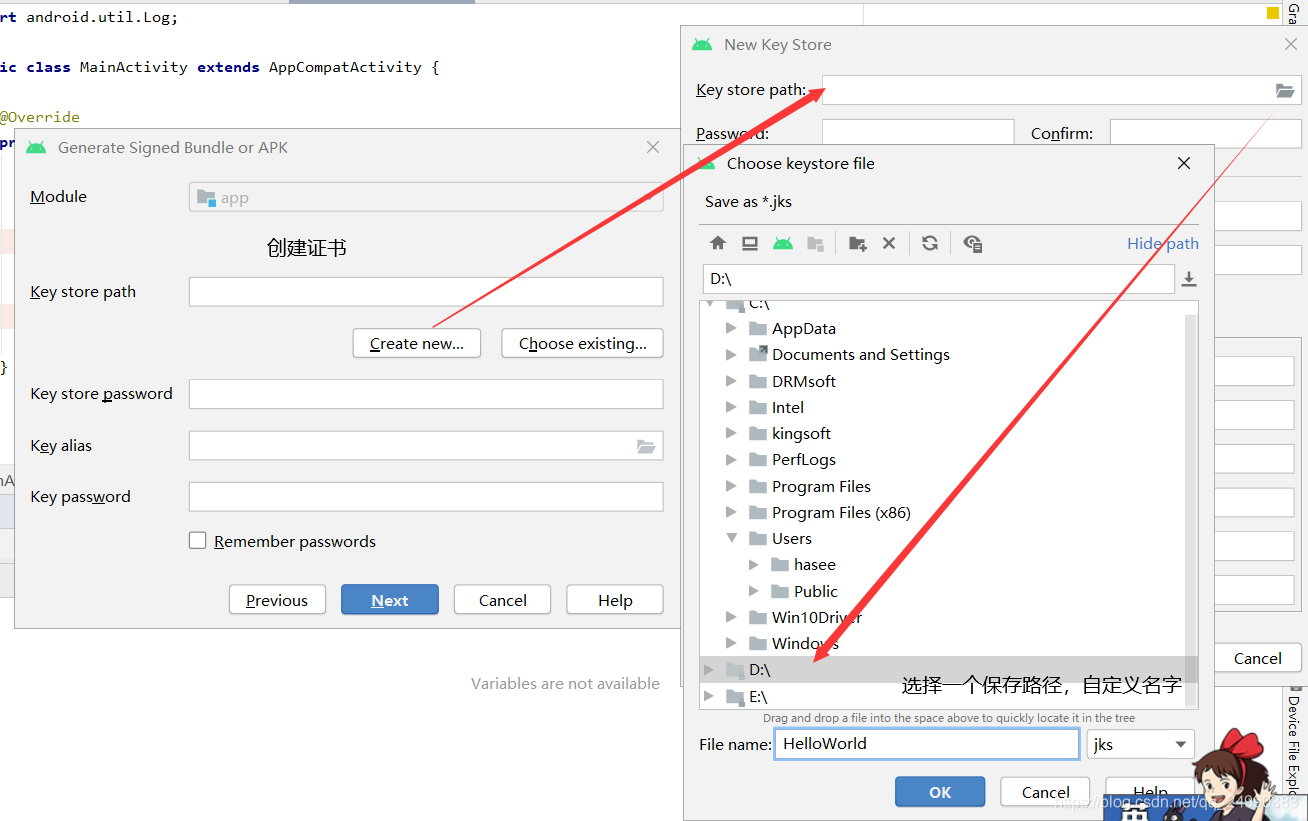
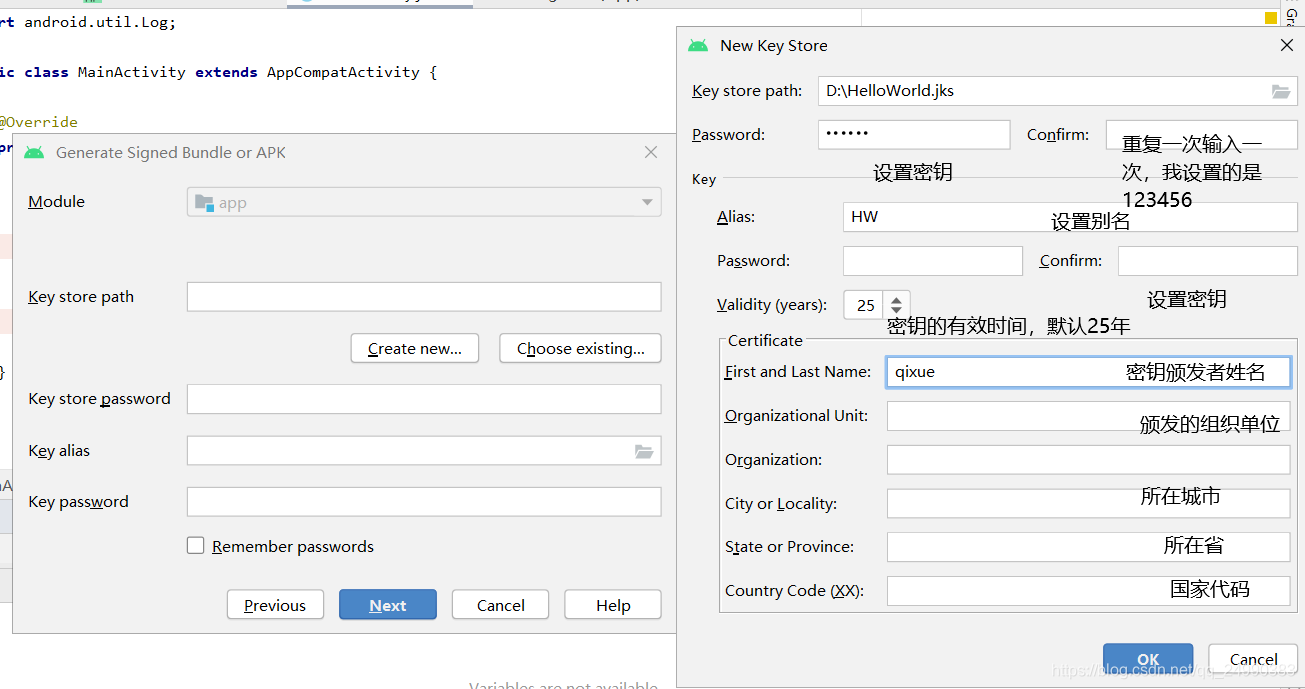
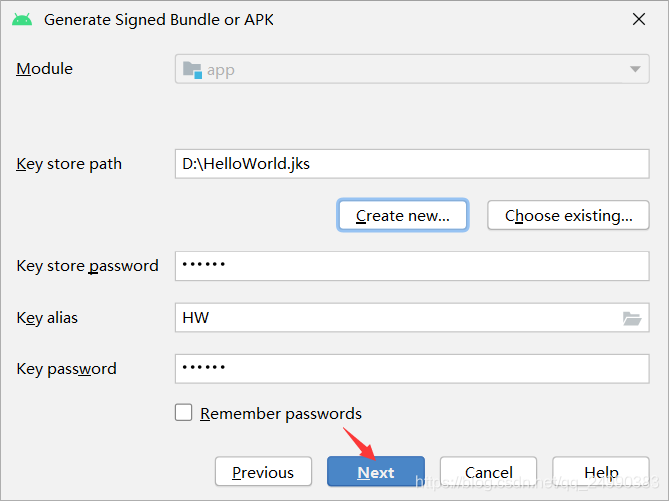
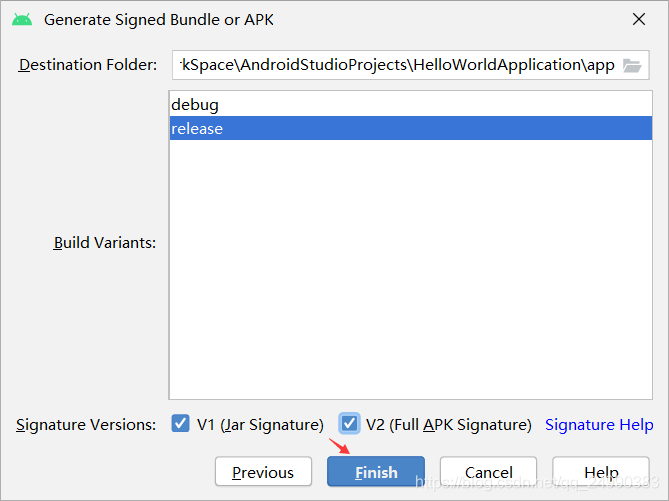

其中.apk文件可以任意发送下载安装,并在Android手机上运行
3.6 本章总结
功能描述: 展示HelloWorld界面
技术要点: 使用AndroidStudio创建程序,使用模拟器运行程序
实现步骤:
- AndroidStudio中选择【File】->【New】->【NewProject】选项创建项目
- 点击工具栏中【AVD Manager】按钮启动模拟器
- 点击工具栏的运行按钮运行程序
