很高兴CAS系列帮助到了不少小伙伴,有不少小伙伴加QQ跟我交流
有个比较普遍的问题是大家不知道怎么把注册,修改密码等相关的功能嵌入CAS,这篇博客统一解答下,有些关于spring的内容是我查找资料结合自身理解的,不一定准确,但是方法一定是我验证可以的
顺手贴上CAS 5.2.X官方文档:https://apereo.github.io/cas/5.2.x/index.html
hugeo的CAS系列:https://blog.csdn.net/u010588262/article/category/7548325
DEMO下载:
part1: https://download.csdn.net/download/u010588262/10327539
part2:https://download.csdn.net/download/u010588262/10372828
part1是前面几篇博客的完整项目,不包含这篇的内容
par2是在part1的基础上的main文件夹,包含此篇的代码
正文
CAS框架本身的功能是用来做登录验证的,其中用到了spring webflow,感兴趣的伙伴可以查找相关资料了解一下,可以对CAS验证的流程有个了解:
注册,修改密码等周边功能CAS是不管的,但是我们可以在CAS服务器端的基础上增加自己需要的功能,maver overlay不就是用来做这个的吗,所以我们的大致思路是,把CAS自带的登录页面修改掉,上面增加注册,修改密码的按钮,指向咱们自己写的controller就行了。
重要提醒:有个需要格外关注的地方是,大家请一定按照我第一篇博客(https://blog.csdn.net/u010588262/article/details/79741626)的方法把CAS本身的lib全部添加到开发项目中,maven里不要有spring boot相关的依赖了,因为CAS的lib里就有spring boot核心的包,已经够我们开发了,CAS的lib里没有的包我们再添加依赖。否则打包时开放项目又打进去一份springboot的包,启动时就会报bean重复的问题(在两边版本不一致的情况下),所以保险起见就是pom中不要有springboot的依赖。
有朋友自己写了controller但是启动之后访问时总是404错误,这是因为springboot根本没有扫描咱们自己的包,可以发现CAS打好包之后里面是没有web.xml文件的,就可以知道肯定是有类继承了SpringBootServletInitializer,找一下发现了CasWebApplicationServletInitializer
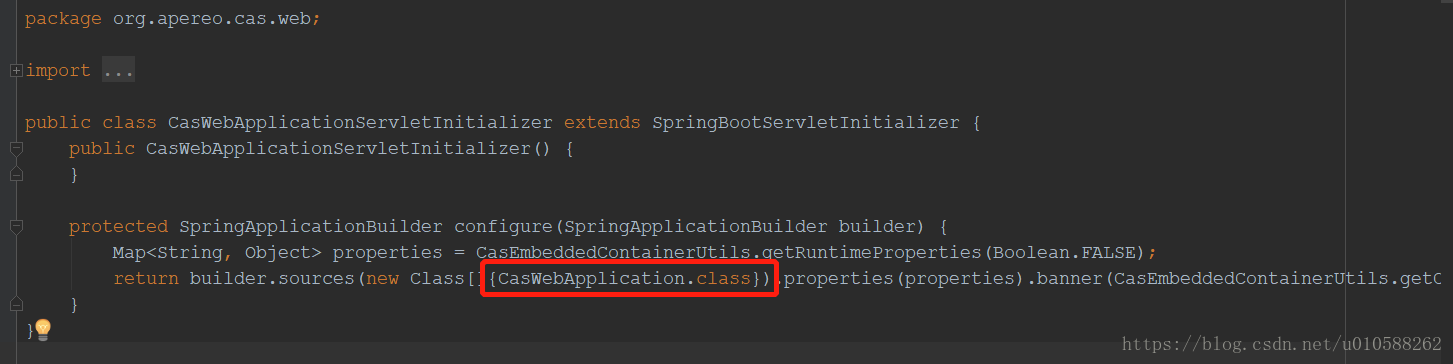
这里面就看到启动类了,最重要的@SpringBootApplication也在这上面:
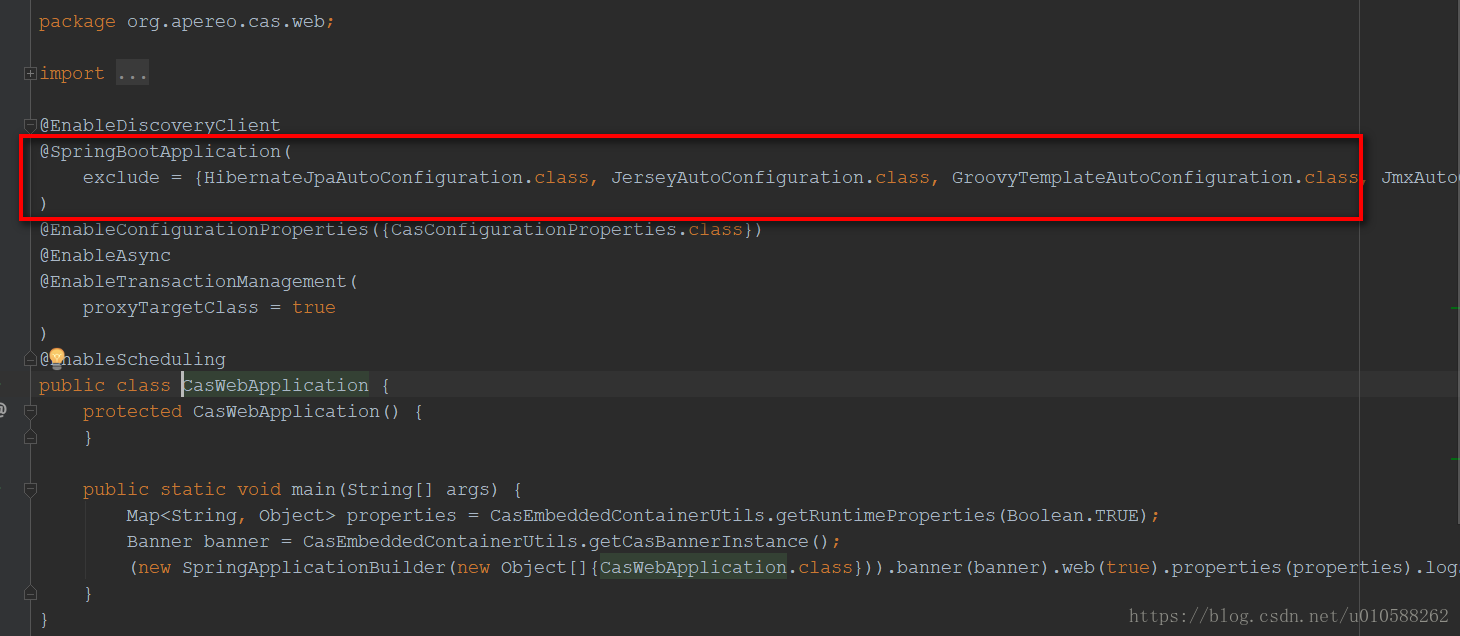
到这里很多小伙伴应该知道了,@SpringBootApplication的功能不赘述了,所以spring默认是到org.apereo.cas.web下寻找component,service,controller,configuration等组件的,所以在咱们自己的包下面使用这些注解spring是扫描不到的,你要做的就是
1. 增加一个配置类:
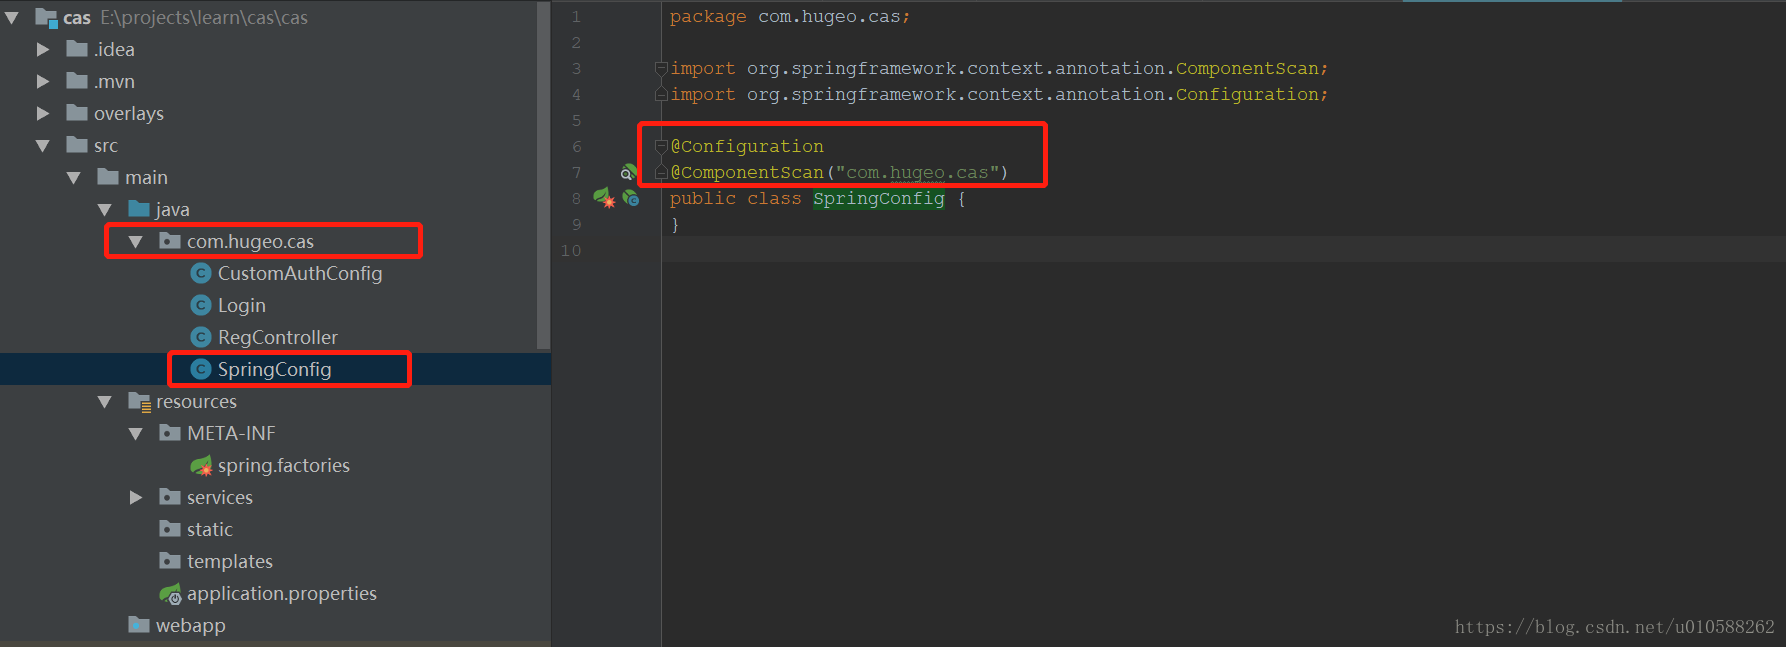
2. 将此配置类配置到spring.factories中,否则spring不管它的哟
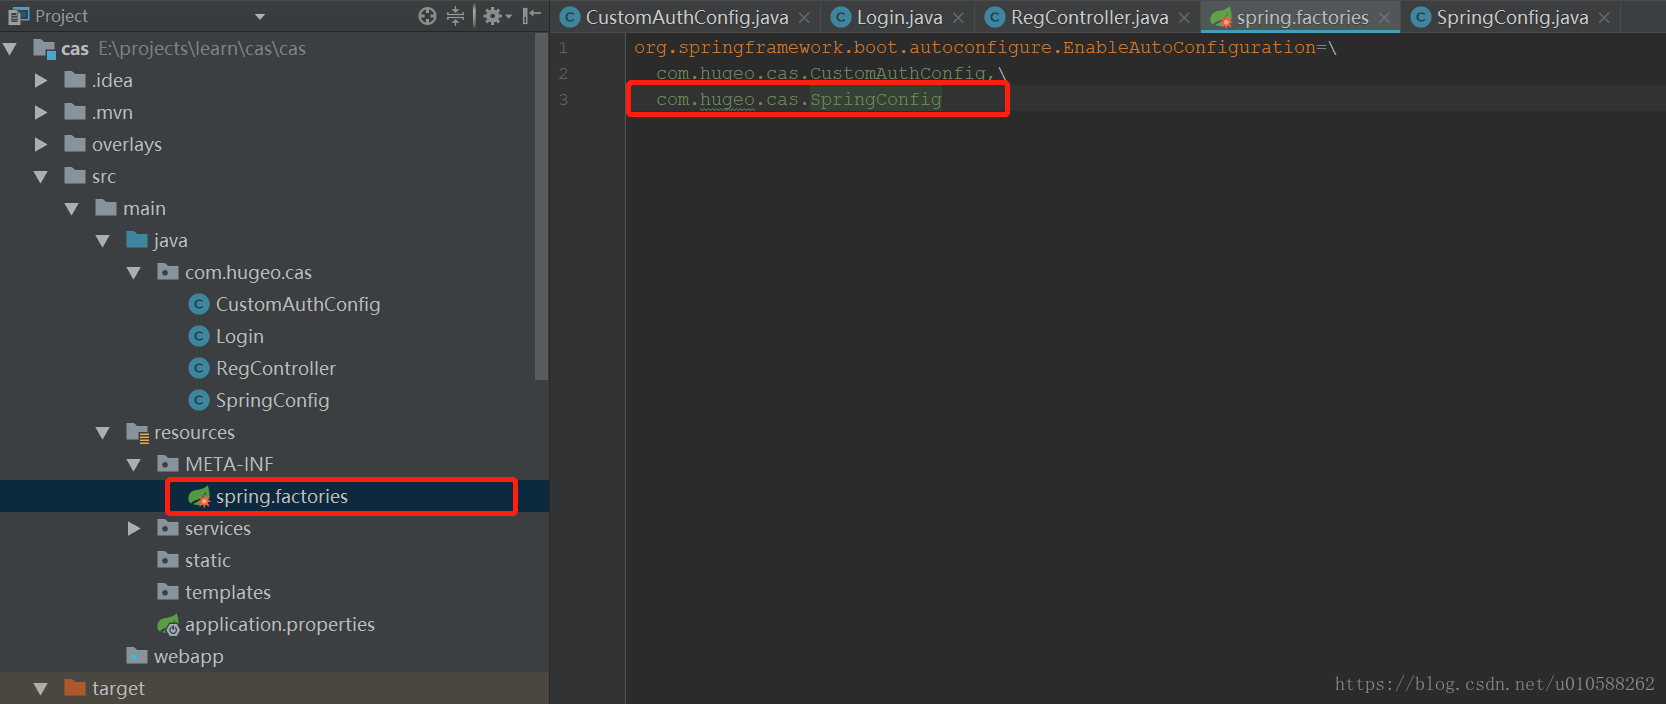
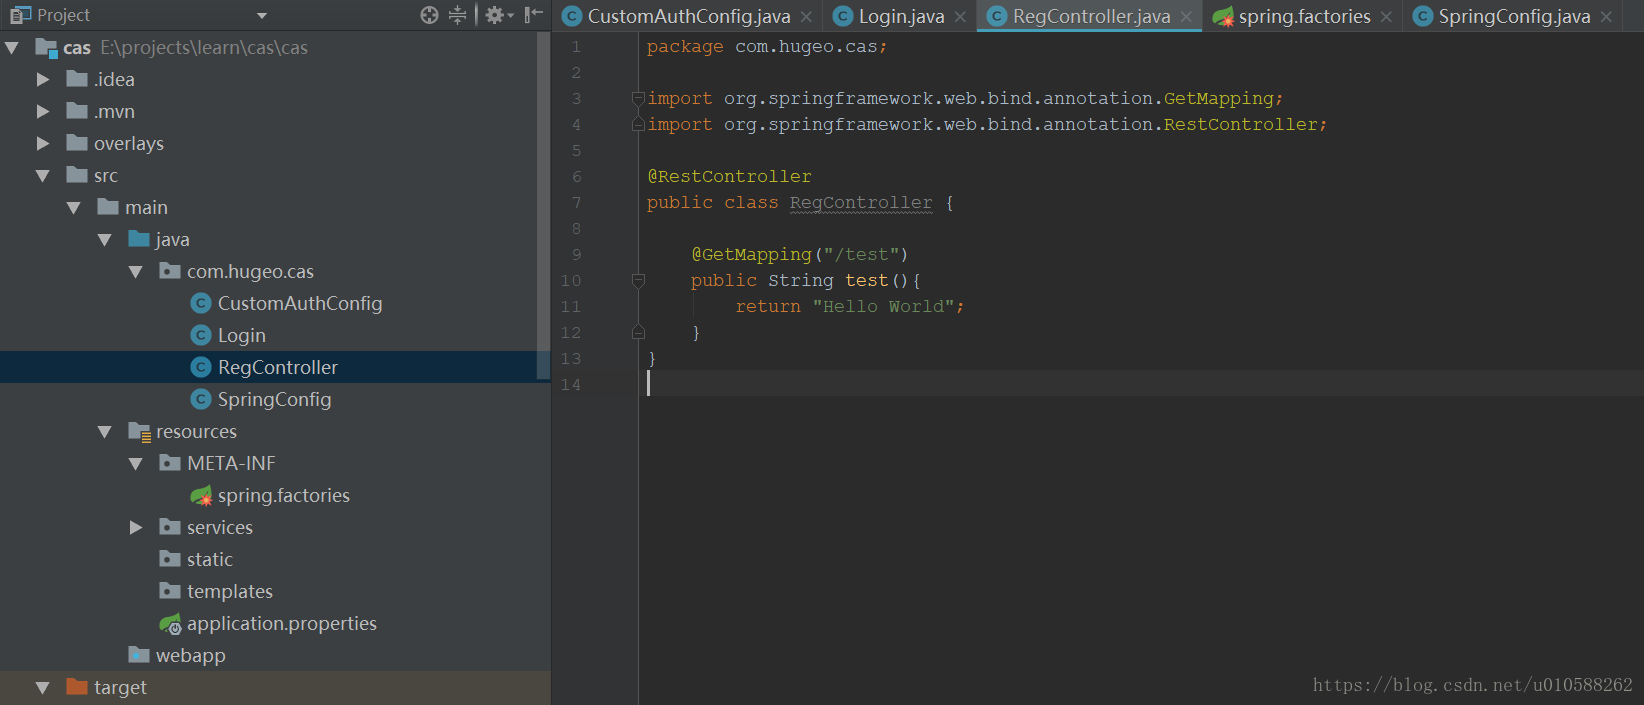
3. 写个简单的controller试一下吧
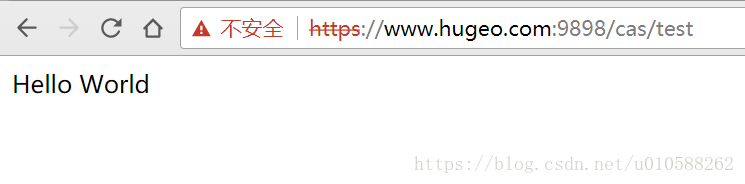
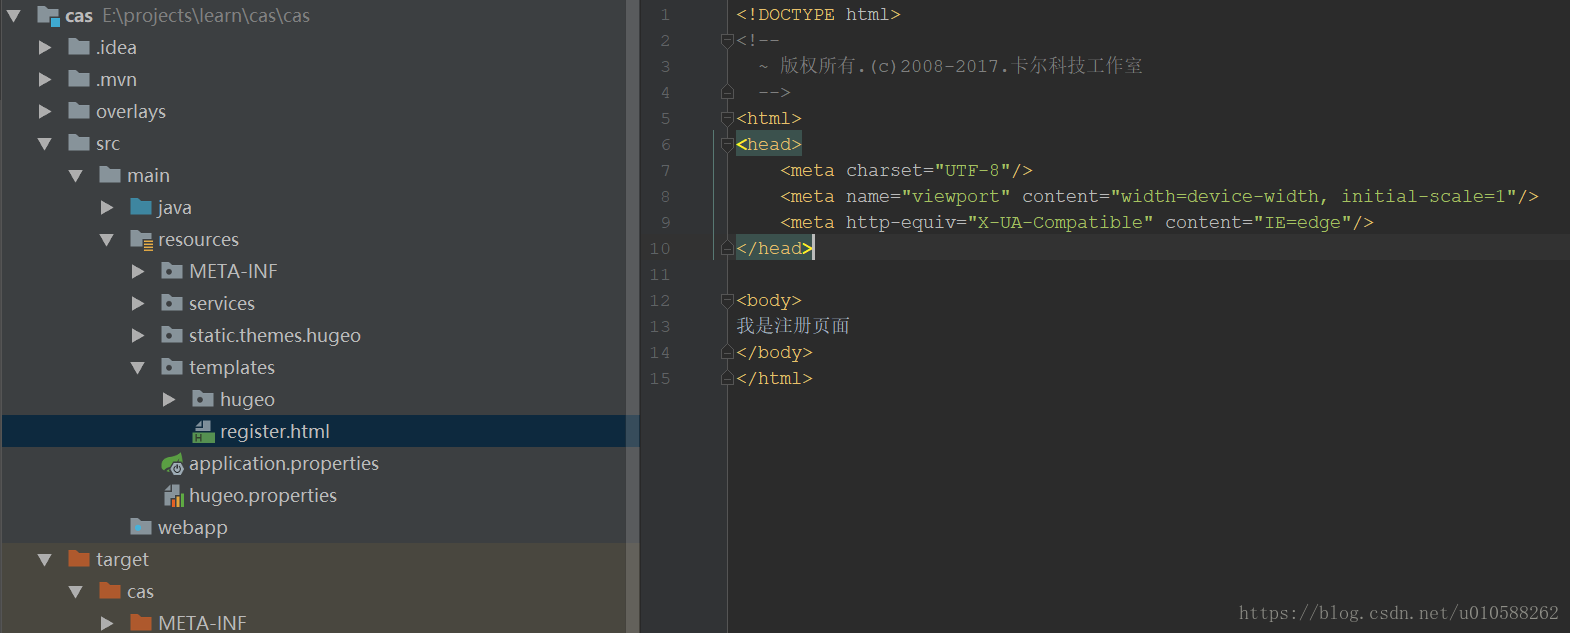
4. 如果看不到效果,去你的target文件夹下看一下打包后的文件是不是真的改过来了,我测试的时候第一次没反应,看target下的spring.factories文件里没加上我的配置类,clean一下重新打包即可。
以上是基础工作
以下是实例
1. 修改登录页面样式+注册
官方文档:https://apereo.github.io/cas/5.2.x/installation/User-Interface-Customization-Themes.html
这块我们要回头说一下客户端注册json文件了,这块不明白的看一下客户端这篇的博客:
https://blog.csdn.net/u010588262/article/details/79806923
简单来说就是每个要使用单点登录的客户端都要在服务端有个配置文件:
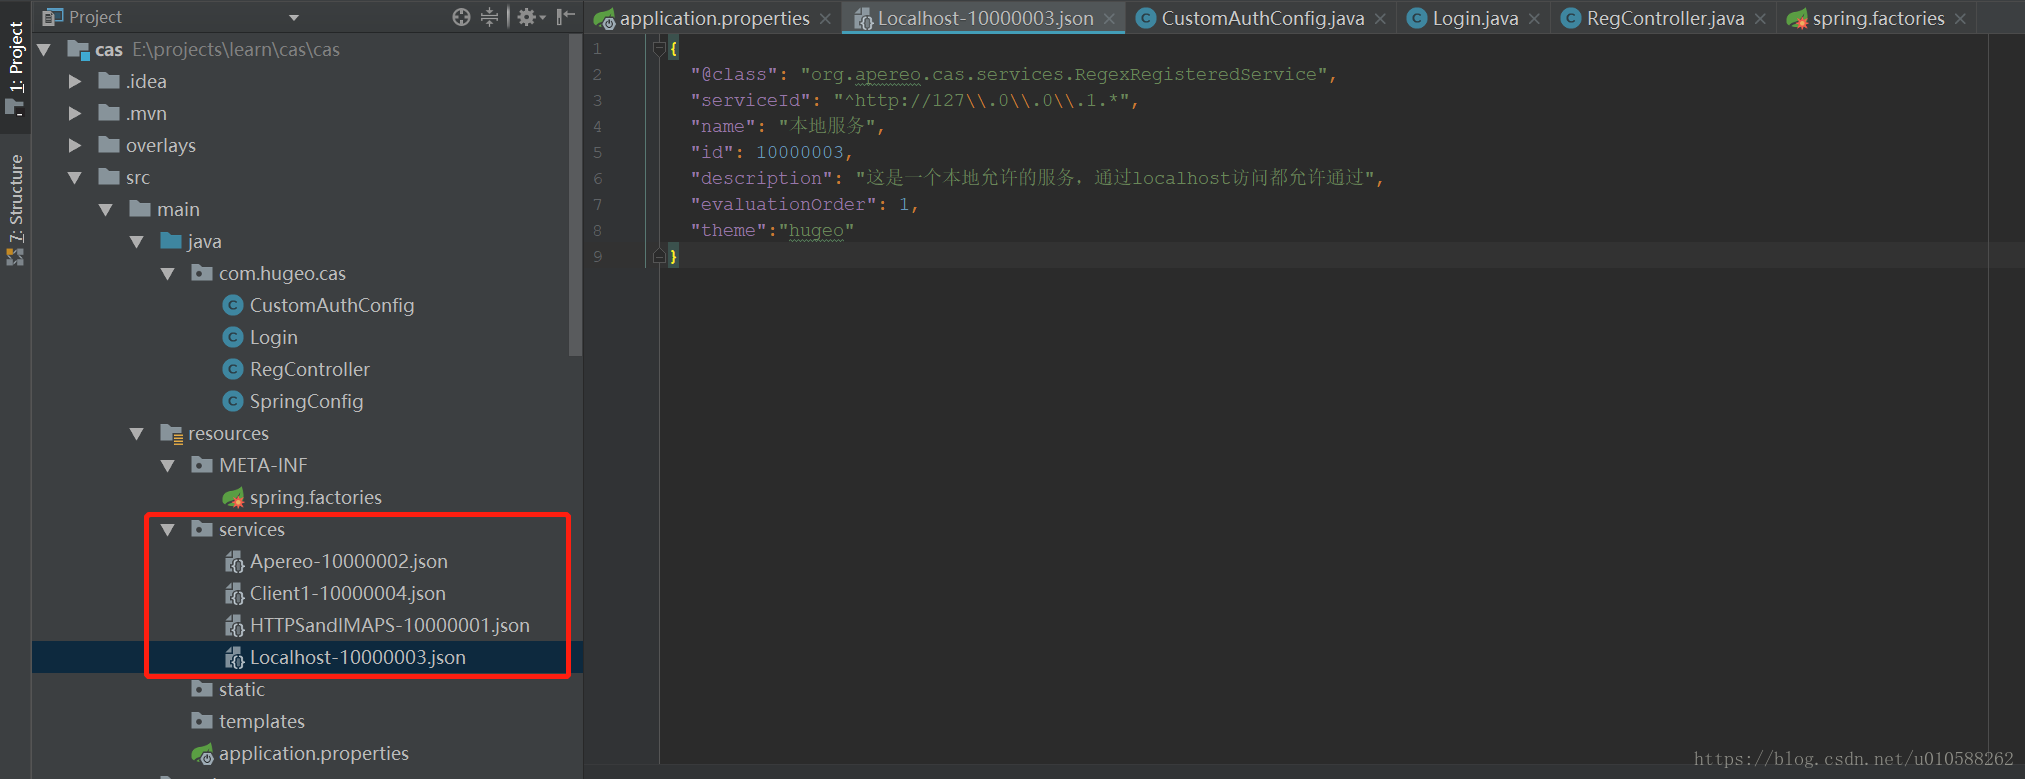
这些文件固定在service文件夹下,文件生效要在application.properties中添加:
#开启识别json文件,默认false
cas.serviceRegistry.initFromJson=true
文件各字段含义:
1. @class固定的,没研究含义
2. serviceId通过正则表达式匹配客户端过来的url
3. evaluationOrder,如果多个文件的正则都匹配了咋办,哪个Order小用哪个
4. name desc id不说了
5. 细心的小伙伴发现了这里比原来的博客里多了一个theme,就是控制这个客户端过来的登录页面样式了,可以支持不同客户端不同登录页面,很人性化。
在application.properties中配置默认默认主题:
# 默认主题
cas.theme.defaultThemeName=hugeo
下面开始创建咱们自己的登录页面吧,涉及到以下几个文件:
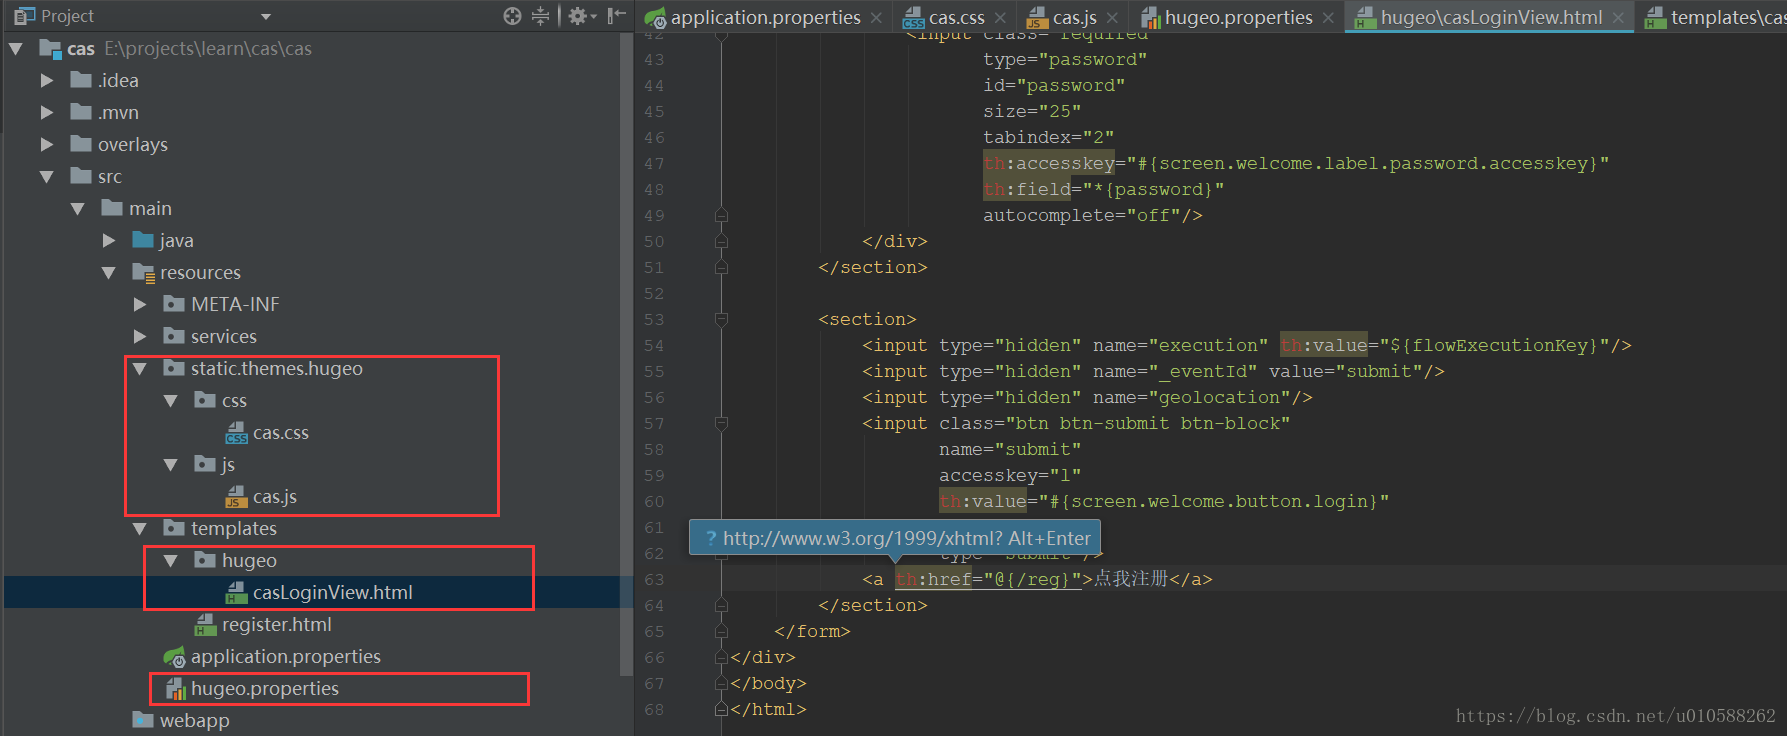
因为我们在json文件中配置的主题名称是hugeo,所以在templates下面创建同名hugeo文件夹,文件夹里面是casLoginView.html,这个名称也是固定的:
<!DOCTYPE html>
<html>
<head>
    <meta charset="UTF-8"/>
    <meta name="viewport" content="width=device-width, initial-scale=1"/>
    <meta http-equiv="X-UA-Compatible" content="IE=edge"/>
    <title th:text="${#themes.code('demo.pageTitle')}"></title>
    <link rel="stylesheet" th:href="@{${#themes.code('hugeo.css.file')}}"/>
    <script th:src="@{${#themes.code('hugeo.js.file')}}"></script>
</head>

<body>
<h1 th:text="${#themes.code('demo.pageTitle')}"></h1>
<div>
    <form method="post" th:object="${credential}">
        <div th:if="${#fields.hasErrors('*')}">
            <span th:each="err : ${#fields.errors('*')}" th:utext="${err}"/>
        </div>
        <h2 th:utext="#{screen.welcome.instructions}"></h2>

        <section class="row">
            <label for="username" th:utext="#{screen.welcome.label.netid}"/>
            <div th:unless="${openIdLocalId}">
                <input class="required"
                       id="username"
                       size="25"
                       tabindex="1"
                       type="text"
                       th:disabled="${guaEnabled}"
                       th:field="*{username}"
                       th:accesskey="#{screen.welcome.label.netid.accesskey}"
                       autocomplete="off"/>
            </div>
        </section>

        <section class="row">
            <label for="password" th:utext="#{screen.welcome.label.password}"/>
            <div>
                <input class="required"
                       type="password"
                       id="password"
                       size="25"
                       tabindex="2"
                       th:accesskey="#{screen.welcome.label.password.accesskey}"
                       th:field="*{password}"
                       autocomplete="off"/>
            </div>
        </section>

        <section>
            <input type="hidden" name="execution" th:value="${flowExecutionKey}"/>
            <input type="hidden" name="_eventId" value="submit"/>
            <input type="hidden" name="geolocation"/>
            <input class="btn btn-submit btn-block"
                   name="submit"
                   accesskey="l"
                   th:value="#{screen.welcome.button.login}"
                   tabindex="6"
                   type="submit"/>
            <a th:href="@{/reg}">点我注册</a>
        </section>
    </form>
</div>
</body>
</html>里面以${#themes.code('hugeo.js.file')}形式获取的参数是从主题同名文件hugeo.properties中获取的:
hugeo.css.file=/themes/hugeo/css/cas.css
hugeo.js.file=/themes/hugeo/js/cas.js
demo.pageTitle=this is it
js,css文件自己创建就行了,可以在html里面直接用,也可以定义在hugeo.properties中然后在html里使用:
<link rel="stylesheet" th:href="@{${#themes.code('hugeo.css.file')}}"/>
<script th:src="@{${#themes.code('hugeo.js.file')}}"></script>
我在css里写了:
h1 {
    color: #1ab7ea;
}
js里写了:
alert("hugeo");只是为了简单看下效果而已,炫酷的页面自己写就好了,cas用的模板引擎是thymeleaf,说实话没用过这玩意,不过登录页面也复杂不到哪儿去,就仿照官方的或者我这个例子,主要还是靠css嘛。

以上内容参考文章:http://blog.csdn.net/u010475041/article/details/78201261
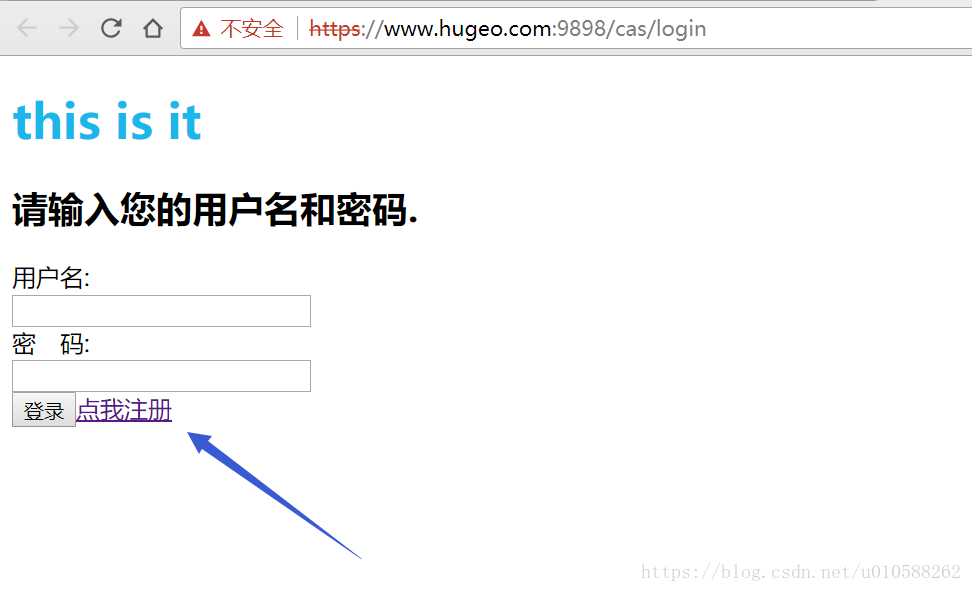
可以看到页面上还加了个注册按钮:
<a th:href="@{/reg}">点我注册</a>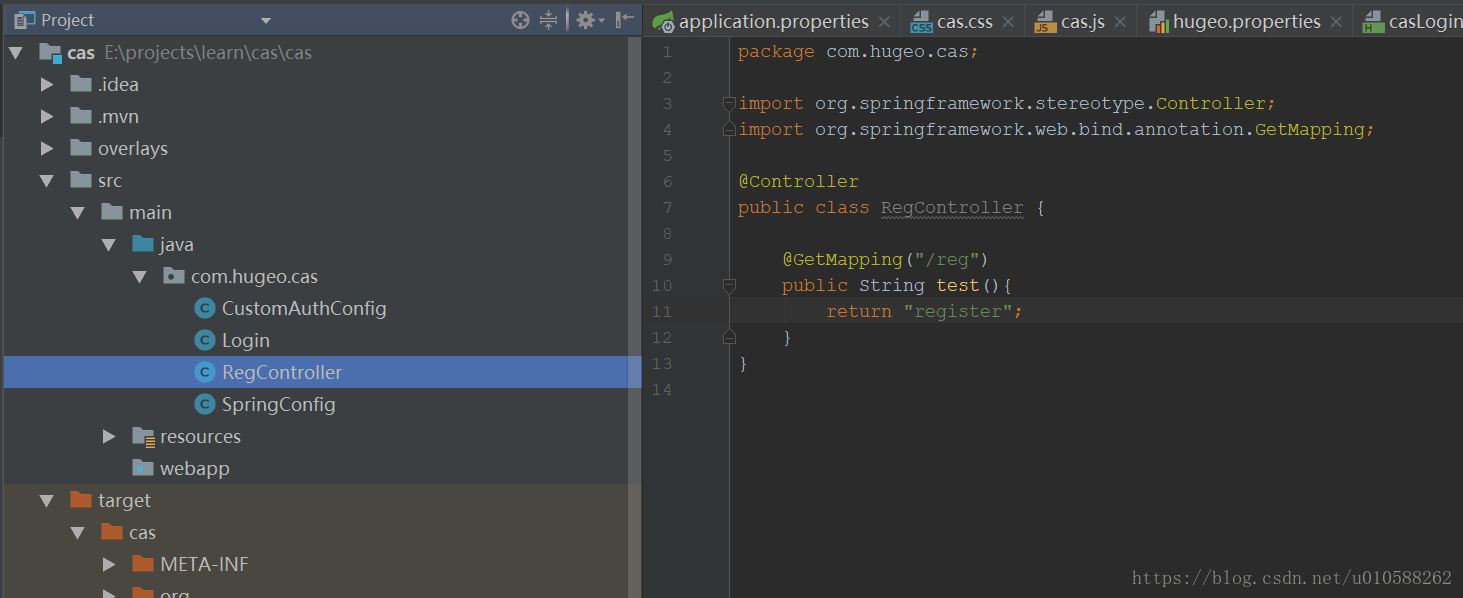
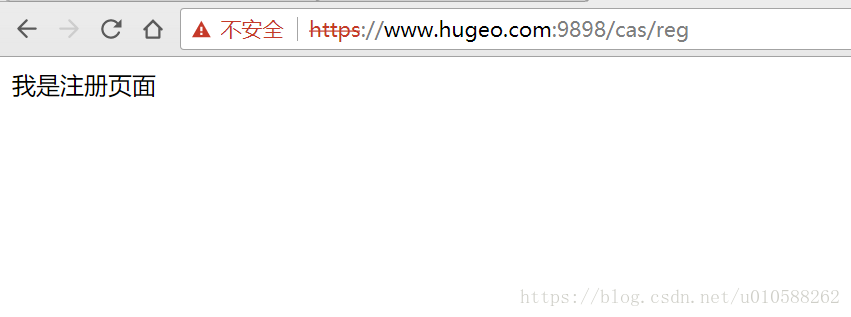
虽然没有真的实现注册功能,但是应该可以照葫芦画瓢了。
其实我在实际使用中并没有把注册,找回密码等功能放在CAS服务端,因为没必要,单点登录由于它的特殊性需要一套特别的框架,但注册和找回密码这种功能只是普通的功能而已,完全可以用自己熟悉的框架熟悉的模板引擎单独做一个应用,在CAS服务端的登录页面上跳转过去即可。没必要跟CAS死磕,花费了自己宝贵的时间,毕竟人家只是用来做SSO的嘛
2.验证码
说到验证码就有一丢丢复杂了,要重点关注之前提到的webflow了
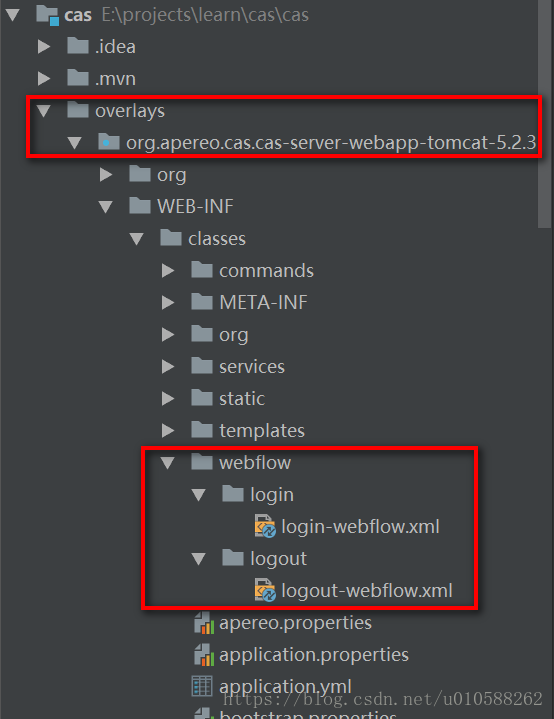
看到login-webflow.xml中有这样的内容:
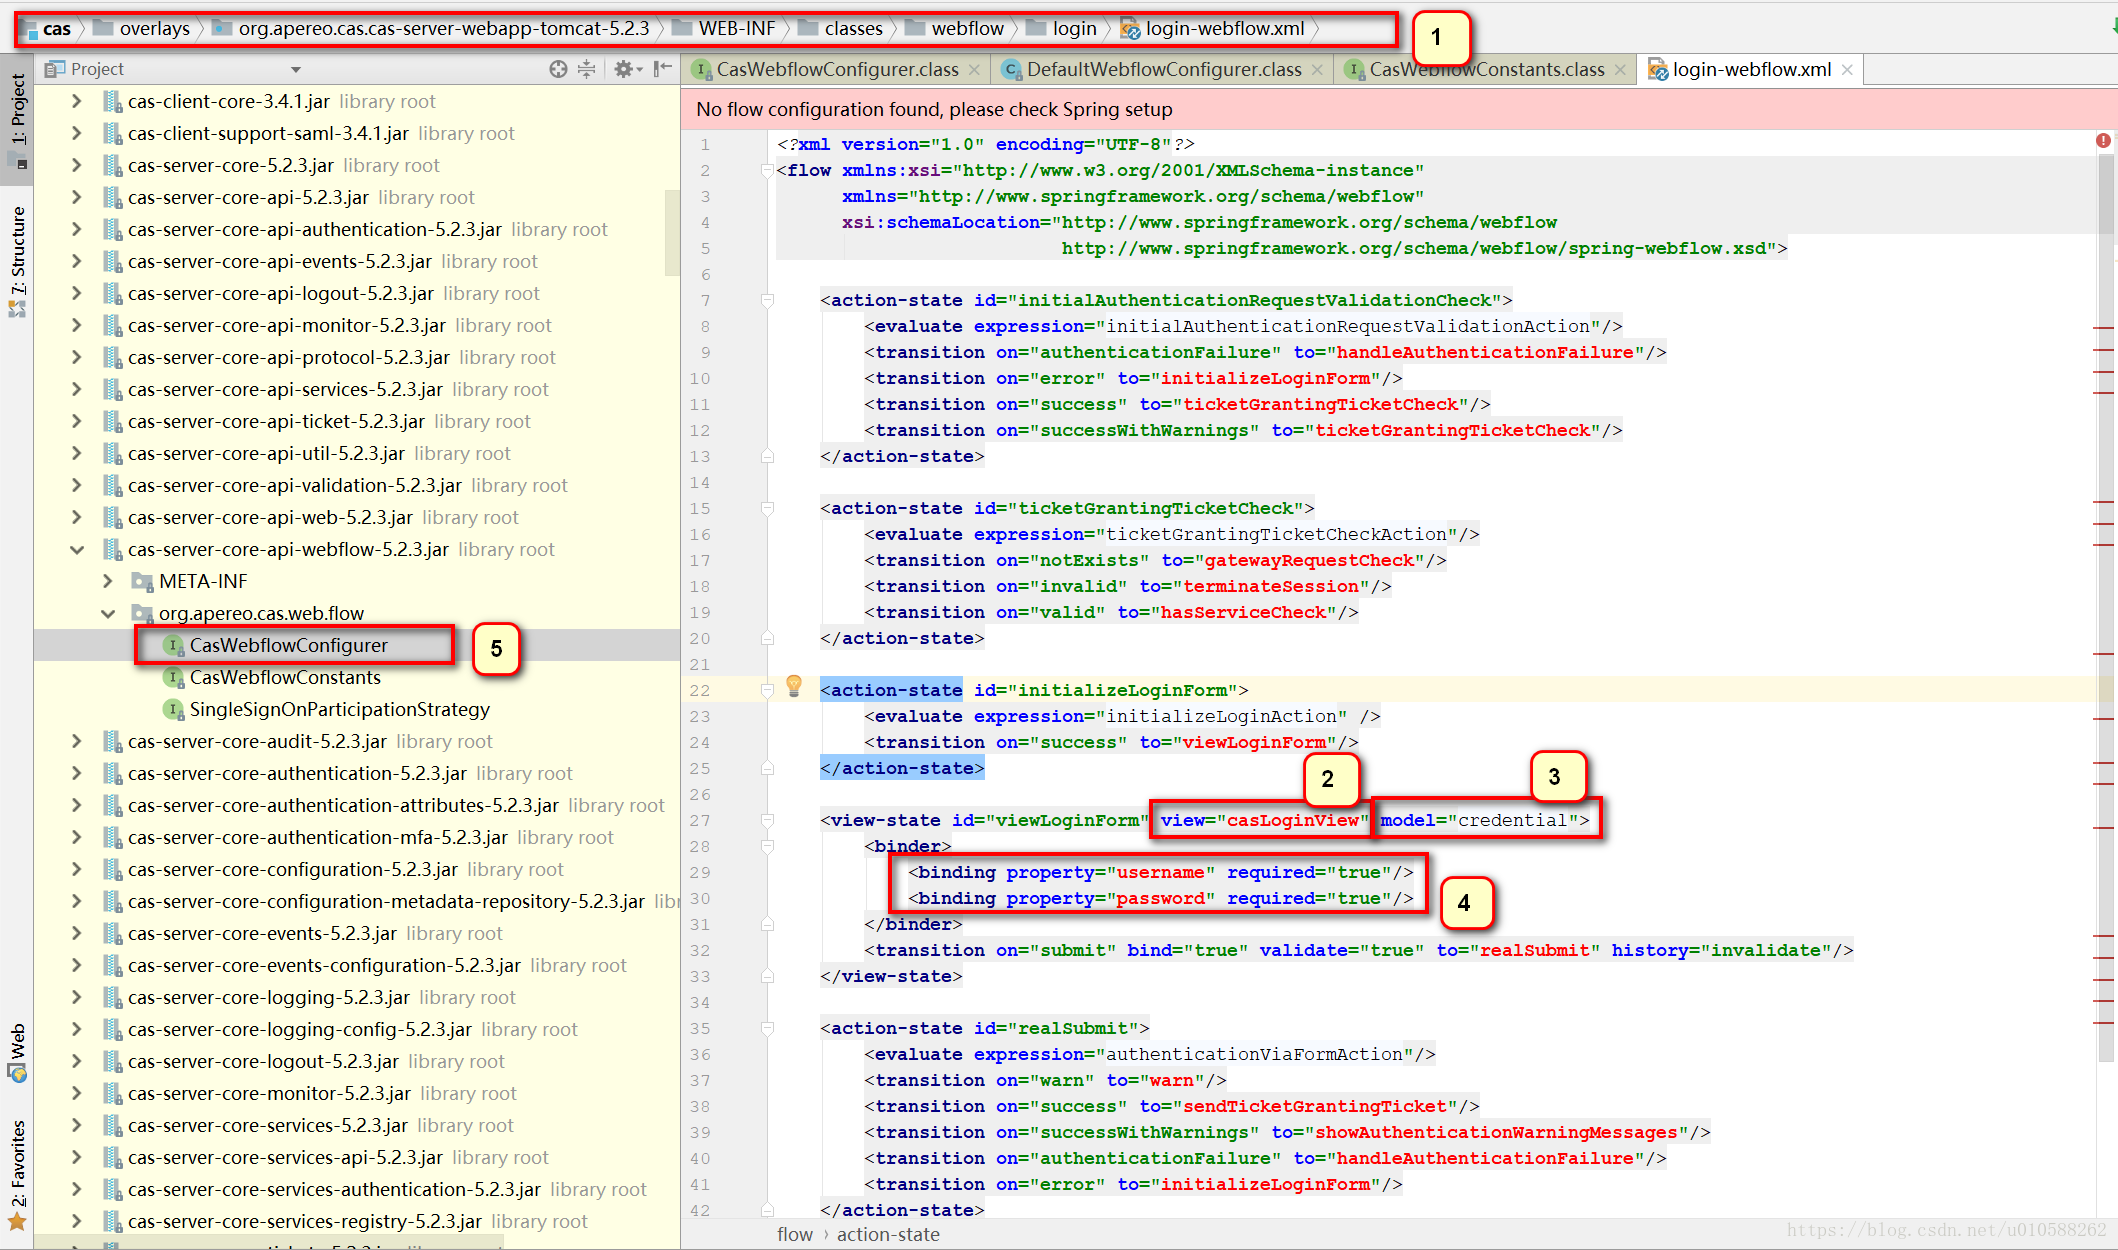
值得我们关注的地方我已标红:
1. login-webflow.xml的位置
2. 简单理解为对应的登录页面,咱们自定义的登录页面就叫casLoginView.xml,还记得吧
3. 3和4结合起来应该可以敏感地感觉到是把页面的username和password注入到credential这个model里面吧
4. 那credential这个model到底是哪个类呢,我在jar包里找了与cas webflow相关的类,找到了一个关键的配置接口CasWeflowConfigurer,它的继承类如下:
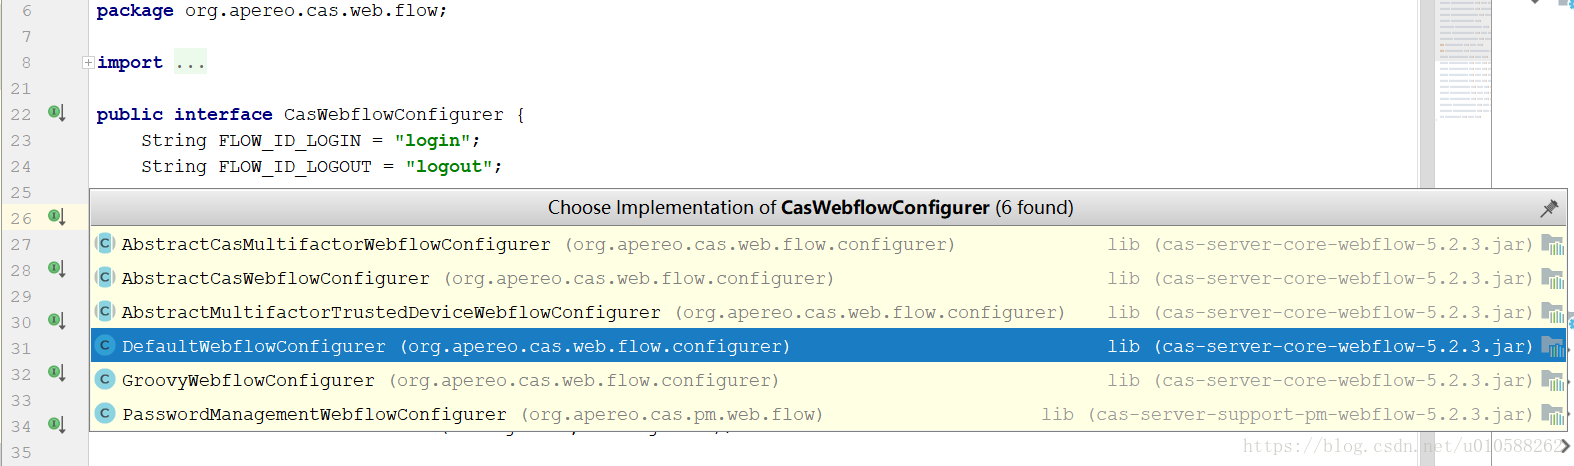
凭借着第六感我们应该去看一下DefaultWebflowConfigurer这个类吧,果然有发现:
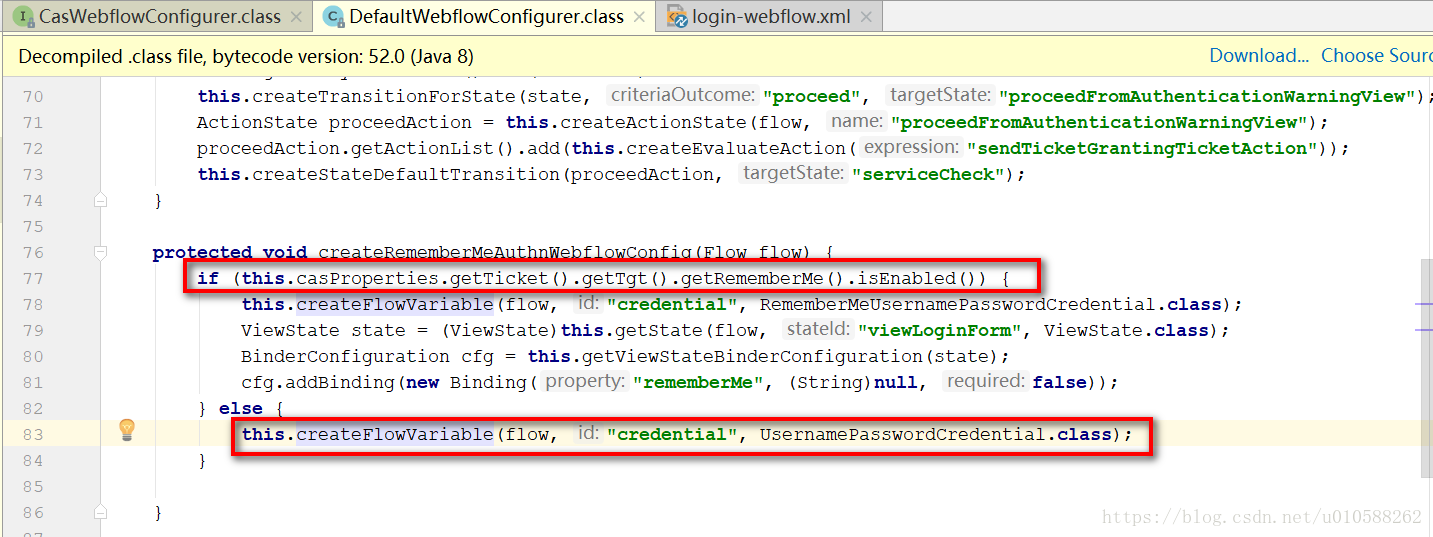
判断语句从字面理解就是有没有开启RememberMe的功能,记忆里咱们没有手动开启过,CAS默认的登录页面上也没有记住我的选项,所以credential代表的model应该就是UsernamePasswordCredential了,看类名也与注入进去的信息是匹配的,最保险的就是打断点啦,确实是这个类。
下面就开始一顿操作猛于虎了,怎么打断点跟代码推测配置啥的就不啰嗦了,帮大家解决问题是最主要的,在前面项目的基础上跟着下面操作就行了:
a. 重写credential,继承UsernamePasswordCredential,加上capcha属性
package com.hugeo.cas.capcha;

import org.apache.commons.lang.builder.HashCodeBuilder;
import org.apereo.cas.authentication.UsernamePasswordCredential;

import javax.validation.constraints.Size;

public class UsernamePasswordCaptchaCredential extends UsernamePasswordCredential{


    @Size(min = 5,max = 5, message = "require capcha")
    private String capcha;

    public String getCapcha() {
        return capcha;
    }

    public UsernamePasswordCaptchaCredential setCapcha(String capcha) {
        this.capcha = capcha;
        return this;
    }

    @Override
    public int hashCode() {
        return new HashCodeBuilder()
                .appendSuper(super.hashCode())
                .append(this.capcha)
                .toHashCode();
    }
}
b. 新建HugeoWebflowConfigurer继承DefaultWebflowConfigurer把咱们第一步重写的类用上
package com.hugeo.cas.capcha;
import org.apereo.cas.authentication.RememberMeUsernamePasswordCredential;
import org.apereo.cas.configuration.CasConfigurationProperties;
import org.apereo.cas.web.flow.configurer.DefaultWebflowConfigurer;
import org.springframework.context.ApplicationContext;
import org.springframework.webflow.definition.registry.FlowDefinitionRegistry;
import org.springframework.webflow.engine.Flow;
import org.springframework.webflow.engine.ViewState;
import org.springframework.webflow.engine.builder.BinderConfiguration;
import org.springframework.webflow.engine.builder.support.FlowBuilderServices;
public class HugeoWebflowConfigurer extends DefaultWebflowConfigurer {
public HugeoWebflowConfigurer(FlowBuilderServices flowBuilderServices, FlowDefinitionRegistry flowDefinitionRegistry, ApplicationContext applicationContext, CasConfigurationProperties casProperties) {
super(flowBuilderServices, flowDefinitionRegistry, applicationContext, casProperties);
}
@Override
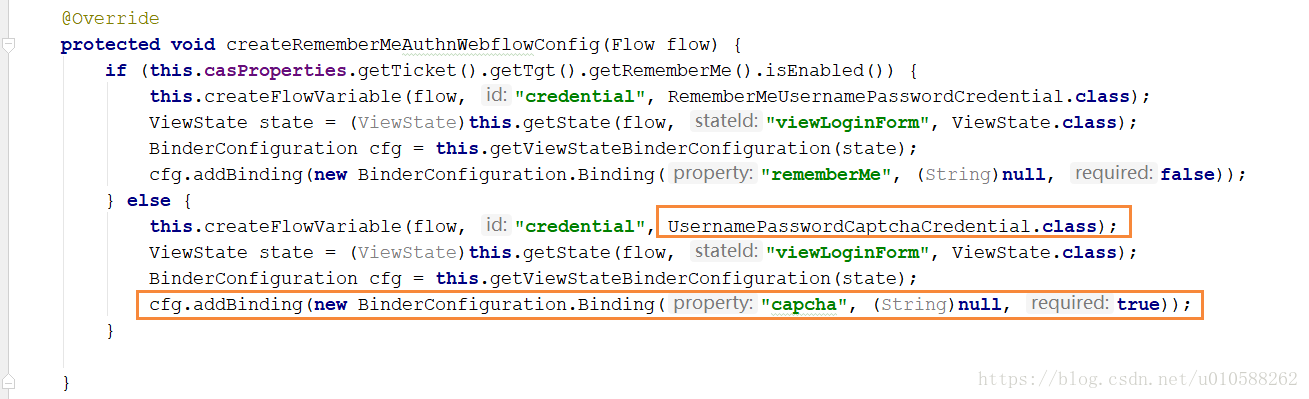
protected void createRememberMeAuthnWebflowConfig(Flow flow) {
if (this.casProperties.getTicket().getTgt().getRememberMe().isEnabled()) {
this.createFlowVariable(flow, "credential", RememberMeUsernamePasswordCredential.class);
ViewState state = (ViewState)this.getState(flow, "viewLoginForm", ViewState.class);
BinderConfiguration cfg = this.getViewStateBinderConfiguration(state);
cfg.addBinding(new BinderConfiguration.Binding("rememberMe", (String)null, false));
} else {
this.createFlowVariable(flow, "credential", UsernamePasswordCaptchaCredential.class);
ViewState state = (ViewState)this.getState(flow, "viewLoginForm", ViewState.class);
BinderConfiguration cfg = this.getViewStateBinderConfiguration(state);
cfg.addBinding(new BinderConfiguration.Binding("capcha", (String)null, true));
}
}
}
主要修改了这里,把原来的UsernamePasswordCredential换成了我们自己的UsernamePasswordCaptchaCredential,并且加上cpacha的bind,也可以在login-webflow.xml里面加,跟username,password类似的,在代码里加方便点,随意咯
c. 注册HugeoWebflowConfigurer
package com.hugeo.cas.capcha;

import org.apereo.cas.configuration.CasConfigurationProperties;
import org.apereo.cas.web.flow.CasWebflowConfigurer;
import org.apereo.cas.web.flow.config.CasWebflowContextConfiguration;
import org.springframework.beans.factory.annotation.Autowired;
import org.springframework.beans.factory.annotation.Qualifier;
import org.springframework.boot.autoconfigure.AutoConfigureBefore;
import org.springframework.boot.context.properties.EnableConfigurationProperties;
import org.springframework.context.ApplicationContext;
import org.springframework.context.annotation.Bean;
import org.springframework.context.annotation.Configuration;
import org.springframework.webflow.definition.registry.FlowDefinitionRegistry;
import org.springframework.webflow.engine.builder.support.FlowBuilderServices;

@Configuration("hugeoWebflowConfiguration")
@EnableConfigurationProperties(CasConfigurationProperties.class)
@AutoConfigureBefore(value = CasWebflowContextConfiguration.class)
public class HugeoWebflowConfiguration {
    @Autowired
    @Qualifier("logoutFlowRegistry")
    private FlowDefinitionRegistry logoutFlowRegistry;
    @Autowired
    @Qualifier("loginFlowRegistry")
    private FlowDefinitionRegistry loginFlowRegistry;
    @Autowired
    private ApplicationContext applicationContext;
    @Autowired
    private CasConfigurationProperties casProperties;

    @Autowired
    @Qualifier("builder")
    private FlowBuilderServices builder;

    @Bean("defaultWebflowConfigurer")
    public CasWebflowConfigurer customWebflowConfigurer() {
        final HugeoWebflowConfigurer c = new HugeoWebflowConfigurer(builder, loginFlowRegistry, applicationContext, casProperties);
        c.setLogoutFlowDefinitionRegistry(logoutFlowRegistry);
        c.initialize();
        return c;
    }
}
还记得咱们一开始说的了吗,configuration要怎么配置来着?

d. 接管身份验证,根据UsernamePasswordCaptchaCredential验证用户名密码验证码
这一步请参考mysql身份验证:https://blog.csdn.net/u010588262/article/details/79757609
在此基础上,我们把Login类再修改一下:
package com.hugeo.cas;


import com.hugeo.cas.capcha.UsernamePasswordCaptchaCredential;
import org.apereo.cas.authentication.Credential;
import org.apereo.cas.authentication.HandlerResult;
import org.apereo.cas.authentication.PreventedException;
import org.apereo.cas.authentication.handler.support.AbstractPreAndPostProcessingAuthenticationHandler;
import org.apereo.cas.authentication.principal.PrincipalFactory;
import org.apereo.cas.services.ServicesManager;
import org.springframework.jdbc.core.JdbcTemplate;
import org.springframework.jdbc.datasource.DriverManagerDataSource;
import org.springframework.security.crypto.bcrypt.BCryptPasswordEncoder;
import org.springframework.web.context.request.RequestContextHolder;
import org.springframework.web.context.request.ServletRequestAttributes;

import javax.security.auth.login.FailedLoginException;
import java.security.GeneralSecurityException;
import java.util.HashMap;
import java.util.Map;

public class Login extends AbstractPreAndPostProcessingAuthenticationHandler {

    public Login(String name, ServicesManager servicesManager, PrincipalFactory principalFactory, Integer order) {
        super(name, servicesManager, principalFactory, order);
    }

    @Override
    protected HandlerResult doAuthentication(Credential credential) throws GeneralSecurityException, PreventedException {
        UsernamePasswordCaptchaCredential mycredential1 = (UsernamePasswordCaptchaCredential) credential;

        String capcha = mycredential1.getCapcha();
        ServletRequestAttributes attributes = (ServletRequestAttributes) RequestContextHolder.getRequestAttributes();
        String right = attributes.getRequest().getSession().getAttribute("capcha").toString();
        if(!capcha.equals(right)){
            throw new FailedLoginException("验证码错误");
        }

        DriverManagerDataSource d=new DriverManagerDataSource();
        d.setDriverClassName("com.mysql.jdbc.Driver");
        d.setUrl("jdbc:mysql://127.0.0.1:3306/orange");
        d.setUsername("root");
        d.setPassword("123456");
        JdbcTemplate template=new JdbcTemplate();
        template.setDataSource(d);


        String username=mycredential1.getUsername();
        //查询数据库加密的的密码
        Map<String,Object> user = template.queryForMap("SELECT `password` FROM sys_user WHERE username = ?", mycredential1.getUsername());

        if(user==null){
            throw new FailedLoginException("没有该用户");
        }

        //返回多属性(暂时不知道怎么用,没研究)
        Map<String, Object> map=new HashMap<>();
        map.put("email", "[email protected]");

        BCryptPasswordEncoder encoder = new BCryptPasswordEncoder();
        if(encoder.matches(mycredential1.getPassword(),user.get("password").toString())){
            return createHandlerResult(mycredential1, principalFactory.createPrincipal(username, map), null);
        }
        throw new FailedLoginException("Sorry, login attemp failed.");
    }

    @Override
    public boolean supports(Credential credential) {
        return credential instanceof UsernamePasswordCaptchaCredential;
    }
}
e. 界面增加验证码
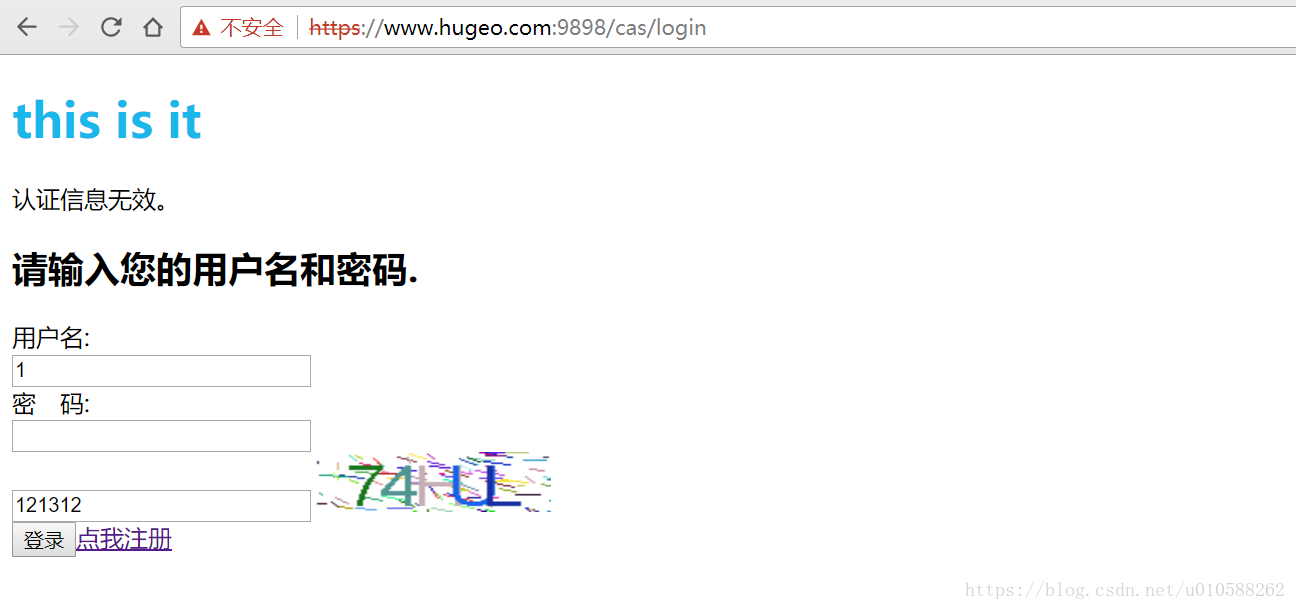
在咱们自定义登录页面的基础上,在casLoginView.html中添加:
<section class="row">
            <label for="capcha">验证码</label>
            <div>
                <input class="required"
                       id="capcha"
                       name="capcha"
                       size="25"
                       tabindex="3"
                       th:field="*{capcha}"
                       autocomplete="off"/>
                <img th:src="@{/capcha}" style="width: 160px;height:40px; ">
            </div>
</section>具体怎么生成验证码就不贴了啊,这个大家应该都有存货的,百度也行。上面img标签的src指向/capcha的,因为我生成验证码的controller方法是@GetMapping(value = "/capcha")
效果:

以上验证码相关内容参考了
https://blog.csdn.net/bitree1/article/details/55050545
https://blog.csdn.net/u010475041/article/details/78420322?locationNum=7&fps=1
好了,此篇终于完结撒花了