文章目录
表单
针对一般元素,比如div,span 、p、 img等,采用的是单向绑定:
v-bind只要把数据绑定到视图中就可以,但是对于表单这种交互比较强的元素或组件,我们一般可能需求双向绑定,即:用户对视图元素的操作同时更新数据。
v-model 在内部为不同的输入元素使用不同的属性和事件来处理数据
text 和 textrea
<!DOCTYPE html>
<html lang="en">

<head>
    <meta charset="UTF-8">
    <meta name="viewport" content="width=device-width, initial-scale=1.0">
    <meta http-equiv="X-UA-Compatible" content="ie=edge">
    <title>Document</title>
    <style>

    </style>
    <!-- 通过script的方式引入vue -->
    <!-- 开发环境版本,包含了有帮助的命令行警告 -->
    <script src="https://cdn.jsdelivr.net/npm/vue/dist/vue.js"></script>
</head>

<body>
    <div id="app">
        <input type="text" v-model="v1">
        <textarea name="" id="" v-model="v2" cols="30" rows="10"></textarea>
    </div>

    <script>
        let app = new Vue({
            //el指定id为app的元素
            el: "#app",
            //template替换的是id为app的元素的所有内容

            data: {
                v1:'aaa',
                v2:'bbbb'
            },

        })
    </script>
</body>

</html>
效果图如下

checkbox 和radio
checkbox 和 radio 使用checked属性和change事件
- 单选框绑定一个值
<!DOCTYPE html>
<html lang="en">

<head>
    <meta charset="UTF-8">
    <meta name="viewport" content="width=device-width, initial-scale=1.0">
    <meta http-equiv="X-UA-Compatible" content="ie=edge">
    <title>Document</title>
    <style>

    </style>
    <!-- 通过script的方式引入vue -->
    <!-- 开发环境版本,包含了有帮助的命令行警告 -->
    <script src="https://cdn.jsdelivr.net/npm/vue/dist/vue.js"></script>
</head>

<body>
    <div id="app">
        <input type="radio" name="" id="" v-model="v3"value="男">男
        <input type="radio" name="" id="" v-model="v3" value="女">女
        <button @click="getData">按钮</button>
    </div>

    <script>
        let app = new Vue({
            //el指定id为app的元素
            el: "#app",
            //template替换的是id为app的元素的所有内容

            data: {
                v1:'aaa',
                v2:'bbbb',
                v3:'男'
            },
            methods:{
                getData(){
                    console.log(this.v3);
                }
            }

        })
    </script>
</body>

</html>
效果如下
- 多选框绑定到一个布尔值或者数组
<!DOCTYPE html>
<html lang="en">

<head>
    <meta charset="UTF-8">
    <meta name="viewport" content="width=device-width, initial-scale=1.0">
    <meta http-equiv="X-UA-Compatible" content="ie=edge">
    <title>Document</title>
    <style>

    </style>
    <!-- 通过script的方式引入vue -->
    <!-- 开发环境版本,包含了有帮助的命令行警告 -->
    <script src="https://cdn.jsdelivr.net/npm/vue/dist/vue.js"></script>
</head>

<body>
    <div id="app">
        <input type="radio" name="" id="" v-model="v3"value="男">男
        <input type="radio" name="" id="" v-model="v3" value="女">女
        <button @click="getData">按钮</button>
        <!--  -->
        <hr>
        <!-- 单选 -->
        <input type="checkbox" v-model="v4">同意
        <hr>
        <!-- 多选 -->
        <input type="checkbox" name="" id="" v-model="v5" value="足球">足球
        <input type="checkbox" name="" id="" v-model="v5" value="篮球">篮球
    </div>

    <script>
        let app = new Vue({
            //el指定id为app的元素
            el: "#app",
            //template替换的是id为app的元素的所有内容

            data: {
                v1:'aaa',
                v2:'bbbb',
                v3:'男',
                v4:true,
                v5:['足球','音乐']
            },
            methods:{
                getData(){
                    console.log(this.v3);
                }
            }

        })
    </script>
</body>

</html>
效果如下
select
select字段将value 作为prop并将change作为事件
扫描二维码关注公众号,回复: 10948363 查看本文章
- 单选绑定到值,多选绑定到数组
<!DOCTYPE html>
<html lang="en">

<head>
    <meta charset="UTF-8">
    <meta name="viewport" content="width=device-width, initial-scale=1.0">
    <meta http-equiv="X-UA-Compatible" content="ie=edge">
    <title>Document</title>
    <style>

    </style>
    <!-- 通过script的方式引入vue -->
    <!-- 开发环境版本,包含了有帮助的命令行警告 -->
    <script src="https://cdn.jsdelivr.net/npm/vue/dist/vue.js"></script>
</head>

<body>
    <div id="app">
        <!-- 单选 -->
        <select name="" id="" v-model="v3">
            <option value="男">男</option>
            <option value="女">女</option>
        </select>
        <!-- 多选 -->
        <select name="" id="" v-model="v5" multiple>
            <option value="足球">足球</option>
            <option value="音乐">音乐</option>
        </select>
        <button @click="getData">按钮</button>
    </div>

    <script>
        let app = new Vue({
            //el指定id为app的元素
            el: "#app",
            //template替换的是id为app的元素的所有内容

            data: {
                v1:'aaa',
                v2:'bbbb',
                v3:'女',
                v4:true,
                v5:['足球','音乐']
            },
            methods:{
                getData(){
                    console.log(this.v3,this.v5);
                }
            }

        })
    </script>
</body>

</html>
效果如下
computed与watch
computed
在实际的应用中,我们会有一些原始数据,同时在应用中又会有一些数据是根据某些原始数据派生出来的一种情况,vue定义一个专门用来处理这种派生的数据的选项, computed
<!DOCTYPE html>
<html lang="en">
<head>
<meta charset="UTF-8">
<meta name="viewport" content="width=device-width, initial-scale=1.0">
<meta http-equiv="X-UA-Compatible" content="ie=edge">
<title>Document</title>
<style>
</style>
<!-- 通过script的方式引入vue -->
<!-- 开发环境版本,包含了有帮助的命令行警告 -->
<script src="https://cdn.jsdelivr.net/npm/vue/dist/vue.js"></script>
</head>
<body>
<div id="app">
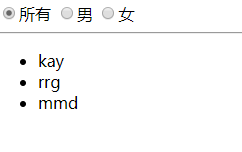
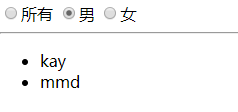
<label ><input type="radio" v-model="gender" value="">所有</label>
<label ><input type="radio" v-model="gender" value="男">男</label>
<label ><input type="radio" v-model="gender" value="女">女</label>
<hr>
<ul>
<li v-for="user of showUsers">
{{user.username}}
</li>
</ul>
</div>
<script>
let app = new Vue({
//el指定id为app的元素
el: "#app",
//template替换的是id为app的元素的所有内容
data: {
gender:"",
users:[
{id:1,username:"kay",gender:"男"},
{id:2,username:"rrg",gender:"女"},
{id:3,username:"mmd",gender:"男"}
]
},
computed:{
//计算属性,这里的函数并不是给我们直接调用的,而是作为属性的get,set熟属性存在
showUsers(){
return this.gender===''?[...this.users]:this.users.filter(user=>user.gender===this.gender);
}
}
})
</script>
</body>
</html>
效果如下:
- 计算属性类似getter和setter ,当访问某个计算属性的时候,就会调用computed中有的函数,函数的返回值将作为该计算属性的值。
- 计算属性的值依赖计算函数中依赖的其他响应式数据
- 计算属性的值可以缓存,如果依赖的其他相应数据没有发生变化,但可以多次访问该计算属性,的到结果是最近一次变化的产生的值(相对于调用方法的到结果在某些时候性能要好一些)
<!DOCTYPE html>
<html lang="en">

<head>
    <meta charset="UTF-8">
    <meta name="viewport" content="width=device-width, initial-scale=1.0">
    <meta http-equiv="X-UA-Compatible" content="ie=edge">
    <title>Document</title>
    <style>

    </style>
    <!-- 通过script的方式引入vue -->
    <!-- 开发环境版本,包含了有帮助的命令行警告 -->
    <script src="https://cdn.jsdelivr.net/npm/vue/dist/vue.js"></script>
</head>

<body>
    <div id="app">
        <button @click="getNow">按钮1</button>
        {{now1}}
    </div>

    <script>
        let app = new Vue({
            //el指定id为app的元素
            el: "#app",
            //template替换的是id为app的元素的所有内容

            data: {

               now1:Date.now()
            },
            computed:{
                //计算属性,这里的函数并不是给我们直接调用的,而是作为属性的get,set熟属性添加。
                //computed 计算  所依赖的属性值无变化,有时候会缓存。
                getNow(){
                    this.now1=Date.now();
                }
            }


        })
    </script>
</body>

</html>
- 有时候,这种派生数据既有get需求,也有set需求
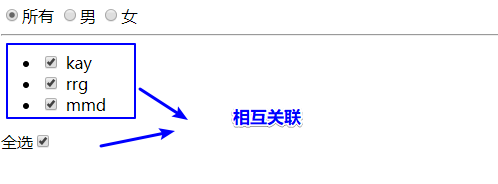
案例:全选
<!DOCTYPE html>
<html lang="en">

<head>
    <meta charset="UTF-8">
    <meta name="viewport" content="width=device-width, initial-scale=1.0">
    <meta http-equiv="X-UA-Compatible" content="ie=edge">
    <title>Document</title>
    <style>

    </style>
    <!-- 通过script的方式引入vue -->
    <!-- 开发环境版本,包含了有帮助的命令行警告 -->
    <script src="https://cdn.jsdelivr.net/npm/vue/dist/vue.js"></script>
</head>

<body>
    <div id="app">
        <label ><input type="radio" v-model="gender" value="">所有</label>
        <label ><input type="radio" v-model="gender" value="男">男</label>
        <label ><input type="radio" v-model="gender" value="女">女</label>
        <hr>
        <ul>
            <li v-for="user of showUsers">
                 <input type="checkbox" name="" id="" v-model="user.checked">
                {{user.username}}

            </li>

        </ul>
        <label for="">全选<input type="checkbox" v-model="checkAll"></label>
    </div>

    <script>
        let app = new Vue({
            //el指定id为app的元素
            el: "#app",
            //template替换的是id为app的元素的所有内容

            data: {
               gender:"",
               users:[
                   {id:1,username:"kay",gender:"男",checked:false},
                   {id:2,username:"rrg",gender:"女",checked:false},
                   {id:3,username:"mmd",gender:"男",checked:false}
               ]
            },
            computed:{
                //计算属性,这里的函数并不是给我们直接调用的,而是作为属性的get,set熟属性添加。
                showUsers(){
                    return this.gender===''?[...this.users]:this.users.filter(user=>user.gender===this.gender);
                },
                checkAll:{
                    get(){
                        console.log('get');
                        return this.users.every(user=>user.checked);
                    },
                    set(newValue){
                        console.log(newValue);
                        this.users=this.users.map(user=>{
                            //返回一个新的对象
                            return {
                                ...user,
                                checked:newValue
                            }
                        })
                    }
                }
            }


        })
    </script>
</body>

</html>
效果如下
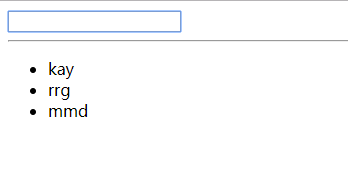
watch
当派生的数据是通过异步的方式除了的时候,需要用到watch。
<!DOCTYPE html>
<html lang="en">

<head>
    <meta charset="UTF-8">
    <meta name="viewport" content="width=device-width, initial-scale=1.0">
    <meta http-equiv="X-UA-Compatible" content="ie=edge">
    <title>根据关键词进行筛选项目 异步</title>
    <style>

    </style>
    <!-- 通过script的方式引入vue -->
    <!-- 开发环境版本,包含了有帮助的命令行警告 -->
    <script src="https://cdn.jsdelivr.net/npm/vue/dist/vue.js"></script>
</head>

<body>
    <div id="app">
       <input type="text" v-model="keyWord">
        <hr>
        <ul>
            <li v-for="user of showUsers">

                {{user.username}}

            </li>

        </ul>

    </div>

    <script>
        let app = new Vue({
            //el指定id为app的元素
            el: "#app",
            //template替换的是id为app的元素的所有内容

            data: {
               keyWord:"",
               users:[
                   {id:1,username:"kay",gender:"男",checked:false},
                   {id:2,username:"rrg",gender:"女",checked:false},
                   {id:3,username:"mmd",gender:"男",checked:false}
               ],
               showUsers:[]
            },
            watch:{
                keyWord(newVal,oldVal){
                    //模拟网络请求
                    setTimeout(_=>{
                        this.showUsers=this.users.filter(user=>user.username.includes(newVal));
                    },1000);
                }
            }


        })
    </script>
</body>

</html>
效果如下
- 多层监听 可以使用字符串 + 点语法 ()
watch:{
  //监听 a下面的子元素b 下面的子元素的c


	'a.b.c':function(){
  	//...
  }
}
- 深度监听 watch只能对当前指定的值进行一层监听,如果需要对对象进行深度监听
watch:{
  //对对象a 进行深度监听
	a:{
  	handler(){
    	console.log('a deep');
    },
    deep:true;
  }

}
组件
组件的注册
在vue中,我们通过new Vue来创建一个组件,不过通常它是作为整个应用的顶层根组件存在的,我们还可以通过另外的方式来注册一个更为通用的组件。
Vue.component()
Vue.component('组件名称',{组件选项})
全局组件与局部组件
通过Vue.component注册的组件,我们称为全局组件,因为我可以在任意范围内使用,我们还可以定义局部组件。
new vue({
...,
  components:{
		'组件名称':{组件选项}
}
})
在一个组件内部通过components选项注册的组件是局部组件,只能在当前components选项所在的组件内部使用。 注意:局部注册的组件只能在当前注册组件中使用,不能在他的子组件中使用。
<!DOCTYPE html>
<html lang="en">

<head>
    <meta charset="UTF-8">
    <meta name="viewport" content="width=device-width, initial-scale=1.0">
    <meta http-equiv="X-UA-Compatible" content="ie=edge">
    <title>Document</title>
    <style>

    </style>
    <!-- 通过script的方式引入vue -->
    <!-- 开发环境版本,包含了有帮助的命令行警告 -->
    <script src="https://cdn.jsdelivr.net/npm/vue/dist/vue.js"></script>
</head>

<body>
    <div id="app">
        <!-- 使用自定义组件 -->
        <kay-compontent-1></kay-compontent-1>
         <kay-compontent-2></kay-compontent-2>
         <!-- kay-compontent-4 会报错,因为不在kay-compontent-2 组件中使用-->
         <kay-compontent-4></kay-compontent-4>

    </div>

    <script>

        //注册自定义组件(全局组件)
        Vue.component('kay-compontent-1',{
            template:`
                <div>kay-compontent-1</div>
            `
        })
         Vue.component('kay-compontent-2',{
         template:`
         <div>kay-compontent-2</div>
         `,
         //局部组件 ,只能在kay-compontent-2中使用
         components:{
             'kay-compontent-4':{
             template:`
             <div>kay-compontent-4</div>
             `
             }
         }
         })
        //根组件
        let app = new Vue({
        //el指定id为app的元素
        el: "#app",
        //注册自定义组件(局部组件)
        components:{
            'kay-compontent-3':{
                template:`
                <div>kay-compontent-3</div>
                `
            }
        },

        data: {

        }
        })
    </script>
</body>

</html>
报错下面如下
data
在非new Vue的组件中,data必须为函数,函数返回值必须是一个对象,作为组件的最终data
<!DOCTYPE html>
<html lang="en">

<head>
    <meta charset="UTF-8">
    <meta name="viewport" content="width=device-width, initial-scale=1.0">
    <meta http-equiv="X-UA-Compatible" content="ie=edge">
    <title>Document</title>
    <style>

    </style>
    <!-- 通过script的方式引入vue -->
    <!-- 开发环境版本,包含了有帮助的命令行警告 -->
    <script src="https://cdn.jsdelivr.net/npm/vue/dist/vue.js"></script>
</head>

<body>
    <div id="app">
        <h1>{{val}}</h1>
        <!-- 使用自定义组件 -->
        <kay-compontent-1></kay-compontent-1>
         <kay-compontent-2></kay-compontent-2>


    </div>

    <script>

        //注册自定义组件(全局组件)
        Vue.component('kay-compontent-1',{
            //data数据必须定义成函数 在全局组件中,return的值就是这个组件可以用的data数据
            data(){
                return {
                    exp1: 'kay-1',
                }
            },
            template:`
                <div>{{exp1}}</div>
            `
        })
         Vue.component('kay-compontent-2',{
         template:`
         <div>kay-compontent-2</div>
         `,
         //局部组件 ,只能在kay-compontent-2中使用
         components:{
             'kay-compontent-4':{
             template:`
             <div>kay-compontent-4</div>
             `
             }
         }
         })
        //根组件
        let app = new Vue({
            //el指定id为app的元素
            el: "#app",
            //注册自定义组件(局部组件)
            components:{
                'kay-compontent-3':{
                    template:`
                    <div>kay-compontent-3</div>
                    `
                }
            },

            data: {
                val:'kay',
            }
        })
    </script>
</body>

</html>

props
组件中内部私有数据存储中组件data中,通过外部传入的数据,则通过props选项接收。
<!DOCTYPE html>
<html lang="en">
<head>
<meta charset="UTF-8">
<meta name="viewport" content="width=device-width, initial-scale=1.0">
<meta http-equiv="X-UA-Compatible" content="ie=edge">
<title>Document</title>
<style>
</style>
<!-- 通过script的方式引入vue -->
<!-- 开发环境版本,包含了有帮助的命令行警告 -->
<script src="https://cdn.jsdelivr.net/npm/vue/dist/vue.js"></script>
</head>
<body>
<div id="app">
<!-- 使用自定义组件 -->
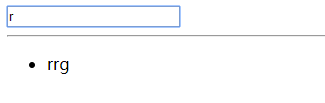
<kay-circle :r="n1"></kay-circle>
<hr>
<kay-circle :r="n2"></kay-circle>
</div>
<script>
//根组件
let app = new Vue({
//el指定id为app的元素
el: "#app",
//注册自定义组件(局部组件)
components:{
'kay-circle':{
// 从外部的参数r
props:['r'],
data(){
//可以使用this.r 打印变量r
console.log(this.r);
return {pi:3.14}
},
template:`<div>r:{{r}}->{{pi*r*r}}</div>`
}
},
//组件内部的数据 放在data中
data: {
n1:10,
n2:100
}
})
</script>
</body>
</html>
效果如下:
注意点:
- 如果传入达props值为一个表达式,则必须使用v-bind 如果不绑定,则是普通字符串
- 组件中的data和props数据都可以通过组件实例进行直接访问
- data中的key与props中的key不能冲突。(变量名不冲突)
组件的通信
注意:不要修改props传入的数据 。父组件通过props传入数据到子组件内部,但是子组件内部不要修改外部传入的props,vue提供了一种事件机制通知父级更新,父级中使用子组件的时候监听对应的事件绑定对应的除了函数即可。
<!DOCTYPE html>
<html lang="en">

<head>
    <meta charset="UTF-8">
    <meta name="viewport" content="width=device-width, initial-scale=1.0">
    <meta http-equiv="X-UA-Compatible" content="ie=edge">
    <title>组件通信</title>
    <style>

    </style>
    <!-- 通过script的方式引入vue -->
    <!-- 开发环境版本,包含了有帮助的命令行警告 -->
    <script src="https://cdn.jsdelivr.net/npm/vue/dist/vue.js"></script>
</head>

<body>
    <div id="app">
        <p>父组件:{{quantity}}</p>
        <kay-child :quantity="initQuantity" @increment="appIncrement"></kay-child>
        <kay-child :quantity="initQuantity" @increment="appIncrement"></kay-child>

    </div>

    <script>
        //定义一个对象 子组件所使用
        const child={
            //外部传入的变量
            props:['quantity'],
            data(){
                return {
                   n:this.quantity
                }
            },
            template:`
                <div>
                    <p>子组件:{{n}}</p>
                    <button @click="increment">按钮</button>
                </div>
            `,
            methods:{
                //此时
                increment(){
                    this.n++;
                    //往父级组件传播事件和参数
                    this.$emit('increment',this.n);
                }
            }
        };

        //根组件
        let app = new Vue({
        //el指定id为app的元素
        el: "#app",
        //注册自定义组件(局部组件)
        components:{
            'kay-child':child
        },
        //组件内部的数据 放在data中
        data: {
           quantity:0,
           initQuantity:0
        },
        methods:{
            appIncrement(v){
                //v是子组件的传递的参数
                console.log(v);
                this.quantity++;
            }
        }
        })
    </script>
</body>

</html>

$emit()
vue 为每个组件对象提供了一个内置方法$emit, 它等同于自定义事件中的new Event,trigger等。
this.$emit('自定义事件名称',事件数据)
组件双绑的实现
虽然并不推荐在组件内部修改 props ,但是,有的时候确实希望组件内部状态变化的时候改变 props ,我们可以通过子组件触发事件,父级监听事件来达到这个目的,不过过程会比较繁琐,vue 提供了一些操作来简化这个过程
v-model
v-model 是vue提供达一个用于实现数据双向绑定的指令,用来简化props到data,data到props的操作流程。
<!DOCTYPE html>
<html lang="en">

<head>
    <meta charset="UTF-8">
    <meta name="viewport" content="width=device-width, initial-scale=1.0">
    <meta http-equiv="X-UA-Compatible" content="ie=edge">
    <title>组件双绑</title>
    <style>
        .kay-radio {
        width: 20px;
        height: 20px;
        background-color: #cccccc;
        }
        .kay-radio.checked {
        background-color: #92beee;
        }
        .plane {
        border: 1px solid #000000;
        width: 300px;
        }
        .plane .header {
        width: 100%;
        height: 30px;
        background: #cccccc;
        }
        .plane .content {
        height: 100px;
        width: 100%;
        display: none;
        }
        .plane.expanded .content {
        display: block;
        }
    </style>
    <!-- 通过script的方式引入vue -->
    <!-- 开发环境版本,包含了有帮助的命令行警告 -->
    <script src="https://cdn.jsdelivr.net/npm/vue/dist/vue.js"></script>
</head>

<body>
    <div id="app">
       <kay-radio v-model="val"></kay-radio>
       <br><br><br>
        <kay-plane :expanded="val"></kay-plane>
    </div>

    <script>
        //定义一个对象 子组件所使用
        const kayRadio= {
            model:{
                //指定v-model绑定的prop属性
                prop:'checked',
                //指定内部触发的南哥事件会修改指定的prop的值。
                event:'check'
            },
            //外部传入的变量
            props: ['checked'],
            data() {
                return {
                    status:this.checked
                }
            },
            template: `
                <div class="kay-radio" :class="{'checked':status}" @click="changeStatus">

                </div>
            `,
            methods: {
                //此时
               changeStatus(){
                   //取反
                   this.status=!this.status;
                   //传播事件到父组件
                   this.$emit('check',this.status);
               }
            }
        };
        //子组件2  kay-plane 面板组件
        const kayPlane={
            //外部传递数据 expanded
            props:['expanded'],
            template:`
                <div class="plane" :class="{'expanded': expanded}">
                    <div class="header"></div>
                    <div class="content"></div>
                </div>
            `,
        }
        //根组件
        let app = new Vue({
            //el指定id为app的元素
            el: "#app",
            //注册自定义组件(局部组件)
            components: {
                'kay-radio': kayRadio,
                'kay-plane':kayPlane
            },
            //组件内部的数据 放在data中
            data: {
                val:true,
            },
            methods: {

            }
        })
    </script>
</body>

</html>
效果如下

- model 选项
- prop指定要绑定的属性,默认是value
- event 指定要绑定触发的事件,默认是input事件
.sync (处理多个prop外部绑定数据)
通过v-model 来进行双向绑定,会给状态维护带来一定的问题,因为修改比较隐蔽,同时只能处理一个prop的绑定,我们还可以通过另外一种方式来达到这个目的。
update:[prop]
这里事件名称要使用update加上prop名称的格式
<!DOCTYPE html>
<html lang="en">

<head>
    <meta charset="UTF-8">
    <meta name="viewport" content="width=device-width, initial-scale=1.0">
    <meta http-equiv="X-UA-Compatible" content="ie=edge">
    <title>组件双绑</title>
    <style>
        .kay-radio {
        width: 50px;
        height: 50px;
        border: 5px solid #000000;
        background-color: #ffffff;
        }
        .kay-radio.checked {
        border-color: green;
        }
        .kay-radio.disabled {
        background-color: #cccccc;
        }
    </style>
    <!-- 通过script的方式引入vue -->
    <!-- 开发环境版本,包含了有帮助的命令行警告 -->
    <script src="https://cdn.jsdelivr.net/npm/vue/dist/vue.js"></script>
</head>

<body>
    <div id="app">
      <p>val1:{{val1}}</p>
      <p>val2:{{val2}}</p>
      <hr>
      <kay-radio :checked.sync="val1" :disabled.sync="val2"></kay-radio>
    </div>

    <script>
        //定义一个对象 子组件所使用
        const kayRadio= {

            //外部传入的变量 checked disabled
            props: ['checked','disabled'],
            data() {
                return {
                    status:this.checked,
                    dis:this.disabled
                }
            },
            template: `
                <div class="kay-radio" :class="{'checked':status,'disabled':dis}" @click="changeDis" @mouseover="setChecked" @mouseout="removeChecked">

                </div>
            `,
            methods: {
                setChecked(){
                    this.status=true;
                    this.$emit('update:checked',this.status);
                },
                removeChecked(){
                    this.status=false;
                    this.$emit('update:checked',this.status);

                },
                //disabled
                changeDis(){
                    this.dis=!this.dis;
                    this.$emit('update:disabled',this.dis);
                }
            }
        };

        //根组件
        let app = new Vue({
            //el指定id为app的元素
            el: "#app",
            //注册自定义组件(局部组件)
            components: {
                'kay-radio': kayRadio,

            },
            //组件内部的数据 放在data中
            data: {
                val1:false,
                val2:false,
            },
            methods: {

            }
        })
    </script>
</body>

</html>
效果如下

插槽
默认情况下,组件模版解析后会替换整个组件内容,如果我们想在组件引用被包含的内容,可以通过vue提供的内置组件slot来获取。
具名插槽
使用内置组件template与v-slot指令进行配置,用来命名插槽,在组件模版中,通过
<slot name="插槽名字">来使用。
<!DOCTYPE html>
<html lang="en">

<head>
    <meta charset="UTF-8">
    <meta name="viewport" content="width=device-width, initial-scale=1.0">
    <meta http-equiv="X-UA-Compatible" content="ie=edge">
    <title>组件双绑</title>
    <style>
        .dialog {
        position: fixed;
        left: 50%;
        top: 30%;
        transform: translateX(-50%) translateY(-50%) ;
        border-radius: 2px;
        box-shadow: 0 1px 3px rgba(0,0,0,.3);
        box-sizing: border-box;
        background: #fff;
        width: 30%;
        }
        .dialog_header {
        padding: 20px 20px 0;
        text-align: left;
        }
        .dialog_title {
        font-size: 16px;
        font-weight: 700;
        color: #1f2d3d;
        }
        .dialog_content {
        padding: 30px 20px;
        color: #48576a;
        font-size: 14px;
        text-align: left;
        }
        .dialog_close_btn {
        position: absolute;
        right: 10px;
        top: 5px;
        }
        .dialog_close_btn:before {
        content: 'x';
        color: #999;
        font-size: 20px;
        cursor: pointer;
        }
    </style>
    <!-- 通过script的方式引入vue -->
    <!-- 开发环境版本,包含了有帮助的命令行警告 -->
    <script src="https://cdn.jsdelivr.net/npm/vue/dist/vue.js"></script>
</head>

<body>
    <div id="app">
        <kay-dialog>
            <!--  -->
            <template v-slot:title>
                <h1>这是标题</h1>
            </template>
            <!-- 默认写default -->
            <template v-slot:default>
                <p>这是内容</p>
            </template>
        </kay-dialog>
    </div>

    <script>
        //定义一个对象 子组件所使用
        const Dialog={
            props:['title'],
            template:`
                <div class="dialog">
                    <i class="dialog_close_btn"></i>
                    <div class="dialog_header">
                        <slot name="title"></slot>
                    </div>
                    <div class="dialog_content">
                        <slot></slot>
                    </div>
                </div>
            `,
        };
        //根组件
        let app = new Vue({
            //el指定id为app的元素
            el: "#app",
            //注册自定义组件(局部组件)
            components: {
                'kay-dialog': Dialog,

            },
            //组件内部的数据 放在data中

        })
    </script>
</body>

</html>

作用域插槽
组件内部与组件包含的内容属于不同的作用域(被包含的内容是组件父级下的作用域)
<!DOCTYPE html>
<html lang="en">

<head>
    <meta charset="UTF-8">
    <meta name="viewport" content="width=device-width, initial-scale=1.0">
    <meta http-equiv="X-UA-Compatible" content="ie=edge">
    <title>组件双绑</title>
    <style>
        .dialog {
            position: fixed;
            left: 50%;
            top: 30%;
            transform: translateX(-50%) translateY(-50%);
            border-radius: 2px;
            box-shadow: 0 1px 3px rgba(0, 0, 0, .3);
            box-sizing: border-box;
            background: #fff;
            width: 30%;
        }

        .dialog_header {
            padding: 20px 20px 0;
            text-align: left;
        }

        .dialog_title {
            font-size: 16px;
            font-weight: 700;
            color: #1f2d3d;
        }

        .dialog_content {
            padding: 30px 20px;
            color: #48576a;
            font-size: 14px;
            text-align: left;
        }

        .dialog_close_btn {
            position: absolute;
            right: 10px;
            top: 5px;
        }

        .dialog_close_btn:before {
            content: 'x';
            color: #999;
            font-size: 20px;
            cursor: pointer;
        }
    </style>
    <!-- 通过script的方式引入vue -->
    <!-- 开发环境版本,包含了有帮助的命令行警告 -->
    <script src="https://cdn.jsdelivr.net/npm/vue/dist/vue.js"></script>
</head>

<body>
    <div id="app">
        <kay-dialog>
            <!--  -->
            <template v-slot:title>
                <h1>用户列表-{{title}}</h1>
            </template>
            <!-- 默认写default -->
            <template v-slot:default="data">
                <p>用户的姓名:{{data.user.username}}</p>
            </template>
        </kay-dialog>
    </div>

    <script>
        //定义一个对象 子组件所使用
        const Dialog = {
            props: ['title'],
            data(){
                return {
                  users: [
                  {id: 1, username: '1', gender: '男',checked:false},
                  {id: 2, username: '2', gender: '男',checked:false},
                  {id: 3, username: '3', gender: '男',checked:false},
                  {id: 4, username: '4', gender: '男',checked:false},
                  {id: 5, username: '5', gender: '女',checked:false},
                  {id: 6, username: '6', gender: '女',checked:false}
                  ]
                }
            },
            template: `
                <div class="dialog">
                    <i class="dialog_close_btn"></i>
                    <div class="dialog_header">
                        <slot name="title"></slot>
                    </div>
                    <div class="dialog_content">
                        <slot v-for="user of users" :user="user"></slot>
                    </div>
                </div>
            `,
        };
        //根组件
        let app = new Vue({
            //el指定id为app的元素
            el: "#app",
            //注册自定义组件(局部组件)
            components: {
                'kay-dialog': Dialog,

            },
            //组件内部的数据 放在data中
            data:{
                title:'kay'
            }
        })
    </script>
</body>

</html>

props验证
组件的props就是组件的参数,为了确保传入的数据在可控的合理范围内容,我们需要对传入的props的值类型进行必要的验证。
<!DOCTYPE html>
<html lang="en">

<head>
    <meta charset="UTF-8">
    <meta name="viewport" content="width=device-width, initial-scale=1.0">
    <meta http-equiv="X-UA-Compatible" content="ie=edge">
    <title>props验证</title>
    <style>
        .dialog {
            position: fixed;
            left: 50%;
            top: 30%;
            transform: translateX(-50%) translateY(-50%);
            border-radius: 2px;
            box-shadow: 0 1px 3px rgba(0, 0, 0, .3);
            box-sizing: border-box;
            background: #fff;
            width: 30%;
        }

        .dialog_header {
            padding: 20px 20px 0;
            text-align: left;
        }

        .dialog_title {
            font-size: 16px;
            font-weight: 700;
            color: #1f2d3d;
        }

        .dialog_content {
            padding: 30px 20px;
            color: #48576a;
            font-size: 14px;
            text-align: left;
        }

        .dialog_close_btn {
            position: absolute;
            right: 10px;
            top: 5px;
        }

        .dialog_close_btn:before {
            content: 'x';
            color: #999;
            font-size: 20px;
            cursor: pointer;
        }
    </style>
    <!-- 通过script的方式引入vue -->
    <!-- 开发环境版本,包含了有帮助的命令行警告 -->
    <script src="https://cdn.jsdelivr.net/npm/vue/dist/vue.js"></script>
</head>

<body>
    <div id="app">
        <!-- 传入的n为字符串abc 会报错 -->
        <kay-component :n="abc"></kay-component>
    </div>

    <script>
       //子组件
       const kayComponent={

           props:{
            //    要求n是number
                n:Number
            },
            template:`<div>{{n*10}}</div>`
       }
        //根组件
        let app = new Vue({
            //el指定id为app的元素
            el: "#app",
            //注册自定义组件(局部组件)
            components: {
                'kay-component':kayComponent

            },
            //组件内部的数据 放在data中
            data: {
                title: 'kay'
            }
        })
    </script>
</body>

</html>
效果如下:
其他的验证如下
Vue.component('my-component', {
  props: {
    // 基础的类型检查 (`null` 和 `undefined` 会通过任何类型验证)
    propA: Number,
    // 多个可能的类型
    propB: [String, Number],
    // 必填的字符串
    propC: {
      type: String,
      required: true
    },
    // 带有默认值的数字
    propD: {
      type: Number,
      default: 100
    },
    // 带有默认值的对象
    propE: {
      type: Object,
      // 对象或数组默认值必须从一个工厂函数获取
      default: function () {
        return { message: 'hello' }
      }
    },
    // 自定义验证函数
    propF: {
      validator: function (value) {
        // 这个值必须匹配下列字符串中的一个
        return ['success', 'warning', 'danger'].indexOf(value) !== -1
      }
    }
  }
})
非prop特性
一个非prop特性是指传向一个组件,但是该组件并没有相应prop定义的特性,这些props会被自动天添加到组件的根元素上。
替换/合并已有的特性
默认情况下,非 prop 特性的属性会覆盖组件根元素上同名的内容,但是针对 style 和 class 有特殊的处理,它们会合并(同名样式还是会覆盖)
禁用特性继承
如果你不希望组件的根元素继承特性,你可以在组件的选项中设置
inheritAttrs: false,我们可以通过组件的this.$attrs来获取这些属性
注意inheritAttrs: false选项不会影响style和class的绑定
<!DOCTYPE html>
<html lang="en">

<head>
    <meta charset="UTF-8">
    <meta name="viewport" content="width=device-width, initial-scale=1.0">
    <meta http-equiv="X-UA-Compatible" content="ie=edge">
    <title>doc</title>
    <style>

    </style>
    <!-- 通过script的方式引入vue -->
    <!-- 开发环境版本,包含了有帮助的命令行警告 -->
    <script src="https://cdn.jsdelivr.net/npm/vue/dist/vue.js"></script>
</head>

<body>
    <div id="app">
        <!-- 传入的n为字符串abc 会报错 -->
        <kay-component style="background:red" :n="1" id="kay1" val="test"></kay-component>
    </div>

    <script>
        //子组件
        const kayComponent = {
            // 禁止继承
            inheritAttrs:false,
            // id style 没有定义在props上,但是会自动会添加到组件的根元素。
            data(){
                console.log(this.$attrs);
                return{};
            },
            props:['n'],
            template: `<div style="height:200px;" id="kay2">{{n}}</div>`
        }
        //根组件
        let app = new Vue({
            //el指定id为app的元素
            el: "#app",
            //注册自定义组件(局部组件)
            components: {
                'kay-component': kayComponent,

            },
            //组件内部的数据 放在data中
            data: {
                title: 'kay'
            }
        })
    </script>
</body>

</html>
效果如下
