一 、Vuex的介绍
vuex 是什么?
- 状态管理工具
- 状态:即数据, 状态管理就是管理组件中的data数据
- Vuex 中的状态管理工具, 采用了 集中式 方式统一管理项目中组件之间需要通讯的数据 【共享的数据。】
- [看图]
如何使用
- 最佳实践 : 只将组件之间共享的数据放在 vuex 中, 而不是将所有的数据都放在 vuex 中
- 也就是说: 如果数据只是在组件内部使用的, 这个数据应该放在组件中, 而不要放在 vuex
- vuex 中的数据也是 响应式 的, 也就是说: 如果一个组件中修改了 vuex 中的数据, 另外一个使用的 vuex 数据的组件, 就会自动更新 ( vuex 和 localstorage的区别)
什么时候用 ?
- 官网
- 说明: 项目体量很小, 不需要使用 vuex, 如果项目中组件通讯不复杂, 也不需要使用 vuex
- 只有写项目的时候, 发现组件通讯多, 组件之间的关系复杂, 项目已经无法继续开发了, 此时, 就应该使用 vuex
二、 Vuex的基本使用
vuex的基本使用
- 安装 :
npm i vuex - 引入 : 引入
vuex之前一定要先引入vue<script src="./node_modules/vuex/dist/vuex.js"></script>
- 实例化 store
- store 仓库 , 获取数据和操作数据都要经过 store
const store = new Vuex.Store()
- 操作数据
- 获取数据 :
store.state.num - 操作数据 :
store.state.num = 300 - 虽然
store.state.count = 300可以修改值 , 但是vuex 也有严格模式, - 添加严格模式 :
strict : true,
- 获取数据 :
- 使用 mutations 【相当于methods】
- 注册 :
mutations : {} increament(state) { state.count = 20; }- 默认第一个参数永远是 state
- 触发事件 :
store.commit('increament')
- 注册 :
01-vuex的基本使用.html
<!DOCTYPE html>
<html lang="en">

<head>
    <meta charset="UTF-8" />
    <title>Document</title>
</head>

<body>
    <!--
       1. 安装 npm i vuex
       2. 引入
       - vuex里面引入了vue的api 引入vuex之前必须 要引入vue
       3. 实例化
     -->

    <script src="./vue.js"></script>
    <script src="./node_modules/vuex/dist/vuex.js"></script>

    <script>
        // 实例化
        // store 仓库 管理数据(查询/修改数据 都要经过 vuex)
        const store = new Vuex.Store({
            // 严格模式
            strict:  true,

            // 状态 :  数据 相当于 data
            state:  {
                name:  '小春'
            },
            // mutations 相当于 methods
            mutations:  {
                // 第一个参数 :  state
                updateName(state) {
                    state.name = '大春'
                }
            }
        })

        //2. 修改数据
        // store.state.name = '大春'
        store.commit('updateName')

        //1. 获取数据
        console.log(store.state.name)

        /**
            * 注意点
            1. 虽然 修改数据 store.state.name ='大春', 确实改变了数据,但是 vuex 有严格模式
            2. do not mutate(修改) vuex store state outside mutation handlers.
               在 mutation 处理函数 外面 不能修改 store>state里的数据
        */
    </script>
</body>

</html>
vuex的传参
-
**触发事件 : **
-
# 传参最好传一个对象, 多个值查看方便 store.commit('increament', { num: 400 }) -
事件
-
# payload 载荷
increament(state,   payload) {
	state.count = payload.num
}
02-传参.html
<!DOCTYPE html>
<html lang="en">

<head>
    <meta charset="UTF-8" />
    <title>Document</title>
</head>

<body>
    <script src="./vue.js"></script>
    <script src="./node_modules/vuex/dist/vuex.js"></script>
    <script>
        // 实例化仓库
        const store = new Vuex.Store({
            // 严格模式
            strict:  true,

            // state 状态
            state:  {
                name:  '小春春'
            },
            // mutations
            mutations:  {
                // 修改数据
                updateName(state,  payload) {
                    // payload 负载 数据
                    state.name += payload.num
                }
            }
        })

        //2. 修改数据
        // 参数1 :  方法名
        // 参数2 :  参数数据
        // store.commit('updateName',  777)
        // 传一个对象
        store.commit('updateName',  {
            num:  888
        })

        //1. 获取数据
        console.log(store.state.name)
    </script>
</body>

</html>
vue和vuex的配合使用
需求 : 有个h1显示数字的标题, 点击按钮累加数字
- 先用vue做出来效果
- 再用vuex和vue配合使用
- 实例化vuex的store
- 实例化vue
- 把store挂载到vue上
- 操作数据
- h1展示数据 :
<h1>{{ $store.state.num }}</h1> - 点击触发事件修改数据 :
this.$store.commit('addNum') addNum(state) { state.num++ }
- h1展示数据 :
03-vue和vuex的配合使用.html
<!DOCTYPE html>
<html lang="en">

<head>
    <meta charset="UTF-8" />
    <title>Document</title>
</head>

<body>
    <!--
        需求 :  有个h1显示数据, 点击按钮, 累加
        1. vue处理
        2. 改造为vuex
    -->

    <div id="app">
        <h1>{{ $store.state.num }}</h1>
        <button @click="fn">按钮</button>
    </div>

    <script src="./vue.js"></script>
    <script src="./node_modules/vuex/dist/vuex.js"></script>
    <script>
        // 实例化 vuex 的仓库
        const store = new Vuex.Store({
            // 严格模式
            strict:  true,
            // 状态
            state:  {
                num:  200
            },
            mutations:  {
                // 累加数据
                increamentNum(state) {
                    state.num += 1
                }
            }
        })

        // 实例vue
        const vm = new Vue({
            el:  '#app',
            store,
            data:  {},
            methods:  {
                fn() {
                    // this.$store.state.num = 300
                    this.$store.commit('increamentNum')
                }
            }
        })
    </script>
</body>

</html>
三、Vue脚手架3.0
官网 : https: //cli.vuejs.org/zh/guide/installation.html
安装
- 安装脚手架 2.x :
npm i vue-cli -g - 安装脚手架 3.x :
npm i -g @vue/cli - 检测脚手架版本号 :
vue -V / --version
创建一个项目
- 命令 :
vue create vuex-todos(可视化 vue ui) - 可以选择默认配置或者手动配置
- 开发运行 :
npm run serve - 发布构建 :
npm run build
四、使用Vuex改版 TodoMVC
- 初始化项目
- 拷贝模板(todomvc-app-template)里的结构(section部分)和样式 (node_modules里的)
- 组件化
- 创建 todo-header.vue、todo-list.vue、todo-footer.vue + scaf结构
- app.vue 中 导入 :
import todoheader from "./components/todo-header.vue"; - 注册 :
components: { todoheader , todolist , todofooter } - 使用 :
<todofooter></todofooter>
- 配置 vuex 管理 list
-
- 创建文件夹 store/store.js
- 安装 vuex
- 引入
- vue安装vuex :
Vue.use(Vuex) - 实例store, 并且导出 store
- main.js 中引入并挂载到 vue 上
- 列表展示
- 删除任务
- 添加任务
- 修改任务
- 修改状态
- 计算属性(三个)
- 清除已经完成的任务
五、如何使用 actions
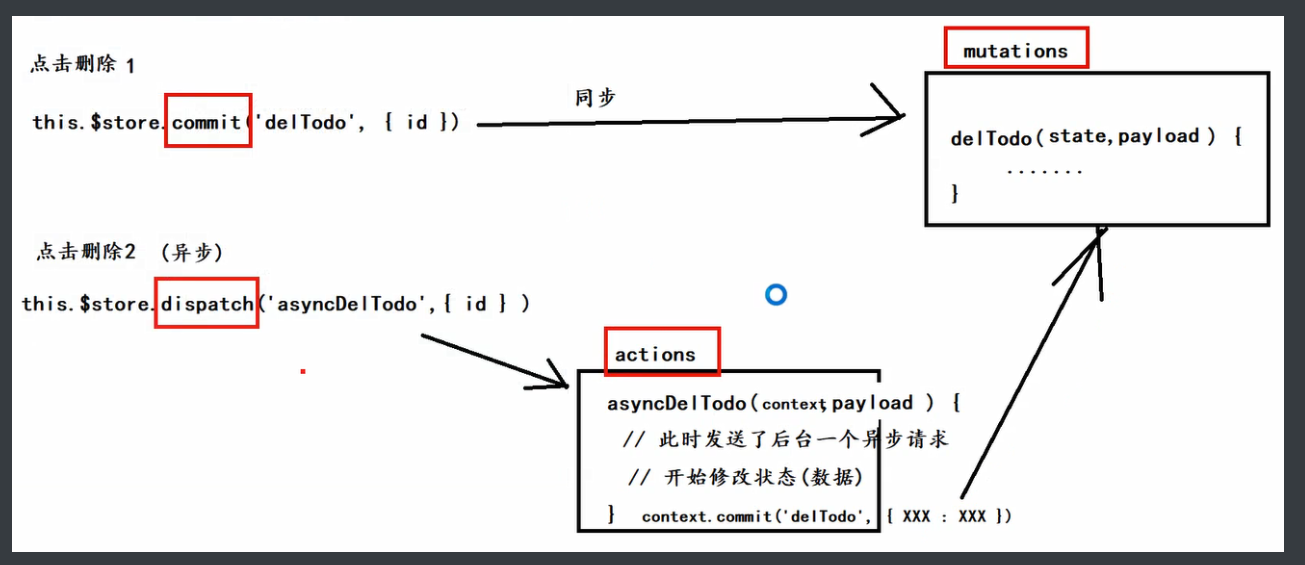
- 官网介绍
- Action 类似于 mutation,不同在于:
- Action 可以包含任意异步操作。
- Action 提交的是 mutation,而不是直接变更状态。
- mutaions 里只能使用同步, 不能出现异步 (演示删除任务 里使用setTimeout 会报错)
- 演示1: actions 可以包含任意异步操作。 代码1
- 演示2: actions 不能直接变更状态 , 代码2 会报错
- 演示3 : actions 提交的是 mutation
# 都是 actions 里
//演示1 :
setTimeout(() => {
    console.log('actions')
},   0)

// 演示2 : 报错
setTimeout(() => {
    context.state.list = context.state.list.filter(
        item => item.id != payload.id
    )
},   0)

// 演示3 :  提交 mutations
setTimeout(() => {
    context.commit('delTodo',   payload)
},   0)
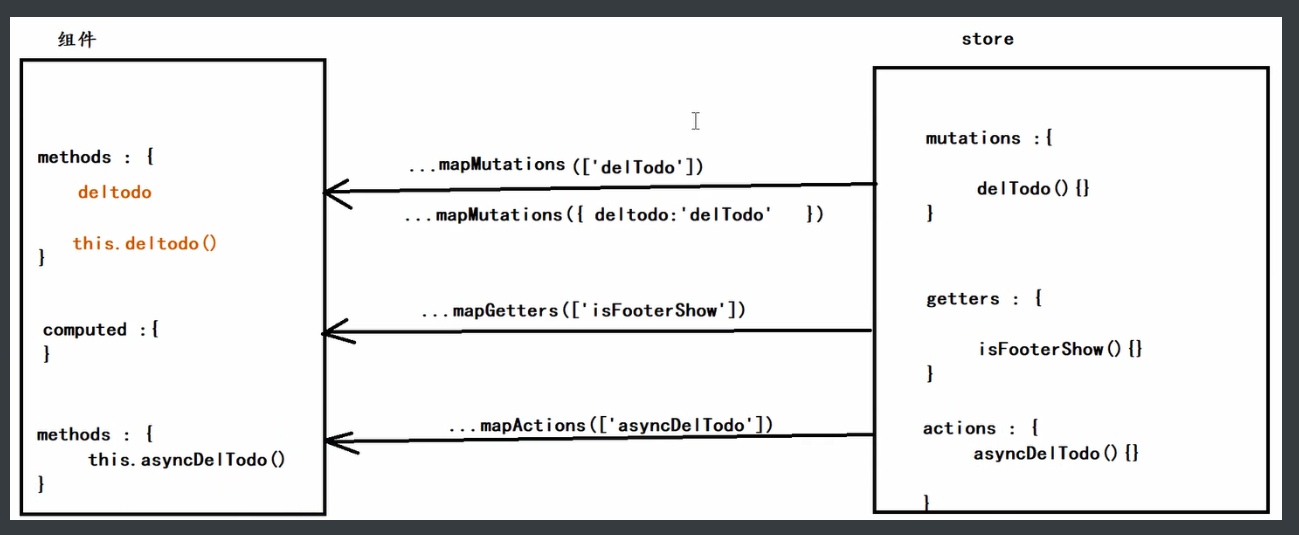
六、常用的几个辅助函数
mapGetters 辅助函数
-
store.js 中的几个计算属性 :
-
let getters = { isFooterShow(state) { return state.list.length > 0 }, itemLeftCount(state) { return state.list.filter(item => !item.done).length }, isClearShow(state) { return state.list.some(item => item.done) } } -
使用
mapGetters-
在
todo-footer.vue中 引入 :import { mapGetters } from "vuex"; -
将 store 中的 getter 映射到局部计算属性
computed: { ...mapGetters(["isFooterShow", "itemLeftCount", "isClearShow"]) }- -
使用
-
- 以前通过属性 :
<footer v-show="$store.getters.isFooterShow"> - 现在通过辅助函数 :
<footer v-show="isFooterShow">
- 以前通过属性 :
-
mapMutations 辅助函数
# 写在 methods
# 映射
...mapMutations(["delTodo",   "updateTodo",   "changeState"]),

 # 起别名 (防止当前所在的函数名和这个mutaions名一致,  会导致死循环)
...mapMutations({
    deltodo:  "delTodo",
    updatetodo:  "updateTodo",
    changestate:  "changeState"
}),

# 以后使用
  this.deltodo({id})  替代 :   this.$store.commit('delTodo',  { id })
mapActions 辅助函数
# 写在 methods
# 映射
...mapActions(["asyncDelTodo"]),
# 起别名
    ...mapActions({
        aDT:  "asyncDelTodo"
    }),

# 使用别名
  this.aDT({ id });
# 如果没有起别名
 this.asyncDelTodo({ id });  替换  this.$store.dispatch('asyncDelTodo',  {id})
App.vue
<template>
    <div id="app">
        <section class="todoapp">
            <!-- 头部 -->
            <todoHeader></todoHeader>

            <!-- 列表部分 -->
            <todoList></todoList>

            <!-- 底部 -->
            <todoFooter></todoFooter>
        </section>
    </div>
</template>

<script>
    // 引入三个子组件
    import todoHeader from "./components/todoHeader.vue";
    import todoList from "./components/todoList.vue";
    import todoFooter from "./components/todoFooter.vue";

    export default {
        name: "app",
        components: {
            todoHeader,
            todoList,
            todoFooter
        }
    };
</script>

<style>
</style>
main.js
import Vue from 'vue'
import App from './App.vue'
// 引入css
import './assets/base.css'
import './assets/index.css'
// 引入 仓库
import store from './store/store.js'

Vue.config.productionTip = false

new Vue({
    store,
    render: h => h(App)
}).$mount('#app')

//演示跨域
import axios from 'axios'

// https://douban.uieee.com/v2
// https://locally.uieee.com/categories
axios.get('/myapi/movie/in_theaters').then(res => {
    console.log(res)
})
store.js
// 引入 vuex
import Vue from 'vue'
import Vuex from 'vuex'

//装
Vue.use(Vuex)

// 抽离 state
const state = {
    list: [
        { id: 1, name: '吃饭', done: true },
        { id: 2, name: '睡觉', done: false },
        { id: 3, name: '打死春春', done: false }
    ]
}

// 抽离 mutations
const mutations = {
    // 添加任务
    addTodo(state, payload) {
        const id =
            state.list.length === 0 ? 1 : state.list[state.list.length - 1].id + 1
        // 添加
        state.list.push({
            id,
            name: payload.name,
            done: false
        })
    },
    // 删除任务
    delTodo(state, payload) {
        // setTimeout(() => {
        state.list = state.list.filter(item => item.id != payload.id)
        // }, 0)
    },
    // 修改状态
    changeState(state, payload) {
        //1. 根据id 查找当前的任务
        let todo = state.list.find(item => item.id == payload.id)

        //2. 状态取反
        todo.done = !todo.done
    },
    // 修改任务名称
    updateTodo(state, payload) {
        //1. 根据id找到对应的任务
        let todo = state.list.find(item => item.id == payload.id)
        //2. 修改任务
        todo.name = payload.name
    },
    // 清除完成
    clearCompleted(state) {
        // 过滤出来未完成的,重新赋值list
        state.list = state.list.filter(item => !item.done)
    }
}

// 抽离 getters (计算属性)
const getters = {
    // 底部的显示与隐藏
    isFooterShow(state) {
        return state.list.length > 0
    },
    // 剩余未完成的个数
    itemLeftCount(state) {
        return state.list.filter(item => !item.done).length
    },
    // clearCompleted 的显示与隐藏
    isClearCompletedShow(state) {
        return state.list.some(item => item.done)
    }
}

// 抽离 actions
const actions = {
    // 参数1 : context,类似store,所以有的人直接写store
    // 参数2 :
    asyncDelTodo(context, payload) {
        setTimeout(() => {
            context.commit('delTodo', payload)
        }, 0)
    }
}

// 实例化 仓库
const store = new Vuex.Store({
    // 严格模式
    strict: true,
    state,
    mutations,
    getters,
    actions
})

// 导出仓库
export default store
todoHeader.vue
import { loadavg } from 'os';
<template>
    <header class="header">
        <h1>todos</h1>
        <input
            class="new-todo"
            placeholder="What needs to be done?"
            autofocus
            @keyup.enter="addTodo"
            v-model="todoName"
        />
    </header>
</template>

<script>
    // 第一步 引入
    import { mapMutations } from "vuex";

    export default {
        data() {
            return {
                todoName: ""
            };
        },
        methods: {
            // 第二步 : 映射
            ...mapMutations(["addTodo"]),
            ...mapMutations({
                addtodo: "addTodo"
            }),

            // 添加任务
            addTodo() {
                console.log(this.todoName);
                // this.$store.commit('addTodo', {
                //   name: this.todoName
                // })
                this.addtodo({
                    name: this.todoName
                });

                this.todoName = "";
            }
        }
    };
</script>

<style>
</style>
todoList.vue
<template>
    <section class="main">
        <input id="toggle-all" class="toggle-all" type="checkbox" />
        <label for="toggle-all">Mark all as complete</label>
        <ul class="todo-list">
            <li
                :class="{ completed : item.done, editing : item.id == editId}"
                v-for="item in $store.state.list"
                :key="item.id"
            >
                <div class="view">
                    <input class="toggle" type="checkbox" :checked="item.done" @input="changeState(item.id)" />
                    <label @dblclick="showEdit(item.id)">{{ item.name }}</label>
                    <button @click="delTodo(item.id)" class="destroy"></button>
                </div>
                <input class="edit" :value="item.name" @keyup.enter="hideEdit" />
            </li>
        </ul>
    </section>
</template>

<script>
    import { mapMutations, mapActions } from "vuex";

    export default {
        data() {
            return {
                editId: -1
            };
        },
        methods: {
            // 将store>mutaions 里的 delTodo , 映射到当前的方法 【相当于methods有了"delTodo"、"updateTodo"、 "changeState"这些方法】
            ...mapMutations(["delTodo", "updateTodo", "changeState"]),
            // 起别名
            ...mapMutations({
                deltodo: "delTodo",
                changestate: "changeState"
            }),

            // 映射actions
            ...mapActions(["asyncDelTodo"]),

            // 删除任务
            delTodo(id) {
                // list 少一个

                // 1. commit => mutations => 同步
                // this.$store.commit('delTodo', { id })
                // this.deltodo({ id }) // 重名,死循环

                // 2. dispatch =>  actions => 异步
                // this.$store.dispatch('asyncDelTodo', { id })

                // 3.使用mapMutations映射过来的方法 【相当于methods有了 "asyncDelTodo"方法,所以直接用this调用。】
                this.asyncDelTodo({ id });
            },
            // 显示编辑状态
            showEdit(id) {
                this.editId = id;
            },
            // 隐藏编辑状态
            hideEdit(e) {
                this.updateTodo({
                    id: this.editId,
                    name: e.target.value
                });

                // this.$store.commit('updateTodo', {
                // id: this.editId,
                // name: e.target.value
                // })

                this.editId = -1;
            },
            // 修改状态
            changeState(id) {
                // this.$store.commit('changeState', { id })
                // this.changeState({id})
                this.changestate({ id });
            }
        }
    };
</script>

<style>
</style>

---


## todoFooter.vue
```html

<template>
    <footer class="footer" v-show="isFooterShow">
        <!-- This should be `0 items left` by default -->
        <span class="todo-count">
            <strong>{{ itemLeftCount }}</strong> item left
        </span>

        <!-- Hidden if no completed items are left ↓ -->
        <button
            @click="clearCompleted"
            v-show="isClearCompletedShow"
            class="clear-completed"
        >Clear completed</button>
    </footer>
</template>

<script>
    // 注意,解构,mapGetters要用{}包裹
    import { mapGetters } from "vuex";

    export default {
        methods: {
            clearCompleted() {
                this.$store.commit("clearCompleted");
            }
        },
        computed: {
            // 将vuex>store 里面的几个getters 属性 映射到 组件内的计算属性
            // 以后使用 就可以把 下面几个当成当前组件的计算属性用了
            ...mapGetters(["isFooterShow", "itemLeftCount", "isClearCompletedShow"])
        }
    };
</script>

<style>
</style>
笔记
初始化项目
-
安装脚手架 :
npm i @vue/cli -g -
创建项目 :
vue create vuex-todos默认
-
运行项目 :
npm run serve -
把没用的删除
把 todos 模板拿过来
- 拷贝 模板中
- 拷贝 node_modules > base.css/index.css
- 在 main.js 中引入 css
组件化 改造
- 创建 todoHeader.vue 把 头部标签代码拷贝过去
- 引入组件
- 注册组件
- 使用组件
配置 vuex
-
安装 :
npm i vuex -
创建 文件 store.js
router/router.js
store/store.js
- 引入
- 实例化 store
- 导出
- 挂载到 vue 实例上
- 准备数据 list
列表展示
- v-for 遍历
- 处理名称
- 处理选中状态
- 处理横线
添加任务
抽离 state 和 mutations
删除任务
修改任务
- 显示编辑状态
- 编辑任务
- 隐藏编辑状态
修改状态
底部显示与隐藏 + 剩余未完成个数 + 是否显示清除完成
- 使用 getters 类似 vue 的计算属性
- 使用 : v-show='$store.getters.isFooterShow'
清除完成的
actions
mutations 里面不能放异步操作
异步操作应该放在 actions
- actions 里面可以放任意异步操作
setTimeout(() => {
  console.log('我是异步的咋地地')
}, 0)
- actions 不能直接修改状态 , 提交 mutations
 asyncDelTodo(context, payload) {
    setTimeout(() => {
      context.commit('delTodo', payload)
    }, 0)
  }
几个辅助函数
辅助函数 1-mapGetters
mapGetters 简化 getters
将store里面的getters属性 映射到当前组件内的计算属性
- 第一步 :
import { mapGetters } from 'vuex' - 第二步 :
computed : {
  ...mapGetters(['isFooterShow','XXXXX'])
}
- 第三步 :使用
v-show='isFooterShow'
辅助函数 2-mapMutations
简化 mutaions
- 引入 import { mapMutations } from 'vuex'
- 映射
methods : {
  ...mapMutations(['delTodo']),
  ...mapMutations({
    deltodo :'delTodo'
  })
}
- 使用
this.deltodo({ id })
辅助函数 03-mapActions
简化 actions
将 store> actions 里面的方法 , 映射到当前组件内的方法
- 引入
- 映射
- 使用
跨域问题
- jsonp (只能用在 get)
- CROS (后台配合我们)
- 反向代理
// 接口
https://douban.uieee.com/v2/movie/in_theaters
module.exports = {
  devServer: {
    proxy: {
      '/myapi': {
        target: 'https://douban.uieee.com/v2',
        pathRewrite: { '^/myapi': '' },

        // 设置https
        secure: false,
        // 必须设置该项
        changeOrigin: true
      }
    }
  }
}