

特点:
- 免费开源、遵循BSD协议
- NOSQL
- 使用 ANSI C 语言编写
- 支持网络、内存、持久化的日志型 key-value 数据库
- 提供多种语言的 API 支持
NoSQL
非关系型数据库(Not-Only SQL,NoSQL)
面对的问题:
超大规模、高并发的 SNS 类型的 Web2.0 纯动态网站暴露了很多难以克服的问题及需求:
- High performance - 对数据库高并发读写的需求
- Huge Storage - 对海量数据的高效率存储和访问的需求
- High Scalability && High Availability - 对数据库的高可扩展性和高可用性的需求
总结一句:要求数据库支持 大规模数据集合、多重数据类型、大数据应用
传统关系型数据库解决不行、NoSQL可以。
# NoSQL 类型
-
键值(key-value)存储数据库
如:Redis、Voldemort、DB、Tokyo Cabinet/Tyrant
应用场景:内容缓存
数据模型:key/value
优势:快速查询
劣势:存储数据缺少结构化 -
列存储数据库
如:HBase、Riak、Cassandra
应用:分布式文件系统
数据模型:列簇式存储(将同一列数据存在一起)
优势:查找快、可扩展性强(增删快)、容易进行分布式扩展
劣势:功能相对局限 -
数据型数据库
如:MongoDB、CouchDB
应用:web应用
数据模型:一系列键值对(与kay-value类似、是value的结构化)
优势:数据结构要求不严格
劣势:查询性能不高,缺乏统一查询语法 -
图形(Graph)数据库
如:Neo4J、InfoGrid、Infinite Graph
应用:社交网络
数据模型:图结构
优势:利用图结构相关算法
劣势:要求对整个图做计算才能得出结果,不容易做分布式的集群方案
总结:
NoSQL适用场景 ⇒ 高并发场景
- 数据模型简单
- 数据库性能要求高
- 不要求高度的数据一致性
Redis
优点
- 高性能 - 读 110000 次/s、写 81000 次/s
- 丰富数据类型 - String、Hash、List、Set、Ordered Set
- 原子性 - Redis 所有操作都是原子性的(通过MULTI和EXEC指令,使多操作也支持事务,即原子性)
- 丰富的扩展 - 支持 publish/subscribe、通知、key过期等特性
- 高速读写 - 使用自己实现的
分离器,没有使用 lock(MySQL使用 lock)
缺点
- 持久化 - redis 数据存储在内存中,持久化方案有两种:
- 定时快照(snapshot):
定时将数据写入磁盘,每次均是全部读写,代价非常高 - 基于语句追加(aof):
只往数据库变化的数据,可能导致 追加的 log 过大。
而且追加方式是所有操作重新执行一遍,回复速度慢
- 定时快照(snapshot):
- 耗内存,内存占用高。
可做数据库、缓存、热点数据(经常查询、且不经常修改)、消息中间件
场景
- 缓存
- 排行榜
- 计数器
- 分布式会话
- 分布式锁
- 社交网络
- 最新列表
- 消息系统
# 安装
官网:https://redis.io/
下载:https://redis.io/download
(io,british Indian Ocean territory,英属印度洋领地)
首先,需要 c 语言编译环境
安装 gcc
需要对 redis 压缩包解压的文件进行编译,
yum -y install gcc automake autoconf libtool make
下载redis压缩包
wget http://download.redis.io/releases/redis-5.0.8.tar.gz
解压
tar xzvf redis-5.0.8.tar.gz -C /opt
# x 解压
# z 支持gzip解压文件
# v 显示信息
# f 指定压缩文件
# -C 解压到指定目录
编译
cd /opt/redis-5.0.8
make
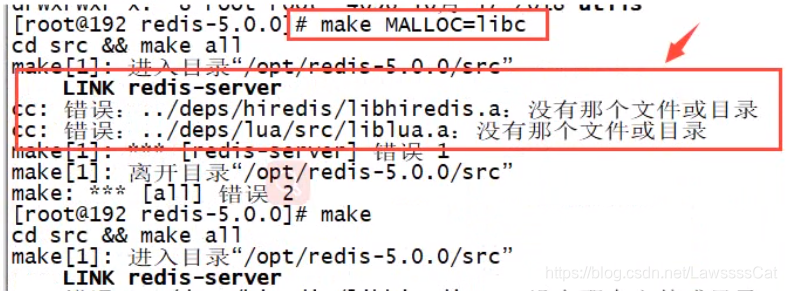
如果出现
则运行(下面)命令, 后重新编译 rediscd /opt/cd /opt/redis-5.0.8/deps make lua hiredis linenoise
指定安装位置
(安装编译后的文件)安装到指定目录:
make PREFIX=/usr/local/redis install
注意:
- 必须在 编译的目录下执行
- PREFIX 必须大写,同时会自动为我们创建 redis 目录,并将结果安装此目录
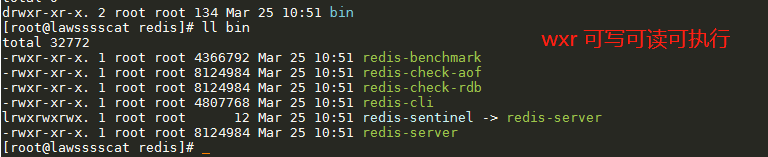
查看安装目录
左边的 rwxr 代表“可写可读可执行”,所以 安装目录下 bin 文件中的都是可执行的
其中
- redis-cli - redis 的客户端
- redis-server - redis 的服务端
# 启动服务端(后台启动、防火墙、开机启动)
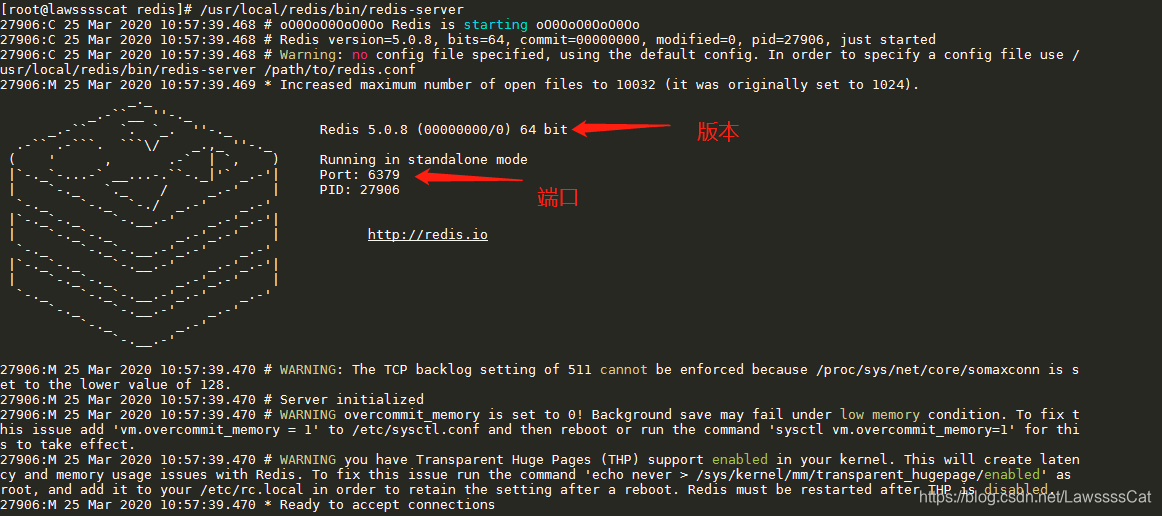
/usr/local/redis/bin/redis-server
启动成功,说明安装成功了
注意两点:端口号6379、版本号 5.0.8
后台启动
# 创建目录
# mkdir /dev/redis
nohup /usr/local/redis/bin/redis-server   > /dev/redis/logs &
查看后台任务
jobs -l
# -l 列出 PID,用 kill PID 可以结束程序
查看日志 (ctrl+c退出)tail -f /dev/redis/logs

防火墙开端口:
firewall-cmd --zone=public --add-port=6379/tcp --permanent
firewall-cmd --reload
# 启动客户端(本地、远程)
启动语法
redis-cli -h IP地址 -p 端口
# 默认IP本机 端口 6379
本地连接
/usr/local/redis/bin/redis-cli
# /usr/local/redis/bin/redis-cli -h 127.0.0.1 -p 6379
连接成功(下图),ip:端口

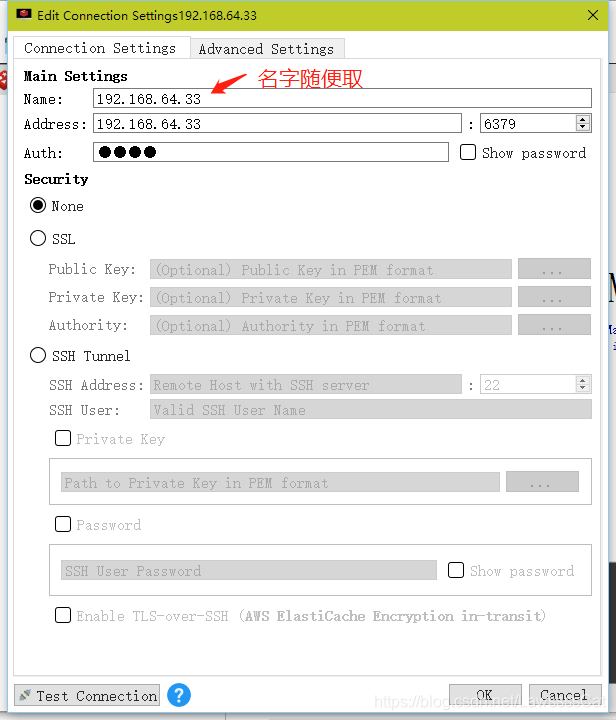
连接工具 远程连接
# 简单命令
PING、PONG
检测是否服务端启动

get、set
存值、取值

keys *
查所有 Key

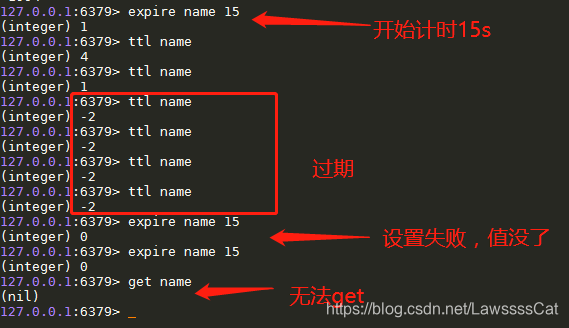
ttl name
剩余生存时间(TTL, time to live)

-1 代表永久有效
expire k1 15
setex key time value
字符串特有的定时方法
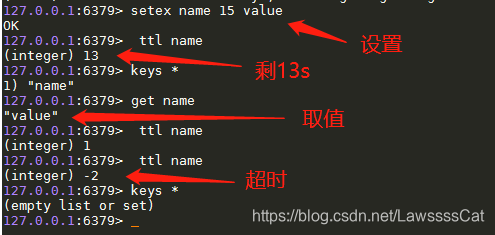
- 除了字符串外,其他都是用 expire 来设置时间
- 如果没有设置时间,就永不过时
- 如果设置了时间,之后又想长期存储,使用 persist key

# 配置(详细)
dump.rdb
redis 数据存在内存中,也会定时将数据进行持久化
dump.rdb 里面存储的就是持久化的信息(里面有我们上面 set 的信息)

redis.conf
解压陌路下 redis.conf 配置文件复制到安装文件的目录下
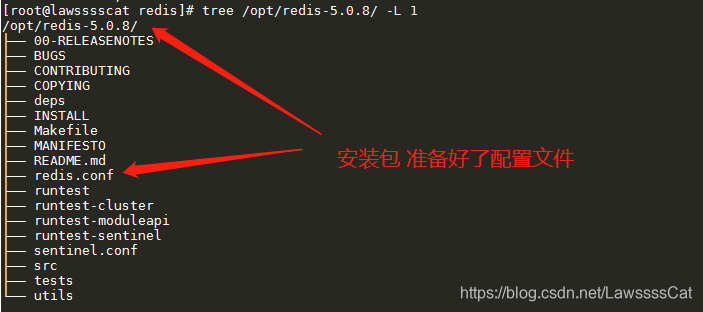
cp /opt/redis-5.0.8/redis.conf /usr/local/redis/
查看 redis.conf 文件
vim /usr/local/redis/redis.conf
重点看几个配置(下面)(5.0.8的顺序)
# Redis configuration file example.
#
# Note that in order to read the configuration file, Redis must be
# started with the file path as first argument:
#
# ./redis-server /path/to/redis.conf

# Note on units: when memory size is needed, it is possible to specify
# it in the usual form of 1k 5GB 4M and so forth:
#
# 1k => 1000 bytes
# 1kb => 1024 bytes
# 1m => 1000000 bytes
# 1mb => 1024*1024 bytes
# 1g => 1000000000 bytes
# 1gb => 1024*1024*1024 bytes
#
# units are case insensitive so 1GB 1Gb 1gB are all the same.

################################## INCLUDES ###################################

# 指定包含其他的配置文件,可以在同一主机上多个Redis实例之间使用同一份配置文件
# 而同时各个实例又拥有自己的特定配置文件
#
# include /path/to/local.conf
# include /path/to/other.conf

################################## MODULES #####################################

# 略

################################## MODULES #####################################

# 绑定的主机地址
bind 127.0.0.1

# 端口号
port 6379

# 客户端连接超时
timeout 0

# redis默认不是以守护进程方式(后台方式)进行
# yes 更换为守护进程开启
# Redis采用的是单进程多线程的模式。
# 在守护进程模式下(daemonize yes),redis会在后台运行,并将进程pid号写入至redis.conf选项pidfile设置的文件中,此时redis将一直运行,除非手动kill将该进程关闭。
# 而当不是守护进程时(daemonize no),开启进程的当前界面将进入redis命令行界面,exit强制退出、或者关闭连接工具(putty,xshell等)都会导致redis进程退出。
# 服务端开发的大部分应用都是采用后台运行的模式
daemonize no

# 当redis以守护进程方式运行,redis默认把pid写入pidfile指定的文件
pidfile /var/run/redis_6379.pid

# 日志级别
# debug (a lot of information, useful for development/testing)
# verbose (many rarely useful info, but not a mess like the debug level)
# notice (moderately verbose, what you want in production probably)
# warning (only very important / critical messages are logged)
loglevel notice

# 日志记录方式,默认为标准输出
# 如果配置为守护京进程方式运行,而这里有配置标准输出,则日志将被发送给/dev/null
# logfile ""
logfile stdout


# 设置数据库的数量
# 默认数据库为0,可以使用 SELECT <dbid> 命令在连接上指定数据库id
# (后面会讲为什么是16个,每个库有什么用)
databases 16

################################ SNAPSHOTTING  ################################

# 指定在多长时间内,有多少次更新操作,就会将数据同步到数据文件,可以多个条件配合
# save <seconds> <changes>
# 默认分表表示为:
# 900秒内有1个更改,300秒内有10个更改,60秒内有10000个更改
save 900 1
save 300 10
save 60 10000

# 指定存储至本地数据库时是否压缩数据,默认为yes
# redis采用LZF(压缩算法)
# 如果为了节省CPU时间,可以关闭该选项,但会导致数据库文件变的巨大
rdbcompression yes

# 指定本地数据库文件名,默认为dump.rdb
dbfilename dump.rdb

# 指定本地数据库存放目录
dir ./

################################# REPLICATION #################################

# 设置当本机为slav服务时,设置master服务的IP地址及端口,在Redis启动时,它会自动从master进行数据同步
#
# Master-Replica replication. Use replicaof to make a Redis instance a copy of
# another Redis server. A few things to understand ASAP about Redis replication.
#
#   +------------------+      +---------------+
#   |      Master      | ---> |    Replica    |
#   | (receive writes) |      |  (exact copy) |
#   +------------------+      +---------------+
#
# 1) Redis replication is asynchronous, but you can configure a master to
#    stop accepting writes if it appears to be not connected with at least
#    a given number of replicas.
# 2) Redis replicas are able to perform a partial resynchronization with the
#    master if the replication link is lost for a relatively small amount of
#    time. You may want to configure the replication backlog size (see the next
#    sections of this file) with a sensible value depending on your needs.
# 3) Replication is automatic and does not need user intervention. After a
#    network partition replicas automatically try to reconnect to masters
#    and resynchronize with them.
#
# replicaof <masterip> <masterport>

# 当master服务设置了密码保护时,slav服务连接master的密码
#
# If the master is password protected (using the "requirepass" configuration
# directive below) it is possible to tell the replica to authenticate before
# starting the replication synchronization process, otherwise the master will
# refuse the replica request.
#
# masterauth <master-password>

################################## SECURITY ###################################

# 设置Redis连接密码,如果设置了连接密码,客户端在连接Redis时,需要通过 AUTH <password>命令提供密码
# 默认关闭
#
# requirepass foobared

################################### CLIENTS ####################################

# 设置同一时间最大客户端连接数
# 默认无限制,Redis可以同时打开客户端连接数为Redis进程可以打开的最大文件描述符数
# 如果设置maxclients 0,表示不做限制。
# 当客户端连接数达到限制时,Redis会关闭新的连接并向客户端返回max number of clients reached 错误信息
#
# maxclients 10000

############################## MEMORY MANAGEMENT ################################

# 指定Redis最大内存限
# Redis在启动时会把数据加载到内存中,达到最大内存后,Redis会先尝试清除已到期或即将到期的Key。
# 当此方法处理后,仍然到达最大内存的设置,将无法再进行写入操作,但仍然可以进行读取操作。
# Redis新的vm机制,会把key存放到内存,value会存放到swap区
# 默认值官方没说
#
# maxmemory <bytes>

# 指定内存维护策略(下面马上讲)
#
# MAXMEMORY POLICY: how Redis will select what to remove when maxmemory
# is reached. You can select among five behaviors:
#
# volatile-lru -> Evict using approximated LRU among the keys with an expire set.
# allkeys-lru -> Evict any key using approximated LRU.
# volatile-lfu -> Evict using approximated LFU among the keys with an expire set.
# allkeys-lfu -> Evict any key using approximated LFU.
# volatile-random -> Remove a random key among the ones with an expire set.
# allkeys-random -> Remove a random key, any key.
# volatile-ttl -> Remove the key with the nearest expire time (minor TTL)
# noeviction -> Don't evict anything, just return an error on write operations.
#
# LRU means Least Recently Used
# LFU means Least Frequently Used
#
# Both LRU, LFU and volatile-ttl are implemented using approximated
# randomized algorithms.
#
# Note: with any of the above policies, Redis will return an error on write
#       operations, when there are no suitable keys for eviction.
#
#       At the date of writing these commands are: set setnx setex append
#       incr decr rpush lpush rpushx lpushx linsert lset rpoplpush sadd
#       sinter sinterstore sunion sunionstore sdiff sdiffstore zadd zincrby
#       zunionstore zinterstore hset hsetnx hmset hincrby incrby decrby
#       getset mset msetnx exec sort
#
# The default is:
#
# maxmemory-policy noeviction

############################# LAZY FREEING ####################################

# 略

############################## APPEND ONLY MODE ###############################

# 指定是否每次更新后进行日志记录
# Redis在默认情况下是异步的把数据库写入磁盘,如果不开启,可能会在断电时导致一段时间内的数据丢失。
# 因为,redis本身同步数据文件是按上面save条件来同步的,所以有的数据会在一段时间内只存在于内存中。
# 默认为 no
appendonly no

# 指定更新日志名,默认为appendonly.aof
# The name of the append only file (default: "appendonly.aof")
appendfilename "appendonly.aof"

# 指定更新日志条件,共有3个可选值:
# no:表示等操作系统进行数据缓存同步到磁盘(快)
# always:表示每次更新操作后手动调用fsync()将数据写到磁盘(慢,安全)
# everysec:表示每秒同步一次(折中方案,默认值)
# 请选择:
# appendfsync always
appendfsync everysec
# appendfsync no

################################ LUA SCRIPTING  ###############################

# 略

################################ REDIS CLUSTER  ###############################

# 略

################################## SLOW LOG ###################################

# 略

################################ LATENCY MONITOR ##############################

# 略

############################### ADVANCED CONFIG ###############################

# 指定在超过一定的数量或者最大的元素超过某一临界值时,采用一种特殊的哈希算法
hash-max-ziplist-entries 512
hash-max-ziplist-value 64

# 指定是否激活重置哈希,默认为开启
# (后面再介绍Redis的哈希算法)
activerehashing yes

########################### ACTIVE DEFRAGMENTATION #######################

# 略
# 内存维护策略
对内存数据的维护,在 redis 中有两种解决方案
设置超时时间
即上面的 expire 和 setex
动态数据删除(LRU算法、LFU算法)
- 对于在内存中但又不用的数据块(内存块)叫做LRU(
Least Recently Used,最近最久未使用算法)- 通过内存管理的一种页面置换算法,操作系统会判断哪些数据属于LRU而将其移出内存而腾出统建来加载另外的数据
- volatile-lru:设定的超时时间的数据中,删除最不常用的数据
- allkeys-lru:查询所有的key中最近最不常用的数据进行删除,这是应用最为广泛的策略
- volatile-random:在已经设定了超时的数据中随机删除
- allkeys-random:查询所有的key,之后随机删除
- volatile-ttl:查询全部设置定超时时间的数据之后,排序,将马上要过期的数据进行删除。
- noeviction:如果设置为该属性,则不会进行删除操作,如果内存溢出,则报错返回。(默认)
- volatile-lfu:从所有配置了过期时间的键中驱逐使用的平率最少的键
LFU(
Least Frequently Used,最近最少使用算法)也是一种常见的缓存算法 - allkeys-lfu:从所有键中驱逐使用频率最少的键
lfu 是4.0后新增策略
# 自定义配置(守护开启、远程连接、设置密码)
注意:
修改前先关了服务

开始修改
vim /usr/local/redis/redis.conf
# 开启默认守护进程启动(当然,你可以使用nohup方法)
# daemonize no
daemonize yes


# 注释掉,即可允许本机以外的机器访问Redis服务
# bind 127.0.0.1

# 设置密码 (1.保证安全、2.有些情况下不设定密码是无法进行远程连接访问的)
# requirepass
使配置生效
服务端启动:(每次启动都需要指定哦)
/usr/local/redis/bin/redis-server /usr/local/redis/redis.conf

通过 守护进程方式启动,jobs 命令式无法查看的。
查看是否运行,需要ps -auxf | grep redis

客户端登录:
用 redis-cli 密码登录(redis-cli -a password)
# redis-cli -h PI地址 -p 端口 -a 密码
redis-cli -h host -p port -a password
# redis 关闭
直接关闭【不可取】
(断电、非正常关闭。容易数据丢失)
查询redis进程id
kill 对查询的id进行强制关闭ps -ef | grep -i redis # -i 不区分大小写kill -9 PID # -9 表示强制关闭- 让 redis 服务主动关闭【推荐】
(正常关闭,数据保存)
关闭redis服务,通过客户端进行shutdown

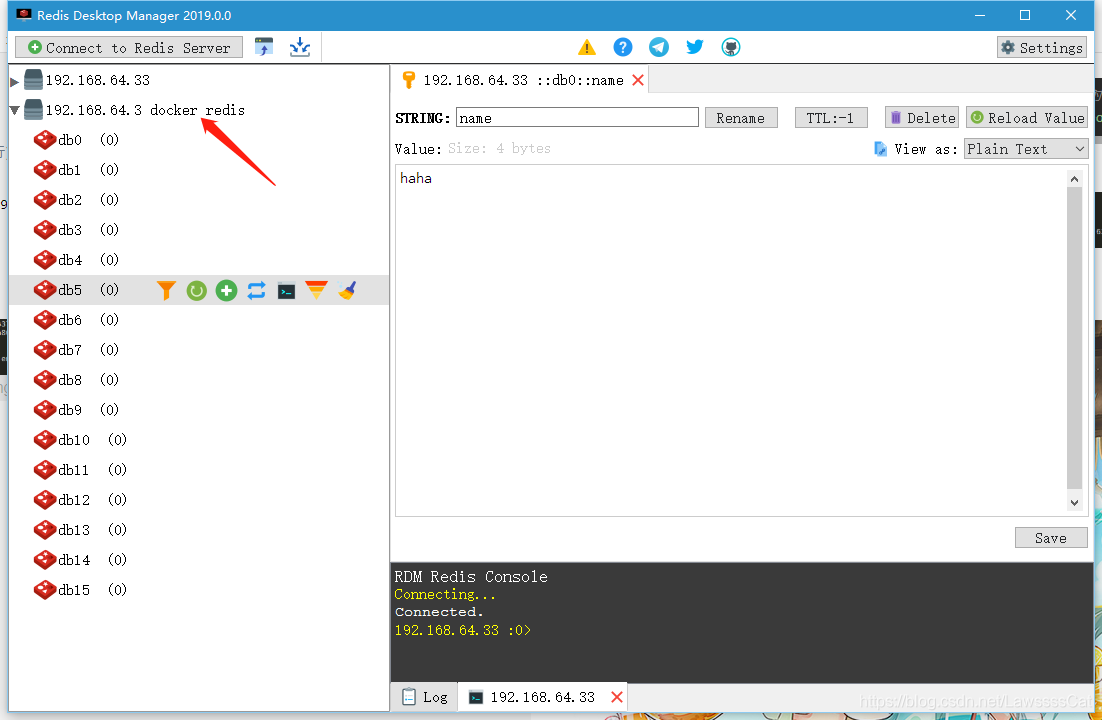
# 可视化工具:redis-desktop-manager
官网下载要收费,不过我相信你们问题不大。

重点是
- 服务端配置要配置好密码,否者不让连接
- 要开启防火墙,参考上面 “ 启动服务端 ”

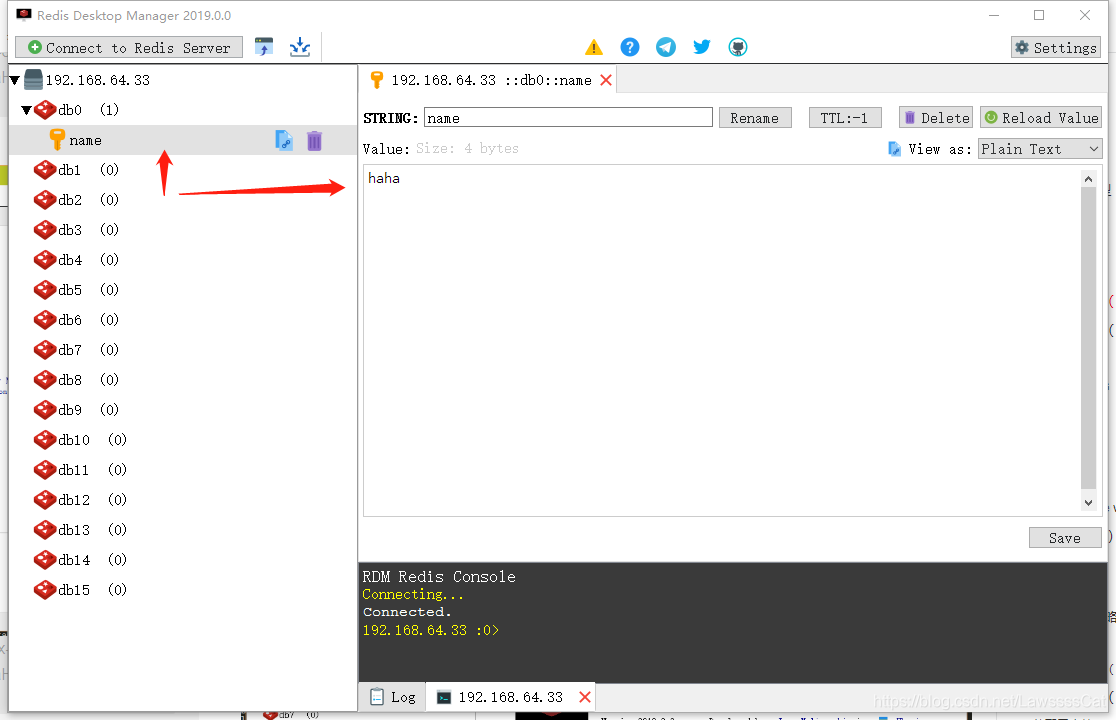
我们会发现,我们set 的数据,默认存在0库中。
为什么这样?为什么16库?下面讲
Doker with Redis
拉取 redis 镜像
docker pull redis
docker方式:开启 redis 服务端
# docker run -d --name docker容器名 -p 本地端口:映射容器端口 镜像名 --requirepass "密码"
# -d 守护进程模式运行
# --requirepass 是dockerfile指定的参数,这里为redis的登录密码
 docker run -d --name redis6379 -p 6379:6379 redis --requirepass "root"

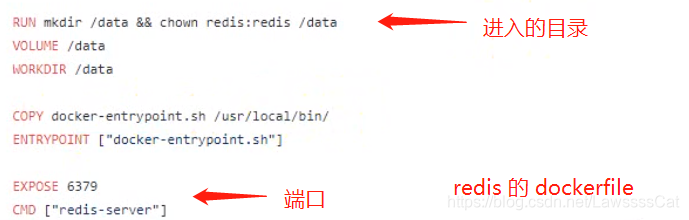
docker启动镜像异常简单,但想要了解细节,需要看相应(redis)的dockerfile(官网有)
windows 连接 redis 虚拟机 ip 192.163.64.3
# -t 让docker分配一个伪终端并绑定到容器的标准输入上
# -i 则让容器的标准输入保持打开
docker exec -it redis6379 bash

docker 方式:开启 redis 客户端(连接docker中的redis服务端)
# redis-cli -a root 开启redis客户端,指定密码
docker exec -it redis6379 redis-cli -a root