案例1:iptables基本管理
案例2:filter过滤和转发控制
案例3:防火墙扩展规则
案例4:配置SNAT实现共享上网
- 1
- 2
- 3
- 4
1 案例1:iptables基本管理
1.1 问题
本案例要求练习iptables命令的使用,按照要求完成以下任务:
关闭firewalld,开启iptables服务
查看防火墙规则
追加、插入防火墙规则
删除、清空防火墙规则
- 1
- 2
- 3
- 4
1.2 步骤
实现此案例需要按照如下步骤进行。
步骤一:关闭firewalld,启动iptables服务
1)关闭firewalld服务器
[root@svr5 ~]# systemctl stop firewalld.service
[root@svr5 ~]# systemctl disable firewalld.service
- 1
- 2
2)安装iptables-services并启动服务
[root@svr5 ~]# yum -y install iptables-services
[root@svr5 ~]# systemctl start iptables.service
- 1
- 2
步骤二:熟悉iptables框架
1)iptables的4个表(区分大小写):
iptables默认有4个表,nat表(地址转换表)、filter表(数据过滤表)、raw表(状态跟踪表)、mangle表(包标记表)。
2)iptables的5个链(区分大小写):
INPUT链(入站规则)
OUTPUT链(出站规则)
FORWARD链(转发规则)
PREROUTING链(路有前规则)
POSTROUTING链(路由后规则)
步骤三:iptables命令的基本使用方法
1)iptabels语法格式
[root@svr5 ~]# iptables  [-t 表名]  选项  [链名]  [条件]  [-j 目标操作]
[root@svr5 ~]# iptables  -t  filter  -I  INPUT -p  icmp  -j  REJECT
[root@svr5 ~]# iptables -t filter -I  INPUT   -p  icmp  -j  ACCEPT
[root@svr5 ~]# iptables  -I  INPUT  -p  icmp  -j  REJECT
//注意事项与规律:
//可以不指定表,默认为filter表
//可以不指定链,默认为对应表的所有链
//除非设置默认策略,否则必须指定匹配条件
//选项/链名/目标操作用大写字母,其余都小写
########################################################################
//目标操作:
// ACCEPT:允许通过/放行
// DROP:直接丢弃,不给出任何回应
// REJECT:拒绝通过,必要时会给出提示
// LOG:记录日志,然后传给下一条规则
- 1
- 2
- 3
- 4
- 5
- 6
- 7
- 8
- 9
- 10
- 11
- 12
- 13
- 14
- 15
iptables命令的常用选项如表-1所示。

表-1 iptables常用选项
2)iptables命令的使用案例
创建规则的案例:
[root@svr5 ~]# iptables  -t  filter  -A  INPUT  -p tcp  -j  ACCEPT
//追加规则至filter表中的INPUT链的末尾,允许任何人使用TCP协议访问本机
[root@svr5 ~]# iptables  -I  INPUT  -p  udp  -j  ACCEPT
//插入规则至filter表中的INPUT链的开头,允许任何人使用UDP协议访问本机
[root@svr5 ~]# iptables  -I  INPUT 2  -p  icmp  -j  ACCEPT
//插入规则至filter表中的INPUT链的第2行,允许任何人使用ICMP协议访问本机
- 1
- 2
- 3
- 4
- 5
- 6
查看iptables防火墙规则
[root@svr5 ~]# iptables  -nL  INPUT                    //仅查看INPUT链的规则
target     prot opt source               destination
ACCEPT     udp  --  0.0.0.0/0            0.0.0.0/0
ACCEPT     icmp --  0.0.0.0/0            0.0.0.0/0
ACCEPT     tcp  --  0.0.0.0/0            0.0.0.0/0
[root@svr5 ~]# iptables  -L  INPUT  --line-numbers        //查看规则,显示行号
num  target     prot opt source         destination
1    ACCEPT     udp   --  anywhere     anywhere
2    ACCEPT     icmp --   anywhere     anywhere
3    ACCEPT     tcp  --   anywhere     anywhere
- 1
- 2
- 3
- 4
- 5
- 6
- 7
- 8
- 9
- 10
删除规则,清空所有规则
[root@svr5 ~]# iptables  -D  INPUT  3
//删除filter表中INPUT链的第3条规则
[root@svr5 ~]# iptables  -nL  INPUT                //查看规则,确认是否删除
[root@svr5 ~]# iptables  -F
//清空filter表中所有链的防火墙规则
[root@svr5 ~]# iptables  -t  nat  -F
//清空nat表中所有链的防火墙规则
[root@svr5 ~]# iptables  -t  mangle  -F
//清空mangle表中所有链的防火墙规则
[root@svr5 ~]# iptables  -t  raw  -F
//清空raw表中所有链的防火墙规则
- 1
- 2
- 3
- 4
- 5
- 6
- 7
- 8
- 9
- 10
- 11
设置防火墙默认规则
[root@svr5 ~]# iptables  -t  filter  -P  INPUT  DROP
[root@svr5 ~]# iptables  -nL
Chain INPUT (policy DROP)
… …
- 1
- 2
- 3
- 4
2 案例2:filter过滤和转发控制
2.1 问题
本案例要求创建常用主机防火墙规则以及网络防火墙规则:
针对Linux主机进行出站、入站控制
利用ip_forward机制实现Linux路由/网关功能
在Linux网关上实现数据包转发访问控制
- 1
- 2
- 3
2.2 方案
根据防火墙保护的对象不同,防火墙可以分为主机型防火墙与网络型防火墙,如图-1所示。
主机型防火墙,主要保护的是服务器本机(过滤威胁本机的数据包)。
网络防火墙,主要保护的是防火墙后面的其他服务器,如web服务器、FTP服务器等。

2.3 步骤
实现此案例需要按照如下步骤进行。
步骤一:iptables防火墙规则的条件
iptables防火墙可以根据很多很灵活的规则进行过滤行为,具体常用的过滤条件如表-2所示。
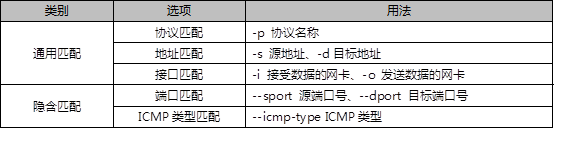
表-2 iptables过滤条件
1)主机型防火墙案例
[root@svr5 ~]# iptables -I INPUT -p tcp --dport 80 -j REJECT
[root@svr5 ~]# iptables -I INPUT -s 192.168.2.100 -j REJECT
[root@svr5 ~]# iptables -I INPUT -d 192.168.2.5 -p tcp --dport 80 -j REJECT
[root@svr5 ~]# iptables -I INPUT -i eth0 -p tcp --dport 80 -j REJECT
[root@svr5 ~]# iptables  -A  INPUT  -s 192.168.4.120  -j  DROP
//丢弃192.168.4.120发给本机的所有数据包
[root@svr5 ~]# iptables  -A  INPUT -s  10.0.10.0/24  -j  DROP
//丢弃10.0.10.0/24网络中所有主机发送给本机的所有数据包
[root@svr5 ~]# iptables -A  INPUT -s  114.212.33.12  -p tcp --dport 22-j  REJECT
//拒绝114.212.33.12使用tcp协议远程连接本机ssh(22端口)
- 1
- 2
- 3
- 4
- 5
- 6
- 7
- 8
- 9
- 10
步骤二:开启Linux的路由转发功能
1)Linux内核默认支持软路由功能,通过修改内核参数即可开启或关闭路由转发功能。
[root@svr5 ~]# echo 0 > /proc/sys/net/ipv4/ip_forward            //关闭路由转发
[root@svr5 ~]# echo 1 > /proc/sys/net/ipv4/ip_forward            //开启路由转发
//注意以上操作仅当前有效,计算机重启后无效
[root@svr5 ~]# echo 'net.ipv4.ip_forward=1' >> /etc/sysctl.conf
//修改/etc/sysctl.conf配置文件,可以实现永久有效规则
- 1
- 2
- 3
- 4
- 5
步骤四:网络型防火墙案例
1)网络型防火墙案例
部署如表-3所示的网络拓扑,一定要把router主机的路由转发功能打开。
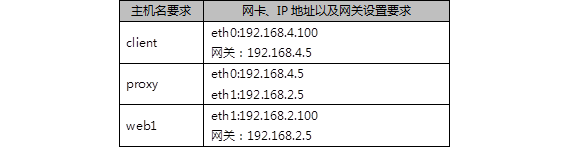
表-3 实验拓扑
添加网关的命令
[root@client ~]# nmcli connection modify eth0 ipv4.gateway 192.168.4.5
[root@client ~]# nmcli connection up eth0
[root@web1 ~]# nmcli connection modify eth1 ipv4.gateway 192.168.2.5
[root@web1 ~]# nmcli connection up eth1
- 1
- 2
- 3
- 4
确认不同网络的联通性
[root@client ~]# ping 192.168.2.100
[root@web1 ~]# ping 192.168.4.100
- 1
- 2
在web1主机上启动http服务
[root@web1 ~]# yum -y install httpd
[root@web1 ~]# echo "test page" > /var/www/html/index.html
[root@web1 ~]# systemctl restart httpd
- 1
- 2
- 3
没有防火墙的清空下client访问web服务
[root@client ~]# curl http://192.168.2.100 //成功
- 1
设置proxy主机的防火墙规则,保护防火墙后面的Web服务器
[root@proxy ~]# iptables -I FORWARD -s 192.168.4.100 -p tcp --dport 80 -j DROP
- 1
设置完防火墙规则后,再次使用client客户端访问测试效果
[root@client ~]# curl http://192.168.2.100 //失败
- 1
步骤三:禁ping的相关策略
1)默认直接禁ping的问题?
[root@router ~]# iptables -I INPUT -p icmp -j DROP
//设置完上面的规则后,其他主机确实无法ping本机,但本机也无法ping其他主机
//当本机ping其他主机,其他主机回应也是使用icmp,对方的回应被丢弃
- 1
- 2
- 3
2)禁止其他主机ping本机,允许本机ping其他主机
[root@router ~]# iptables  -A  INPUT  -p icmp  \
> --icmp-type echo-request  -j  DROP
//仅禁止入站的ping请求,不拒绝入站的ping回应包
- 1
- 2
- 3
注意:关闭ICMP的类型,可以参考help帮助,参考命令如下:
[root@router ~]# iptables -p icmp --help
- 1
3 案例3:防火墙扩展规则
3.1 问题
本案例要求熟悉使用iptables的扩展规则,实现更丰富的过滤功能,完成以下任务:
根据MAC地址封锁主机
在一条规则中开放多个TCP服务
根据IP范围设置封锁规则
- 1
- 2
- 3
3.2 方案
iptables在基本过滤条件的基础上还扩展了很多其他条件,在使用时需要使用-m参数来启动这些扩展功能,语法如下:
iptables 选项 链名称 -m 扩展模块 --具体扩展条件 -j 动作
3.3 步骤
实现此案例需要按照如下步骤进行。
步骤一:根据MAC地址过滤
1)根据IP过滤的确定是对方修改IP后,防火墙是失效
[root@router ~]# iptables -F
[root@router ~]# iptables -I INPUT -s 192.168.4.100 -p tcp --dport 22 -j DROP
//设置规则禁止192.168.4.100使用ssh远程本机
- 1
- 2
- 3
但是,当client主机修改IP地址后,该规则就会失效,注意因为修改了IP,对client主机的远程连接会断开,需要使用virt-manager开启虚拟机操作:
[root@client ~]# ifconfig eth0  192.168.4.101
[root@client ~]# ssh 192.168.4.5                    //依然成功
- 1
- 2
根据MAC地址过滤,可以防止这种情况的发生
[root@client ~]# ip link show eth0                    //查看client的MAC地址
eth0: <BROADCAST,MULTICAST,UP,LOWER_UP> mtu 1500 qdisc pfifo_fast state UP mode DEFAULT qlen 1000
link/ether 52:54:00:00:00:0b brd ff:ff:ff:ff:ff:ff
[root@router ~]# iptables  -A  INPUT  -p tcp --dport 22\
> -m   mac --mac-source  52:54:00:00:00:0b  -j  DROP
//拒绝52:54:00:00:00:0b这台主机远程本机
- 1
- 2
- 3
- 4
- 5
- 6
步骤二:基于多端口设置过滤规则
1)一次需要过滤或放行很多端口时会比较方便
[root@router ~]# iptables  -A  INPUT  -p tcp   \
> -m  multiport --dports  20:22,25,80,110,143,16501:16800  -j  ACCEPT
//一次性开启20,21,22,25,80,110,143,16501到16800所有的端口
- 1
- 2
- 3
步骤三:根据IP地址范围设置规则
1)允许从 192.168.4.10-192.168.4.20 登录
[root@router ~]# iptables  -A  INPUT  -p tcp  --dport  22  \
> -m  iprange  --src-range  192.168.4.10-192.168.4.20   -j  ACCEPT
- 1
- 2
2)禁止从 192.168.4.0/24 网段其他的主机登录
[root@router ~]# iptables -A INPUT -p tcp --dport 22 -s 192.168.4.0/24 -j DROP
- 1
4 案例4:配置SNAT实现共享上网
4.1 问题
本案例要求设置防火墙规则,允许位于局域网中的主机可以访问外网,主要包括下列服务:
搭建内外网案例环境
配置SNAT策略实现共享上网访问
- 1
- 2
4.2 步骤
实现此案例需要按照如下步骤进行。
步骤一:搭建内外网案例环境
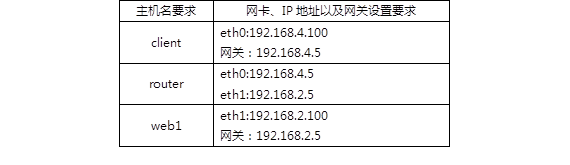
表-4 实验拓扑
这里,我们设定192.168.2.0/24网络为外部网络,192.168.4.0/24为内部网络。
现在,在外部网络中有一台web服务器192.168.2.100,因为设置了网关,client已经可以访问此web服务器了。但,如果查看web1的日志就会发现,日志里记录的是192.168.4.100在访问网页。
我们需要实现的效果是,client可以访问web服务器,但要伪装为192.168.2.5后再访问web服务器(模拟所有位于公司内部的电脑都使用的是私有IP,希望访问外网,就需要伪装为公司的外网IP后才可以)。
步骤二:设置防火墙规则,实现IP地址的伪装(SNAT源地址转换)
1)确保router主机开启了路由转发功能
[root@router ~]# echo 1 > /proc/sys/net/ipv4/ip_forward //开启路由转发
- 1
2)设置防火墙规则,实现SNAT地址转换
[root@router ~]# iptables  -t  nat  -A POSTROUTING \
> -s  192.168.4.0/24 –p tcp --dport 80  -j SNAT  --to-source 192.168.2.5
- 1
- 2
3)登陆web主机查看日志
[root@router ~]# tail  /var/log/httpd/access_log
.. ..
192.168.2.5 - - [12/Aug/2018:17:57:10 +0800] "GET / HTTP/1.1" 200 27 "-" "Mozilla/4.0 (compatible; MSIE 6.0; Windows NT 5.1; SV1)"
- 1
- 2
- 3
通过日志会发现,客户端是先伪装为了192.168.2.5之后再访问的web服务器!
</div>
<link href="https://csdnimg.cn/release/phoenix/mdeditor/markdown_views-b6c3c6d139.css" rel="stylesheet">
<div class="more-toolbox">
<div class="left-toolbox">
<ul class="toolbox-list">
<li class="tool-item tool-active is-like "><a href="javascript:;"><svg class="icon" aria-hidden="true">
<use xlink:href="#csdnc-thumbsup"></use>
</svg><span class="name">点赞</span>
<span class="count"></span>
</a></li>
<li class="tool-item tool-active is-collection "><a href="javascript:;" data-report-click="{"mod":"popu_824"}"><svg class="icon" aria-hidden="true">
<use xlink:href="#icon-csdnc-Collection-G"></use>
</svg><span class="name">收藏</span></a></li>
<li class="tool-item tool-active is-share"><a href="javascript:;" data-report-click="{"mod":"1582594662_002"}"><svg class="icon" aria-hidden="true">
<use xlink:href="#icon-csdnc-fenxiang"></use>
</svg>分享</a></li>
<!--打赏开始-->
<!--打赏结束-->
<li class="tool-item tool-more">
<a>
<svg t="1575545411852" class="icon" viewBox="0 0 1024 1024" version="1.1" xmlns="http://www.w3.org/2000/svg" p-id="5717" xmlns:xlink="http://www.w3.org/1999/xlink" width="200" height="200"><defs><style type="text/css"></style></defs><path d="M179.176 499.222m-113.245 0a113.245 113.245 0 1 0 226.49 0 113.245 113.245 0 1 0-226.49 0Z" p-id="5718"></path><path d="M509.684 499.222m-113.245 0a113.245 113.245 0 1 0 226.49 0 113.245 113.245 0 1 0-226.49 0Z" p-id="5719"></path><path d="M846.175 499.222m-113.245 0a113.245 113.245 0 1 0 226.49 0 113.245 113.245 0 1 0-226.49 0Z" p-id="5720"></path></svg>
</a>
<ul class="more-box">
<li class="item"><a class="article-report">文章举报</a></li>
</ul>
</li>
</ul>
</div>
</div>
<div class="person-messagebox">
<div class="left-message"><a href="https://blog.csdn.net/xie_qi_chao" target="_blank">
<img src="https://profile.csdnimg.cn/B/F/6/3_xie_qi_chao" class="avatar_pic" username="xie_qi_chao">
<img src="https://g.csdnimg.cn/static/user-reg-year/1x/2.png" class="user-years">
</a></div>
<div class="middle-message">
<div class="title"><span class="tit"><a href="https://blog.csdn.net/xie_qi_chao" data-report-click="{"mod":"popu_379"}" target="_blank">解启超</a></span>
</div>
<div class="text"><span>发布了329 篇原创文章</span> · <span>获赞 52</span> · <span>访问量 3万+</span></div>
</div>
<div class="right-message">
<a href="https://im.csdn.net/im/main.html?userName=xie_qi_chao" target="_blank" class="btn btn-sm btn-red-hollow bt-button personal-letter">私信
</a>
<a class="btn btn-sm attented bt-button personal-watch" data-report-click="{"mod":"popu_379"}">已关注</a>
</div>
</div>
</div>
</article>

案例1:iptables基本管理
案例2:filter过滤和转发控制
案例3:防火墙扩展规则
案例4:配置SNAT实现共享上网
- 1
- 2
- 3
- 4
1 案例1:iptables基本管理
1.1 问题
本案例要求练习iptables命令的使用,按照要求完成以下任务:
关闭firewalld,开启iptables服务
查看防火墙规则
追加、插入防火墙规则
删除、清空防火墙规则
- 1
- 2
- 3
- 4
1.2 步骤
实现此案例需要按照如下步骤进行。
步骤一:关闭firewalld,启动iptables服务
1)关闭firewalld服务器
[root@svr5 ~]# systemctl stop firewalld.service
[root@svr5 ~]# systemctl disable firewalld.service
- 1
- 2
2)安装iptables-services并启动服务
[root@svr5 ~]# yum -y install iptables-services
[root@svr5 ~]# systemctl start iptables.service
- 1
- 2
步骤二:熟悉iptables框架
1)iptables的4个表(区分大小写):
iptables默认有4个表,nat表(地址转换表)、filter表(数据过滤表)、raw表(状态跟踪表)、mangle表(包标记表)。
2)iptables的5个链(区分大小写):
INPUT链(入站规则)
OUTPUT链(出站规则)
FORWARD链(转发规则)
PREROUTING链(路有前规则)
POSTROUTING链(路由后规则)
步骤三:iptables命令的基本使用方法
1)iptabels语法格式
[root@svr5 ~]# iptables  [-t 表名]  选项  [链名]  [条件]  [-j 目标操作]
[root@svr5 ~]# iptables  -t  filter  -I  INPUT -p  icmp  -j  REJECT
[root@svr5 ~]# iptables -t filter -I  INPUT   -p  icmp  -j  ACCEPT
[root@svr5 ~]# iptables  -I  INPUT  -p  icmp  -j  REJECT
//注意事项与规律:
//可以不指定表,默认为filter表
//可以不指定链,默认为对应表的所有链
//除非设置默认策略,否则必须指定匹配条件
//选项/链名/目标操作用大写字母,其余都小写
########################################################################
//目标操作:
// ACCEPT:允许通过/放行
// DROP:直接丢弃,不给出任何回应
// REJECT:拒绝通过,必要时会给出提示
// LOG:记录日志,然后传给下一条规则
- 1
- 2
- 3
- 4
- 5
- 6
- 7
- 8
- 9
- 10
- 11
- 12
- 13
- 14
- 15
iptables命令的常用选项如表-1所示。
表-1 iptables常用选项
2)iptables命令的使用案例
创建规则的案例:
[root@svr5 ~]# iptables  -t  filter  -A  INPUT  -p tcp  -j  ACCEPT
//追加规则至filter表中的INPUT链的末尾,允许任何人使用TCP协议访问本机
[root@svr5 ~]# iptables  -I  INPUT  -p  udp  -j  ACCEPT
//插入规则至filter表中的INPUT链的开头,允许任何人使用UDP协议访问本机
[root@svr5 ~]# iptables  -I  INPUT 2  -p  icmp  -j  ACCEPT
//插入规则至filter表中的INPUT链的第2行,允许任何人使用ICMP协议访问本机
- 1
- 2
- 3
- 4
- 5
- 6
查看iptables防火墙规则
[root@svr5 ~]# iptables  -nL  INPUT                    //仅查看INPUT链的规则
target     prot opt source               destination
ACCEPT     udp  --  0.0.0.0/0            0.0.0.0/0
ACCEPT     icmp --  0.0.0.0/0            0.0.0.0/0
ACCEPT     tcp  --  0.0.0.0/0            0.0.0.0/0
[root@svr5 ~]# iptables  -L  INPUT  --line-numbers        //查看规则,显示行号
num  target     prot opt source         destination
1    ACCEPT     udp   --  anywhere     anywhere
2    ACCEPT     icmp --   anywhere     anywhere
3    ACCEPT     tcp  --   anywhere     anywhere
- 1
- 2
- 3
- 4
- 5
- 6
- 7
- 8
- 9
- 10
删除规则,清空所有规则
[root@svr5 ~]# iptables  -D  INPUT  3
//删除filter表中INPUT链的第3条规则
[root@svr5 ~]# iptables  -nL  INPUT                //查看规则,确认是否删除
[root@svr5 ~]# iptables  -F
//清空filter表中所有链的防火墙规则
[root@svr5 ~]# iptables  -t  nat  -F
//清空nat表中所有链的防火墙规则
[root@svr5 ~]# iptables  -t  mangle  -F
//清空mangle表中所有链的防火墙规则
[root@svr5 ~]# iptables  -t  raw  -F
//清空raw表中所有链的防火墙规则
- 1
- 2
- 3
- 4
- 5
- 6
- 7
- 8
- 9
- 10
- 11
设置防火墙默认规则
[root@svr5 ~]# iptables  -t  filter  -P  INPUT  DROP
[root@svr5 ~]# iptables  -nL
Chain INPUT (policy DROP)
… …
- 1
- 2
- 3
- 4
2 案例2:filter过滤和转发控制
2.1 问题
本案例要求创建常用主机防火墙规则以及网络防火墙规则:
针对Linux主机进行出站、入站控制
利用ip_forward机制实现Linux路由/网关功能
在Linux网关上实现数据包转发访问控制
- 1
- 2
- 3
2.2 方案
根据防火墙保护的对象不同,防火墙可以分为主机型防火墙与网络型防火墙,如图-1所示。
主机型防火墙,主要保护的是服务器本机(过滤威胁本机的数据包)。
网络防火墙,主要保护的是防火墙后面的其他服务器,如web服务器、FTP服务器等。
2.3 步骤
实现此案例需要按照如下步骤进行。
步骤一:iptables防火墙规则的条件
iptables防火墙可以根据很多很灵活的规则进行过滤行为,具体常用的过滤条件如表-2所示。
表-2 iptables过滤条件
1)主机型防火墙案例
[root@svr5 ~]# iptables -I INPUT -p tcp --dport 80 -j REJECT
[root@svr5 ~]# iptables -I INPUT -s 192.168.2.100 -j REJECT
[root@svr5 ~]# iptables -I INPUT -d 192.168.2.5 -p tcp --dport 80 -j REJECT
[root@svr5 ~]# iptables -I INPUT -i eth0 -p tcp --dport 80 -j REJECT
[root@svr5 ~]# iptables  -A  INPUT  -s 192.168.4.120  -j  DROP
//丢弃192.168.4.120发给本机的所有数据包
[root@svr5 ~]# iptables  -A  INPUT -s  10.0.10.0/24  -j  DROP
//丢弃10.0.10.0/24网络中所有主机发送给本机的所有数据包
[root@svr5 ~]# iptables -A  INPUT -s  114.212.33.12  -p tcp --dport 22-j  REJECT
//拒绝114.212.33.12使用tcp协议远程连接本机ssh(22端口)
- 1
- 2
- 3
- 4
- 5
- 6
- 7
- 8
- 9
- 10
步骤二:开启Linux的路由转发功能
1)Linux内核默认支持软路由功能,通过修改内核参数即可开启或关闭路由转发功能。
[root@svr5 ~]# echo 0 > /proc/sys/net/ipv4/ip_forward            //关闭路由转发
[root@svr5 ~]# echo 1 > /proc/sys/net/ipv4/ip_forward            //开启路由转发
//注意以上操作仅当前有效,计算机重启后无效
[root@svr5 ~]# echo 'net.ipv4.ip_forward=1' >> /etc/sysctl.conf
//修改/etc/sysctl.conf配置文件,可以实现永久有效规则
- 1
- 2
- 3
- 4
- 5
步骤四:网络型防火墙案例
1)网络型防火墙案例
部署如表-3所示的网络拓扑,一定要把router主机的路由转发功能打开。
表-3 实验拓扑
添加网关的命令
[root@client ~]# nmcli connection modify eth0 ipv4.gateway 192.168.4.5
[root@client ~]# nmcli connection up eth0
[root@web1 ~]# nmcli connection modify eth1 ipv4.gateway 192.168.2.5
[root@web1 ~]# nmcli connection up eth1
- 1
- 2
- 3
- 4
确认不同网络的联通性
[root@client ~]# ping 192.168.2.100
[root@web1 ~]# ping 192.168.4.100
- 1
- 2
在web1主机上启动http服务
[root@web1 ~]# yum -y install httpd
[root@web1 ~]# echo "test page" > /var/www/html/index.html
[root@web1 ~]# systemctl restart httpd
- 1
- 2
- 3
没有防火墙的清空下client访问web服务
[root@client ~]# curl http://192.168.2.100 //成功
- 1
设置proxy主机的防火墙规则,保护防火墙后面的Web服务器
[root@proxy ~]# iptables -I FORWARD -s 192.168.4.100 -p tcp --dport 80 -j DROP
- 1
设置完防火墙规则后,再次使用client客户端访问测试效果
[root@client ~]# curl http://192.168.2.100 //失败
- 1
步骤三:禁ping的相关策略
1)默认直接禁ping的问题?
[root@router ~]# iptables -I INPUT -p icmp -j DROP
//设置完上面的规则后,其他主机确实无法ping本机,但本机也无法ping其他主机
//当本机ping其他主机,其他主机回应也是使用icmp,对方的回应被丢弃
- 1
- 2
- 3
2)禁止其他主机ping本机,允许本机ping其他主机
[root@router ~]# iptables  -A  INPUT  -p icmp  \
> --icmp-type echo-request  -j  DROP
//仅禁止入站的ping请求,不拒绝入站的ping回应包
- 1
- 2
- 3
注意:关闭ICMP的类型,可以参考help帮助,参考命令如下:
[root@router ~]# iptables -p icmp --help
- 1
3 案例3:防火墙扩展规则
3.1 问题
本案例要求熟悉使用iptables的扩展规则,实现更丰富的过滤功能,完成以下任务:
根据MAC地址封锁主机
在一条规则中开放多个TCP服务
根据IP范围设置封锁规则
- 1
- 2
- 3
3.2 方案
iptables在基本过滤条件的基础上还扩展了很多其他条件,在使用时需要使用-m参数来启动这些扩展功能,语法如下:
iptables 选项 链名称 -m 扩展模块 --具体扩展条件 -j 动作
3.3 步骤
实现此案例需要按照如下步骤进行。
步骤一:根据MAC地址过滤
1)根据IP过滤的确定是对方修改IP后,防火墙是失效
[root@router ~]# iptables -F
[root@router ~]# iptables -I INPUT -s 192.168.4.100 -p tcp --dport 22 -j DROP
//设置规则禁止192.168.4.100使用ssh远程本机
- 1
- 2
- 3
但是,当client主机修改IP地址后,该规则就会失效,注意因为修改了IP,对client主机的远程连接会断开,需要使用virt-manager开启虚拟机操作:
[root@client ~]# ifconfig eth0  192.168.4.101
[root@client ~]# ssh 192.168.4.5                    //依然成功
- 1
- 2
根据MAC地址过滤,可以防止这种情况的发生
[root@client ~]# ip link show eth0                    //查看client的MAC地址
eth0: <BROADCAST,MULTICAST,UP,LOWER_UP> mtu 1500 qdisc pfifo_fast state UP mode DEFAULT qlen 1000
link/ether 52:54:00:00:00:0b brd ff:ff:ff:ff:ff:ff
[root@router ~]# iptables  -A  INPUT  -p tcp --dport 22\
> -m   mac --mac-source  52:54:00:00:00:0b  -j  DROP
//拒绝52:54:00:00:00:0b这台主机远程本机
- 1
- 2
- 3
- 4
- 5
- 6
步骤二:基于多端口设置过滤规则
1)一次需要过滤或放行很多端口时会比较方便
[root@router ~]# iptables  -A  INPUT  -p tcp   \
> -m  multiport --dports  20:22,25,80,110,143,16501:16800  -j  ACCEPT
//一次性开启20,21,22,25,80,110,143,16501到16800所有的端口
- 1
- 2
- 3
步骤三:根据IP地址范围设置规则
1)允许从 192.168.4.10-192.168.4.20 登录
[root@router ~]# iptables  -A  INPUT  -p tcp  --dport  22  \
> -m  iprange  --src-range  192.168.4.10-192.168.4.20   -j  ACCEPT
- 1
- 2
2)禁止从 192.168.4.0/24 网段其他的主机登录
[root@router ~]# iptables -A INPUT -p tcp --dport 22 -s 192.168.4.0/24 -j DROP
- 1
4 案例4:配置SNAT实现共享上网
4.1 问题
本案例要求设置防火墙规则,允许位于局域网中的主机可以访问外网,主要包括下列服务:
搭建内外网案例环境
配置SNAT策略实现共享上网访问
- 1
- 2
4.2 步骤
实现此案例需要按照如下步骤进行。
步骤一:搭建内外网案例环境
表-4 实验拓扑
这里,我们设定192.168.2.0/24网络为外部网络,192.168.4.0/24为内部网络。
现在,在外部网络中有一台web服务器192.168.2.100,因为设置了网关,client已经可以访问此web服务器了。但,如果查看web1的日志就会发现,日志里记录的是192.168.4.100在访问网页。
我们需要实现的效果是,client可以访问web服务器,但要伪装为192.168.2.5后再访问web服务器(模拟所有位于公司内部的电脑都使用的是私有IP,希望访问外网,就需要伪装为公司的外网IP后才可以)。
步骤二:设置防火墙规则,实现IP地址的伪装(SNAT源地址转换)
1)确保router主机开启了路由转发功能
[root@router ~]# echo 1 > /proc/sys/net/ipv4/ip_forward //开启路由转发
- 1
2)设置防火墙规则,实现SNAT地址转换
[root@router ~]# iptables  -t  nat  -A POSTROUTING \
> -s  192.168.4.0/24 –p tcp --dport 80  -j SNAT  --to-source 192.168.2.5
- 1
- 2
3)登陆web主机查看日志
[root@router ~]# tail  /var/log/httpd/access_log
.. ..
192.168.2.5 - - [12/Aug/2018:17:57:10 +0800] "GET / HTTP/1.1" 200 27 "-" "Mozilla/4.0 (compatible; MSIE 6.0; Windows NT 5.1; SV1)"
- 1
- 2
- 3
通过日志会发现,客户端是先伪装为了192.168.2.5之后再访问的web服务器!
</div>
<link href="https://csdnimg.cn/release/phoenix/mdeditor/markdown_views-b6c3c6d139.css" rel="stylesheet">
<div class="more-toolbox">
<div class="left-toolbox">
<ul class="toolbox-list">
<li class="tool-item tool-active is-like "><a href="javascript:;"><svg class="icon" aria-hidden="true">
<use xlink:href="#csdnc-thumbsup"></use>
</svg><span class="name">点赞</span>
<span class="count"></span>
</a></li>
<li class="tool-item tool-active is-collection "><a href="javascript:;" data-report-click="{"mod":"popu_824"}"><svg class="icon" aria-hidden="true">
<use xlink:href="#icon-csdnc-Collection-G"></use>
</svg><span class="name">收藏</span></a></li>
<li class="tool-item tool-active is-share"><a href="javascript:;" data-report-click="{"mod":"1582594662_002"}"><svg class="icon" aria-hidden="true">
<use xlink:href="#icon-csdnc-fenxiang"></use>
</svg>分享</a></li>
<!--打赏开始-->
<!--打赏结束-->
<li class="tool-item tool-more">
<a>
<svg t="1575545411852" class="icon" viewBox="0 0 1024 1024" version="1.1" xmlns="http://www.w3.org/2000/svg" p-id="5717" xmlns:xlink="http://www.w3.org/1999/xlink" width="200" height="200"><defs><style type="text/css"></style></defs><path d="M179.176 499.222m-113.245 0a113.245 113.245 0 1 0 226.49 0 113.245 113.245 0 1 0-226.49 0Z" p-id="5718"></path><path d="M509.684 499.222m-113.245 0a113.245 113.245 0 1 0 226.49 0 113.245 113.245 0 1 0-226.49 0Z" p-id="5719"></path><path d="M846.175 499.222m-113.245 0a113.245 113.245 0 1 0 226.49 0 113.245 113.245 0 1 0-226.49 0Z" p-id="5720"></path></svg>
</a>
<ul class="more-box">
<li class="item"><a class="article-report">文章举报</a></li>
</ul>
</li>
</ul>
</div>
</div>
<div class="person-messagebox">
<div class="left-message"><a href="https://blog.csdn.net/xie_qi_chao" target="_blank">
<img src="https://profile.csdnimg.cn/B/F/6/3_xie_qi_chao" class="avatar_pic" username="xie_qi_chao">
<img src="https://g.csdnimg.cn/static/user-reg-year/1x/2.png" class="user-years">
</a></div>
<div class="middle-message">
<div class="title"><span class="tit"><a href="https://blog.csdn.net/xie_qi_chao" data-report-click="{"mod":"popu_379"}" target="_blank">解启超</a></span>
</div>
<div class="text"><span>发布了329 篇原创文章</span> · <span>获赞 52</span> · <span>访问量 3万+</span></div>
</div>
<div class="right-message">
<a href="https://im.csdn.net/im/main.html?userName=xie_qi_chao" target="_blank" class="btn btn-sm btn-red-hollow bt-button personal-letter">私信
</a>
<a class="btn btn-sm attented bt-button personal-watch" data-report-click="{"mod":"popu_379"}">已关注</a>
</div>
</div>
</div>
</article>