Spring Boot 整合 Ehcache
EhCache 是一个纯Java的进程内缓存框架,具有快速、精干等特点,是Hibernate中默认的CacheProvider。
ehcache提供了多种缓存策略,主要分为内存和磁盘两级,所以无需担心容量问题。
spring-boot是一个快速的集成框架,其设计目的是用来简化新Spring应用的初始搭建以及开发过程。该框架使用了特定的方式来进行配置,从而使开发人员不再需要定义样板化的配置。
由于spring-boot无需任何样板化的配置文件,所以spring-boot集成一些其他框架时会有略微的不同。
1 修改 pom 文件
<project xmlns="http://maven.apache.org/POM/4.0.0"
xmlns:xsi="http://www.w3.org/2001/XMLSchema-instance"
xsi:schemaLocation="http://maven.apache.org/POM/4.0.0
http://maven.apache.org/xsd/maven-4.0.0.xsd">
<modelVersion>4.0.0</modelVersion>
<parent>
<groupId>org.springframework.boot</groupId>
<artifactId>spring-boot-starter-parent</artifactId>
<version>1.5.10.RELEASE</version>
</parent>
<groupId>com.bjsxt</groupId>
<artifactId>23-spring-boot-ehcache</artifactId>
<version>0.0.1-SNAPSHOT</version>
<properties>
<java.version>1.7</java.version>
<thymeleaf.version>3.0.2.RELEASE</thymeleaf.version>
<thymeleaf-layout-dialect.version>2.0.4</thymeleaf-layout-dialect.ve
rsion>
</properties>
<dependencies>
<!-- springBoot 的启动器 -->
<dependency><groupId>org.springframework.boot</groupId>
<artifactId>spring-boot-starter-web</artifactId>
</dependency>
<!-- springBoot 的启动器 -->
<dependency>
<groupId>org.springframework.boot</groupId>
<artifactId>spring-boot-starter-thymeleaf</artifactId>
</dependency>
<!-- springBoot 的启动器 -->
<dependency>
<groupId>org.springframework.boot</groupId>
<artifactId>spring-boot-starter-data-jpa</artifactId>
</dependency>
<!-- 测试工具的启动器 -->
<dependency>
<groupId>org.springframework.boot</groupId>
<artifactId>spring-boot-starter-test</artifactId>
</dependency>
<!-- mysql -->
<dependency>
<groupId>mysql</groupId>
<artifactId>mysql-connector-java</artifactId>
</dependency>
<!-- druid 连接池 -->
<dependency>
<groupId>com.alibaba</groupId>
<artifactId>druid</artifactId>
<version>1.0.9</version>
</dependency>
<!-- Spring Boot 缓存支持启动器 -->
<dependency>
<groupId>org.springframework.boot</groupId>
<artifactId>spring-boot-starter-cache</artifactId>
</dependency>


<!-- Ehcache 坐标 -->
<dependency>
<groupId>net.sf.ehcache</groupId>
<artifactId>ehcache</artifactId></dependency>

</dependencies>

 <build>
        <plugins>
            <plugin>
                <groupId>org.springframework.boot</groupId>
                <artifactId>spring-boot-maven-plugin</artifactId>
            </plugin>
        </plugins>
    </build>


</project>
配置Ehcache缓存
文件名: ehcache.xml
位置: src/main/resources/ehcache.xml
现在,需要告诉Spring Boot去哪里找缓存配置文件,这需要在Spring Boot配置文件中进行设置:
spring.cache.jcache.config=classpath:ehcache.xml
然后使用@EnableCaching注解开启Spring Boot应用程序缓存功能,你可以在应用主类中进行操作:
@SpringBootApplication
@EnableCaching
public class CacheApplication {
    public static void main(String[] args) {

        SpringApplication.run(CacheApplication.class, args);

    }

}
ehcache.xml
<ehcache xmlns:xsi="http://www.w3.org/2001/XMLSchema-instance"
xsi:noNamespaceSchemaLocation="../config/ehcache.xsd">
<diskStore path="java.io.tmpdir"/>

<!--defaultCache:echcache 的默认缓存策略 -->
<defaultCache
maxElementsInMemory="10000"
eternal="false"
timeToIdleSeconds="120"
timeToLiveSeconds="120"
maxElementsOnDisk="10000000"
diskExpiryThreadIntervalSeconds="120"
memoryStoreEvictionPolicy="LRU">
<persistence strategy="localTempSwap"/>
</defaultCache>

<!-- 自定义缓存策略 -->
<cache name="users"
maxElementsInMemory="10000"
eternal="false"
timeToIdleSeconds="120"
timeToLiveSeconds="120"
maxElementsOnDisk="10000000"
diskExpiryThreadIntervalSeconds="120"
memoryStoreEvictionPolicy="LRU">
<persistence strategy="localTempSwap"/>
</cache>
</ehcache>
解释下这个xml文件中的标签。
-
(1).diskStore: 为缓存路径,ehcache分为内存和磁盘两级,此属性定义磁盘的缓存位置。参数解释如下:
user.home – 用户主目录
user.dir – 用户当前工作目录
java.io.tmpdir – 默认临时文件路径 -
(2).defaultCache:默认缓存策略,当ehcache找不到定义的缓存时,则使用这个缓存策略。只能定义一个。
-
(3).cache:自定缓存策略,为自定义的缓存策略。参数解释如下:
-
cache元素的属性:
- name:缓存名称
- maxElementsInMemory:内存中最大缓存对象数
- maxElementsOnDisk:硬盘中最大缓存对象数,若是0表示无穷大
- eternal:true表示对象永不过期,此时会忽略timeToIdleSeconds和timeToLiveSeconds属性,默认为false
- overflowToDisk:true表示当内存缓存的对象数目达到了maxElementsInMemory界限后,会把溢出的对象写到硬盘缓存中。注意:如果缓存的对象要写入到硬盘中的话,则该对象必须实现了Serializable接口才行。
- diskSpoolBufferSizeMB:磁盘缓存区大小,默认为30MB。每个Cache都应该有自己的一个缓存区。
- diskPersistent:是否缓存虚拟机重启期数据
- diskExpiryThreadIntervalSeconds:磁盘失效线程运行时间间隔,默认为120秒
- timeToIdleSeconds: 设定允许对象处于空闲状态的最长时间,以秒为单位。当对象自从最近一次被访问后,如果处于空闲状态的时间超过了timeToIdleSeconds属性值,这个对象就会过期,EHCache将把它从缓存中清空。只有当eternal属性为false,该属性才有效。如果该属性值为0,则表示对象可以无限期地处于空闲状态
- timeToLiveSeconds:设定对象允许存在于缓存中的最长时间,以秒为单位。当对象自从被存放到缓存中后,如果处于缓存中的时间超过了 timeToLiveSeconds属性值,这个对象就会过期,EHCache将把它从缓存中清除。只有当eternal属性为false,该属性才有效。如果该属性值为0,则表示对象可以无限期地存在于缓存中。timeToLiveSeconds必须大于timeToIdleSeconds属性,才有意义
- memoryStoreEvictionPolicy:当达到maxElementsInMemory限制时,Ehcache将会根据指定的策略去清理内存。可选策略有:LRU(最近最少使用,默认策略)、FIFO(先进先出)、LFU(最少访问次数)。
application.properties 文件
spring.datasource.driverClassName=com.mysql.jdbc.Driver
spring.datasource.url=jdbc:mysql://localhost:3306/ssm
spring.datasource.username=rootspring.datasource.password=root
spring.datasource.type=com.alibaba.druid.pool.DruidDataSource
spring.jpa.hibernate.ddl-auto=update
spring.jpa.show-sql=true
spring.cache.ehcache.cofnig=ehcache.xml
创建业务层
将ehcache的管理器暴露给spring的上下文容器,
@Service
public class UsersServiceImpl implements UsersService {
@Autowired
private UsersRepository usersRepository;
@Override
public List<Users> findUserAll() {
return this.usersRepository.findAll();
}
@Override
//@Cacheable:对当前查询的对象做缓存处理 自定义文件
@Cacheable(value="users")public Users findUserById(Integer id) {
return this.usersRepository.findOne(id);
}
@Override
public Page<Users> findUserByPage(Pageable pageable) {
return this.usersRepository.findAll(pageable);
}
@Override
public void saveUsers(Users users) {
this.usersRepository.save(users);
}
}
修改实体类 Users implements Serializable
@Entity
@Table(name="t_users")
public class Users implements Serializable {
@Id
@GeneratedValue(strategy=GenerationType.IDENTITY)
@Column(name="id")
private Integer id;
@Column(name="name")
private String name;
@Column(name="age")
private Integer age;
@Column(name="address")
private String address;

get/set 省略
@Cacheable 与@CacheEvict 讲解
@Cacheable(前面用过 自定义策略)
@Cacheable 作用: 把方法的返回值添加到 Ehcache 中做缓存
Value 属性: 指定一个 Ehcache 配置文件中的缓存策略, 如果么有给定 value, name 则表示使用默认的缓存策略。
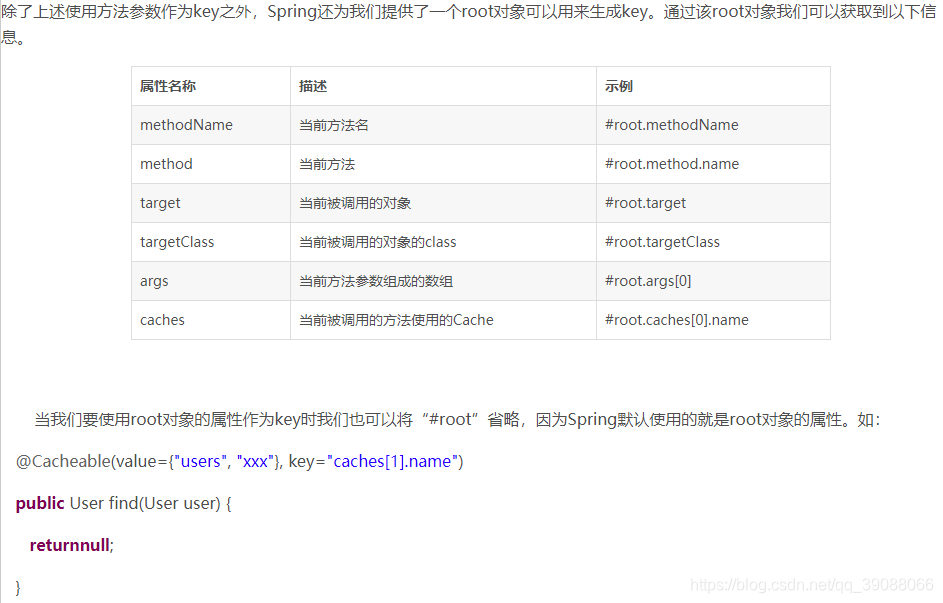
Key 属性: 给存储的值起个名称。 在查询时如果有名称相同的, 那么则知己从缓存中将数据返回(就不会走数据库了)默认开启
业务层+测试
这个注解一般加在查询方法上,表示将一个方法的返回值缓存起来,默认情况下,缓存的 key 就是方法的参数,缓存的 value 就是方法的返回值。示例代码如下:
@Override
@Cacheable(value="users",key="#pageable.pageSize")
//以属性 为key
public Page<Users> findUserByPage(Pageable pageable) {
return this.usersRepository.findAll(pageable);
}


测试:
@Test
public void testFindUserByPage(){
Pageable pageable = new PageRequest(0, 2);
//第一次查询
System.out.println(this.usersService.findUserByPage(pageable).getTot
alElements());
//第二次查询
System.out.println(this.usersService.findUserByPage(pageable).getTot
alElements());
//第三次查询
pageable = new PageRequest(1, 2);
System.out.println(this.usersService.findUserByPage(pageable).getTot
alElements());
}
}

key="#pageable"
第一次查了数据库,
第二次 一样的语句没有查数据库,
第三次修改了 key即pageable  又查了数据库

key="#pageable.pageSize"
第一次查了数据库,
第二,三次 都不查数据库 从缓存中拿

注意
1、必须是同一个缓存实例。

2、key值必须是相同的。
@CachePut 、@Cacheable的区别
@CachePut:这个注释可以确保方法被执行,同时方法的返回值也被记录到缓存中。
@Cacheable:当重复使用相同参数调用方法的时候,方法本身不会被调用执行,即方法本身被略过了,取而代之的是方法的结果直接从缓存中找到并返回了。
那么对于@CachePut这个注解,它的作用是什么呢,每次方法都执行,那么缓存的意义是什么呢?在这里写了一个小实例对这两个标签进行测试,并解释了上边这个疑问。
首先,我们猜想对于同一个缓存实例的相同的key的缓存的数据,可以用@CachePut更新,而@Cacheable在取值的时候,是@CachePut更新后的值。
@CacheEvict(清除缓存)
业务层
@Service
public class UsersServiceImpl implements UsersService {
@Autowired
private UsersRepository usersRepository;
@Override
@Cacheable(value="users")public List<Users> findUserAll() {
return this.usersRepository.findAll();
}
@Override
//@Cacheable:对当前查询的对象做缓存处理
@Cacheable(value="users")
public Users findUserById(Integer id) {
return this.usersRepository.findOne(id);
}
@Override
@Cacheable(value="users",key="#pageable.pageSize")
public Page<Users> findUserByPage(Pageable pageable) {
return this.usersRepository.findAll(pageable);
}
@Override
//@CacheEvict(value="users",allEntries=true) 清除缓存中以 users 缓
//存策略缓存的对象
@CacheEvict(value="users",allEntries=true)
public void saveUsers(Users users) {
this.usersRepository.save(users);
}
}
测试
@Test
public void testFindAll(){
//第一次查询
System.out.println(this.usersService.findUserAll().size());
Users users = new Users();
users.setAddress("南京");
users.setAge(43);
users.setName("朱七");
this.usersService.saveUsers(users);
//第二次查询
System.out.println(this.usersService.findUserAll().size());
}
Spring Boot 整合 Spring Data Redis
springdata设计初衷是位简化数据类型和数据的持久化存储,它并不局限是关系型数据库还是nosql数据库,都提供了简化的数据库连接,让数据获取变得更加的简单。所有这些的实现有统一的api提供。
设置spring-data-redis的相关配置特性:
1.RedisTemplate:高度封装的,自动连接池管理类;
2.对数据类型进行了归类,封装了操作接口类:
a) ValueOperations:key-value操作
b) setOperations:set的相关操作
c) ZsetOperations:
d) HashOperations:hash数据类型操作
e) ListOperations:list数据类型操作
3.对事务进行 封装,通过容器进行控制。
4.序列化机制,提供各种序列化策略选择
运行环境: Linux
Redis 能够兼容绝大部分的 POSIX 系统,例如 Linux、OS X 等,但是很遗憾不支持在 Windows 上安装,当然如果你需要在 windows 下安装 redis 的话,也是可以的,微软公司的开源技术组在 GitHub 上 维护一个 Redis 的分支,
GitHub 地址为:https://github.com/microsoftarchive/redis,我看了一下这上面的版本比较旧,所以我个人不推荐使用这个来安装 Redis ,
Windows 用户可以使用 Docker 容器来安装,也是非常方便、简单的,接下来我们就一起来看看 Redis 的安装方式吧。
安装 Redis
在 redis 官网中有安装教程,链接:https://redis.io/download
- 安装 gcc
Yum install gcc-c++ - 解压 redis.3.0.0.tar.gz 压缩包
tar -zxvf redis-3.0.0.tar.gz - 进入解压后的目录进行编译
cd redis-3.0.0
make - 将 Redis 安装到指定目录
make PREFIX=/usr/local/redis install - 启动 Redis
./redis-server
redis 关闭
shutdown [nosave|save]
shell 交互界面输入 shutdown 命令就可以关闭 Redis 实例,后面有一个可选参数,nosave 就是不将内存中的数据持久化,save 就是将内存中的数据持久化。
接下来我们看看/usr/local/redis/bin目录下的几个文件时什么
redis-benchmark:redis性能测试工具
redis-check-aof:检查aof日志的工具
redis-check-dump:检查rdb日志的工具
redis-cli:连接用的客户端
redis-server:redis服务进程
redis.conf 文件
默认情况,Redis不是在后台运行,我们需要把redis放在后台运行
vim /usr/local/redis/etc/redis.conf
将daemonize的值改为yes
redis.conf 是 Redis 的配置文件,redis 的所有配置有在这个文件里面,这个文件挺大的有接近 1400 行,有关 redis 的操作、使用说明都在里面,可以详细的阅读阅读这个配置文件,大部分情况下我们使用默认配置就行,只需要设置少量配置就行。redis.conf 的存放位置在 Redis 的安装目录下,我这里是 /usr/local/redis-5.0.5 目录下,一起来看看我们可能会修改的几个配置:
- bind 127.0.0.1:允许访问机器的IP,默认只有本机才能访问,你可以修改 ip 来运行其他机器也能访问,但是如果你想让所有机器都可以访问的话,直接设置为 bind 0.0.0.0 就行了。
- port 6379:redis 实例启动的端口,默认为 6379
daemonize no:是否以守护进程的方式运行,默认是 no,也就是说你把启动窗口关闭了,redis 实例也就关闭了,一般这个选项我们设置为 yes,以守护进程的方式运行,说俗一点就是后台运行。 - pidfile /var/run/redis_6379.pid:如果我们使用守护进程方式运行的话 ,就会产生一个后缀名为 .pid 的文件,这个使用默认的也行
- dir ./:持久化文件存放位置,这个配置我们还是设置一下为好,我这里设置为 dir /usr/local/redis_data
- appendonly no:是否开启 AOF 持久化方式,redis 默认只开启了 RDB 模式,这里我们设置为 yes,两种方式都开启,双重保险,
daemonize:如需要在后台运行,把该项的值改为yes
pdifile:把pid文件放在/var/run/redis.pid,可以配置到其他地址
bind:指定redis只接收来自该IP的请求,如果不设置,那么将处理所有请求,在生产环节中最好设置该项
port:监听端口,默认为6379
timeout:设置客户端连接时的超时时间,单位为秒
loglevel:等级分为4级,debug,revbose,notice和warning。生产环境下一般开启notice
logfile:配置log文件地址,默认使用标准输出,即打印在命令行终端的端口上
database:设置数据库的个数,默认使用的数据库是0
save:设置redis进行数据库镜像的频率
rdbcompression:在进行镜像备份时,是否进行压缩
dbfilename:镜像备份文件的文件名
dir:数据库镜像备份的文件放置的路径
slaveof:设置该数据库为其他数据库的从数据库
masterauth:当主数据库连接需要密码验证时,在这里设定
requirepass:设置客户端连接后进行任何其他指定前需要使用的密码
maxclients:限制同时连接的客户端数量
maxmemory:设置redis能够使用的最大内存
appendonly:开启appendonly模式后,redis会把每一次所接收到的写操作都追加到appendonly.aof文件中,当redis重新启动时,会从该文件恢复出之前的状态
appendfsync:设置appendonly.aof文件进行同步的频率
vm_enabled:是否开启虚拟内存支持
vm_swap_file:设置虚拟内存的交换文件的路径
vm_max_momery:设置开启虚拟内存后,redis将使用的最大物理内存的大小,默认为0
vm_page_size:设置虚拟内存页的大小
vm_pages:设置交换文件的总的page数量
vm_max_thrrads:设置vm IO同时使用的线程数量
Spring Boot 整合 Spring Data Redis
Spring Data Redis 是属于 Spring Data 下的一个模块。 作用就是简化对于 redis 的操做
pom代码
<!-- Spring Data Redis 的启动器 -->
<dependency>
     <groupId>org.springframework.boot</groupId>
     <artifactId>spring-boot-starter-data-redis</artifactId>
</dependency>

<dependency>
      <groupId>com.fasterxml.jackson.core</groupId>
      <artifactId>jackson-databind</artifactId>
</dependency>

<!-- Test 的启动器 -->
<dependency>
<groupId>org.springframework.boot</groupId>
<artifactId>spring-boot-starter-test</artifactId>
</dependency>
引入yml配置文件
spring:
redis:
database: 0
host: 127.0.0.1
port: 6379
写redis配置(redisTemplate)
编写 Spring Data Redis 的配置类(重点)
@Configuration
public class RedisConfig {
/**
* 1.创建 JedisPoolConfig 对象。 在该对象中完成一些链接池配置
* *
/
@Bean
public JedisPoolConfig jedisPoolConfig(){
JedisPoolConfig config = new JedisPoolConfig();
//最大空闲数
config.setMaxIdle(10);
//最小空闲数
config.setMinIdle(5);
//最大链接数
config.setMaxTotal(20);
return config;
}
/
**
* 2.创建 JedisConnectionFactory: 配置 redis 链接信息
*/
@Bean
public JedisConnectionFactory
jedisConnectionFactory(JedisPoolConfig config){
JedisConnectionFactory factory = new JedisConnectionFactory();
//关联链接池的配置对象
factory.setPoolConfig(config);
//配置链接 Redis 的信息
//主机地址
factory.setHostName("192.168.70.128");
//端口
factory.setPort(6379);
return factory;
}
/
**
* 3.创建 RedisTemplate:用于执行 Redis 操作的方法
*/
@Bean
public RedisTemplate<String,Object>
redisTemplate(JedisConnectionFactory factory){
RedisTemplate<String, Object> template = new RedisTemplate<>();
//关联
template.setConnectionFactory(factory);
//为 key 设置序列化器
template.setKeySerializer(new StringRedisSerializer());
//为 value 设置序列化器
template.setValueSerializer(new StringRedisSerializer());
return template;
}
}
编写测试类
@RunWith(SpringJUnit4ClassRunner.class)
@SpringBootTest(classes=App.class)
public class RedisTest {
@Autowired
private RedisTemplate<String, Object> redisTemplate;
/**
* 添加一个字符串
*/@Test
public void testSet(){
this.redisTemplate.opsForValue().set("key", "北京尚学堂");
} /
**
* 获取一个字符串
*/
@Test
public void testGet(){
String value =
(String)this.redisTemplate.opsForValue().get("key");
System.out.println(value);
}
}
提取 redis 的配置信息
src/main/resource/ 目 录 下 新 建 一 个 配 置 文
件:application.properties
spring.redis.pool.max-idle=10
spring.redis.pool.min-idle=5
spring.redis.pool.max-total=20
spring.redis.hostName=192.168.70.128
spring.redis.port=6379
修改配置类
@Configuration
public class RedisConfig {
/**
* 1.创建 JedisPoolConfig 对象。 在该对象中完成一些链接池配置
* @ConfigurationProperties:会将前缀相同的内容创建一个实体。*/
@Bean
@ConfigurationProperties(prefix="spring.redis.pool")
public JedisPoolConfig jedisPoolConfig(){
JedisPoolConfig config = new JedisPoolConfig();
/*//最大空闲数
config.setMaxIdle(10);
//最小空闲数
config.setMinIdle(5);
//最大链接数
config.setMaxTotal(20);*/
System.out.println("默认值: "+config.getMaxIdle());
System.out.println("默认值: "+config.getMinIdle());
System.out.println("默认值: "+config.getMaxTotal());
return config;
} /
**
* 2.创建 JedisConnectionFactory: 配置 redis 链接信息
*/
@Bean
@ConfigurationProperties(prefix="spring.redis")
public JedisConnectionFactory
jedisConnectionFactory(JedisPoolConfig config){
System.out.println("配置完毕: "+config.getMaxIdle());
System.out.println("配置完毕: "+config.getMinIdle());
System.out.println("配置完毕: "+config.getMaxTotal());
JedisConnectionFactory factory = new JedisConnectionFactory();
//关联链接池的配置对象
factory.setPoolConfig(config);
//配置链接 Redis 的信息
//主机地址
/*factory.setHostName("192.168.70.128");
//端口
factory.setPort(6379);*/
return factory;
} /
**
* 3.创建 RedisTemplate:用于执行 Redis 操作的方法
*/
@Bean
public RedisTemplate<String,Object>redisTemplate(JedisConnectionFactory factory){
RedisTemplate<String, Object> template = new RedisTemplate<>();
//关联
template.setConnectionFactory(factory);
//为 key 设置序列化器
template.setKeySerializer(new StringRedisSerializer());
//为 value 设置序列化器
template.setValueSerializer(new StringRedisSerializer());
return template;
}
}
测试
创建实体类
public class Users implements Serializable {
private Integer id;
private String name;
private Integer age;}
测试代码
/**
* 添加 Users 对象
*/
@Test
public void testSetUesrs(){
Users users = new Users();
users.setAge(20);
users.setName("张三丰");
users.setId(1);
//重新设置序列化器
this.redisTemplate.setValueSerializer(new
JdkSerializationRedisSerializer());
this.redisTemplate.opsForValue().set("users", users);
} /
**
* 取 Users 对象
*/
@Test
public void testGetUsers(){
//重新设置序列化器
this.redisTemplate.setValueSerializer(new
JdkSerializationRedisSerializer());
Users users =
(Users)this.redisTemplate.opsForValue().get("users");
System.out.println(users);
}
Spring Data Redis 以 JSON 格式存储实体对象
/**
* 基于 JSON 格式存 Users 对象
*/
@Test
public void testSetUsersUseJSON(){
Users users = new Users();
users.setAge(20);
users.setName("李四丰");
users.setId(1);
this.redisTemplate.setValueSerializer(new
Jackson2JsonRedisSerializer<>(Users.class));
this.redisTemplate.opsForValue().set("users_json", users);
} /
**
* 基于 JSON 格式取 Users 对象
*/
@Test
public void testGetUseJSON(){
this.redisTemplate.setValueSerializer(new
Jackson2JsonRedisSerializer<>(Users.class));
Users users =
(Users)this.redisTemplate.opsForValue().get("users_json");
System.out.println(users);
}
