-
Modo pseudodistribuido
Hadoop también se puede ejecutar en un solo nodo en un modo pseudodistribuido donde cada demonio de Hadoop se ejecuta en un proceso Java separado.
Hadoop también puede ejecutarse en un solo nodo en un modo pseudodistribuido, donde cada demonio de Hadoop se ejecuta en un proceso Java separado.
-
Inicie HDFS y ejecute el programa MapReduce
-
Configurar el clúster
-
Configure
etc/hadoop/hadoop-env.shy modifique laJAVA_HOMEruta a las variables de entorno.[root@localhost hadoop]# vim hadoop-env.sh # The only required environment variable is JAVA_HOME. All others are # optional. When running a distributed configuration it is best to # set JAVA_HOME in this file, so that it is correctly defined on # remote nodes. # 唯一需要的环境变量是JAVA_HOME。 所有其他均为可选。 运行分布式配置时,最好在此文件中设置JAVA_HOME,以便在远程节点上正确定义它。 # The java implementation to use. export JAVA_HOME=/opt/module/jdk1.8.0_144 -
Configure
etc/hadoop/core-site.xml, especifique lanameNodedirección y el directorio de archivos temporales.[root@localhost hadoop]# vim core-site.xml <configuration> <!-- 指定 HDFS 中 NameNode 的地址 --> <property> <name>fs.defaultFS</name> <value>hdfs://192.168.116.100:9000</value> </property> <!-- 指定 Hadoop 运行时产生文件的存储目录 --> <property> <name>hadoop.tmp.dir</name> <value>/opt/module/hadoop-2.7.2/data/tmp</value> </property> </configuration>Aquí, dado que la asignación del archivo de hosts no está configurada en hdfs, se utiliza la configuración de la dirección IP.
-
Configure
etc/hadoop/hdfs-site.xml, configure el número de copias, el valor predeterminado es 3 [la copia aquí es una configuración local, y otros nodos se respaldan automáticamente].[root@localhost hadoop]# vim hdfs-site.xml <configuration> <!-- 指定 HDFS 副本的数量 --> <property> <name>dfs.replication</name> <value>1</value> </property> </configuration>
-
-
Iniciar el clúster
-
Formatee el NameNode (debe formatearse la primera vez que se inicia)
[root@localhost hadoop-2.7.2]# bin/hdfs namenode -format -
NameNode dinámico, DataNode
[root@localhost hadoop-2.7.2]# sbin/hadoop-daemon.sh start namenode starting namenode, logging to /opt/module/hadoop-2.7.2/logs/hadoop-root-namenode-localhost.localdomain.out [root@localhost hadoop-2.7.2]# sbin/hadoop-daemon.sh start datanode starting datanode, logging to /opt/module/hadoop-2.7.2/logs/hadoop-root-datanode-localhost.localdomain.out -
-
Ver clúster
-
A ver si iniciado con éxito (
jpsesJDKel comando para establecer la variable de entorno puede ser utilizado después de la finalización)[root@localhost hadoop-2.7.2]# jps 1362 DataNode 1461 Jps 1308 NameNode -
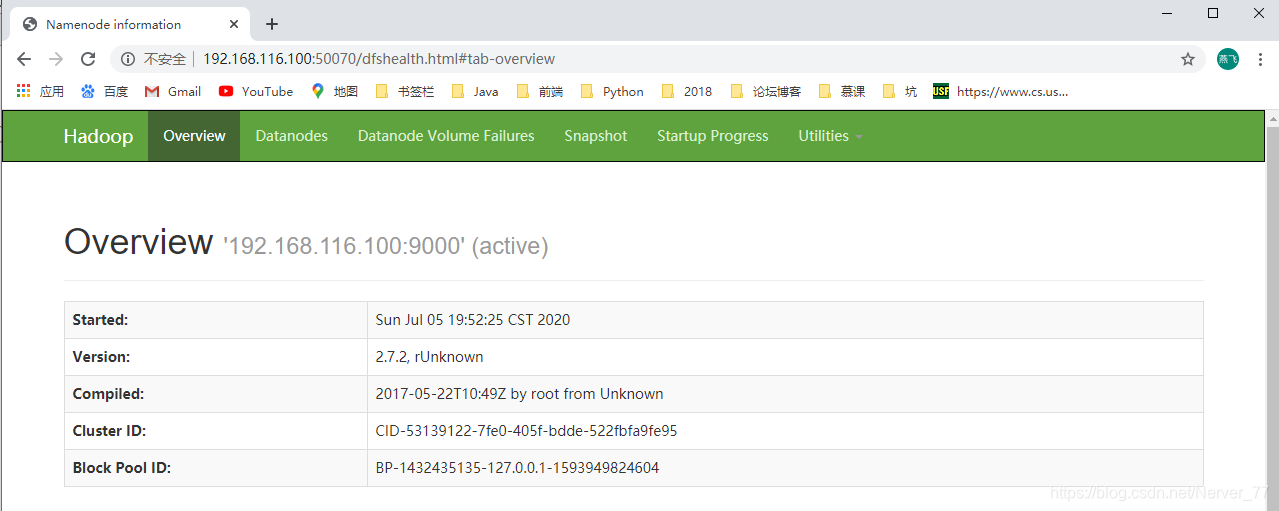
Para ver el
HDFSsistema de archivos a través de la web , aquí estáwinel acceso que realiza el navegador debajo del host. Dado que el mapeo relacionado con los hosts no está configurado, el acceso se realiza directamente a través de la IP.http://192.168.116.100:50070/dfshealth.html#tab-overview
-
Ver el registro generado
[root@localhost logs]# ll 总用量 72 -rw-r--r-- 1 root root 25277 7月 5 20:10 hadoop-root-datanode-localhost.localdomain.log -rw-r--r-- 1 root root 714 7月 5 19:52 hadoop-root-datanode-localhost.localdomain.out -rw-r--r-- 1 root root 30915 7月 5 20:10 hadoop-root-namenode-localhost.localdomain.log -rw-r--r-- 1 root root 5002 7月 5 20:00 hadoop-root-namenode-localhost.localdomain.out -rw-r--r-- 1 root root 0 7月 5 19:52 SecurityAuth-root.audit [root@localhost logs]# cat hadoop-root-datanode-localhost.localdomain.log -
Tenga en cuenta al formatear el NameNode:
-
Ingrese el directorio de almacenamiento especificado de los archivos generados por el tiempo de ejecución de Hadoop:
-
/name,nameNode
[root@localhost hadoop-2.7.2]# cd data/tmp/dfs/name/current/ [root@localhost current]# ll 总用量 1040 -rw-r--r-- 1 root root 1048576 7月 5 20:10 edits_inprogress_0000000000000000001 -rw-r--r-- 1 root root 350 7月 5 19:50 fsimage_0000000000000000000 -rw-r--r-- 1 root root 62 7月 5 19:50 fsimage_0000000000000000000.md5 -rw-r--r-- 1 root root 2 7月 5 19:52 seen_txid -rw-r--r-- 1 root root 201 7月 5 19:50 VERSION [root@localhost current]# cat VERSION #Sun Jul 05 19:50:24 CST 2020 namespaceID=253643691 clusterID=CID-53139122-7fe0-405f-bdde-522fbfa9fe95 cTime=0 storageType=NAME_NODE blockpoolID=BP-1432435135-127.0.0.1-1593949824604 layoutVersion=-63/data,dataNode
[root@localhost hadoop-2.7.2]# cd data/tmp/dfs/data/current/
[root@localhost current]# ll
总用量 4
drwx------ 4 root root  54 7月   5 19:52 BP-1432435135-127.0.0.1-1593949824604
-rw-r--r-- 1 root root 229 7月   5 19:52 VERSION
[root@localhost current]# cat VERSION
#Sun Jul 05 19:52:36 CST 2020
storageID=DS-9a858421-29ac-4778-b625-6881374acfd6
clusterID=CID-53139122-7fe0-405f-bdde-522fbfa9fe95
cTime=0
datanodeUuid=acc2d611-bd06-4a73-94e8-9672fed10714
storageType=DATA_NODE
layoutVersion=-56
Se puede encontrar que clusterID en nameNode y dataNode son iguales, y deben ser consistentes en HDFS para comunicarse. El formato aleatorio del nameNode hará que el clusterID del nameNode cambie, lo que no puede ser coherente con el dataNode, lo que provocará la imposibilidad de comunicarse y obtener datos. Por lo tanto, al formatear nameNode, debe eliminar datos y registrar datos, y luego realizar
namenode -formatoperaciones. -
-
-
Operando el clúster
-
HDFSCree una carpeta de entrada (entrada) en el sistema de archivos[root@localhost hadoop-2.7.2]# bin/hdfs dfs -mkdir -p /user/bcxtm/input -
Cargue el archivo de prueba en el sistema de archivos:
-put[root@localhost hadoop-2.7.2]# bin/hdfs dfs -put wcinput/wc.input /user/bcxtm/input/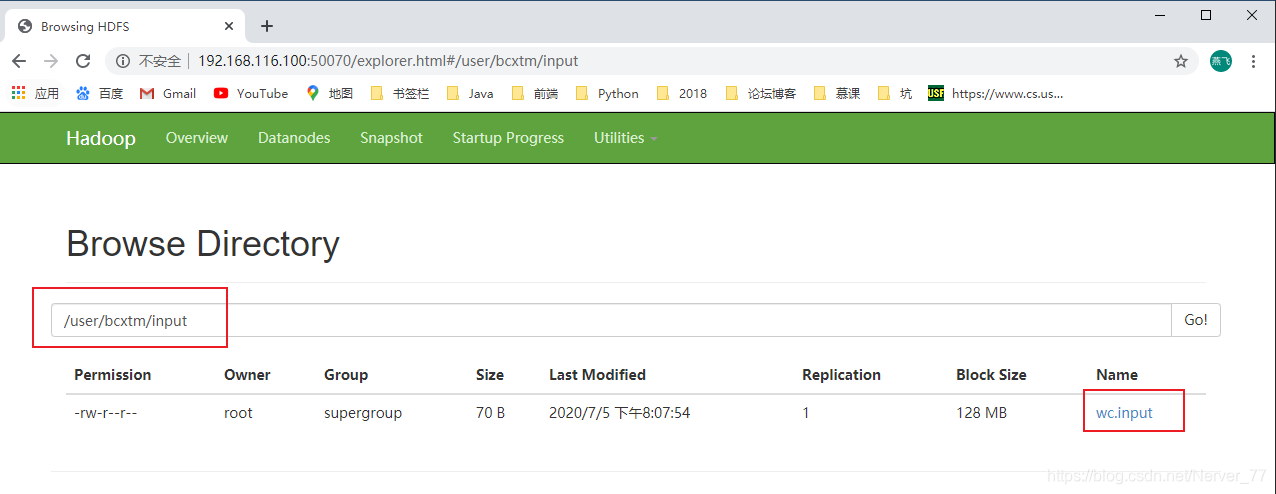
-
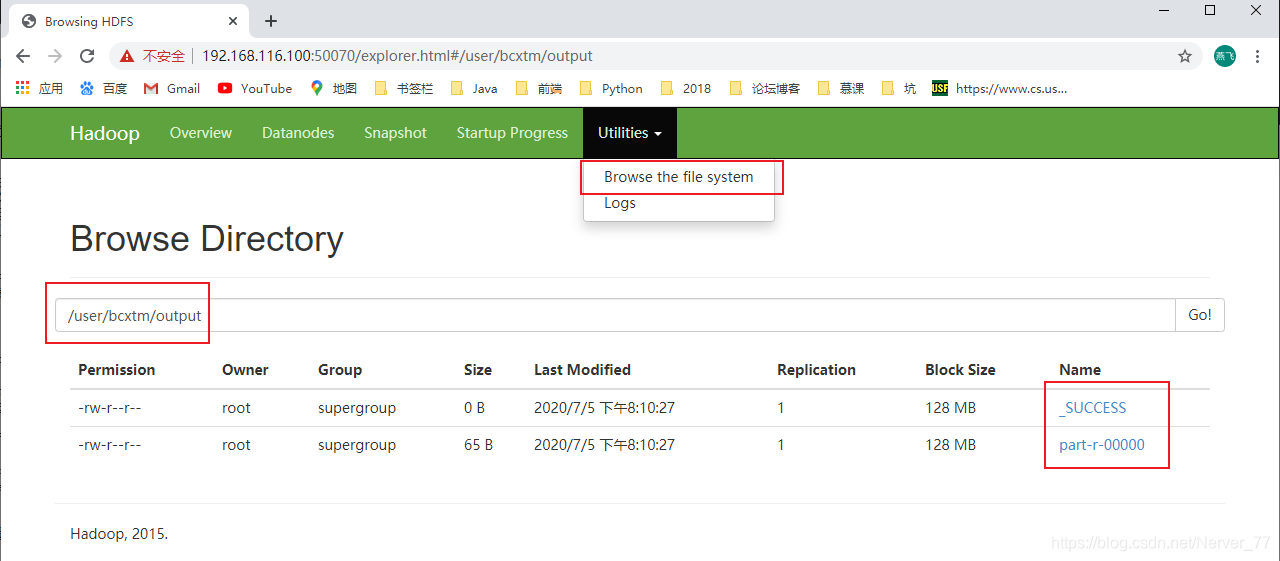
Ejecute el
MapReduceprograma para implementar el caso de recuento de palabras nuevamente[root@localhost hadoop-2.7.2]# bin/hadoop jar share/hadoop/mapreduce/hadoop-mapreduce-examples-2.7.2.jar wordcount /user/bcxtm/input/ /user/bcxtm/output
-
Descargue el archivo de salida de prueba en el local:
-get[root@localhost hadoop-2.7.2]# hdfs dfs -get /user/bcxtm/output/part-r-00000 /wcoutput/ get: `/wcoutput/': No such file or directory [root@localhost hadoop-2.7.2]# mkdir wcoutput [root@localhost hadoop-2.7.2]# hdfs dfs -get /user/bcxtm/output/part-r-00000 ./wcoutput/ # 查看下载到本地的测试输出文件 [root@localhost hadoop-2.7.2]# cat wcoutput/part-r-00000 Alibaba 1 Baidu 1 Bcxtm 3 ByteDance 1 lisi 1 wangwu 2 zhangsan 1
-
-
-
Inicie YARN y ejecute el programa MapReduce
-
Configurar el clúster
-
Configure
etc/hadoop/yarn-env.shy modifique laJAVA_HOMEruta a las variables de entorno.[root@localhost hadoop]# vim yarn-env.sh [root@localhost hadoop]# cat yarn-env.sh # some Java parameters # export JAVA_HOME=/home/y/libexec/jdk1.6.0/ if [ "$JAVA_HOME" != "" ]; then #echo "run java in $JAVA_HOME" JAVA_HOME=/opt/module/jdk1.8.0_144 -
Configuración
etc/hadoop/yarn-site.xml,nodeManageryresourceManager. Aquí laResourceManagerdirección todavía está configurada usando la dirección IP.[root@localhost hadoop]# vim yarn-site.xml [root@localhost hadoop]# cat yarn-site.xml <configuration> <!-- Site specific YARN configuration properties --> <!-- Reducer 获取数据的方式 --> <property> <name>yarn.nodemanager.aux-services</name> <value>mapreduce_shuffle</value> </property> <!-- 指定 YARN 的 ResourceManager 的地址 --> <property> <name>yarn.resourcemanager.hostname</name> <value>192.168.116.100</value> </property> </configuration> -
Configure
etc/hadoop/mapred-env.shy modifique laJAVA_HOMEruta a las variables de entorno.[root@localhost hadoop]# vim mapred-env.sh [root@localhost hadoop]# cat mapred-env.sh # export JAVA_HOME=/home/y/libexec/jdk1.6.0/ export JAVA_HOME=/opt/module/jdk1.8.0_144 export HADOOP_JOB_HISTORYSERVER_HEAPSIZE=1000 export HADOOP_MAPRED_ROOT_LOGGER=INFO,RFA -
Configuración
etc/hadoop/mapred-site.xml, cambie el nombre del archivo correspondiente de la configuración de la plantilla.[root@localhost hadoop]# ll ## ... -rw-r--r-- 1 root root 758 5月 22 2017 mapred-site.xml.template [root@localhost hadoop]# mv mapred-site.xml.template mapred-site.xml [root@localhost hadoop]# ll ## ... -rw-r--r-- 1 root root 758 5月 22 2017 mapred-site.xml [root@localhost hadoop]# vim mapred-site.xml [root@localhost hadoop]# cat mapred-site.xml <configuration> <!-- 指定 MR 运行在 YARN 上 --> <property> <name>mapreduce.framework.name</name> <value>yarn</value> </property> </configuration>
-
-
Iniciar el clúster
-
Debe asegurarse de que NameNode y DataNode se hayan iniciado antes de comenzar
[root@localhost hadoop]# jps 1936 Jps 1362 DataNode 1308 NameNode -
Iniciar
ResourceManageryNodeManager[root@localhost hadoop-2.7.2]# sbin/yarn-daemon.sh start resourcemanager starting resourcemanager, logging to /opt/module/hadoop-2.7.2/logs/yarn-root-resourcemanager-localhost.localdomain.out [root@localhost hadoop-2.7.2]# sbin/yarn-daemon.sh start nodemanager starting nodemanager, logging to /opt/module/hadoop-2.7.2/logs/yarn-root-nodemanager-localhost.localdomain.out [root@localhost hadoop-2.7.2]# jps 2081 Jps 1362 DataNode 1308 NameNode 1964 ResourceManager 2014 NodeManager
-
-
Operación de clúster
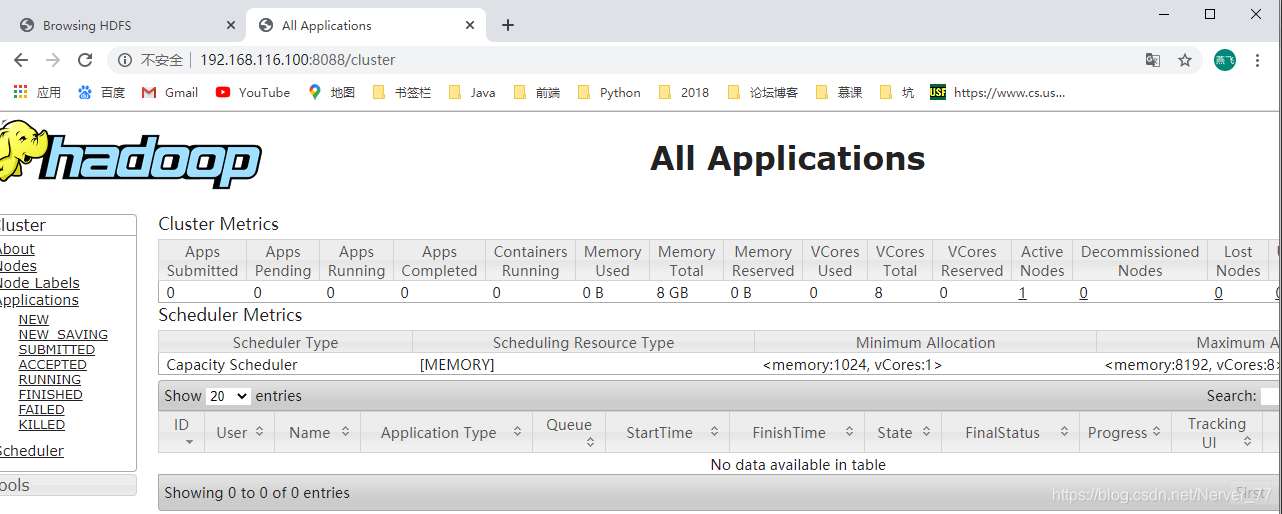
- Por
webarte: http://192.168.116.100:8088/cluster
- Por
-
Configurar el servidor de historial
- Configure
mapred-site.xml, agregue la dirección del servidor histórica y la dirección web
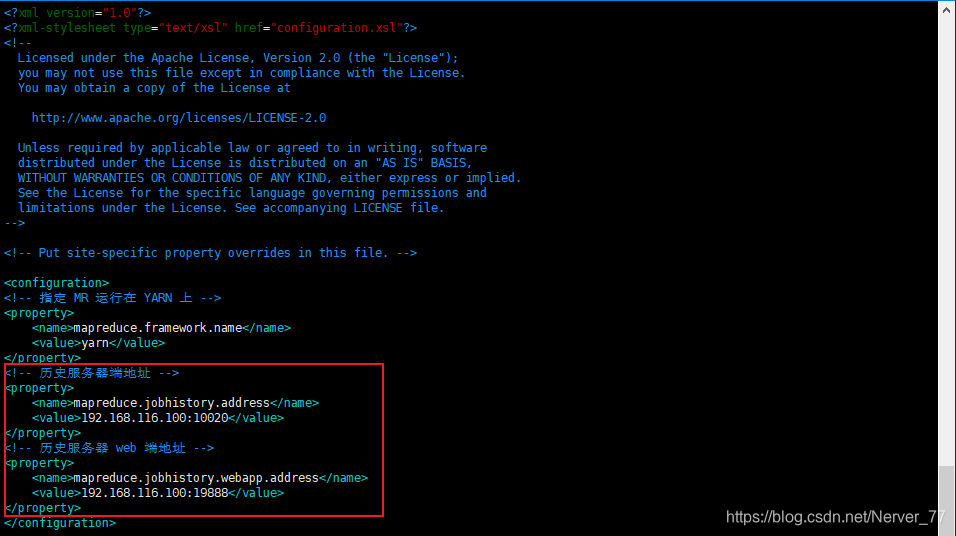
[root@localhost hadoop]# vim mapred-site.xml [root@localhost hadoop]# cat mapred-site.xml <configuration> <!-- 指定 MR 运行在 YARN 上 --> <property> <name>mapreduce.framework.name</name> <value>yarn</value> </property> <!-- 历史服务器端地址 --> <property> <name>mapreduce.jobhistory.address</name> <value>192.168.116.100:10020</value> </property> <!-- 历史服务器 web 端地址 --> <property> <name>mapreduce.jobhistory.webapp.address</name> <value>192.168.116.100:19888</value> </property> </configuration>-
Iniciar servidor de historial
[root@localhost hadoop-2.7.2]# sbin/mr-jobhistory-daemon.sh start historyserver starting historyserver, logging to /opt/module/hadoop-2.7.2/logs/mapred-root-historyserver-localhost.localdomain.out [root@localhost hadoop-2.7.2]# jps 1362 DataNode 2474 JobHistoryServer 2507 Jps 1308 NameNode 1964 ResourceManager 2014 NodeManager -
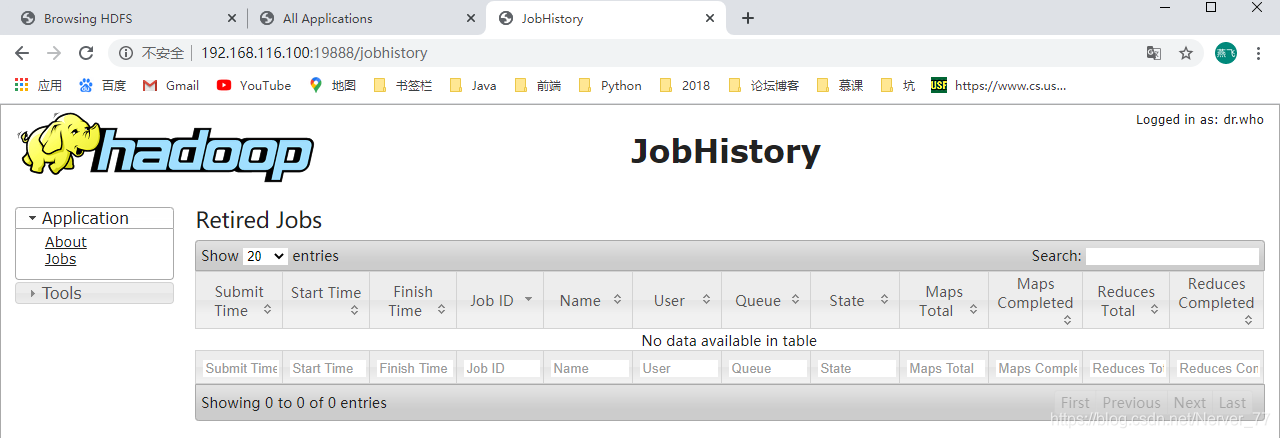
Por
webarte: http://192.168.116.100:19888/jobhistory
- Configure
-
Configurar la agregación de registros (una vez completada la aplicación, cargue la información del registro de operaciones del programa en el sistema HDFS)
Nota: Para habilitar la función de agregación de registros, debe reiniciar NodeManager, ResourceManager e
HistoryServer-
Configurar
yarn-site.xml, establecer la función de agregación de registros y el tiempo de vencimiento (segundos)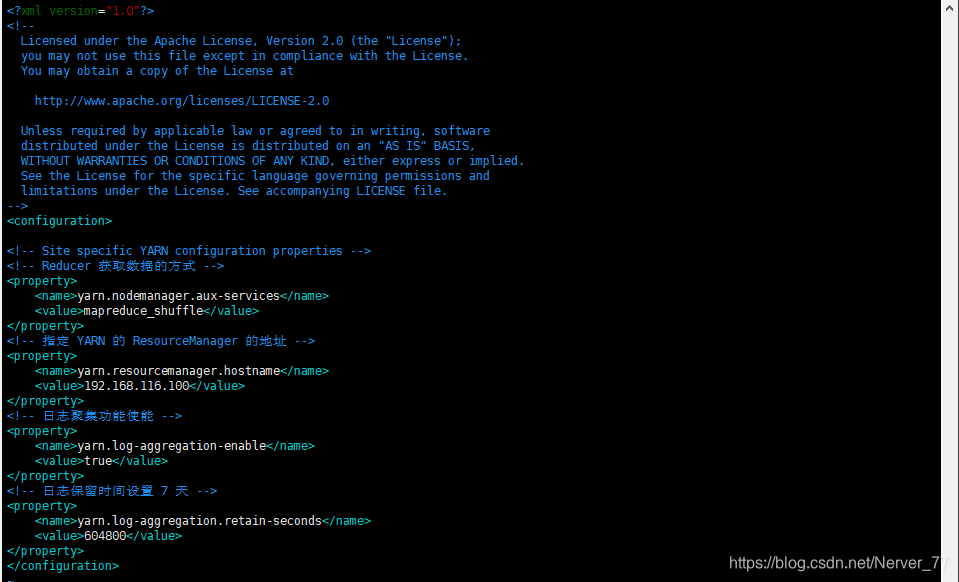
[root@localhost hadoop]# vim yarn-site.xml [root@localhost hadoop]# cat yarn-site.xml <configuration> <!-- Site specific YARN configuration properties --> <!-- Reducer 获取数据的方式 --> <property> <name>yarn.nodemanager.aux-services</name> <value>mapreduce_shuffle</value> </property> <!-- 指定 YARN 的 ResourceManager 的地址 --> <property> <name>yarn.resourcemanager.hostname</name> <value>192.168.116.100</value> </property> <!-- 日志聚集功能使能 --> <property> <name>yarn.log-aggregation-enable</name> <value>true</value> </property> <!-- 日志保留时间设置 7 天 --> <property> <name>yarn.log-aggregation.retain-seconds</name> <value>604800</value> </property> </configuration> -
Cierre NodeManager, ResourceManager e HistoryServer
[root@localhost hadoop-2.7.2]# sbin/yarn-daemon.sh stop nodemanager stopping nodemanager [root@localhost hadoop-2.7.2]# sbin/yarn-daemon.sh stop resourcemanager stopping resourcemanager [root@localhost hadoop-2.7.2]# sbin/mr-jobhistory-daemon.sh stop historyserver stopping historyserver [root@localhost hadoop-2.7.2]# jps 1362 DataNode 2664 Jps 1308 NameNode -
Inicie NodeManager, ResourceManager e HistoryServer
[root@localhost hadoop-2.7.2]# sbin/yarn-daemon.sh start nodemanager
starting nodemanager, logging to /opt/module/hadoop-2.7.2/logs/yarn-root-nodemanager-localhost.localdomain.out
[root@localhost hadoop-2.7.2]# sbin/yarn-daemon.sh start resourcemanager
starting resourcemanager, logging to /opt/module/hadoop-2.7.2/logs/yarn-root-resourcemanager-localhost.localdomain.out
[root@localhost hadoop-2.7.2]# sbin/mr-jobhistory-daemon.sh start historyserver
starting historyserver, logging to /opt/module/hadoop-2.7.2/logs/mapred-root-historyserver-localhost.localdomain.out
[root@localhost hadoop-2.7.2]# jps
1362 DataNode
2819 ResourceManager
2965 JobHistoryServer
2998 Jps
2697 NodeManager
1308 NameNode
-
-
Elimine
HDFSel archivo de salida en el sistema de archivos para facilitar la posterior ejecución del programa MapReduce[root@localhost hadoop-2.7.2]# hdfs dfs -rm -r /user/bcxtm/output 20/07/05 21:48:10 INFO fs.TrashPolicyDefault: Namenode trash configuration: Deletion interval = 0 minutes, Emptier interval = 0 minutes. Deleted /user/bcxtm/output -
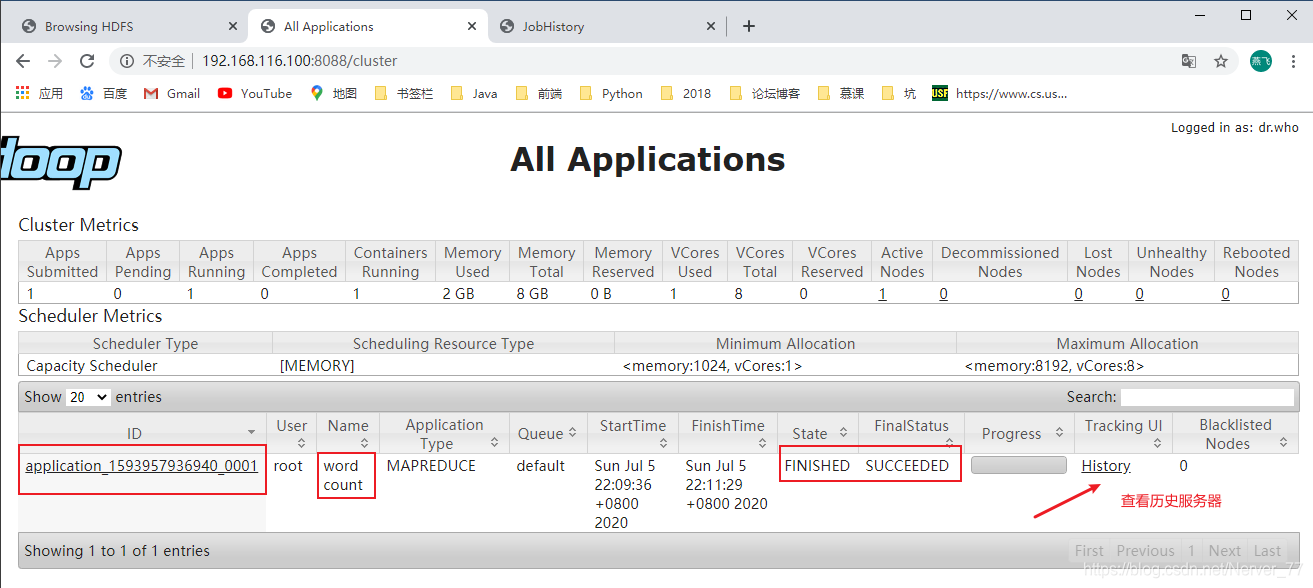
Vuelva a ejecutar el programa MapReduce
[root@localhost hadoop-2.7.2]# hadoop jar share/hadoop/mapreduce/hadoop-mapreduce-examples-2.7.2.jar wordcount /user/bcxtm/input /user/bcxtm/output
20/07/05 22:09:30 INFO client.RMProxy: Connecting to ResourceManager at /192.168.116.100:8032
20/07/05 22:09:36 INFO input.FileInputFormat: Total input paths to process : 1
20/07/05 22:09:36 INFO mapreduce.JobSubmitter: number of splits:1
20/07/05 22:09:36 INFO mapreduce.JobSubmitter: Submitting tokens for job: job_1593957936940_0001
20/07/05 22:10:12 INFO impl.YarnClientImpl: Submitted application application_1593957936940_0001
20/07/05 22:10:37 INFO mapreduce.Job: The url to track the job: http://192.168.116.100:8088/proxy/application_1593957936940_0001/
20/07/05 22:10:37 INFO mapreduce.Job: Running job: job_1593957936940_0001
20/07/05 22:10:43 INFO mapreduce.Job: Job job_1593957936940_0001 running in uber mode : false
20/07/05 22:10:43 INFO mapreduce.Job:  map 0% reduce 0%
20/07/05 22:10:53 INFO mapreduce.Job:  map 100% reduce 0%
20/07/05 22:11:21 INFO mapreduce.Job:  map 100% reduce 100%
20/07/05 22:11:31 INFO mapreduce.Job: Job job_1593957936940_0001 completed successfully
20/07/05 22:11:31 INFO mapreduce.Job: Counters: 49
Se puede ver que la ejecución del programa MapReduce a través de YRAN creará un trabajo y luego realizará un proceso de ejecución de Map y luego Reducir. Finalmente, puede ver el estado de ejecución y la información histórica de esta tarea a través de la página web.
-
Ver información histórica del servidor

-
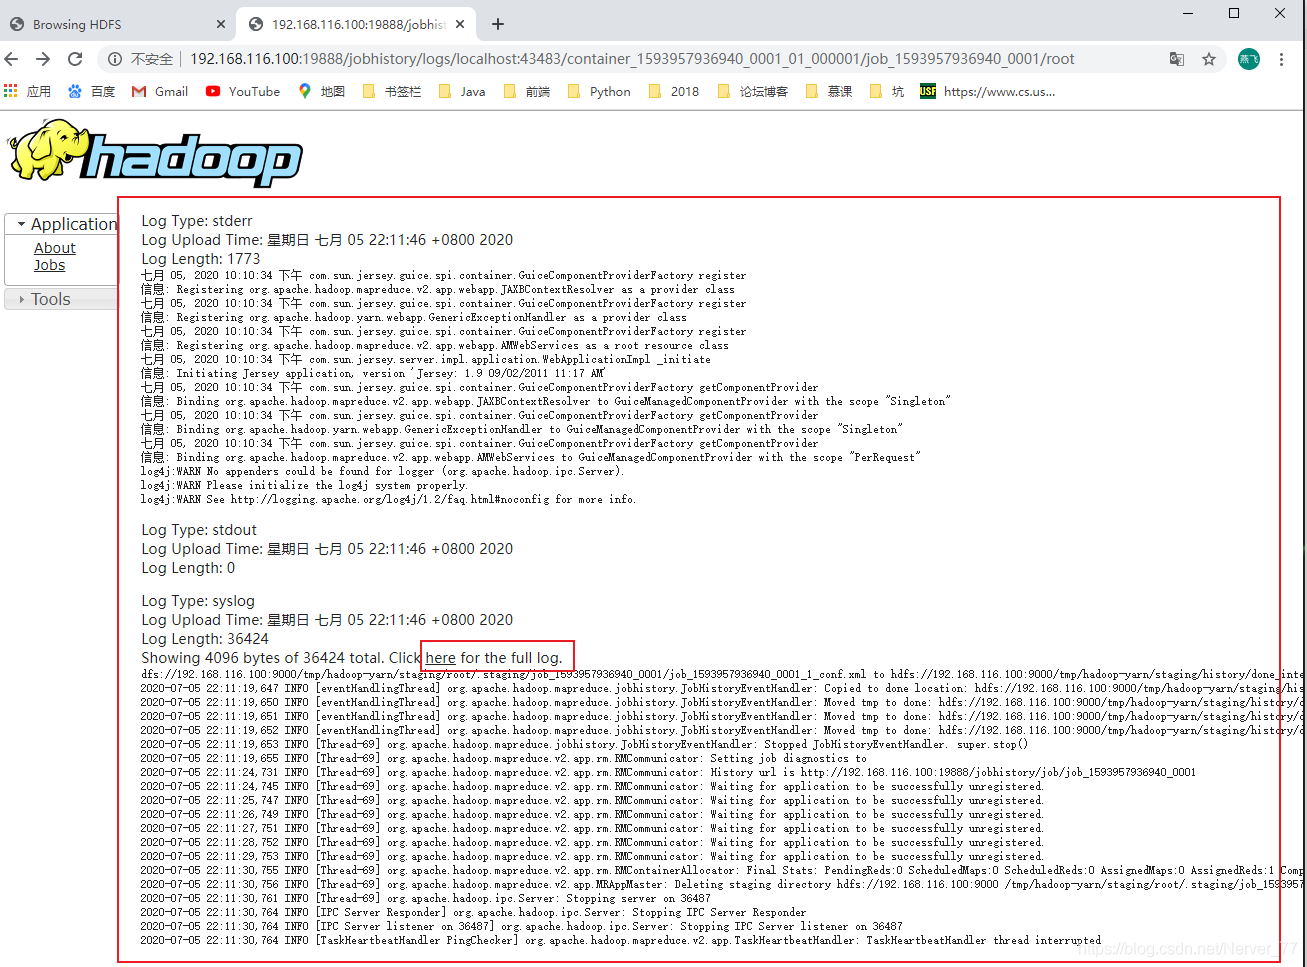
Ver información de agregación de registros
-
-
Notas del estudio de Hadoop _4: modo de funcionamiento pseudodistribuido
Supongo que te gusta
Origin blog.csdn.net/Nerver_77/article/details/107146549
Recomendado
Clasificación