Before the project will be integrated into the interface of an automation project continued on jenkins, this article specifically written under recording.
When continuous integration, divided into the following steps:
1. Server installation jdk; 2.maven installation and configuration; 3.git installation and configuration; installation and operation of 4.jenkins; 5. integrated interface automation project will continue to jenkins;. 6 output line of the test report
A, jdk installation
There are many online tutorials this, this will not repeat.
Two, maven installation and configuration
1. Download compressed , 1.1 or 1.2 can be used:
1.1 through their own computer to archive uploaded to the server:
. a maven enter the official website to download bin.zip format archive, Baidu search apche maven can;
. B whether the uploading of support plug-in installed on a linux server to check:
which rz
Any advances to step c; if not then execute:
yum install lrzsz
c. Upload a local archive
rz
1.2 directly on the server, cd into the directory you want to store maven, enter the following command to download:
wget http://mirrors.tuna.tsinghua.edu.cn/apache/maven/maven-3/3.6.3/binaries/apache-maven-3.6.3-bin.tar.gz
2. Extract the archive
unzip apache-maven-3.6.3-bin.zip
3. Set Environment Variables
Vim / etc / Profile
 // Add the following two lines in the configuration file
Export MAVEN_HOME = / Home / fanlilin / Apache-maven- 3.6 . . 3
Export the PATH = $ MAVEN_HOME / bin: $ the PATH
// After exiting vim editor, save the configuration
source / etc / profile
Three, git installation and configuration
1. Installation Git , 1.2 manner recommended
1.1 Use yum command (low git version, not recommended)
yum install Go
1.2 Download the maven by reference, to the official website to download git rz corresponding packet uploaded to the server, and then use the 'tar -xzvf archive name' can extract.
2. git users to create
git config --global user.name ‘your name'
git config --global user.email 'your email address’
3. git environment variable configuration
vim / etc / Profile
 // add the following line after opening the configuration file
export PATH = / usr / local / git / bin: $ PATH
Four, jenkins download and run
1. Install Jenkins . 1.1 or 1.2 wherein selection of a way to:
1.1 cd to the home directory server or sub-user name:
wget HTTP: // mirrors.jenkins.io/war-stable/latest/jenkins.war

// When the download is complete, simply run and specify the port number
 // Note the port number and the project can not be built conflict
nohup java -jar jenkins -httpPort = the .war 8080
By mounting jenkins 1.2 rpm
Go to the official website to download the corresponding version of the package jenkins: https://pkg.jenkins.io/redhat-stable/
rz corresponding path uploaded to the server, run:
Jenkins Start Service
 // default port number is 8080 in this way
2. Prepare jenkins
Browser to access the server ip: 8080, jenkins enter the start page, you need to be patient. It is worth mentioning that, because of this process is particularly slow, I went to Baidu solution is also recommended that you do the following:
// enter the configuration file, change to an address outside the network of domestic
vim var / lib / Jenkins / hudson.model.UpdateCenter.xml

// make the following modifications vim after entering
the
HTTP: // updates.jenkins-ci.org/ update-center.json
replace
HTTP: // mirror.xmission.com/jenkins/updates/update-center.json
Plug into the selection, recommendation and custom plug-ins are, after entering jenkins can re-download, I chose the recommended plugins.
3. Configure jenkins
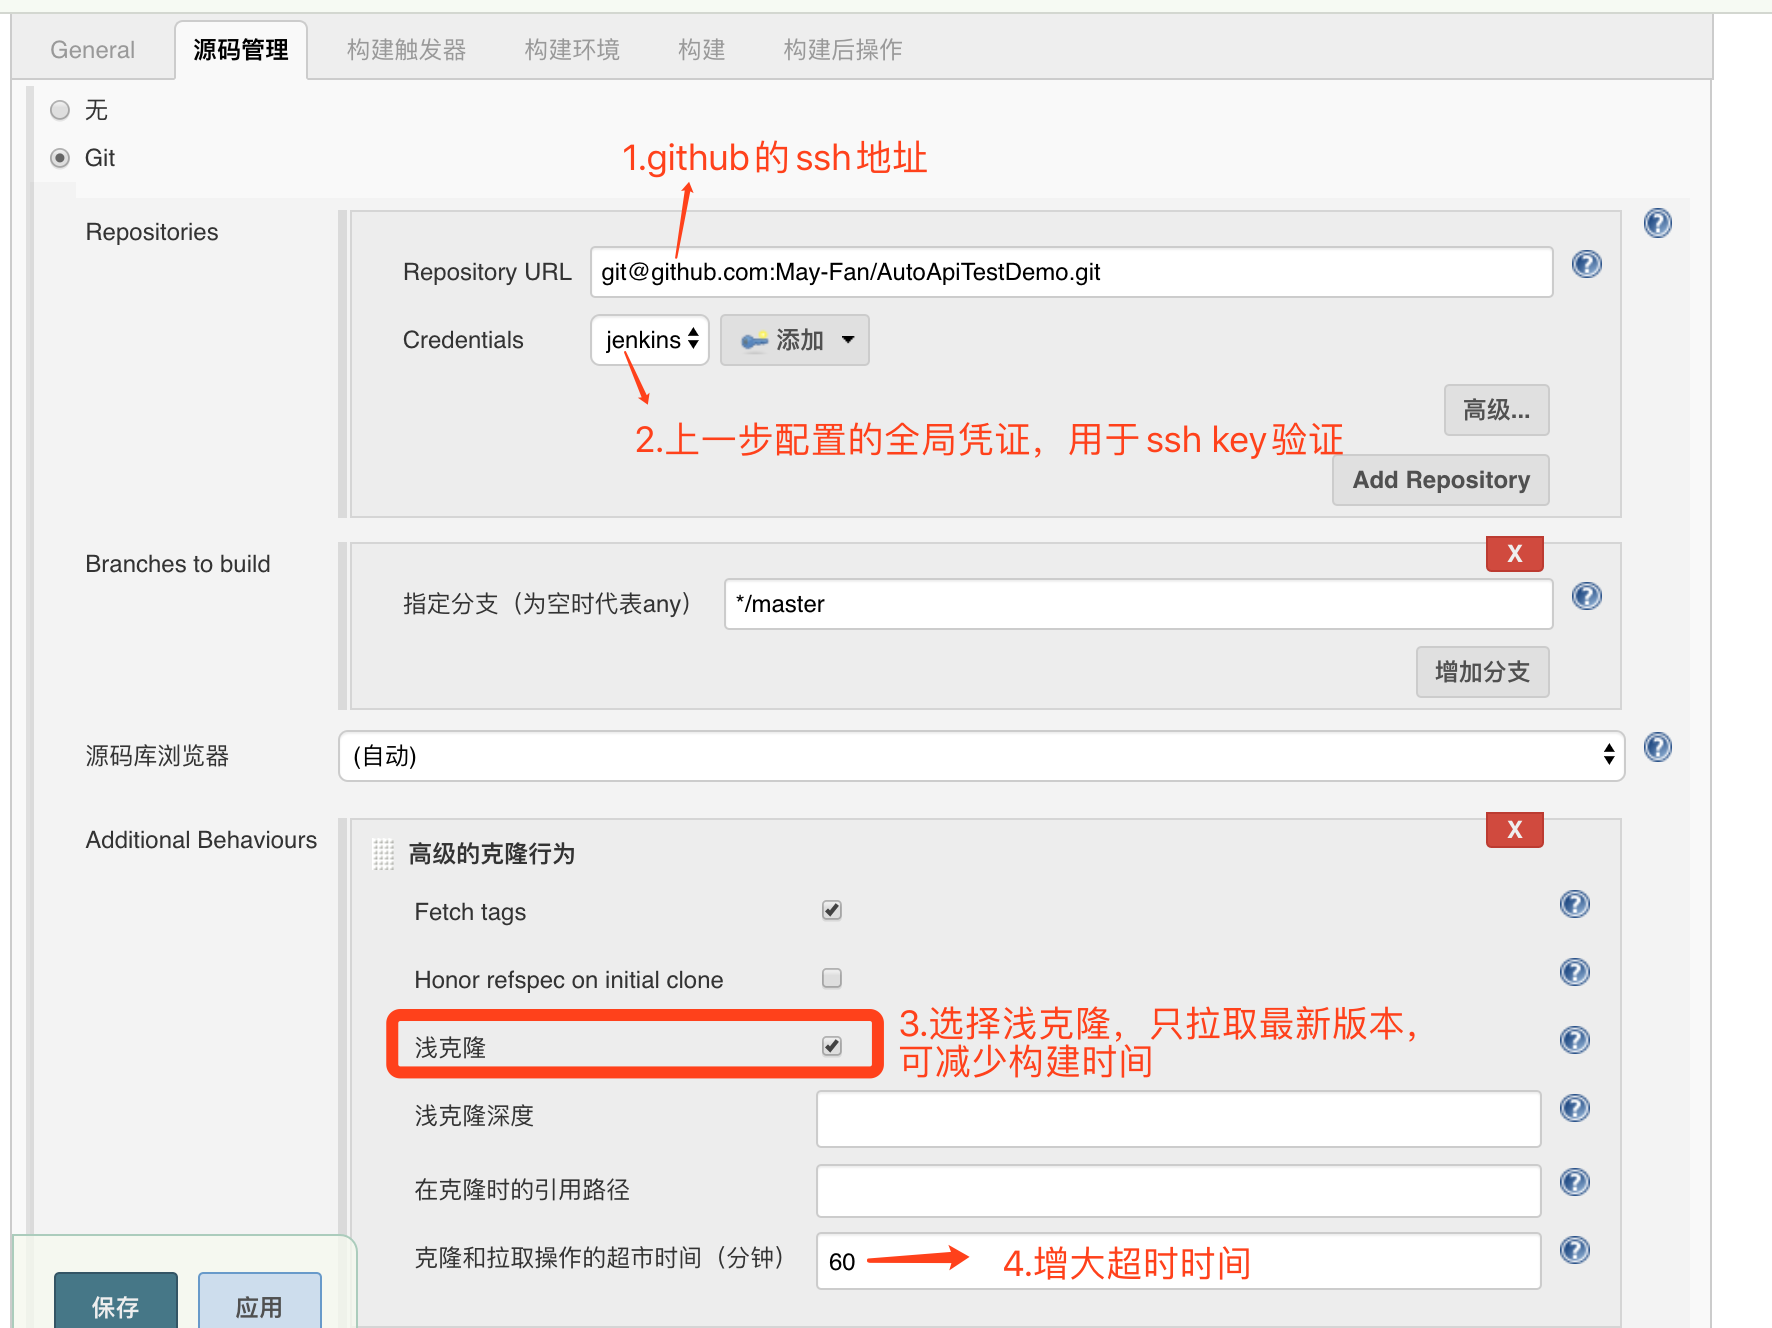
. A into the System Management -> Global Tool Configuration -> git, configured as follows:

b. Configure ssh key.
// 1. Generates Key SSH
CD ~ /. SSH
SSH-keygen -t -C RSA ' your Adress In Email'

// 2. Obtain the public key, will return the paste contents to the settings- github> SSH Key
CAT ~ / . SSH / id_rsa.pub

. //. 3 acquires the private key, returns to the paste content jenkins-> global credentials -> new credentials, see below
CAT ~ /. SSH / id_rsa

Fifth, build the project
In the upper left corner of the home page click New Task jenkins -> free style, configuration is as follows:
1. create springboot project :

shell script is as follows:
//构建时查询当前进程是否在执行
//如果正在执行,杀死进程
pid=$(ps x | grep api-1.0-SNAPSHOT.jar | grep -v grep | awk '{print $1}')
if "[-n '$pid']" ; then
kill -9 $pid
fi

//进入目录,执行打包命令
//mvn可以用服务器中的绝对路径
cd api
mvn clean package
cd target
pwd
BUILD_ID=dontKillMe
//在后台运行jar包
nohup java -jar api-1.0-SNAPSHOT.jar &
2.创建springboot项目的接口自动化项目:
将项目命名为test,和步骤1图中构建后需要再操作的项目名称一致;
填写github地址,选择相同的ssh凭证;
构建->执行shell脚本,代码如下:
cd autoApiTest
pwd
//mvn可以用服务器中的绝对路径
mvn clean package
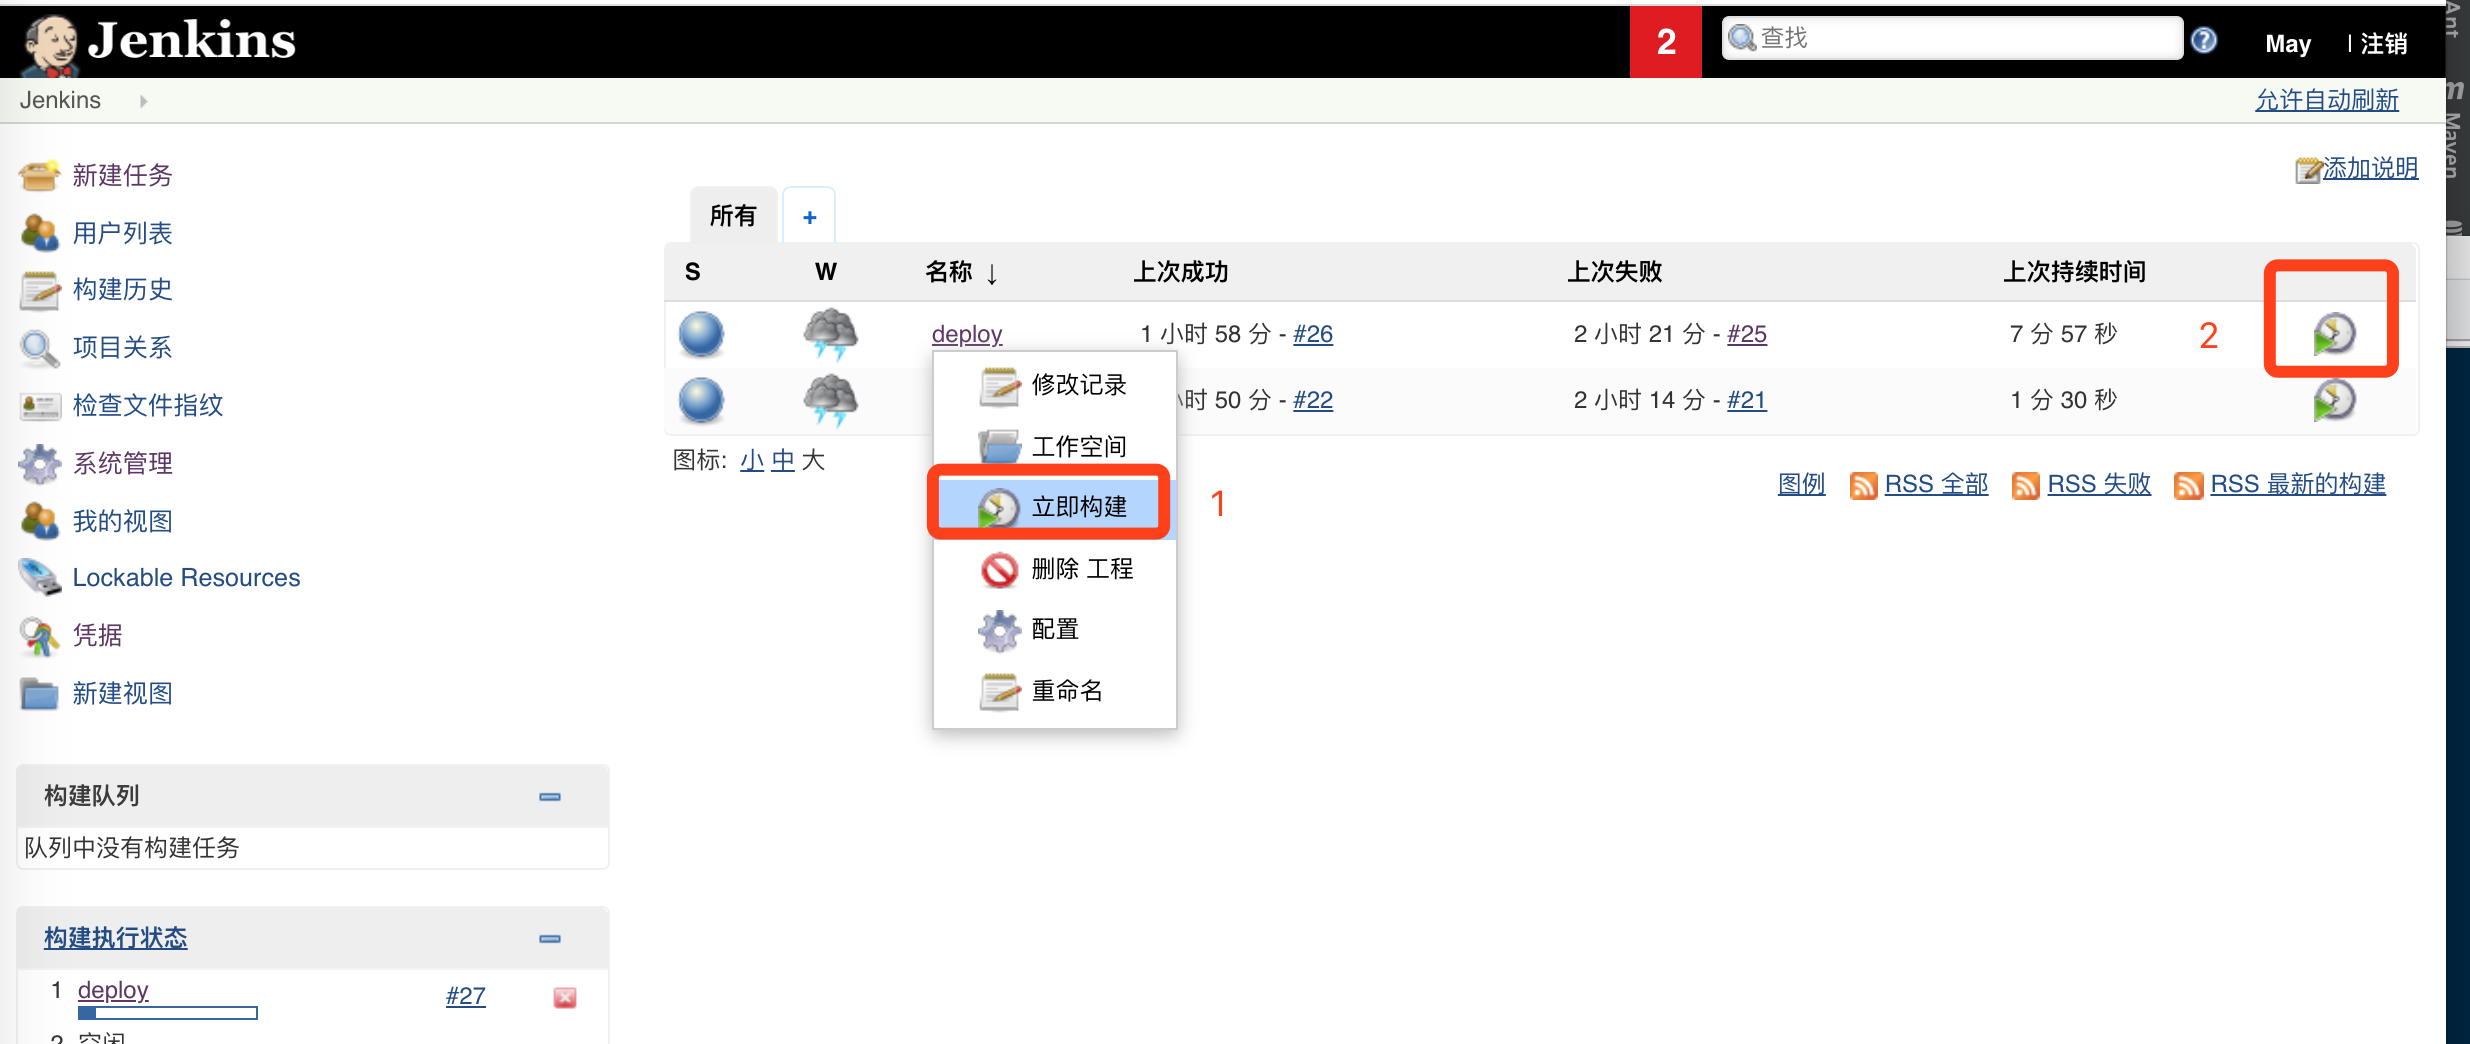
3.构建项目:
点击下图2个地方均可以构建。
由于在deloy上添加了test的构建,因此只要springboot项目运行一次,对应的test自动化项目也会运行一次。篇幅问题,测试报告处理会在以后的文章中专门讲如何配置。