
Kurento Java Tutorial - Hello World
This web application is for Java developers to introduce the principle of Kurento with programming and design. It includes a video communication image WebRTC (loopback). This tutorial assumes you have a basic knowledge of Java, JavaScript, HTML and the WebRTC. Before starting this tutorial, we also recommend reading the section on Kurento and WebRTC.
Note
This application uses HTTPS. If you are running on the local host it and accept the security exception in the browser, it will work, but if the remote is running, you should protect your application. For more information, check the "Configuring the Java server to use HTTPS".
Quick Start
Run the demonstration program follow the following steps:
1, install Kurento Media Server: Setup Wizard link
2, run these commands:
git clone https://github.com/Kurento/kurento-tutorial-java.git
cd kurento-tutorial-java/kurento-hello-world
git checkout 6.13.0
mvn -U clean spring-boot:run -Dkms.url=ws://localhost:8888/kurento
3, using WebRTC-compatible browser (Chrome, Firefox) open demo page: HTTPS: // localhost: 8443/
4, click "Start" to start the presentation.
5, allow access to your webcam.
6. Once the negotiation and establish loopback connection, you should see your webcam video in both local and remote placeholder.
7, click "Stop" to complete the presentation.
Understand this example
Kurento provides a Kurento Java client to control Kurento media server for developers. Java client application that can be used for any type of library: server-side Web, the desktop, Android and so on. It is compatible with any framework, such as JavaEE, Spring, Play, Vert.x, Swing and JavaFX.
This Hello World demo is one of the easiest web applications that can be created using Kurento. The following figure shows a screenshot of the demo running:
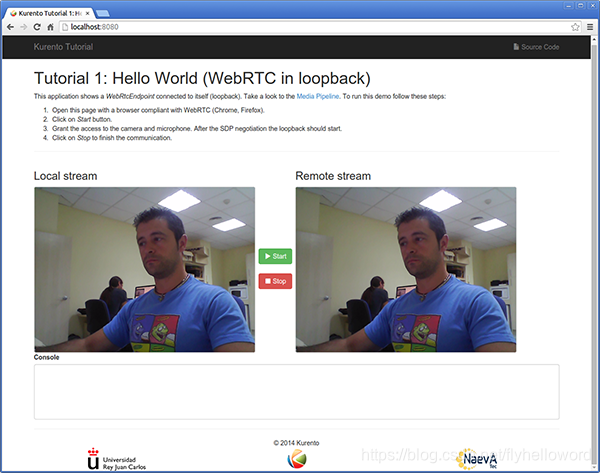
Kurento Hello World Screenshot: WebRTC in loopback
应用程序的界面(一个HTML网页)由两个HTML5标记组成:一个显示本地流(由设备网络摄像头捕获),另一个显示媒体服务器发送回客户端的远程流。
应用程序的逻辑非常简单:本地流被发送到Kurento媒体服务器,该服务器将其发送回客户端,而无需修改。要实现此行为,我们需要创建一个由单个媒体元素(即WebRtcEndpoint)组成的媒体管道,该管道具有交换全双工(双向)WebRTC媒体流的能力。此媒体元素连接到自身,以便将它从浏览器接收到的媒体发送回浏览器。此媒体管道如下图所示:

这是一个web应用程序,因此它遵循客户机-服务器体系结构。在客户端,逻辑是用JavaScript实现的。在服务器端,我们使用基于Spring引导的应用服务器,使用Kurento Java客户机API来控制Kurento媒体服务器的功能。总之,这个演示的顶层架构是三层的。为了与这些实体通信,使用了两个websocket:
1.在客户端和应用服务器之间创建一个WebSocket来实现一个自定义的信令协议。
2、另一个WebSocket用于执行Kurento Java客户端和Kurento媒体服务器之间的通信。
此通信使用Kurento协议进行。有关详细说明,请阅读本节:Kurento协议。
下图显示了与应用程序接口交互的完整序列图:
i)JavaScript逻辑;
ii)应用服务器逻辑(使用Kurento Java客户端);
iii)Kurento媒体服务器。
Kurento Hello World(loopbak中的WebRTC)演示的完整序列图
应用服务逻辑
这个演示是在服务器端使用Java开发的,基于Spring Boot框架,它在生成的maven工件中嵌入了Tomcat web服务器,从而简化了开发和部署过程。
注释
您可以使用您喜欢的任何Java服务器端技术来使用Kurento构建web应用程序。例如,一个纯Java EE应用程序、SIP Servlets、Play、Vert.x等等。为了方便起见,我们选择了Spring Boot。
在下图中,您可以看到服务器端代码的类图:
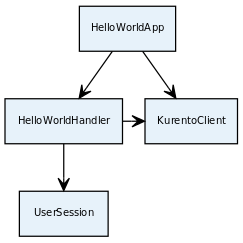
HelloWorld应用程序的服务器端类图
这个演示的main class是HelloWorldApp。
如您所见,KurentoClient在这个类中被实例化为一个Spring Bean。此bean用于创建Kurento媒体管道,用于向应用程序添加媒体功能。在这个实例中,我们看到需要向客户机库指定Kurento媒体服务器的位置。在这个例子中,我们假设它位于localhost,监听端口8888。如果复制此示例,则需要在其中插入Kurento媒体服务器实例的特定位置。
一旦Kurento客户端被实例化,就可以与Kurento媒体服务器通信并控制其多媒体功能。
@SpringBootApplication
@EnableWebSocket
public class HelloWorldApp implements WebSocketConfigurer {
  @Bean
  public HelloWorldHandler handler() {
    return new HelloWorldHandler();
  }

  @Bean
  public KurentoClient kurentoClient() {
    return KurentoClient.create();
  }

  @Override
  public void registerWebSocketHandlers(WebSocketHandlerRegistry registry) {
    registry.addHandler(handler(), "/helloworld");
  }

  public static void main(String[] args) throws Exception {
    SpringApplication.run(HelloWorldApp.class, args);
  }
}
此web应用程序遵循单页应用程序体系结构(SPA),并使用WebSocket通过请求和响应与应用服务器通信。具体来说,main app类实现接口WebSocketConfigurer以注册一个WebSocketHandler,该WebSocketHandler处理 /helloworld 的WebSocket请求。
类HelloWorldHandler实现TextWebSocketHandler来处理文本WebSocket请求。这个类的中心部分是handleTextMessage方法。此方法实现请求的操作,通过WebSocket返回响应。换句话说,它实现了前面序列图中描述的信令协议的服务器部分。
public void handleTextMessage(WebSocketSession session, TextMessage message)
    throws Exception {
  [...]
  switch (messageId) {
    case "start":
      start(session, jsonMessage);
      break;
    case "stop": {
      stop(session);
      break;
    }
    case "onIceCandidate":
      onRemoteIceCandidate(session, jsonMessage);
      break;
    default:
      sendError(session, "Invalid message, ID: " + messageId);
      break;
  }
  [...]
}
The start() method performs the following actions:
- 配置媒体处理逻辑。这是应用程序配置Kurento如何处理媒体的部分。换句话说,媒体管道就是在这里创建的。为此,对象KurentoClient用于创建mediapipline对象。使用它,我们需要的媒体元素被创建和连接。在本例中,我们只实例化一个WebRtcEndpoint,用于接收WebRTC流并将其发送回客户端。
final MediaPipeline pipeline = kurento.createMediaPipeline();

final WebRtcEndpoint webRtcEp =
    new WebRtcEndpoint.Builder(pipeline).build();

webRtcEp.connect(webRtcEp);
- 创建事件侦听器。由Kurento管理的所有对象都能够发出几种类型的事件,如端点事件中所述。应用服务器可以监听它们,以便对媒体服务器的处理逻辑内部的情况有更多的了解。监听所有可能的事件是一个很好的实践,因此客户机应用程序拥有尽可能多的信息。
// Common events for all objects that inherit from BaseRtpEndpoint
addErrorListener(
    new EventListener<ErrorEvent>() { ... });
addMediaFlowInStateChangeListener(
    new EventListener<MediaFlowInStateChangeEvent>() { ... });
addMediaFlowOutStateChangeListener(
    new EventListener<MediaFlowOutStateChangeEvent>() { ... });
addConnectionStateChangedListener(
    new EventListener<ConnectionStateChangedEvent>() { ... });
addMediaStateChangedListener(
    new EventListener<MediaStateChangedEvent>() { ... });
addMediaTranscodingStateChangeListener(
    new EventListener<MediaTranscodingStateChangeEvent>() { ... });

// Events specific to objects of class WebRtcEndpoint
addIceCandidateFoundListener(
    new EventListener<IceCandidateFoundEvent>() { ... });
addIceComponentStateChangeListener(
    new EventListener<IceComponentStateChangeEvent>() { ... });
addIceGatheringDoneListener(
    new EventListener<IceGatheringDoneEvent>() { ... });
addNewCandidatePairSelectedListener(
    new EventListener<NewCandidatePairSelectedEvent>() { ... });
- WebRTC SDP协商。在WebRTC中,SDP提供/应答模型用于协商将在对等方之间交换的音频或视频轨迹,以及它们支持的公共特性的子集。此协商通过在一个对等方中生成SDP提议,将其发送给另一个对等方,并返回将生成的SDP响应来完成。
在这种特殊情况下,SDP提议由浏览器生成并发送给Kurento,Kurento随后生成SDP应答,该应答必须作为响应发送回浏览器。
// 'webrtcSdpOffer' is the SDP Offer generated by the browser;
// send the SDP Offer to KMS, and get back its SDP Answer
String webrtcSdpAnswer = webRtcEp.processOffer(webrtcSdpOffer);
sendMessage(session, webrtcSdpAnswer);
- Gather ICE candidates。当SDP提供/应答协商正在进行时,每个对等方都可以开始收集将用于ICE协议的连接候选。此过程的工作方式与浏览器通过发出事件RTCPeerConnection.onicecandidate通知其客户机代码的方式非常相似;同样,Kurento的WebRtcEndpoint将通过事件IceCandidateFound通知其客户机应用程序。
webRtcEp.gatherCandidates();
Client-Side Logic
现在让我们转到应用程序的客户端。要在服务器端调用先前创建的WebSocket服务,我们使用JavaScript类WebSocket。我们使用一个名为Kurento-utils.js的特定Kurento JavaScript库来简化WebRTC与服务器的交互。这个库依赖于adapter.js,这是一个由Google维护的JavaScript WebRTC实用程序,它可以消除浏览器之间的差异。
这些库作为Maven依赖项引入到项目中,Maven依赖项从WebJars.org下载所有必需的文件;它们加载在index.html页面中,并在index.js文件中使用。
在下面的代码片段中,我们可以看到在path/helloworld中创建的WebSocket。然后,使用WebSocket的onmessage监听器在客户端实现JSON信令协议。请注意,有三条传入客户端的消息:startResponse、error和iceCandidate。为实现通信中的每一步都采取了方便的措施。例如,在函数start中,kurento-utils.js的函数webrtcpeeer.WebRtcPeerSendrecv用于启动WebRTC通信。
var ws = new WebSocket('ws://' + location.host + '/helloworld');

ws.onmessage = function(message) {
   var parsedMessage = JSON.parse(message.data);
   console.info('Received message: ' + message.data);

   switch (parsedMessage.id) {
   case 'startResponse':
      startResponse(parsedMessage);
      break;
   case 'error':
      if (state == I_AM_STARTING) {
         setState(I_CAN_START);
      }
      onError('Error message from server: ' + parsedMessage.message);
      break;
   case 'iceCandidate':
      webRtcPeer.addIceCandidate(parsedMessage.candidate, function(error) {
         if (error)
            return console.error('Error adding candidate: ' + error);
      });
      break;
   default:
      if (state == I_AM_STARTING) {
         setState(I_CAN_START);
      }
      onError('Unrecognized message', parsedMessage);
   }
}

function start() {
   console.log('Starting video call ...');

   // Disable start button
   setState(I_AM_STARTING);
   showSpinner(videoInput, videoOutput);

   console.log('Creating WebRtcPeer and generating local sdp offer ...');

   var options = {
      localVideo : videoInput,
      remoteVideo : videoOutput,
      onicecandidate : onIceCandidate
   }
   webRtcPeer = new kurentoUtils.WebRtcPeer.WebRtcPeerSendrecv(options,
         function(error) {
            if (error)
               return console.error(error);
            webRtcPeer.generateOffer(onOffer);
         });
}

function onOffer(error, offerSdp) {
   if (error)
      return console.error('Error generating the offer');
   console.info('Invoking SDP offer callback function ' + location.host);
   var message = {
      id : 'start',
      sdpOffer : offerSdp
   }
   sendMessage(message);
}

function onIceCandidate(candidate) {
   console.log('Local candidate' + JSON.stringify(candidate));

   var message = {
      id : 'onIceCandidate',
      candidate : candidate
   };
   sendMessage(message);
}

function startResponse(message) {
   setState(I_CAN_STOP);
   console.log('SDP answer received from server. Processing ...');

   webRtcPeer.processAnswer(message.sdpAnswer, function(error) {
      if (error)
         return console.error(error);
   });
}

function stop() {
   console.log('Stopping video call ...');
   setState(I_CAN_START);
   if (webRtcPeer) {
      webRtcPeer.dispose();
      webRtcPeer = null;

      var message = {
         id : 'stop'
      }
      sendMessage(message);
   }
   hideSpinner(videoInput, videoOutput);
}

function sendMessage(message) {
   var jsonMessage = JSON.stringify(message);
   console.log('Sending message: ' + jsonMessage);
   ws.send(jsonMessage);
}
依赖项
这个Java Spring应用程序是使用Maven实现的。pom.xml的相关部分是声明Kurento依赖项的地方。如下面的代码片段所示,我们需要两个依赖项:客户端的Kurento客户机Java依赖项(Kurento客户机)和JavaScript Kurento实用程序库(Kurento实用程序库)。其他客户端库由WebJars管理。
