### Introduction:
Source GitHub project Address: https://github.com/hlk-1135/SSH_PersonInformation
(If you like, please give me a Star, welcomed the exchange and common progress!)
Functional modules: login, registration, personal information management, contact management, scheduling, file management.
Requirements:
(1) have a login and registration page input validation, take struts2 validation framework to achieve, namely in the form of -validation.xml profile.
(2) address book search function must support fuzzy queries.
Note: Registration requires the use of model-driven form.
This is a requirement given by the teacher, in fact, the current experiment, Struts2 has been in a small case, the logic is not very complicated, single function module, similar to the previous library management system, if you want to complete the follow-up is still very large amount of work due Jdbc has been using to manipulate the database, in this project, we decided to use Spring + Struts2 + Hibernate.
#### modules:
- Individual user's login and registration, use js verify registration information. (In which the interceptor, only after login can be contacts, documents and other related operations, or can only access the home page.)
- Additions and deletions to change search address book contacts, support fuzzy queries by name or phone number. (Update: the completion of the bulk delete friends)
- Additions and deletions to change search schedule. (And contacts CRUD no difference, so I did not realize)
- For managing files (save the uploaded file and file information into the database)
#### First, set up the environment:
use MyEclipsel. Rear end frame using Struts2 + Spring + Hibernate, using the front-end frame BootStrap.
#### 1, the database:
the User table and the table of friends to create and insert data:
SET FOREIGN_KEY_CHECKS=0;

-- ----------------------------
-- Table structure for `user`
-- ----------------------------
DROP TABLE IF EXISTS `user`;
CREATE TABLE `user` (
  `userId` int(100) NOT NULL AUTO_INCREMENT,
  `userName` varchar(100) NOT NULL,
  `password` varchar(100) NOT NULL,
  `work` varchar(100) NOT NULL,
  `realName` varchar(100) NOT NULL,
  `phone` varchar(100) NOT NULL,
  PRIMARY KEY (`userId`)
) ENGINE=InnoDB AUTO_INCREMENT=2 DEFAULT CHARSET=utf8;

-- ----------------------------
-- Table structure for `friends`
-- ----------------------------
DROP TABLE IF EXISTS `friends`;
CREATE TABLE `friends` (
  `friendId` int(100) NOT NULL AUTO_INCREMENT,
  `userId` int(100) NOT NULL,
  `friendName` varchar(100) NOT NULL,
  `friendPhone` varchar(100) NOT NULL,
  `friendCompany` varchar(100) NOT NULL,
  `friendQQ` varchar(100) NOT NULL,
  PRIMARY KEY (`friendId`),
  KEY `user_id` (`userId`),
  CONSTRAINT `user_id` FOREIGN KEY (`userId`) REFERENCES `user` (`userId`) ON DELETE CASCADE ON UPDATE CASCADE
) ENGINE=InnoDB AUTO_INCREMENT=4 DEFAULT CHARSET=utf8;

-- ----------------------------
-- Records of user
-- ----------------------------
INSERT INTO `user` VALUES ('1', 'hlk1135', '123456', '学生', '王五', '17862828631');

-- ----------------------------
-- Records of friends
-- ----------------------------
INSERT INTO `friends` VALUES ('1', '1', '张三', '17862821111', '阿里巴巴', '862186722');
INSERT INTO `friends` VALUES ('2', '1', '李四', '17862821111', '百度', '111111111');
#### 2, set up the project structure:
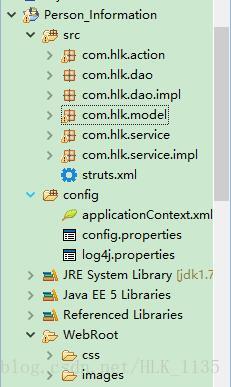
Initially set up SSH environment when using the Add Myeclipse automatically import their own, but because of the conflict between the jar package, manually change all their import. Give you a jar package after SSH integration, although there are several jar package is redundant, but I can guarantee that absolutely no conflict, and certainly can make good SSH project up and running.
Struts2 + Spring3 + Hibernate4 integration jar package download
1) web.xml:
<?xml version="1.0" encoding="UTF-8"?>
<web-app version="2.5"
	xmlns="http://java.sun.com/xml/ns/javaee"
	xmlns:xsi="http://www.w3.org/2001/XMLSchema-instance"
	xsi:schemaLocation="http://java.sun.com/xml/ns/javaee
	http://java.sun.com/xml/ns/javaee/web-app_2_5.xsd">
  <display-name></display-name>
  <welcome-file-list>
    <welcome-file>index.jsp</welcome-file>
  </welcome-file-list>
  <!-- 配置Spring的监听器,用于初始化ApplicationContext对象 -->
  <listener>
    <listener-class>org.springframework.web.context.ContextLoaderListener</listener-class>
  </listener>
  <context-param>
    <param-name>contextConfigLocation</param-name>
    <param-value>/WEB-INF/classes/applicationContext.xml</param-value>
  </context-param>
  <filter>
  	<filter-name>struts2</filter-name>
  	<filter-class>
  		org.apache.struts2.dispatcher.ng.filter.StrutsPrepareAndExecuteFilter
  	</filter-class>
    <!-- 自动扫描action -->
    <init-param>
      <param-name>actionPackages</param-name>
      <param-value>com.hlk.action</param-value>
    </init-param>
  </filter>
  <filter-mapping>
  	<filter-name>struts2</filter-name>
  	<url-pattern>/*</url-pattern>
  </filter-mapping>
 </web-app>
Note: If there contextConfigLocation xml files using the classpath:report similar to the following error:
org.springframework.beans.factory.BeanDefinitionStoreException: IOException parsing XML document from ServletContext resource [/WEB-INF/beans.xml]; nested exception is java.io.FileNotFoundException: Could not open ServletContext resource [/WEB-INF/beans.xml]
Caused by: java.io.FileNotFoundException: Could not open ServletContext resource [/WEB-INF/beans.xml]
Finally, through continuous testing, tuning and get the following conclusions, for reference only:
<!-- needed for ContextLoaderListener -->
 <!-- 指定spring配置文件的位置 -->
 <context-param>
  <param-name>contextConfigLocation</param-name>
  <!-- 可以成功加载配置文件 -->
  <!-- <param-value>/WEB-INF/classes/beans.xml,/WEB-INF/classes/action-beans.xml</param-value> -->
  <!-- 不能成功加载配置文件 -->
  <!-- <param-value>/WEB-INF/beans.xml,/WEB-INF/action-beans.xml</param-value> -->
  <!-- 可以成功加载配置文件 -->
  <!-- <param-value>classpath:*beans.xml</param-value> -->
  <!-- 不能成功加载配置文件 -->
  <!-- <param-value>classpath:beans.xml,action-beans.xml</param-value> -->
  <!-- 可以成功加载配置文件 -->
  <param-value>classpath:beans.xml,classpath:action-beans.xml</param-value>
 </context-param>
 <!-- Bootstraps the root web application context before servlet initialization -->
 <listener>
  <listener-class>org.springframework.web.context.ContextLoaderListener</listener-class>
 </listener>
stackoverflow in this sentence:
Do not use classpath. This may cause problems with different ClassLoaders (container vs. application). WEB-INF is always the better choice.
2) applicationContext.xml: (the Spring configuration file)
<?xml version="1.0" encoding="UTF-8"?>
<beans xmlns="http://www.springframework.org/schema/beans"
    xmlns:xsi="http://www.w3.org/2001/XMLSchema-instance" xmlns:context="http://www.springframework.org/schema/context"
    xmlns:tx="http://www.springframework.org/schema/tx"
    xsi:schemaLocation="http://www.springframework.org/schema/beans http://www.springframework.org/schema/beans/spring-beans-3.1.xsd
                http://www.springframework.org/schema/context http://www.springframework.org/schema/context/spring-context-3.1.xsd
                http://www.springframework.org/schema/tx http://www.springframework.org/schema/tx/spring-tx-3.1.xsd">

    <!-- 自动扫描dao和service包(自动注入) -->
	<context:component-scan base-package="com.hlk.dao,com.hlk.service"/>
	<!-- 引入属性文件 -->
	<context:property-placeholder location="/WEB-INF/classes/config.properties"/>
	<!-- 配置数据源 -->
	<bean name="dataSource" class="com.alibaba.druid.pool.DruidDataSource" init-method="init" destroy-method="close">
		<!-- 数据源驱动类可不写,Druid默认会自动根据URL识别DriverClass -->
		<property name="driverClassName" value="${driverClassName}" />
		<!-- 基本属性 url、user、password -->
		<property name="url" value="${jdbc_url}" />
		<property name="username" value="${jdbc_username}" />
		<property name="password" value="${jdbc_password}" />
		<!-- 配置初始化大小、最小、最大 -->
		<property name="initialSize" value="3" />
		<property name="minIdle" value="3" />
		<property name="maxActive" value="20" />
		<!-- 配置获取连接等待超时的时间 -->
		<property name="maxWait" value="60000" />
		<!-- 配置间隔多久才进行一次检测,检测需要关闭的空闲连接,单位是毫秒 -->
		<property name="timeBetweenEvictionRunsMillis" value="60000" />
		<!-- 配置一个连接在池中最小生存的时间,单位是毫秒 -->
		<property name="minEvictableIdleTimeMillis" value="300000" />
		<property name="validationQuery" value="${validationQuery}" />
		<property name="testWhileIdle" value="true" />
		<property name="testOnBorrow" value="false" />
		<property name="testOnReturn" value="false" />
		<!-- 配置监控统计拦截的filters -->
		<property name="filters" value="stat" />
	</bean>
	<!-- 配置hibernate session工厂 -->
	<bean id="sessionFactory"
		class="org.springframework.orm.hibernate4.LocalSessionFactoryBean">
		<property name="dataSource">
			<ref bean="dataSource" />
		</property>
		<property name="hibernateProperties">
			<props>
				<prop key="hibernate.hbm2ddl.auto">update</prop>
				<prop key="hibernate.dialect">org.hibernate.dialect.MySQLDialect</prop>
				<prop key="hibernate.show_sql">true</prop>
				<prop key="hibernate.format_sql">true</prop>
			</props>
		</property>
		<!--自动扫描注解方式配置的hibernate类文件  -->
        <property name="packagesToScan">
        	<list>
				<value>com.hlk.model</value>
			</list>
        </property>
	</bean>
	<!-- 用注解来实现事务管理 -->
    <bean id="txManager" name="txManager" class="org.springframework.orm.hibernate4.HibernateTransactionManager">
        <property name="sessionFactory" ref="sessionFactory"></property>
    </bean>
    <!-- 注解方式配置事物 -->
    <tx:annotation-driven transaction-manager="txManager"/>
</beans>
This uses druid database connection pooling, code comments in great detail, I will not do the introduction.
3) properties file config.properties:
hibernate.dialect=org.hibernate.dialect.MySQLDialect
driverClassName=com.mysql.jdbc.Driver
validationQuery=SELECT 1
jdbc_url=jdbc:mysql://127.0.0.1:3306/information?useUnicode=true&characterEncoding=UTF-8&zeroDateTimeBehavior=convertToNull&useSSL=false
jdbc_username=root
jdbc_password=

hibernate.hbm2ddl.auto=update
hibernate.show_sql=true
hibernate.format_sql=true
4) struts2 profile struts.xml:
<?xml version="1.0" encoding="UTF-8" ?>
<!DOCTYPE struts PUBLIC "-//Apache Software Foundation//DTD Struts Configuration 2.1//EN" "http://struts.apache.org/dtds/struts-2.1.dtd">
<struts>

	<!-- 指定由spring负责action对象的创建 -->
	<constant name="struts.objectFactory" value="spring" />
	<!-- 是否启用开发模式 -->
	<constant name="struts.devMode" value="true" />
	<!-- struts配置文件改动后,是否重新加载 -->
	<constant name="struts.configuration.xml.reload" value="true" />
	<!-- 设置浏览器是否缓存静态内容 -->
	<constant name="struts.serve.static.browserCache" value="false" />
	<!-- 请求参数的编码方式 -->
	<constant name="struts.i18n.encoding" value="utf-8" />
	<!-- 每次HTTP请求系统都重新加载资源文件,有助于开发 -->
	<constant name="struts.i18n.reload" value="true" />
	<!-- 文件上传最大值 -->
	<constant name="struts.multipart.maxSize" value="104857600" />
	<!-- 让struts2支持动态方法调用 -->
	<constant name="struts.enable.DynamicMethodInvocation" value="true" />
	<!-- Action名称中是否还是用斜线 -->
	<constant name="struts.enable.SlashesInActionNames" value="false" />
	<!-- 允许标签中使用表达式语法 -->
	<constant name="struts.tag.altSyntax" value="true" />
	<!-- 对于WebLogic,Orion,OC4J此属性应该设置成true -->
	<constant name="struts.dispatcher.parametersWorkaround" value="false" />
</struts>
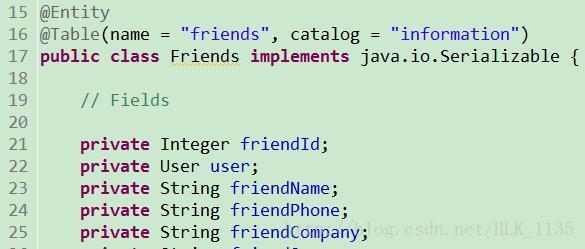
4) Hibernate reverse engineering and Friends User generated two Java entity classes.

I would not use Hibernate reverse engineering MyEclipse in how to do? no problem! please click here!
Click on this to tell you! ! !
#### Well, these are the work it out, then we can knock code to implement our needs friends.
#### Second, the function of each module implementation:
1, the user module
1) User Login
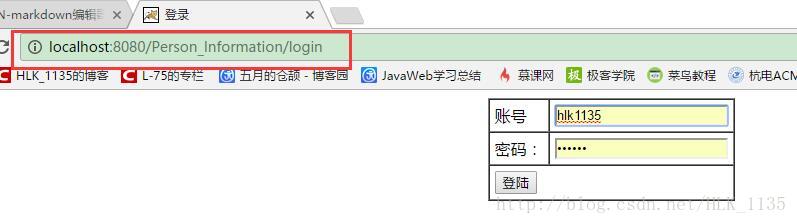
Login interception:
We get operation performed url, if not login, check to see if there is a user object logon session, if it is null, then return to the login page.
public class UserInterceptor extends AbstractInterceptor{
	@Override
	public String intercept(ActionInvocation invocation) throws Exception {
		//获取当前执行的方法
		String methodName = invocation.getProxy().getMethod();
		ActionContext ac = invocation.getInvocationContext();
		//从session中获取登录的用户对象
		Object obj = ac.getSession().get("userInfo");

		if(!"login".equals(methodName)) {
			if(obj == null) { //如果session中userInfo对象为null
				return "login";
			} else {
				return invocation.invoke();//允许执行操作
			}
		}
		return invocation.invoke();
	}
}
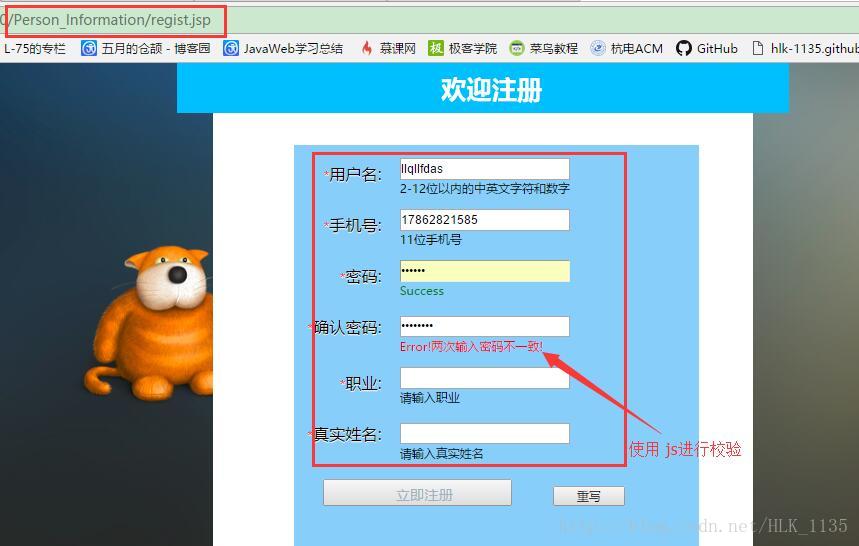
2) register the user (using the verify js)
2, successful login main page
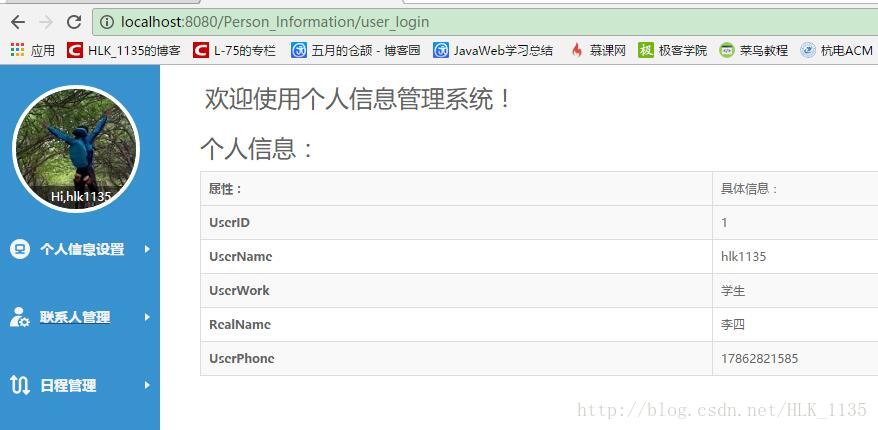
After a successful login login information into the session, making it easy to find and follow other display modules.
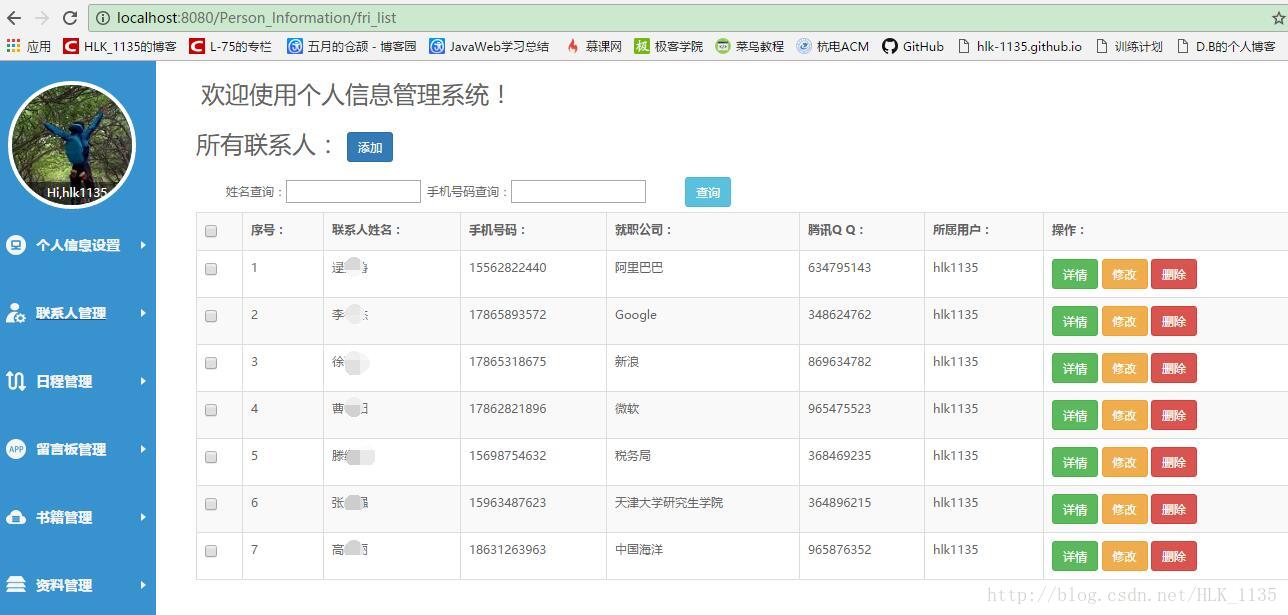
3, contact management module
Because id user table to the foreign key table friends, so here user login display and query the contact, not the user's operation to other contacts only. Therefore, above the user into the session played a role.
1) Add a contact
Here we must pay attention to a problem is that when we add a contact, a contact record, also includes userId, so we need to find out user objects, set it to the contact object, and then save the contact.
	public String save() {
		//先根据userId,查出user对象;再设置到联系人对象中
		User user = userService.findUserById(userId);
		friends.setUser(user);
		// 调用Service,保存联系人
		friendService.save(friends);
		return "frilistAction";
	}

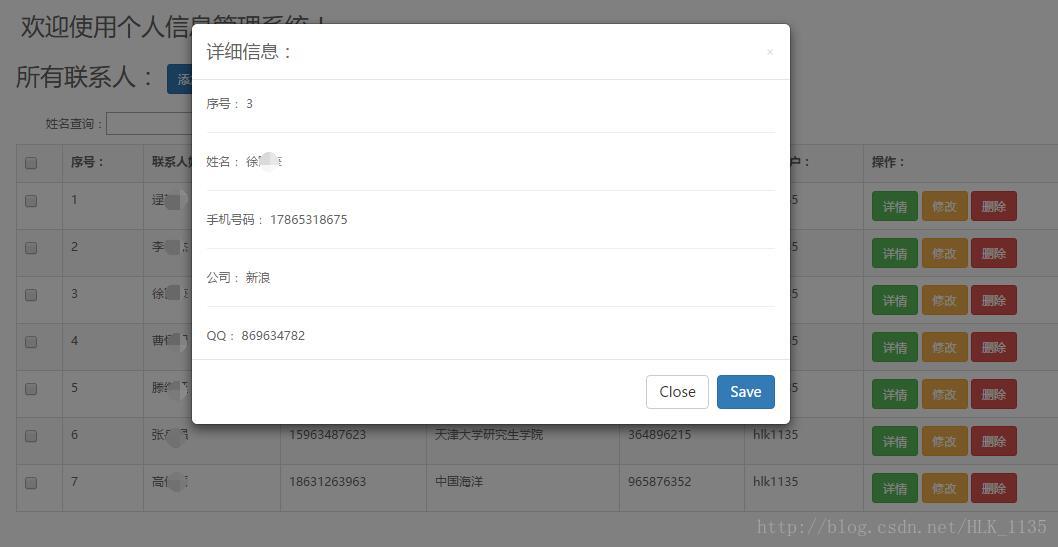
2) View contact details
Here again, using modal box BootStrap specific operation, you can learn about the specific description of the Demo small. ------ Struts2 simple library management system
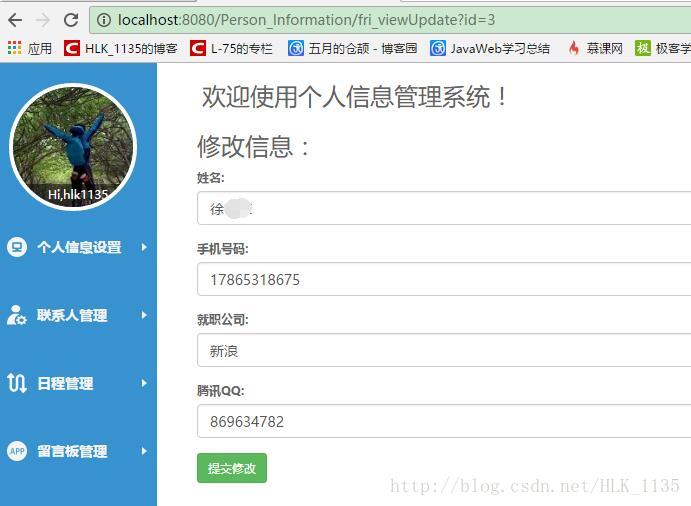
3) Modify Contact Information
4) fuzzy queries by names and phone numbers
fuzzy query support here is to use only the phone number, just use the name, both.
	/**
	 * 根据姓名和手机号模糊查询
	 */
	@Override
	public List<Friends> getAll(String friendName, String friendPhone) {
		HttpServletRequest request = ServletActionContext.getRequest();
		User user = (User)request.getSession().getAttribute("userInfo");
		int uid = user.getUserId();
		return this.getCurrentSession()
				.createQuery("from Friends where friendName like ? and friendPhone like ? and userId=?")
				.setParameter(0, "%" + friendName + "%")
				.setParameter(1, "%" + friendPhone + "%")
				.setInteger(2, uid)
				.list();
	}
Enter the query information:

search result:

5) batch delete contacts
Obtaining box; string dividing the splicing; delete operation for loop
<input type="checkbox" name="checkboxes" value="<s:property value="#friend.friendId"/>"/>
function delchecked() {
		var ids="";
		var obj=$("input[name='checkboxes']");

		for(var i=0;i<obj.length;i++) {
			if(obj[i].checked)
				if(ids=="") {
					ids += obj[i].value;
				} else {
					ids += "," + obj[i].value;
				}
		}
		alert(ids);
		if(ids == ""){
			alert("请勾选要删除的项");
			return false;
		}
		if(confirm("你确定要删除选定项?"))
			location.href="fri_deletemany?ids=" + ids;	//跳转到action
}
FriendAction.java:
public String deletemany() {
		//获取出需要删除的联系人的id
		String str = ServletActionContext.getRequest().getParameter("ids");
		String[] s = str.trim().split(",");
		for (int i = 0; i < s.length; i++) {
			int id = Integer.parseInt(s[i]);
			Friends f = friendService.findById(id);
			friendService.delete(f);
		}
		return "frilistAction";
	}
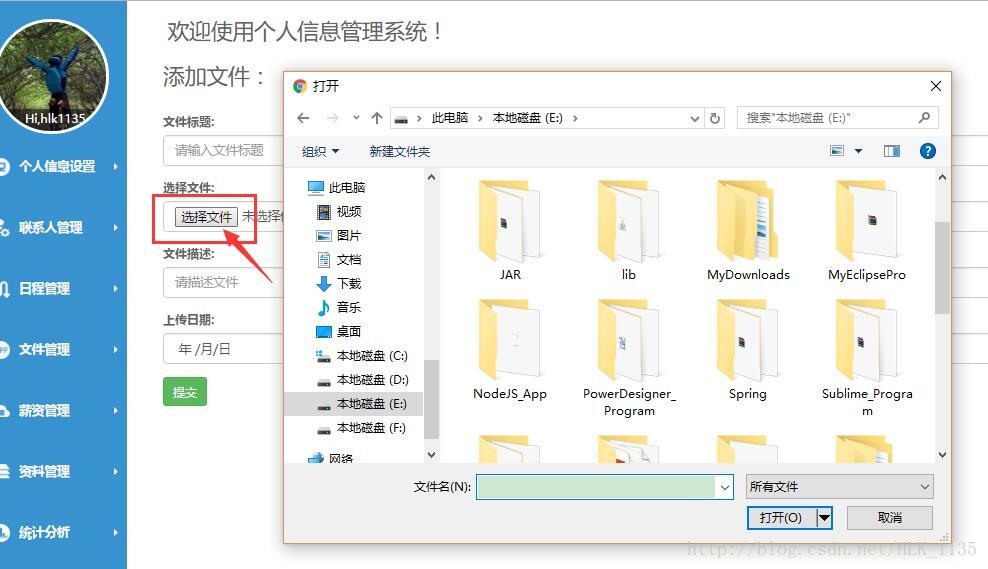
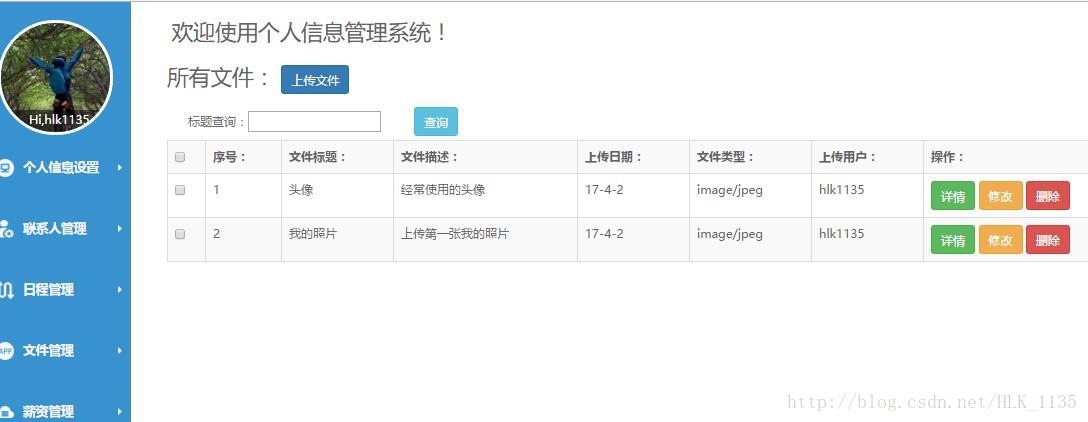
4, file management module
1) upload files
2) File list display
### follow-up function modules continue to improve, the code updates will be uploaded to the finishing Github.
SSH-based personal information management system project source code
