Brief introduction
1, ansible installation particularly simple deployment process, the learning curve is flat;
2, no separate client installation, using the existing knowledge SSHD services (protocols) to.
3, based on the Python development, a collection of many advantages of maintenance tools (puppet, chef, func, fabric ) of movement, to achieve a bulk system configuration, batch deployment, run the batch command functions.
ansible Features
1, simple to deploy, simply deploy Ansible environment in master, host not need to do anything;
2, using the default SSH protocol on the device management;
3, a large number of routine operation and maintenance operations module, enabling the vast majority of daily operation;
4, configuration is simple, powerful, and strong expansion;
5, API support and custom modules can be easily extended by Python;
6, to customize powerful configuration by playbooks, state management;
7, lightweight, no need to client installation agent, when you update, you can update only once on the operating machine;
8, providing a powerful, strong operational management Web interface and REST API interfaces --AWX platform.
Chart
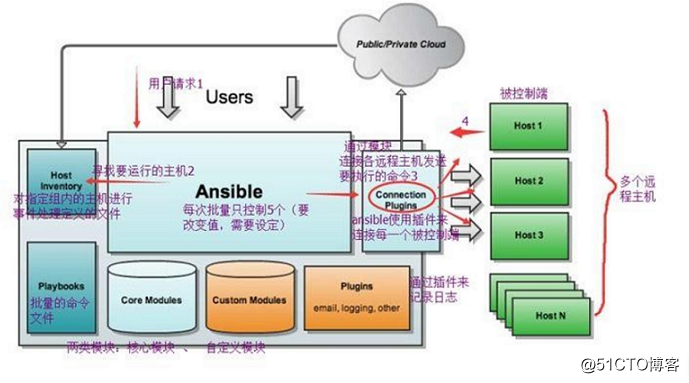
Ansible:Ansible核心程序。
HostInventory:记录由Ansible管理的主机信息,包括端口、密码、ip等。
Playbooks:“剧本”YAML格式文件,多个任务定义在一个文件中,定义主机需要调用哪些模块来完成的功能。
CoreModules:核心模块,主要操作是通过调用核心模块来完成管理任务。
CustomModules:自定义模块,完成核心模块无法完成的功能,支持多种语言。
ConnectionPlugins:连接插件,Ansible和Host通信使用
ansible task execution mode
Ansible host system by the control operation of the managed node can be divided into two categories, i.e. adhoc and playbook:
ad-hoc mode (ad hoc mode)
uses a single module supports the implementation of a single batch command. ad-hoc command is a command to input a way fast, and need to save up command. The equivalent word in the shell bash.
playbook mode (play mode)
is Ansible major management model, which is a powerful Ansible function key. playbook by more than a collection of task completion of a class of functions, such as installation and deployment of Web services, batch backup database server. Playbook can be understood as simply by combining a plurality of ad-hoc operation profile.
ansible execution process
Simple to understand Ansible at run-time, first read ansible.cfg configuration, obtain a list of hosts Inventory management in accordance with the rules, parallel tasks to perform configuration of these hosts, and finally waiting for the results of the implementation of the return.
Practical operation
surroundings
管理端:CentOS 7-2 192.168.18.147
被管理端1:CentOS 7-3 192.168.18.128
被管理端2:CentOS 7-4 192.168.18.148
Management side:
[root@localhost ~]# systemctl stop firewalld.service
[root@localhost ~]# setenforce 0
[root@localhost ~]# yum install epel-release -y
[root@localhost ~]# yum install ansible -y
[root@localhost ~]# ansible --version
ansible 2.9.2
[root@localhost ~]# yum install tree -y
[root@localhost ~]# tree /etc/ansible/
/etc/ansible/
├── ansible.cfg         #配置文件
├── hosts
└── roles

1 directory, 2 files
`配置主机清单`
[root@localhost ~]# vim  /etc/ansible/hosts
#在24行下插入以下内容
[webserver]
192.168.18.128
[mysql]
192.168.18.148

`生成密钥对`
[root@localhost ~]# ssh-keygen -t rsa
Generating public/private rsa key pair.
Enter file in which to save the key (/root/.ssh/id_rsa):        #直接回车
Created directory '/root/.ssh'.
Enter passphrase (empty for no passphrase):     #输入密码:abc123
Enter same passphrase again:                    #再次输入密码:abc123
Your identification has been saved in /root/.ssh/id_rsa.
Your public key has been saved in /root/.ssh/id_rsa.pub.
The key fingerprint is:
SHA256:5RvIVqbI9hscNK1Y4YivNnnUEgQeNfNm/WJcBXr8jWc [email protected]
The key's randomart image is:
+---[RSA 2048]----+
|    oo= .   ...  |
|   . + * + o .   |
|    o o O B +    |
|     o @ @ + . o |
|      O S * . o E|
|     = = o +   o |
|    = . + .      |
|   . o   o       |
|        .        |
+----[SHA256]-----+

`密钥对位置`
[root@localhost ~]# ls -la
总用量 56
......
drwx------.  2 root root   38 1月  22 17:34 .ssh
......此处省略多行
[root@localhost ~]# cd .ssh/
[root@localhost .ssh]# ls
id_rsa(私钥)  id_rsa.pub(公钥)

`把密钥推给被管理端1`
[root@localhost .ssh]# ssh-copy-id [email protected]
/usr/bin/ssh-copy-id: INFO: Source of key(s) to be installed: "/root/.ssh/id_rsa.pub"
The authenticity of host '192.168.18.128 (192.168.18.128)' can't be established.
ECDSA key fingerprint is SHA256:mTT+FEtzAu4X3D5srZlz93S3gye8MzbqVZFDzfJd4Gk.
ECDSA key fingerprint is MD5:fa:5a:88:23:49:60:9b:b8:7e:4b:14:4b:3f:cd:96:a0.
Are you sure you want to continue connecting (yes/no)? yes  #确认链接
/usr/bin/ssh-copy-id: INFO: attempting to log in with the new key(s), to filter out any that are already installed
/usr/bin/ssh-copy-id: INFO: 1 key(s) remain to be installed -- if you are prompted now it is to install the new keys
[email protected]'s password:     #输入相对应被管理端的root密码

Number of key(s) added: 1

Now try logging into the machine, with:   "ssh '[email protected]'"
and check to make sure that only the key(s) you wanted were added.
`把密钥推给被管理端2`
[root@localhost .ssh]# ssh-copy-id [email protected]
/usr/bin/ssh-copy-id: INFO: Source of key(s) to be installed: "/root/.ssh/id_rsa.pub"
The authenticity of host '192.168.18.148 (192.168.18.148)' can't be established.
ECDSA key fingerprint is SHA256:mTT+FEtzAu4X3D5srZlz93S3gye8MzbqVZFDzfJd4Gk.
ECDSA key fingerprint is MD5:fa:5a:88:23:49:60:9b:b8:7e:4b:14:4b:3f:cd:96:a0.
Are you sure you want to continue connecting (yes/no)? yes  #确认链接
/usr/bin/ssh-copy-id: INFO: attempting to log in with the new key(s), to filter out any that are already installed
/usr/bin/ssh-copy-id: INFO: 1 key(s) remain to be installed -- if you are prompted now it is to install the new keys
[email protected]'s password:     #输入相对应被管理端的root密码

Number of key(s) added: 1

Now try logging into the machine, with:   "ssh '[email protected]'"
and check to make sure that only the key(s) you wanted were added.
Verify key is pushed success:
the management side 1: 192.168.18.128
[root@localhost ~]# systemctl stop firewalld.service
[root@localhost ~]# setenforce 0
[root@localhost ~]# cd .ssh/
[root@localhost .ssh]# ls
authorized_keys
#此时密钥推送成功
The management terminal 2:
[root@localhost ~]# systemctl stop firewalld.service
[root@localhost ~]# setenforce 0
[root@localhost ~]# cd .ssh/
[root@localhost .ssh]# ls
authorized_keys
#此时密钥推送成功
Ansible management module
1, command module
`使用IP地址查看被管理端1的时间`
[root@localhost .ssh]# ansible 192.168.18.128 -m command -a 'date'
Enter passphrase for key '/root/.ssh/id_rsa':       #输入密钥密码abc123
192.168.18.128 | CHANGED | rc=0 >>
2020年 02月 02日 星期日 15:53:20 CST
`使用别名查看被管理端2的时间`
[root@localhost .ssh]# ansible mysql -m command -a 'date'
Enter passphrase for key '/root/.ssh/id_rsa':       #输入密钥密码abc123
192.168.18.148 | CHANGED | rc=0 >>
2020年 02月 02日 星期日 15:55:13 CST

`为避免总是输入密码的麻烦,我们可以执行免交互代理`
[root@localhost .ssh]# ssh-agent bash
[root@localhost .ssh]# ssh-add
Enter passphrase for /root/.ssh/id_rsa:             #输入密钥密码abc123
Identity added: /root/.ssh/id_rsa (/root/.ssh/id_rsa)

[root@localhost .ssh]# ansible webserver -m command -a 'date'
192.168.18.128 | CHANGED | rc=0 >>
2020年 02月 02日 星期日 16:01:40 CST
#此时可以免交互直接显示时间

`所有hosts主机执行date命令`
[root@localhost .ssh]# ansible all -a 'date'
192.168.18.128 | CHANGED | rc=0 >>
2020年 02月 02日 星期日 16:21:08 CST

192.168.18.148 | CHANGED | rc=0 >>
2020年 02月 02日 星期日 16:21:08 CST
2, cron module [two states (state): present represents addition (can be omitted), absent] represents removed
[root@localhost .ssh]# ansible mysql -m cron -a 'minute="*/1" job="/usr/bin/echo hello"  name="test hello"'
192.168.18.148 | CHANGED => {
    "ansible_facts": {
        "discovered_interpreter_python": "/usr/bin/python"
    },
    "changed": true,
    "envs": [],
    "jobs": [
        "test hello"
    ]
}
[root@localhost .ssh]# ansible mysql -a 'crontab -l'
192.168.18.148 | CHANGED | rc=0 >>
#Ansible: test hello
*/1 * * * * /usr/bin/echo hello
At this point we can enter the managed terminal 2 to verify:
[root@localhost .ssh]# crontab -l
#Ansible: test hello
*/1 * * * * /usr/bin/echo hello
您在 /var/spool/mail/root 中有新邮件

[root@localhost .ssh]# vim /var/spool/mail/root
From [email protected]  Sun Feb  2 16:40:02 2020
Return-Path: <[email protected]>
X-Original-To: root
Delivered-To: [email protected]
Received: by localhost.localdomain (Postfix, from userid 0)
        id 2255A319AE4E; Sun,  2 Feb 2020 16:40:02 +0800 (CST)
From: "(Cron Daemon)" <[email protected]>
To: [email protected]
Subject: Cron <root@localhost> /usr/bin/echo hello
Content-Type: text/plain; charset=UTF-8
Auto-Submitted: auto-generated
Precedence: bulk
X-Cron-Env: <XDG_SESSION_ID=19>
X-Cron-Env: <XDG_RUNTIME_DIR=/run/user/0>
X-Cron-Env: <LANG=zh_CN.UTF-8>
X-Cron-Env: <SHELL=/bin/sh>
X-Cron-Env: <HOME=/root>
X-Cron-Env: <PATH=/usr/bin:/bin>
X-Cron-Env: <LOGNAME=root>
X-Cron-Env: <USER=root>
Message-Id: <[email protected]>
Date: Sun,  2 Feb 2020 16:40:02 +0800 (CST)

hello
#以下省略多行,每分钟生成一个
At this point remove the planned task, absent:
[root@localhost .ssh]# ansible mysql -m cron -a 'name="test hello" state=absent'
192.168.18.148 | CHANGED => {
    "ansible_facts": {
        "discovered_interpreter_python": "/usr/bin/python"
    },
    "changed": true,
    "envs": [],
    "jobs": []
}

`此时再回到被管理端2中会发现计划任务消失`
[root@localhost ~]# crontab -l
3, user modules are modules [user request is useradd, userdel, usermod three commands]
`创建用户test01`
[root@localhost ~]# ansible all -m user -a 'name=test01'
192.168.18.128 | CHANGED => {
    "ansible_facts": {
        "discovered_interpreter_python": "/usr/bin/python"
    },
    "changed": true,
    "comment": "",
    "create_home": true,
    "group": 1001,
    "home": "/home/test01",
    "name": "test01",
    "shell": "/bin/bash",
    "state": "present",
    "system": false,
    "uid": 1001
}
192.168.18.148 | CHANGED => {
    "ansible_facts": {
        "discovered_interpreter_python": "/usr/bin/python"
    },
    "changed": true,
    "comment": "",
    "create_home": true,
    "group": 1001,
    "home": "/home/test01",
    "name": "test01",
    "shell": "/bin/bash",
    "state": "present",
    "system": false,
    "uid": 1001
}
`此时回到被管理端1中验证添加用户`
[root@localhost ~]# id test01
uid=1001(test01) gid=1001(test01) 组=1001(test01)
`此时回到被管理端2中验证添加用户`
[root@localhost ~]# id test01
uid=1001(test01) gid=1001(test01) 组=1001(test01)
#此时两台被管理端test01用户均添加成功

`删除webserver端中的test01用户`
[root@localhost ~]# ansible webserver -m user -a 'name=test01 state=absent'
192.168.18.128 | CHANGED => {
    "ansible_facts": {
        "discovered_interpreter_python": "/usr/bin/python"
    },
    "changed": true,
    "force": false,
    "name": "test01",
    "remove": false,
    "state": "absent"
}
`此时回到被管理端1:webserver中验证用户情况`
[root@localhost ~]# id test01
id: test01: no such user
#此时显示找不到,说明已被删除
module group [group requested module is groupadd, groupdel, groupmod three commands]
`创建mysql组`
[root@localhost ~]# ansible mysql -m group -a 'name=mysql gid=306 system=yes'
192.168.18.148 | CHANGED => {
    "ansible_facts": {
        "discovered_interpreter_python": "/usr/bin/python"
    },
    "changed": true,
    "gid": 306,
    "name": "mysql",
    "state": "present",
    "system": true
}
`远程查看被管理端2:mysql中是否有mysql组`
[root@localhost ~]# ansible mysql -a 'tail /etc/group'
192.168.18.148 | CHANGED | rc=0 >>
postfix:x:89:
stapusr:x:156:
stapsys:x:157:
stapdev:x:158:
tcpdump:x:72:
zhou:x:1000:
dhcpd:x:177:
named:x:25:
test01:x:1001:
mysql:x:306:        #此时有mysql组,同时gid号为306

`创建新用户test02并添加到mysql组`
[root@localhost ~]# ansible mysql -m user -a 'name=test02 uid=306 group=mysql system=yes'
192.168.18.148 | CHANGED => {
    "ansible_facts": {
        "discovered_interpreter_python": "/usr/bin/python"
    },
    "changed": true,
    "comment": "",
    "create_home": true,
    "group": 306,
    "home": "/home/test02",
    "name": "test02",
    "shell": "/bin/bash",
    "state": "present",
    "system": true,
    "uid": 306
}
`远程查看被管理端2:mysql中是否在mysql组是否有新创建的用户test02`
[root@localhost ~]# ansible mysql -a 'id test02'
192.168.18.148 | CHANGED | rc=0 >>
uid=306(test02) gid=306(mysql) 组=306(mysql)
copy module
`远程把被管理端2:mysql中的etc目录下fstab自动挂载文件,复制到opt目录下并且取名为fstab.bk,属组为root,权限为644`
[root@localhost ~]# ansible mysql -m copy -a 'src=/etc/fstab dest=/opt/fstab.bk owner=root mode=644'
192.168.18.148 | CHANGED => {
    "ansible_facts": {
        "discovered_interpreter_python": "/usr/bin/python"
    },
    "changed": true,
    "checksum": "100f3bbf6644926857bbec2a40ab2f70bf1c060b",
    "dest": "/opt/fstab.bk",
    "gid": 0,
    "group": "root",
    "md5sum": "f57167de0e8f6f2963771a72af8a2840",
    "mode": "0644",
    "owner": "root",
    "secontext": "system_u:object_r:usr_t:s0",
    "size": 595,
    "src": "/root/.ansible/tmp/ansible-tmp-1580693038.81-171191249824445/source",
    "state": "file",
    "uid": 0
}
`远程查看被管理端2:mysql的opt目录下是否在mysql组是否有fstab.bk文件`
[root@localhost ~]# ansible mysql -a 'ls -l /opt'
192.168.18.148 | CHANGED | rc=0 >>
总用量 4
-rw-r--r--. 1 root root 595 2月   3 09:24 fstab.bk
drwxr-xr-x. 2 root root   6 3月  26 2015 rh

`指定内容this is test,重定向生成新文件test.txt在opt目录下`
[root@localhost ~]# ansible mysql -m copy -a 'content="this is test" dest=/opt/test.txt'
192.168.18.148 | CHANGED => {
    "ansible_facts": {
        "discovered_interpreter_python": "/usr/bin/python"
    },
    "changed": true,
    "checksum": "b6794b2000d94d348203d0279c2e7322b922cb16",
    "dest": "/opt/test.txt",
    "gid": 0,
    "group": "root",
    "md5sum": "8c6d115258631625b625486f81b09532",
    "mode": "0644",
    "owner": "root",
    "secontext": "system_u:object_r:usr_t:s0",
    "size": 12,
    "src": "/root/.ansible/tmp/ansible-tmp-1580693472.89-123279558248268/source",
    "state": "file",
    "uid": 0
}
`远程查看被管理端2:mysql的opt目录下的test.txt文件中内容是否为this is test`
[root@localhost ~]# ansible mysql -a 'cat /opt/test.txt'
192.168.18.148 | CHANGED | rc=0 >>
this is test
file module
`路径opt下的文件test.txt,用户为test02,组指定为mysql,权限为666`
[root@localhost ~]# ansible mysql -m file -a 'path=/opt/test.txt owner=test02 group=mysql mode=666'
192.168.18.148 | CHANGED => {
    "ansible_facts": {
        "discovered_interpreter_python": "/usr/bin/python"
    },
    "changed": true,
    "gid": 306,
    "group": "mysql",
    "mode": "0666",
    "owner": "test02",
    "path": "/opt/test.txt",
    "secontext": "system_u:object_r:usr_t:s0",
    "size": 12,
    "state": "file",
    "uid": 306
}
`此时回到被管理端2:mysql中opt目录下的test.txt文件的详细情况`
[root@localhost ~]# cd /opt/
[root@localhost opt]# ls -l
总用量 8
-rw-r--r--. 1 root   root  595 2月   3 09:24 fstab.bk
drwxr-xr-x. 2 root   root    6 3月  26 2015 rh
-rw-rw-rw-. 1 test02 mysql  12 2月   3 09:31 test.txt
#此时test.txt文件属主为test02,属组为mysql,权限为666

`设置/opt/test.txt.link为/opt/test.txt的链接文件`
[root@localhost ~]# ansible mysql -m file -a 'src=/opt/test.txt path=/opt/test.txt.link state=link'
192.168.18.148 | CHANGED => {
    "ansible_facts": {
        "discovered_interpreter_python": "/usr/bin/python"
    },
    "changed": true,
    "dest": "/opt/test.txt.link",
    "gid": 0,
    "group": "root",
    "mode": "0777",
    "owner": "root",
    "secontext": "unconfined_u:object_r:usr_t:s0",
    "size": 13,
    "src": "/opt/test.txt",
    "state": "link",
    "uid": 0
}
`此时回到被管理端2:mysql中opt目录下查看此链接文件`
[root@localhost opt]# ls -l
总用量 8
-rw-r--r--. 1 root   root  595 2月   3 09:24 fstab.bk
drwxr-xr-x. 2 root   root    6 3月  26 2015 rh
-rw-rw-rw-. 1 test02 mysql  12 2月   3 09:31 test.txt
lrwxrwxrwx. 1 root   root   13 2月   3 09:59 test.txt.link -> /opt/test.txt  #链接性的文件

`创建一个空文件`
[root@localhost ~]# ansible mysql -m file -a 'path=/opt/abc.txt state=touch'
192.168.18.148 | CHANGED => {
    "ansible_facts": {
        "discovered_interpreter_python": "/usr/bin/python"
    },
    "changed": true,
    "dest": "/opt/abc.txt",
    "gid": 0,
    "group": "root",
    "mode": "0644",
    "owner": "root",
    "secontext": "unconfined_u:object_r:usr_t:s0",
    "size": 0,
    "state": "file",
    "uid": 0
}
`此时回到被管理端2:mysql中opt目录下abc.txt文件的详细情况`
[root@localhost opt]# ls                #此时有abc.txt文件
abc.txt  fstab.bk  rh  test.txt  test.txt.link
[root@localhost opt]# cat abc.txt       #因为是空文件,所以没有内容

`删除创建的abc.txt空文件`
[root@localhost ~]# ansible mysql -m file -a 'path=/opt/abc.txt state=absent'
192.168.18.148 | CHANGED => {
    "ansible_facts": {
        "discovered_interpreter_python": "/usr/bin/python"
    },
    "changed": true,
    "path": "/opt/abc.txt",
    "state": "absent"
}
`此时回到被管理端2:mysql中opt目录下是否有abc.txt文件`
[root@localhost opt]# ls
fstab.bk  rh  test.txt  test.txt.link
ping module
`测试两台被管理端是否在线`
[root@localhost ~]# ansible all -m ping
192.168.18.148 | SUCCESS => {
    "ansible_facts": {
        "discovered_interpreter_python": "/usr/bin/python"
    },
    "changed": false,
    "ping": "pong"
}
192.168.18.128 | SUCCESS => {
    "ansible_facts": {
        "discovered_interpreter_python": "/usr/bin/python"
    },
    "changed": false,
    "ping": "pong"
}
yum module
`在被管理端1:webserver中安装httpd服务`
[root@localhost ~]# ansible webserver -m yum -a 'name=httpd'
192.168.18.128 | CHANGED => {
    "ansible_facts": {
        "discovered_interpreter_python": "/usr/bin/python"
    },
    "changed": true,
    "changes": {
        "installed": [
            "httpd"
        ]
    },
    "msg": "",
    "rc": 0,
    "results": [
        "Loaded plugins: fastestmirror, langpacks\nLoading mirror speeds from cached hostfile\n * base: mirrors.huaweicloud.com\n * extras: mirror.bit.edu.cn\n * updates: mirror.bit.edu.cn\nResolving Dependencies\n--> Running transaction check\n---> Package httpd.x86_64 0:2.4.6-90.el7.centos will be installed\n--> Processing Dependency: httpd-tools = 2.4.6-90.el7.centos for package: httpd-2.4.6-90.el7.centos.x86_64\n--> Processing Dependency: /etc/mime.types for package: httpd-2.4.6-90.el7.centos.x86_64\n--> Processing Dependency: libaprutil-1.so.0()(64bit) for package: httpd-2.4.6-90.el7.centos.x86_64\n--> Processing Dependency: libapr-1.so.0()(64bit) for package: httpd-2.4.6-90.el7.centos.x86_64\n--> Running transaction check\n---> Package apr.x86_64 0:1.4.8-5.el7 will be installed\n---> Package apr-util.x86_64 0:1.5.2-6.el7 will be installed\n---> Package httpd-tools.x86_64 0:2.4.6-90.el7.centos will be installed\n---> Package mailcap.noarch 0:2.1.41-2.el7 will be installed\n--> Finished Dependency Resolution\n\nDependencies Resolved\n\n================================================================================\n Package            Arch          Version                     Repository   Size\n================================================================================\nInstalling:\n httpd              x86_64        2.4.6-90.el7.centos         base        2.7 M\nInstalling for dependencies:\n apr                x86_64        1.4.8-5.el7                 base        103 k\n apr-util           x86_64        1.5.2-6.el7                 base         92 k\n httpd-tools        x86_64        2.4.6-90.el7.centos         base         91 k\n mailcap            noarch        2.1.41-2.el7                base         31 k\n\nTransaction Summary\n================================================================================\nInstall  1 Package (+4 Dependent packages)\n\nTotal download size: 3.0 M\nInstalled size: 10 M\nDownloading packages:\n--------------------------------------------------------------------------------\nTotal                                              1.0 MB/s | 3.0 MB  00:03     \nRunning transaction check\nRunning transaction test\nTransaction test succeeded\nRunning transaction\n  Installing : apr-1.4.8-5.el7.x86_64                                       1/5 \n  Installing : apr-util-1.5.2-6.el7.x86_64                                  2/5 \n  Installing : httpd-tools-2.4.6-90.el7.centos.x86_64                       3/5 \n  Installing : mailcap-2.1.41-2.el7.noarch                                  4/5 \n  Installing : httpd-2.4.6-90.el7.centos.x86_64                             5/5 \n  Verifying  : apr-1.4.8-5.el7.x86_64                                       1/5 \n  Verifying  : mailcap-2.1.41-2.el7.noarch                                  2/5 \n  Verifying  : httpd-tools-2.4.6-90.el7.centos.x86_64                       3/5 \n  Verifying  : apr-util-1.5.2-6.el7.x86_64                                  4/5 \n  Verifying  : httpd-2.4.6-90.el7.centos.x86_64                             5/5 \n\nInstalled:\n  httpd.x86_64 0:2.4.6-90.el7.centos                                            \n\nDependency Installed:\n  apr.x86_64 0:1.4.8-5.el7                     apr-util.x86_64 0:1.5.2-6.el7    \n  httpd-tools.x86_64 0:2.4.6-90.el7.centos     mailcap.noarch 0:2.1.41-2.el7    \n\nComplete!\n"
    ]
}
#安装完成后会显示过程
`此时可以返回被管理端1:webserver中查看httpd服务是否安装成功`
[root@localhost ~]# rpm -q httpd
httpd-2.4.6-90.el7.centos.x86_64        #此时服务安装完成

`可以用以下命令移除服务`
[root@localhost ~]# ansible webserver -m yum -a 'name=httpd state=absent'
service module
`启动被管理端2中的httpd服务`
[root@localhost ~]# ansible webserver -m service -a 'enabled=true name=httpd state=started'
192.168.18.128 | CHANGED => {
    "ansible_facts": {
        "discovered_interpreter_python": "/usr/bin/python"
    },
    "changed": true,
    "enabled": true,
    "name": "httpd",
    "state": "started",
......此处省略多行
`此时到被管理端1:webserver中查看httpd服务的状态`
[root@localhost ~]# systemctl status httpd.service
● httpd.service - The Apache HTTP Server
   Loaded: loaded (/usr/lib/systemd/system/httpd.service; enabled; vendor preset: disabled)
   Active: active (running) since 一 2020-02-03 10:24:28 CST; 2min 25s ago
#此时状态显示为running运行
shell module
`创建一个用户,为用户生成免交互密码`
[root@localhost ~]# ansible webserver -m user -a 'name=jarry'       #创建新用户jarry
192.168.18.128 | CHANGED => {
    "ansible_facts": {
        "discovered_interpreter_python": "/usr/bin/python"
    },
    "changed": true,
    "comment": "",
    "create_home": true,
    "group": 1001,
    "home": "/home/jarry",
    "name": "jarry",
    "shell": "/bin/bash",
    "state": "present",
    "system": false,
    "uid": 1001
}
[root@localhost ~]# ansible webserver -m shell -a 'echo abc123 | passwd --stdin jarry'
192.168.18.128 | CHANGED | rc=0 >>
更改用户 jarry 的密码 。
passwd:所有的身份验证令牌已经成功更新。
#生成jarry用户的登录密码为abc123
script module
`首先在管理端编写脚本`
[root@localhost ~]# cd /opt/
[root@localhost opt]# vim test.sh
#!/bin/bash
echo "this is test script" > /opt/script.txt
chmod 666 /opt/script.txt
[root@localhost opt]# ls
rh  test.sh
[root@localhost opt]# chmod +x test.sh      #给予执行权限

`对所有被管理端执行test.sh脚本`
[root@localhost opt]# ansible all -m script -a 'test.sh'
192.168.18.128 | CHANGED => {
    "changed": true,
    "rc": 0,
    "stderr": "Shared connection to 192.168.18.128 closed.\r\n",
    "stderr_lines": [
        "Shared connection to 192.168.18.128 closed."
    ],
    "stdout": "",
    "stdout_lines": []
}
192.168.18.148 | CHANGED => {
    "changed": true,
    "rc": 0,
    "stderr": "Shared connection to 192.168.18.148 closed.\r\n",
    "stderr_lines": [
        "Shared connection to 192.168.18.148 closed."
    ],
    "stdout": "",
    "stdout_lines": []
}
`验证两台被管理端的opt目录下是否有script.txt文件`
#被管理端1:
[root@localhost ~]# cd /opt/
[root@localhost opt]# ls
rh  script.txt
[root@localhost opt]# cat script.txt
this is test script
#被管理端2:
[root@localhost opt]# ls
fstab.bk  rh  script.txt  test.txt  test.txt.link
[root@localhost opt]# cat script.txt
this is test script
setup module
`列出被管理端2:mysql的所有主机信息`
[root@localhost opt]# ansible mysql -m setup
192.168.18.148 | SUCCESS => {
    "ansible_facts": {
        "ansible_all_ipv4_addresses": [
            "192.168.122.1",
            "192.168.18.148"
        ],
        "ansible_all_ipv6_addresses": [
            "fe80::1cb1:b734:7f72:576f",
            "fe80::578f:4368:6a2c:80d7",
            "fe80::6a0c:e6a0:7978:3543"
        ],
        "ansible_apparmor": {
            "status": "disabled"
        },
        "ansible_architecture": "x86_64",
        "ansible_bios_date": "07/29/2019",
        "ansible_bios_version": "6.00",
        "ansible_cmdline": {
            "BOOT_IMAGE": "/vmlinuz-3.10.0-693.el7.x86_64",
            "LANG": "zh_CN.UTF-8",
            "crashkernel": "auto",
            "quiet": true,
            "rhgb": true,
            "ro": true,
            "root": "UUID=32c169ff-9bf7-4d89-a2f1-a99a7e59d4f2"
        },
        "ansible_date_time": {
            "date": "2020-02-03",
            "day": "03",
            "epoch": "1580698171",
            "hour": "10",
            "iso8601": "2020-02-03T02:49:31Z",
            "iso8601_basic": "20200203T104931948449",
            "iso8601_basic_short": "20200203T104931",
            "iso8601_micro": "2020-02-03T02:49:31.948682Z",
            "minute": "49",
            "month": "02",
            "second": "31",
            "time": "10:49:31",
            "tz": "CST",
            "tz_offset": "+0800",
            "weekday": "星期一",
            "weekday_number": "1",
            "weeknumber": "05",
            "year": "2020"
        },
        "ansible_default_ipv4": {
            "address": "192.168.18.148",
            "alias": "ens33",
            "broadcast": "192.168.18.255",
            "gateway": "192.168.18.2",
            "interface": "ens33",
            "macaddress": "00:0c:29:79:45:8e",
            "mtu": 1500,
            "netmask": "255.255.255.0",
            "network": "192.168.18.0",
            "type": "ether"
        },
......
......
......