Article Directory
Other structures
Sorry, I just moved blog Park, Bowen moved here not markdown syntax, now I re-use the markdown put up
Build a blog is not difficult, but a lot of online information pit. I may be some mistake, please indicate in the comments. But there are tested.
I use the version hexo4.0 + NexT7.6 version.
My personal blog
There Ali cloud server can be deployed up, no github can also be used to store, it is free on github, but access is slower.
What I do not understand despite the harassment, I can notice. So that the problem can be solved as soon as possible
1 Introduction
There are many online tutorials hexo + nexT7, a lot of problems because the version now, some configuration error or done will not take effect. Build this blog took me four days, plus landscaping.
Used during nexT5.0 and hexo4.0 access path leading to a little problem, http appear: // localhost: 4000 / archives / 20% / I do not understand Editor's Note, the puncturing two local blog. It was found that a version of the problem.
First, make it clear at the front, give me every step done using a local test three instructions (below say) it, do not do silly waiting for the completion of half or even all done only to test if an error that's very deadly, of course, the worst result is redone. If the bug occurs each time the test if the problem can be ruled out, depending on which step.
And I use the latter was to carry out his Ali cloud server, the other servers not touched, but roughly the same. Want to get behind the domain name you can now go to get a domain name, such as cloud Ali million net (I was in this really), cloud Tencent, Baidu cloud and so can. And go for the record. Of course, also can not prepare, CDN acceleration is required before they can apply for the record. After the first case was prepared by Ye Hao work.
2. Install Node and Git
Use hexo need to install the two front tools: Node and Git.
Node directly installed by default on the line, click on the download Node . Installing without reason.
Git also a direct download, click the Download Git . The default installation has been completed requires the following:
- If you do not GitHub account, to register themselves with the account directly create a new repository called yourgithubname.github.io, which yourgithubname your github name, you must operate.
For example, I: / in front of my username, behind is to use my username.
![[Pictures of foreign chains dumping fails, the source station may have security chain mechanism, it is recommended to save the picture down uploaded directly (img-Y383A8sn-1576596225479) (D: /% E6% 9C% 89% E9% 81% 93% E4% BA % 91% E6% 9C% AC% E5% 9C% B0% E5% AD% 98% E6% 94% BE /% E5% 8D% 9A% E5% AE% A2 / gitname.png)]](https://img-blog.csdnimg.cn/20191217232434489.png)
- Git configuration of SSH Key, the first use Git Bash uses some configuration:
- Your github username, non nickname, and fill in your registered email github
git config --global user.name "name"
git config --global user.email  "[email protected]"
- Configure SSH, you can log in their own, do not log on each deployment
ssh-keygen -t rsa -C "邮件地址"
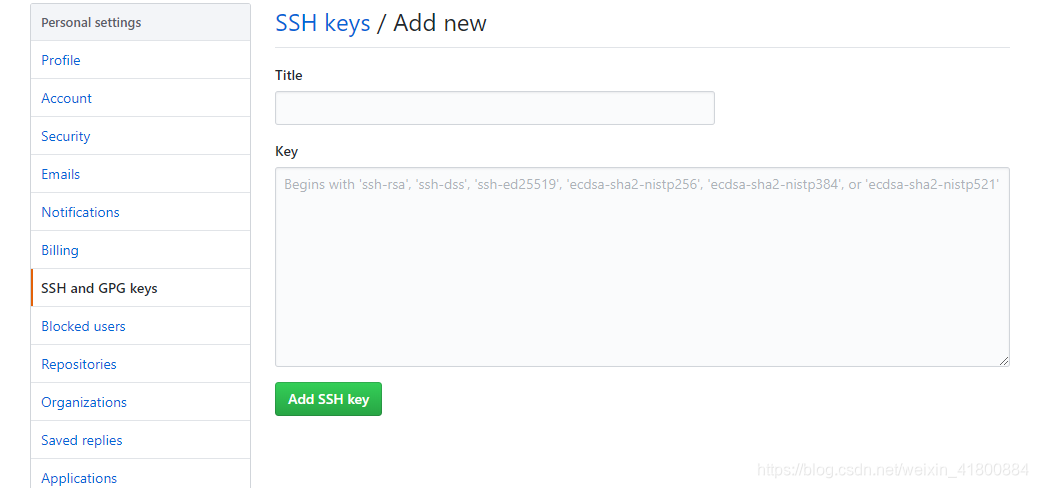
- Enter then 3 times in a row, will eventually generate a file in the user directory, open the user directory of the C drive your username continue to open, find .ssh \ id_rsa.pub file (like my C: \ Users \ chast. ssh), open Notepad and copy the contents inside, open your github page, upper right corner of your little head into the Settings -> SSH and GPG keys -> New SSH key: Title casually named, paste the copied content to Key in.
3. Install Hexo
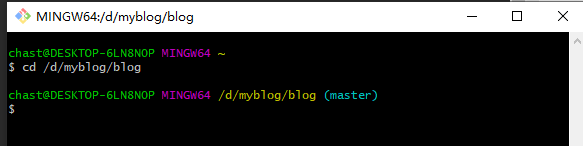
- Then open just installed git, will appear in the Window interface to start a Git Bash, click it, and then create a directory on a disk above, casually name, then use the Git Bash navigate to the directory
- Then install Hexo: version 4.0 installed by default.
npm install -g hexo
- Initialization Hexo.
hexo init
-
Initialization As follows.
-
After you use the following three instructions in a local startup blog for testing.
hexo clean // 清除缓存
hexo g  // 生成静态页面
hexo s // 启动本地项目
-
Then you can access on your browser localhost: 4000 to see the original blog, if you see the shows a success.
-
Then deploy blog to git, _config.yml first file in the directory of the site last line configuration.
deploy:
  type: git
  repository: https://github.com/yourgitname/yourgitname.github.io.git
  branch: master
- Push install plugin
npm install hexo-deployer-git --save
- Then use the following three commands.
hexo clean // 清除缓存
hexo g  // 生成静态页面
hexo d // 部署
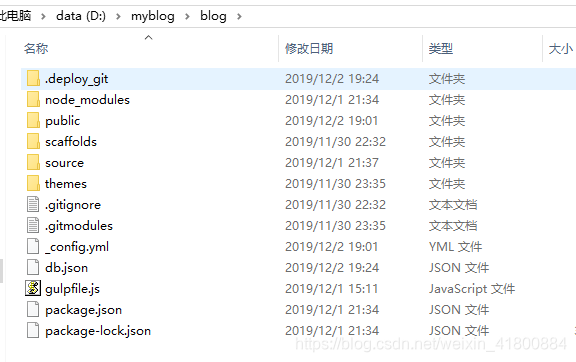
4.Hexo directory structure
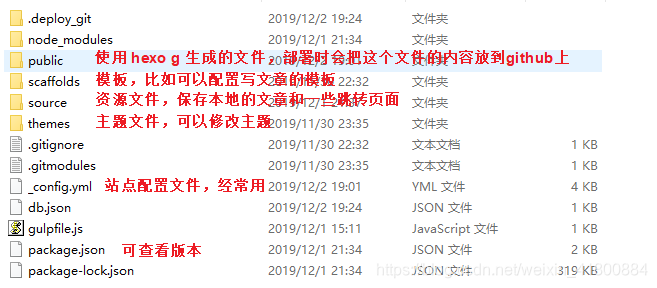
- If you want to modify the site content custom theme in: site directory \ themes \ next \ layout modified, based on the file name.
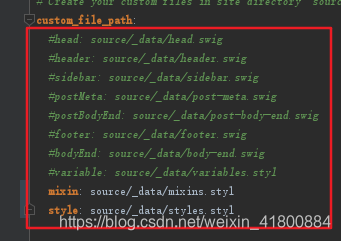
- If you want to add their own css styles in the theme configuration file in the following figure remove the comment, and then to the corresponding directory create the file, and then add css styles inside.
5. My version
How can I see my version, in the site root directory (hexo initialization where) there is a packge.json, which you can see the results of using hexo initialized.
The main attention is consistent with and under my hexo such as to install the theme nexT, consistent with the best, I can take the following code after initialization to overwrite the original code, and then use npm install, re-install the same code in accordance with json version. However, it is recommended not to install my copy, I do not know what will be reported wrong, or step by step. Version of the same theme for the beautification of whether the latter can take effect relationship.
Note: the future should not be updated, now mainly used version is hexo4.0 and next7.x, pay attention to see version
{
  "name": "hexo-site",
  "version": "0.0.0",
  "private": true,
  "scripts": {
    "build": "hexo generate",
    "clean": "hexo clean",
    "deploy": "hexo deploy",
    "server": "hexo server"
  },
  "hexo": {
    "version": "4.0.0"
  },
  "dependencies": {
    "gulp": "^4.0.2",
    "gulp-clean": "^0.4.0",
    "gulp-htmlclean": "^2.7.22",
    "gulp-htmlmin": "^5.0.1",
    "gulp-imagemin": "^6.2.0",
    "gulp-minify-css": "^1.2.4",
    "gulp-uglify": "^3.0.2",
    "hexo": "^4.0.0",
    "hexo-abbrlink": "^2.0.5",
    "hexo-asset-image": "^1.0.0",
    "hexo-autonofollow": "^1.0.1",
    "hexo-baidu-url-submit": "0.0.6",
    "hexo-deployer-git": "^2.1.0",
    "hexo-generator-archive": "^1.0.0",
    "hexo-generator-baidu-sitemap": "^0.1.6",
    "hexo-generator-category": "^1.0.0",
    "hexo-generator-feed": "^2.2.0",
    "hexo-generator-index": "^1.0.0",
    "hexo-generator-search": "^2.4.0",
    "hexo-generator-searchdb": "^1.2.0",
    "hexo-generator-sitemap": "^2.0.0",
    "hexo-generator-tag": "^1.0.0",
    "hexo-neat": "^1.0.4",
    "hexo-renderer-ejs": "^1.0.0",
    "hexo-renderer-marked": "^2.0.0",
    "hexo-renderer-stylus": "^1.1.0",
    "hexo-server": "^1.0.0",
    "hexo-symbols-count-time": "^0.7.0",
    "hexo-wordcount": "^6.0.1"
  },
  "devDependencies": {}
}
Remember a favorite spot Like
there are subsequent to build a blog:
hexo4-NexT7 build blog (ii) change the theme