Article Directory
I. Overview
LNMP (Linux-Apache-MySQL-PHP) website architecture is the internationally popular Web framework that includes: Linux operating system, Nginx web server, MySQL database, Perl, PHP or Python programming language, all components of the products are open source software .
Second, the experimental environment
Open a Linux virtual machine in vmware used to build service
A real machine for sharing installation packages and kits.
Third, the experimental procedures
Manually compile and install Nginx ----- "install mysql -----" install php ---- "building forum
Fourth, manually compile and install Nginx
Installation Environment bags, tool kits
[root@localhost ~]# yum install gcc gcc-c++ pcre* zlib-devel make -y
Through the real machine to the official website to download the installation package and extract the D drive to create a new folder LNMP, open the folder sharing permissions.
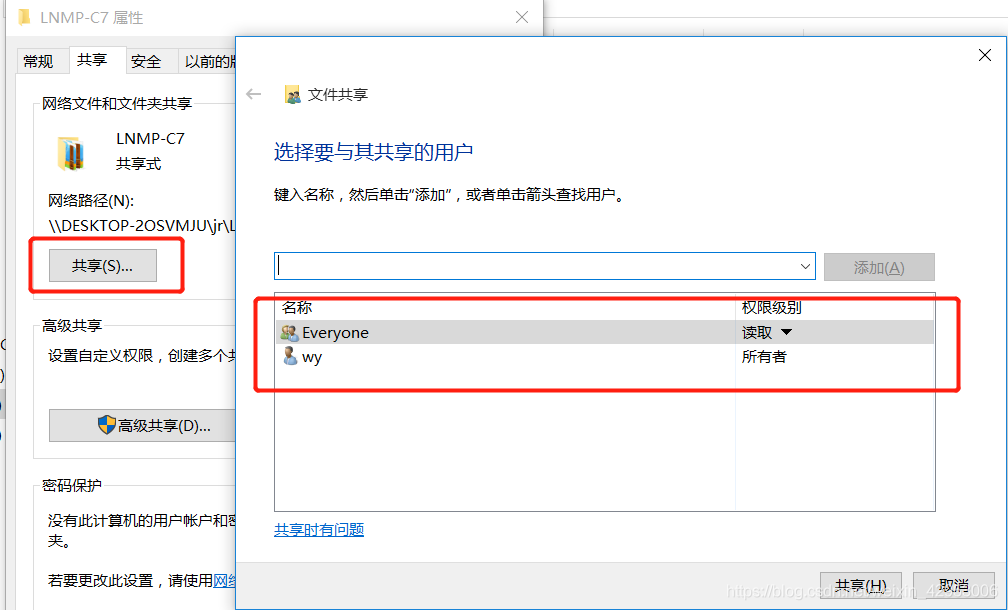
Remote access and sharing LNMP mount new folder / abc directory on a Linux virtual machines under
[root@localhost ~]# mkdir /abc
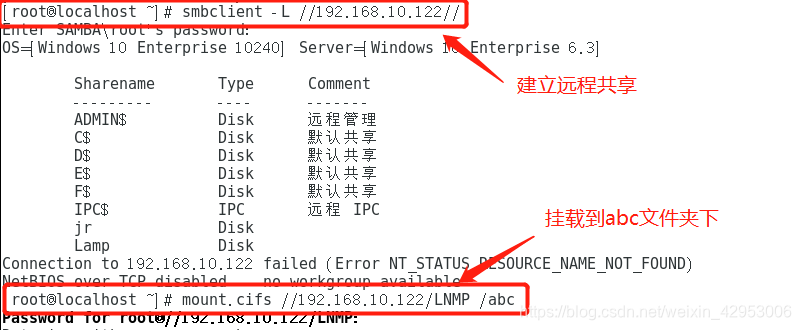
Enter / abc Nginx in extracting the files to opt directory
[root@localhost abc]# cd /abc/LNMP-C7/
[root@localhost LNMP-C7]# ls
Discuz_X3.4_SC_UTF8.zip    ncurses-5.6.tar.gz   php-5.6.11.tar.bz2  php-7.1.20.tar.bz2  zend-loader-php5.6-linux-x86_64_update1.tar.gz
mysql-boost-5.7.20.tar.gz  nginx-1.12.2.tar.gz  php-7.1.10.tar.bz2  php-7.1.20.tar.gz
[root@localhost LNMP-C7]# tar zxvf nginx-1.12.2.tar.gz -C /opt
After the extraction is completed, unzip into the directory /opt/nginx-1.12.2/, create and execute the program user nginx CON
Figure script.
[root@localhost LNMP-C7]# cd /opt/nginx-1.12.2/
[root@localhost nginx-1.12.2]#  useradd -M -s /sbin/nologin nginx
[root@localhost nginx-1.12.2]# ./configure \
--prefix=/usr/local/nginx \
--user=nginx \
--group=nginx \
--with-http_stub_status_module
Compile and execute after installation
[root@localhost nginx-1.12.2]# make && make install
You can create a soft link after the installation is complete, convenient management command
[root@localhost nginx-1.12.2]# ln -s /usr/local/nginx/sbin/* /usr/local/sbin
Add executed documents to facilitate the management command systemctl
[root@localhost nginx-1.12.2]#  cd /lib/systemd/system
[root@localhost nginx-1.12.2]#  vim nginx.service
[Unit]
Description=nginx      ##描述
After=network.target        ####描述服务类别
[Service]
Type=forking       ###后台运行形势
PIDFile=/usr/local/nginx/logs/nginx.pid     ##PID文件位置
ExecStart=/usr/local/nginx/sbin/nginx     ##启动服务
ExecReload=/usr/bin/kill -s HUP $MAINPID
ExecStop=/usr/bin/kill -s QUIT $MAINPID
PrivateTmp=true
[Install]
WantedBy=multi-user.target
After completion of wq to save, change the permissions to execute the document, turn off the firewall, start Nginx service
[root@localhost system]#  chmod 754 nginx.service
[root@localhost system]#  systemctl stop firewalld.service
[root@localhost system]#  setenforce  0
[root@localhost system]#  systemctl start nginx.service
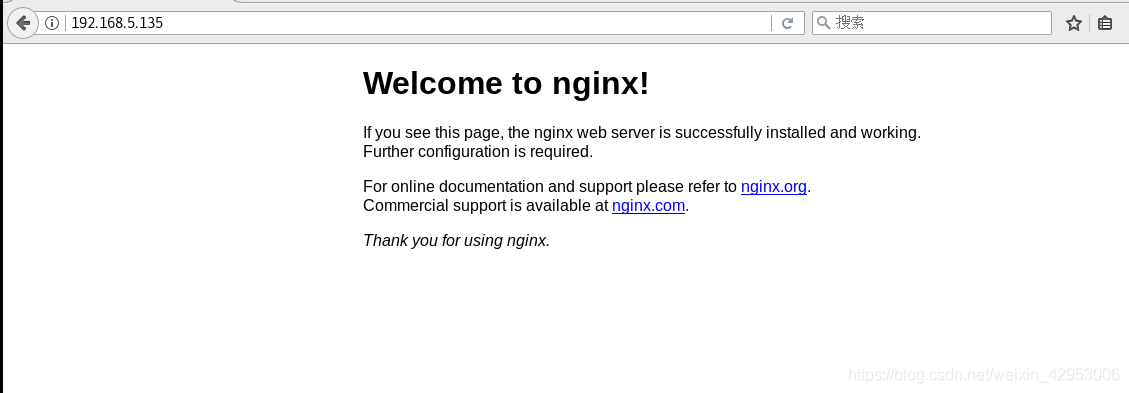
Nginx web access verification
V. manually compile and install mysql
Installation environment package, users create a program
[root@localhost ~]#  yum -y install ncurses  ncurses-devel bison cmake
[root@localhost ~]#  useradd -s /sbin/nologin  mysql
Mysql-extracting compressed file to opt directory
[root@localhost ~]#  cd /abc/LNMP-C7/
[root@localhost LNMP-C7]#  tar zxvf mysql-boost-5.7.20.tar.gz -C /opt/
After the extraction is completed, unzip into the directory /opt/mysql-5.7.20/ execute cmake
[root@localhost LNMP-C7]# cd /opt/mysql-5.7.20/
[root@localhost mysql-5.7.20]# cmake \
-DCMAKE_INSTALL_PREFIX=/usr/local/mysql \
-DMYSQL_UNIX_ADDR=/usr/local/mysql/mysql.sock \
-DSYSCONFDIR=/etc \
-DSYSTEMD_PID_DIR=/usr/local/mysql \
-DDEFAULT_CHARSET=utf8 \
-DDEFAULT_COLLATION=utf8_general_ci \
-DWITH_INNOBASE_STORAGE_ENGINE=1 \
-DWITH_ARCHIVE_STORAGE_ENGINE=1 \
-DWITH-BLACKHOLE_STIRAGE_ENGINE=1 \
-DWITH-PERDSCHEMA_STORAGE_ENGINE=1 \
-DMYSQL_DATADIR=/usr/local/mysql/data \
-DWITH_BOOST=boost \
-DWITH_SYSTEMD=1
After completing the compilation and installation
[root@localhost mysql-5.7.20]# make && make install
After installation is complete modify permissions and mysql my.cnf configuration file, delete the original file, and then add the following to this quote.
[root@localhost mysql-5.7.20]#  chown -R mysql:mysql /usr/local/mysql/
[root@localhost mysql-5.7.20]#  vim /etc/my.cnf
[client]
port=3306
default-character-set=utf8
socket=/usr/local/mysql/mysql.sock

[mysql]
port=3306
default-character-set=utf8
socket=/usr/local/mysql/mysql.sock

[mysqld]
user=mysql
basedir=/usr/local/mysql
datadir=/usr/local/mysql/data
port=3306
character_set_server=utf8
pid-file=/usr/local/mysql/mysqld.pid
socket=/usr/local/mysql/mysql.sock
server-id=1

sql_mode=NO_ENGINE_SUBSTITUTION,STRICT_TRANS_TABLES,NO_AUTO_CREATE_USER,NO_AUTO_VALUE_ON_ZERO,NO_ZERO_IN_DATE,NO_ZERO_DATE,ERROR_FOR_DIVISION_BY_ZERO,PIPES_AS_CONCAT,ANSI_QUOTES
After editing wq save, set the environment variable
[root@localhost mysql-5.7.20]#  echo  'PATH=/usr/local/mysql/bin:/usr/local/mysql/lib:$PATH' >> /etc/profile   ##将MySQL写到本地环境配置中
[root@localhost mysql-5.7.20]#  echo 'export PATH' >> /etc/profile
##设置全局环境配置
[root@localhost mysql-5.7.20]# source /etc/profile   ##重新加载
Initialize the database
[root@localhost mysql-5.7.20]#  cd /usr/local/mysql/
[root@localhost mysql]#  bin/mysqld \
--initialize-insecure \
--user=mysql \
--basedir=/usr/local/mysql \
--datadir=/usr/local/mysql/data
Easy to use to copy the MySQL systemctl management service profile to the / usr / lib / systemd / system / lower
[root@localhost mysql]#  cp /usr/local/mysql/usr/lib/systemd/system/mysqld.service /usr/lib/systemd/system/
[root@localhost mysql]#  systemctl enable mysqld      ###开机自启
[root@localhost mysql]#  systemctl start mysqld.service  ###启动服务
[root@localhost mysql]# netstat -natp | grep 3306
tcp6       0      0 :::3306                 :::*                    LISTEN      2711/mysqld
Set mysql password
[root@localhost mysql]#  mysqladmin -u root -p password
    Enter password:               ##空格
	New password:                ##新密码
	Confirm new password:   ##确认密码
6, installation PHP
Installation environment package
[root@localhost ~]# yum -y \
install \
libjpeg \
libjpeg-devel \
libpng libpng-devel \
freetype freetype-devel \
libxml2 \
libxml2-devel \
zlib zlib-devel \
curl curl-devel \
openssl openssl-devel
Php unzip compressed files to opt directory
[root@localhost ~]#  cd /abc/LNMP-C7
[root@localhost LNMP-C7]#   tar jxvf php-7.1.10.tar.bz2 -C /opt/
After the extraction is completed into the /opt/php-7.1.10 directory, execute configure the relevant parameters added
[root@localhost LNMP-C7]# cd /opt/php-7.1.10/
[root@localhost php-7.1.10]#  ./configure \
--prefix=/usr/local/php \               ##安装路径
--with-mysql-sock=/usr/local/mysql/mysql.sock \   ##连接文件建立通信桥梁
--with-mysqli \    ##客户端支持库
--with-zlib \
--with-curl \       ##支持上传下载功能
--with-gd \
--with-jpeg-dir \
--with-png-dir \
--with-freetype-dir \
--with-openssl \
--enable-fpm \
--enable-mbstring \        ##支持多字节的字符串
--enable-xml \
--enable-session \
--enable-ftp \
--enable-pdo \
--enable-tokenizer \
--enable-zip     ##zip压缩包
After completing the execution compile and install
[root@localhost php-7.1.10]# make && make install
After the installation is complete modification of three PHP configuration file
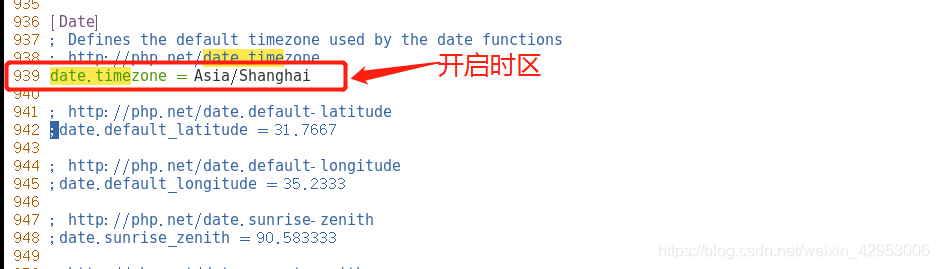
Modify the core profile
[root@localhost php-7.1.10]#  cp  opt/php-7.1.10/php.ini-development /usr/local/php/lib/php.ini
[root@localhost php-7.1.10]#   vim /usr/local/php/lib/php.ini

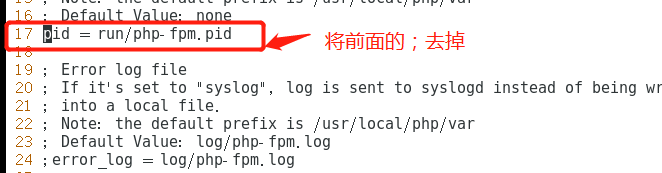
Modify the process service file (open fpm module)
[root@localhost php-7.1.10]#  cd /usr/local/php/etc
[root@localhost etc]# cp php-fpm.conf.default php-fpm.conf
[root@localhost etc]#  vim php-fpm.conf
Modify the file extension service
[root@localhost etc]#  cd /usr/local/php/etc/php-fpm.d/
[root@localhost php-fpm.d]# cp www.conf.default  www.conf
##启动
[root@localhost php-fpm.d]# /usr/local/php/sbin/php-fpm -c /usr/local/php/lib/php.ini
[root@localhost php-fpm.d]# netstat -ntap | grep 9000     ##查看端口信息
tcp   0 0 127.0.0.1:9000   0.0.0.0:*    LISTEN   69104/php-fpm: mast
Nginx allowed to modify support php
[root@localhost php-fpm.d]# vim /usr/local/nginx/conf/nginx.conf
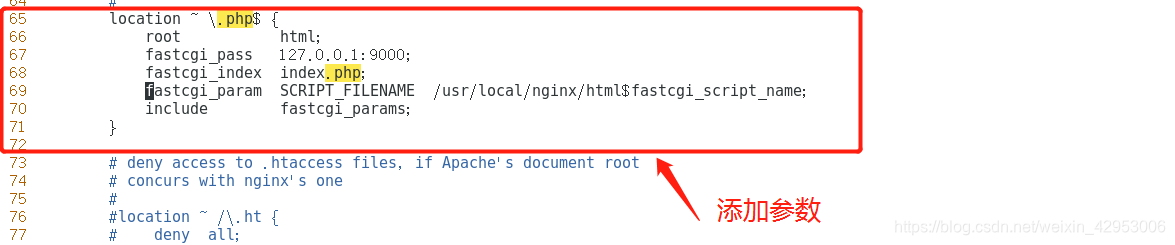
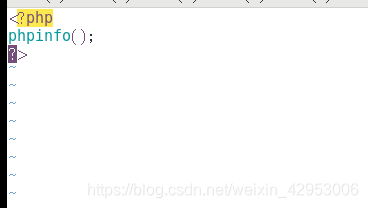
Modify php.html file
[root@localhost php-fpm.d]#  cd /usr/local/nginx/html
[root@localhost html]# vim index.php
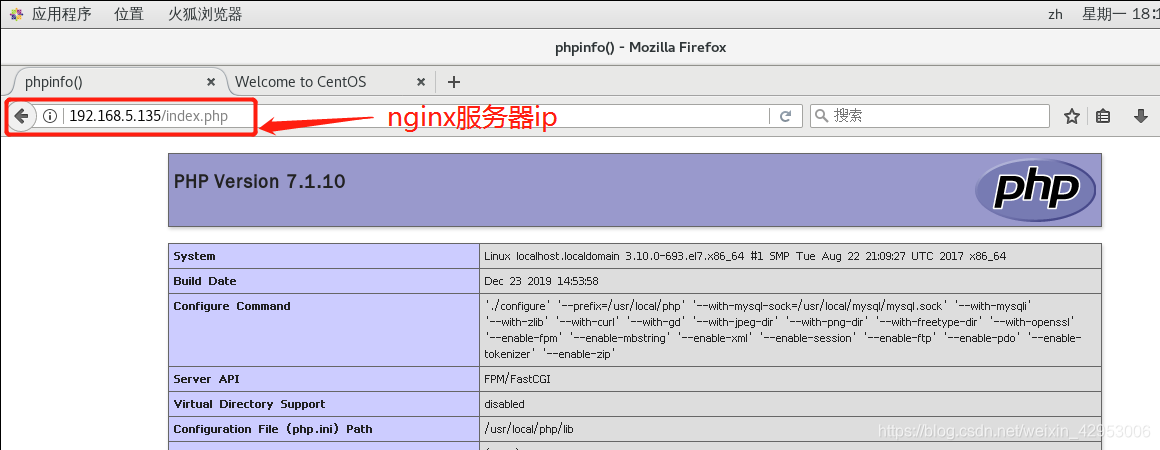
Nginx restart the service, verify php page
[root@localhost html]# systemctl stop nginx.service
[root@localhost html]# systemctl start nginx.service
Seven, to build Discuz forum
Create a database user forum
[root@localhost html]# mysql -u root -p
Enter password: ##进入数据库,密码为之前设定的abc23
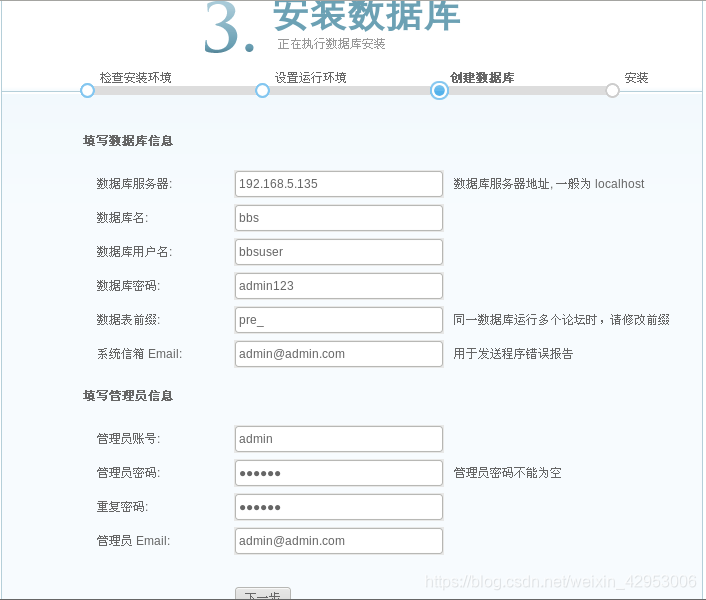
mysql> CREATE DATABASE BBS; ##创建bbs数据库
Query OK, 1 row affected (0.00 sec)
###设置权限用户bbsusers
mysql> GRANT all ON bbs.* TO 'bbsusers'@'%' IDENTIFIED BY 'admin123';
mysql> GRANT all ON bbs.* TO 'bbsusers'@'localhost' IDENTIFIED BY 'admin123';
mysql> flush privileges; ####刷新
mysql> exit
Entering / abc / LNMP-C7 /, the file to extract the Discuz in / opt
[root@localhost html]# cd /abc/LNMP-C7/
[root@localhost LNMP-C7]# unzip  Discuz_X3.4_SC_UTF8.zip -d /opt
After the extraction is completed, into the decompression / opt / dir_SC_UTF8 /, the directory is copied to the database upload
[root@localhost LNMP-C7]# cd /opt
[root@localhost opt]# ls
dir_SC_UTF8  mysql-5.7.20  nginx-1.12.2  php-7.1.10  rh  说明.htm
[root@localhost opt]# cd dir_SC_UTF8/
[root@localhost dir_SC_UTF8]# cp -r upload/ /usr/local/nginx/html/bbs/
Bbs site into the database directory, modify the permissions
[root@localhost dir_SC_UTF8]# cd /usr/local/nginx/html/bbs/
[root@localhost bbs]# chown -R root:nginx ./config/
[root@localhost bbs]# chown -R root:nginx ./data/
[root@localhost bbs]# chown -R root:nginx ./uc_client/
[root@localhost bbs]# chown -R root:nginx ./uc_server/
[root@localhost bbs]# chmod -R 777 ./config/
[root@localhost bbs]# chmod -R 777 ./data/
[root@localhost bbs]# chmod -R 777 ./uc_client/
[root@localhost bbs]# chmod -R 777 ./uc_server/
[root@localhost bbs]#
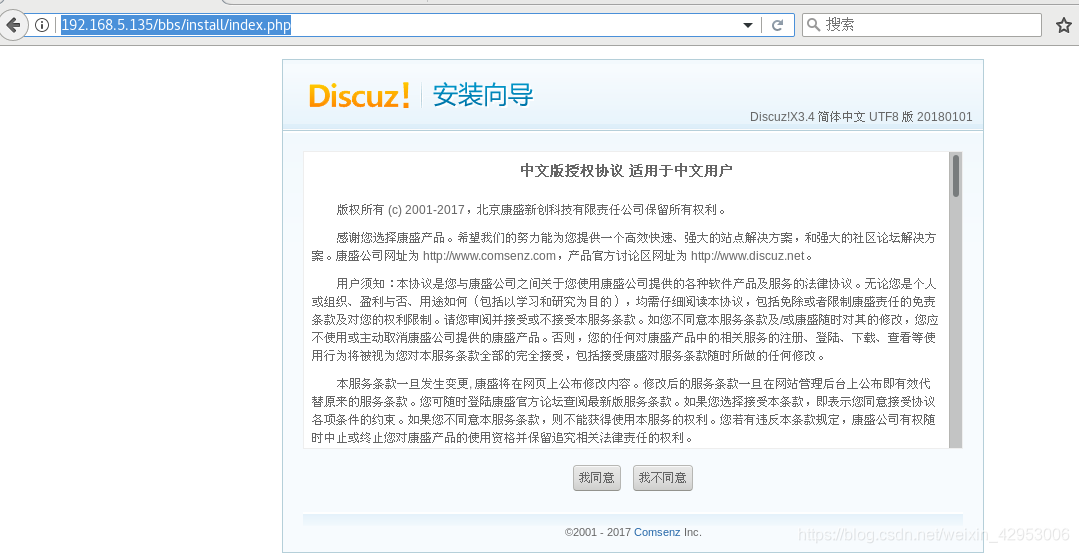
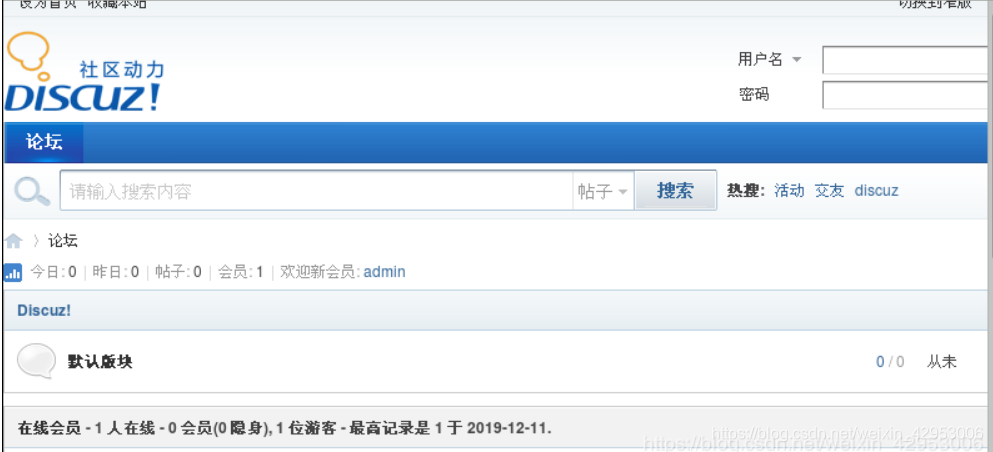
After editing into the http://192.168.5.135/bbs/install/index.php installation forum