What is Docker? Why should
Docker VS VM
use
Docker Docker related concepts to
mirror Image
container Container
data volume Volume
connection Link
warehouse Repository
based on Docker create LNMP environment
download mirror
create data disk
create network
create php-fpm, nginx, mysql mirror
create test page
connection MySQL
Docker-Compose The problem that nginx does not record logs in creating LNMP environment
container
https://docs.docker.com/
Foreword
What is Docker?
Docker is an open source software project that allows applications deployed under software containers to be automated, thereby providing an additional layer of software abstraction on the Linux operating system and an automatic management mechanism for virtualization of the operating system layer . Docker uses the resource separation mechanism in the Linux core, such as cgroups and the Linux core name space, to establish independent software containers. This can operate under a single Linux entity, avoiding the extra burden of starting a virtual machine.
Docker VS VM
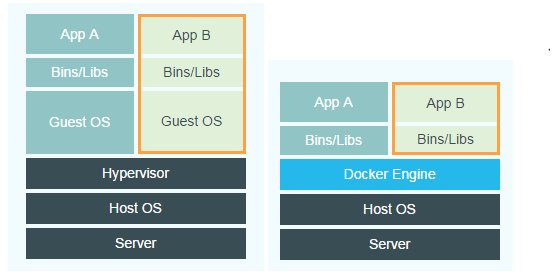
The Docker daemon can directly communicate with the main operating system and allocate resources for each Docker container; it can also isolate the container from the main operating system and isolate each container from each other. The virtual machine VM is the main operating system Hypervisor that virtualizes hardware resources to create an independent sub-operating system, and the resources are not shared.
Why use docker
1. Ensure that the offline development environment, test environment and online production environment are consistent.
2. Compared with VM, it has fast start-up speed, high resource utilization rate, and low performance overhead.
3. DevOps
4. Microservices . One service only does one thing.
5. Automatically executes repetitive tasks of setting up and configuring the development environment to facilitate development. People can focus on the important thing: build great software.
Docker related concepts
Statue Image
The Docker image is a read-only template. Images can be used to create Docker containers.
Docker provides a very simple mechanism to create an image or update an existing image. Users can even download an already prepared image directly from others and use it directly.
Mirror = OS + + software operating environment of the user program
, for example: a mirror may comprise a complete ubuntu operating system environment, which only Apache or other application required by the user is installed.
We can create an image by writing a Dockerfile.
Container
Docker uses containers to run applications.
A container is a running instance created from an image. It can be started, started, stopped and deleted. Each container is an isolated platform that guarantees safety.
You can think of the container as a simple version of the Linux environment (including root user permissions, process space, user space, network space, etc.) and applications running in it.
Note: The image is read-only, the container creates a writable layer as the top layer when it starts .
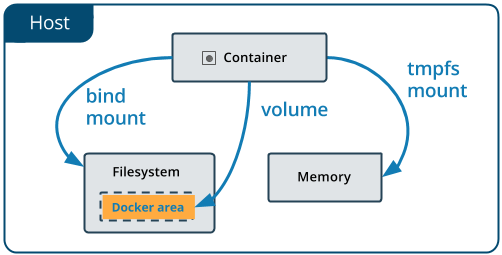
Data volume
Data volumes allow you to persist data without being affected by the lifecycle of the container.
The change in thinking that must be made when using docker: the container should be short-lived and one-off.
Link
When the container is started, it will be assigned a random private IP, and other containers can use this IP address to communicate with it. This is important for two reasons: one is that it provides a channel for mutual communication during Rong, and the other is that containers will share a local network.
To enable inter-container communication, docker allows you to refer to other existing containers when creating a new container. The container that is referenced in the container you just created will get an alias (which you specify). We said that the two containers are linked together.
Therefore, if the DB container is already running, we can create a web server container and reference the DB container when creating it, giving it an alias, such as dbapp. In this newly created web server container, I can use the host name dbapp to communicate with the DB container at any time.
Repository
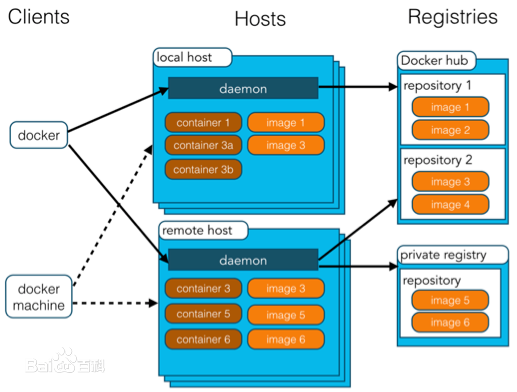
A warehouse is a place where image files are stored centrally. Sometimes, the warehouse and the warehouse registration server (Registry) are confused, and it is not strictly distinguished. In fact, the warehouse registration server often stores multiple warehouses, and each warehouse contains multiple mirrors, and each mirror has different tags.
The warehouse is divided into two forms: public warehouse (Public) and private warehouse (Private).
The largest public warehouse is Docker Hub, which stores a huge number of images for users to download. Domestic public warehouses include Docker Pool, etc., which can provide more stable and fast access for mainland users.
Of course, users can also create a private warehouse in the local network.
After users create their own image, they can use the push command to upload it to a public or private warehouse, so that the next time they use this image on another machine, they only need to pull it from the warehouse.
Note: The concept of the Docker warehouse is similar to Git, and the registration server can be understood as a hosting service like GitHub.
Create LNMP environment based on Docker
Download mirror
docker pull bitnami/php-fpm    #下载最新php-fpm镜像,里面自带了最新版的php
docker pull nginx                      #下载最新nginx镜像
docker pull mysql                     #下载最新mysql镜像
Create a data disk
https://docs.docker.com/storage/volumes/
Note:
1. If you create directly, the file will be managed by the container, otherwise you need to mount the specified directory
2. Students who use mac need to pay attention, you will find that this path cannot be found on the machine, because mac docker is actually running in the virtual on the machine, so you need to enter the virtual machine docker view
screen ~/Library/Containers/com.docker.docker/Data/vms/0/tty
at this time cd /var/lib/docker/volumes/learn/_data/the volume is created.
If you find it troublesome, Mac can skip this step
docker volume create learn
We directly create a data disk here, and you will find that the actual path is in the docker related directory
~/Documents/code/learn » docker volume inspect learn
[
    {
        "CreatedAt": "2020-04-15T11:07:22Z",
        "Driver": "local",
        "Labels": {},
        "Mountpoint": "/var/lib/docker/volumes/learn/_data",
        "Name": "learn",
        "Options": {},
        "Scope": "local"
    }
]
Create a network
https://docs.docker.com/engine/reference/commandline/network_create/
Docker has the following network types:
bridge: used for communication between independent containers
host: directly use the host ’s network, and the port also uses the host ’s
overlay: when there are multiple docker hosts, cross-host container communication
macvlan: each container has a virtual MAC address
none: disable network
by default, docker creates a bridge network, when you create a new container to perform docker runwhen the bridge will be automatically connected to the network, you can not delete the default network, But you can create a new one.
By default, Docker will establish a bridge, a host and a none network:
~ » docker network ls
NETWORK ID NAME DRIVER SCOPE
a0bf815f3cb0 bridge bridge local
836b8a7368f8 host host local
8f2915cdc31a none null local


docker network create --subnet=172.54.0.0/24 lnmp #创建B类划分子网络,方便配置文件中直接使用容器名称
Create php-fpm, nginx, mysql mirror
https://docs.docker.com/engine/reference/commandline/run/
docker run -d --name php -v learn:/var/www --net lnmp --restart=always bitnami/php-fpm
docker run -d --name nginx -p 80:80 -v learn:/var/www --net lnmp --restart=always nginx
docker run -d --name mysql --restart=always -p3306:3306 -e MYSQL_ROOT_PASSWORD=123456 --net lnmp mysql
Under mac:
docker run -d --name php -v /Users/lixin/Documents/code/learn:/var/www --net lnmp --restart=always bitnami/php-fpm
docker run -d --name nginx -p 80:80 -v /Users/lixin/Documents/code/learn:/var/www --net lnmp --restart=always nginx
docker run -d --name mysql --restart=always -p3306:3306 -e MYSQL_ROOT_PASSWORD=123456 --net lnmp mysql
Modify configuration file
#导出文件
docker cp default.conf nginx:/etc/nginx/conf.d/default.conf
#导入文件
docker cp nginx:/etc/nginx/conf.d/default.conf default.conf
The modification example is as follows.
server {
    listen 80;
    server_name localhost;


    location / {
        root /var/www;
        index index.html index.htm index.php;
    }


    error_page 500 502 503 504 /50x.html;
    location = /50x.html {
        root /usr/share/nginx/html;
    }


    location ~ \.php$ {
        root /var/www;
        fastcgi_pass php:9000;
        fastcgi_index index.php;
        fastcgi_param SCRIPT_FILENAME $document_root$fastcgi_script_name;
        include fastcgi_params;
    }
}
Then restart nginx
docker restart nginx
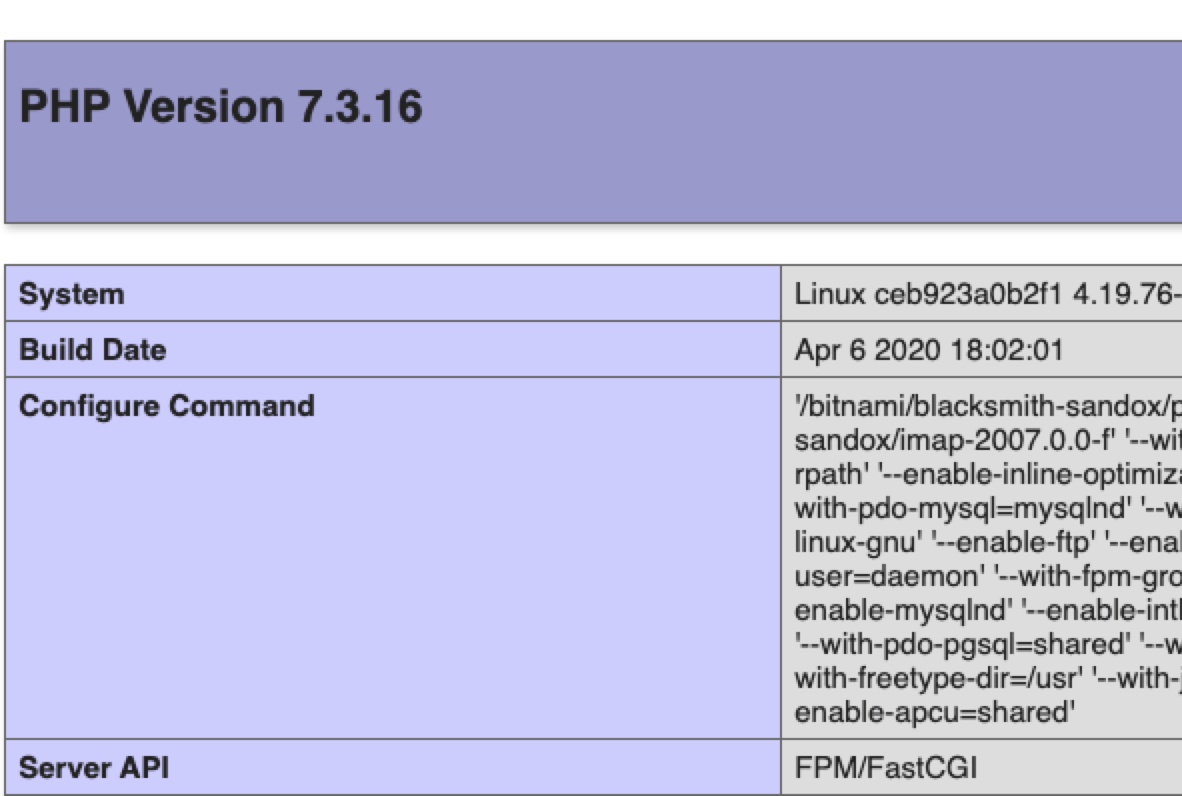
Create a test page
<?php
phpinfo();
?>
Under Linux:
Move the file to the data volume directory (the web root directory is under this directory)
mv index.php /var/lib/docker/volumes/webpage/_data/
Under mac:
create files directly in the mount directory.
Then visit localhost
Connect to MySQL
Create test file
<?php
$link = mysqli_connect('mysql', 'root', '123456');
if (!$link) {
 die('Could not connect: ' . mysqli_connect_error());
}
echo 'Connected successfully';
mysqli_close($link);
?>
After the visit you will find error: [Could not connect: The server requested authentication method unknown to the client ]
This is because the authentication encryption plug-adjusted after MySQL8.0, but does not support php link library ( reference here , and here ).
Solution:
1. Enter the container
2. Log in to mysql
3. Execute ALTER USER 'root' IDENTIFIED WITH mysql_native_password BY '123456';Reset the password once with the original plug-in.
~ » docker exec -it mysql /bin/sh;exit
# mysql -u root -p
Enter password:
Welcome to the MySQL monitor. Commands end with ; or \g.
Your MySQL connection id is 10
Server version: 8.0.19 MySQL Community Server - GPL


Copyright (c) 2000, 2020, Oracle and/or its affiliates. All rights reserved.


Oracle is a registered trademark of Oracle Corporation and/or its
affiliates. Other names may be trademarks of their respective
owners.


Type 'help;' or '\h' for help. Type '\c' to clear the current input statement.


mysql> ALTER USER 'root' IDENTIFIED WITH mysql_native_password BY '123456';
Query OK, 0 rows affected (0.01 sec)


mysql>
刷新:Connected successfully
Docker-Compose creates LNMP environment
The Docker-Compose project is the official open source project of Docker, which is responsible for the rapid orchestration of the Docker container cluster.
Docker-Compose divides the managed container into three layers, which are project, service and container. All files in the Docker-Compose running directory (docker-compose.yml, extends files or environment variable files, etc.) constitute a project, and the project name is the current directory name if there is no special designation. A project can contain multiple services, each service defines the image, parameters, and dependencies of the container operation. A service can include multiple container instances. Docker-Compose does not solve the problem of load balancing, so you need to use other tools to achieve service discovery and load balancing.
The Docker-Compose project configuration file defaults to docker-compose.yml, and the configuration file can be customized through the environment variable COMPOSE_FILE or -f parameter, which defines multiple dependent services and the containers that each service runs.
Using a Dockerfile template file allows users to easily define a separate application container. In the work, we often encounter situations that require multiple containers to cooperate with each other to complete a certain task. For example, to implement a Web project, in addition to the Web service container itself, it is often necessary to add a back-end database service container, and even include a load balancing container.
Compose allows users to define a set of associated application containers as a project through a separate docker-compose.yml template file (YAML format).
The Docker-Compose project is written in Python and calls the API provided by the Docker service to manage the container. Therefore, as long as the platform you operate supports the Docker API, you can use Compose on it for orchestration management.
https://docs.docker.com/compose/
https://docs.docker.com/compose/install/
https://docs.docker.com/compose/gettingstarted/
https://docs.docker.com/ compose / compose-file /
Note:
1. The desktop version of Docker for mac comes with compose, so there is no need to install it.
2. You can also consider usingdocker stack
If you often need to build an environment on a new machine, it is very troublesome to create one by one every time like the above. At this time, you can use docker-compose to define software services through YAML, and finally only need one command to create And allow all defined services.
Compse is usually used based on the following three steps:
- Define the running environment of the program based on dockerfile, so that you can reuse it in any situation. (If you do not need to build, this step can be ignored, use the ready-made image directly)
- Define services based on docker-compose.yml so that they can run simultaneously in an isolated environment.
- Run docker-compose up to create and run the entire program.
It can be used in development environment, automated testing and stand-alone deployment.
The sample file is as follows:
version: '3'
services:
  php:
    container_name: php
    image: "bitnami/php-fpm"
    networks:
      - lnmp
    volumes:
       - /Users/lixin/Documents/code/learn:/var/www
    restart: always
  nginx:
    container_name: nginx
    image: "nginx"
    ports:
      - "80:80"
    volumes:
       - /Users/lixin/Documents/code/learn:/var/www
    networks:
      - lnmp
    restart: always
  mysql:
    container_name: mysql
    image: "mysql"
    ports:
      - "3306:3306"
    networks:
      - lnmp
    restart: always
    environment:
      MYSQL_ROOT_PASSWORD: "123456"
networks:
  lnmp:
    ipam:
      driver: default
      config:
        - subnet: "172.54.0.0/24"
Then save it to docker-compose.ymlplace the file in a specially stored compose-related directory and execute the command
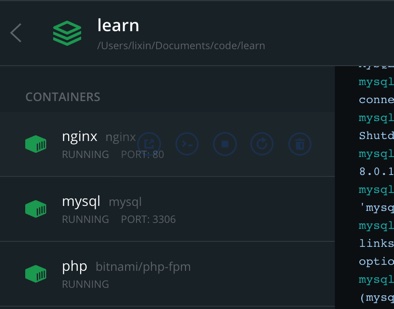
~/Documents/code/learn » docker-compose up -d
Starting php ... done
Starting nginx ... done
Starting mysql ... done
Note: The container created based on compose will be placed under docker-compose.ymlthe container group named after the directory
The problem of nginx not logging in the container
During use, you will find that even though the access log and error log are set in the nginx conf, it is not written to the corresponding file.
This is because the official nginx default has been set to output directly to the Docker log collector.
FROM debian:jessie


MAINTAINER NGINX Docker Maintainers "[email protected]"


ENV NGINX_VERSION 1.11.5-1~jessie


RUN apt-key adv --keyserver hkp://pgp.mit.edu:80 --recv-keys 573BFD6B3D8FBC641079A6ABABF5BD827BD9BF62 \
 && echo "deb http://nginx.org/packages/mainline/debian/ jessie nginx" >> /etc/apt/sources.list \
 && apt-get update \
 && apt-get install --no-install-recommends --no-install-suggests -y \
      ca-certificates \
      nginx=${NGINX_VERSION} \
      nginx-module-xslt \
      nginx-module-geoip \
      nginx-module-image-filter \
      nginx-module-perl \
      nginx-module-njs \
      gettext-base \
 && rm -rf /var/lib/apt/lists/*


# forward request and error logs to docker log collector
RUN ln -sf /dev/stdout /var/log/nginx/access.log \
 && ln -sf /dev/stderr /var/log/nginx/error.log


EXPOSE 80 443


CMD ["nginx", "-g", "daemon off;"]
注:The official nginx image creates a symbolic link from /var/log/nginx/access.log to /dev/stdout, and creates another symbolic link from /var/log/nginx/error.log to /dev/stderr, overwriting the log files and causing logs to be sent to the relevant special device instead. See the Dockerfile.