一、k8s Authentication
We know apiserver There are several authentication methods:
- X509 Client Certs
- Static Token File
- Bootstrap Tokens
- Static Password File
- Service Account Tokens
- OpenID Connect Tokens
- Webhook Token Authentication
- Authenticating Proxy
Generally, we use binary self k8s cluster, or use kubeadm create clusters, cluster managers, that is k8s the user object, X509 certificates are used to verify if they are issued by the same CA, we recognize the user ;
In order to reduce the complexity of enterprise user management, need to find ways how to integrate IAM users EKS cluster, so we do not need to create a user EKS delay, reduce maintenance work to a user, then this is how to integrate it, by the k8s of WebHook the Token the authentication , authentication process architecture which is as follows:
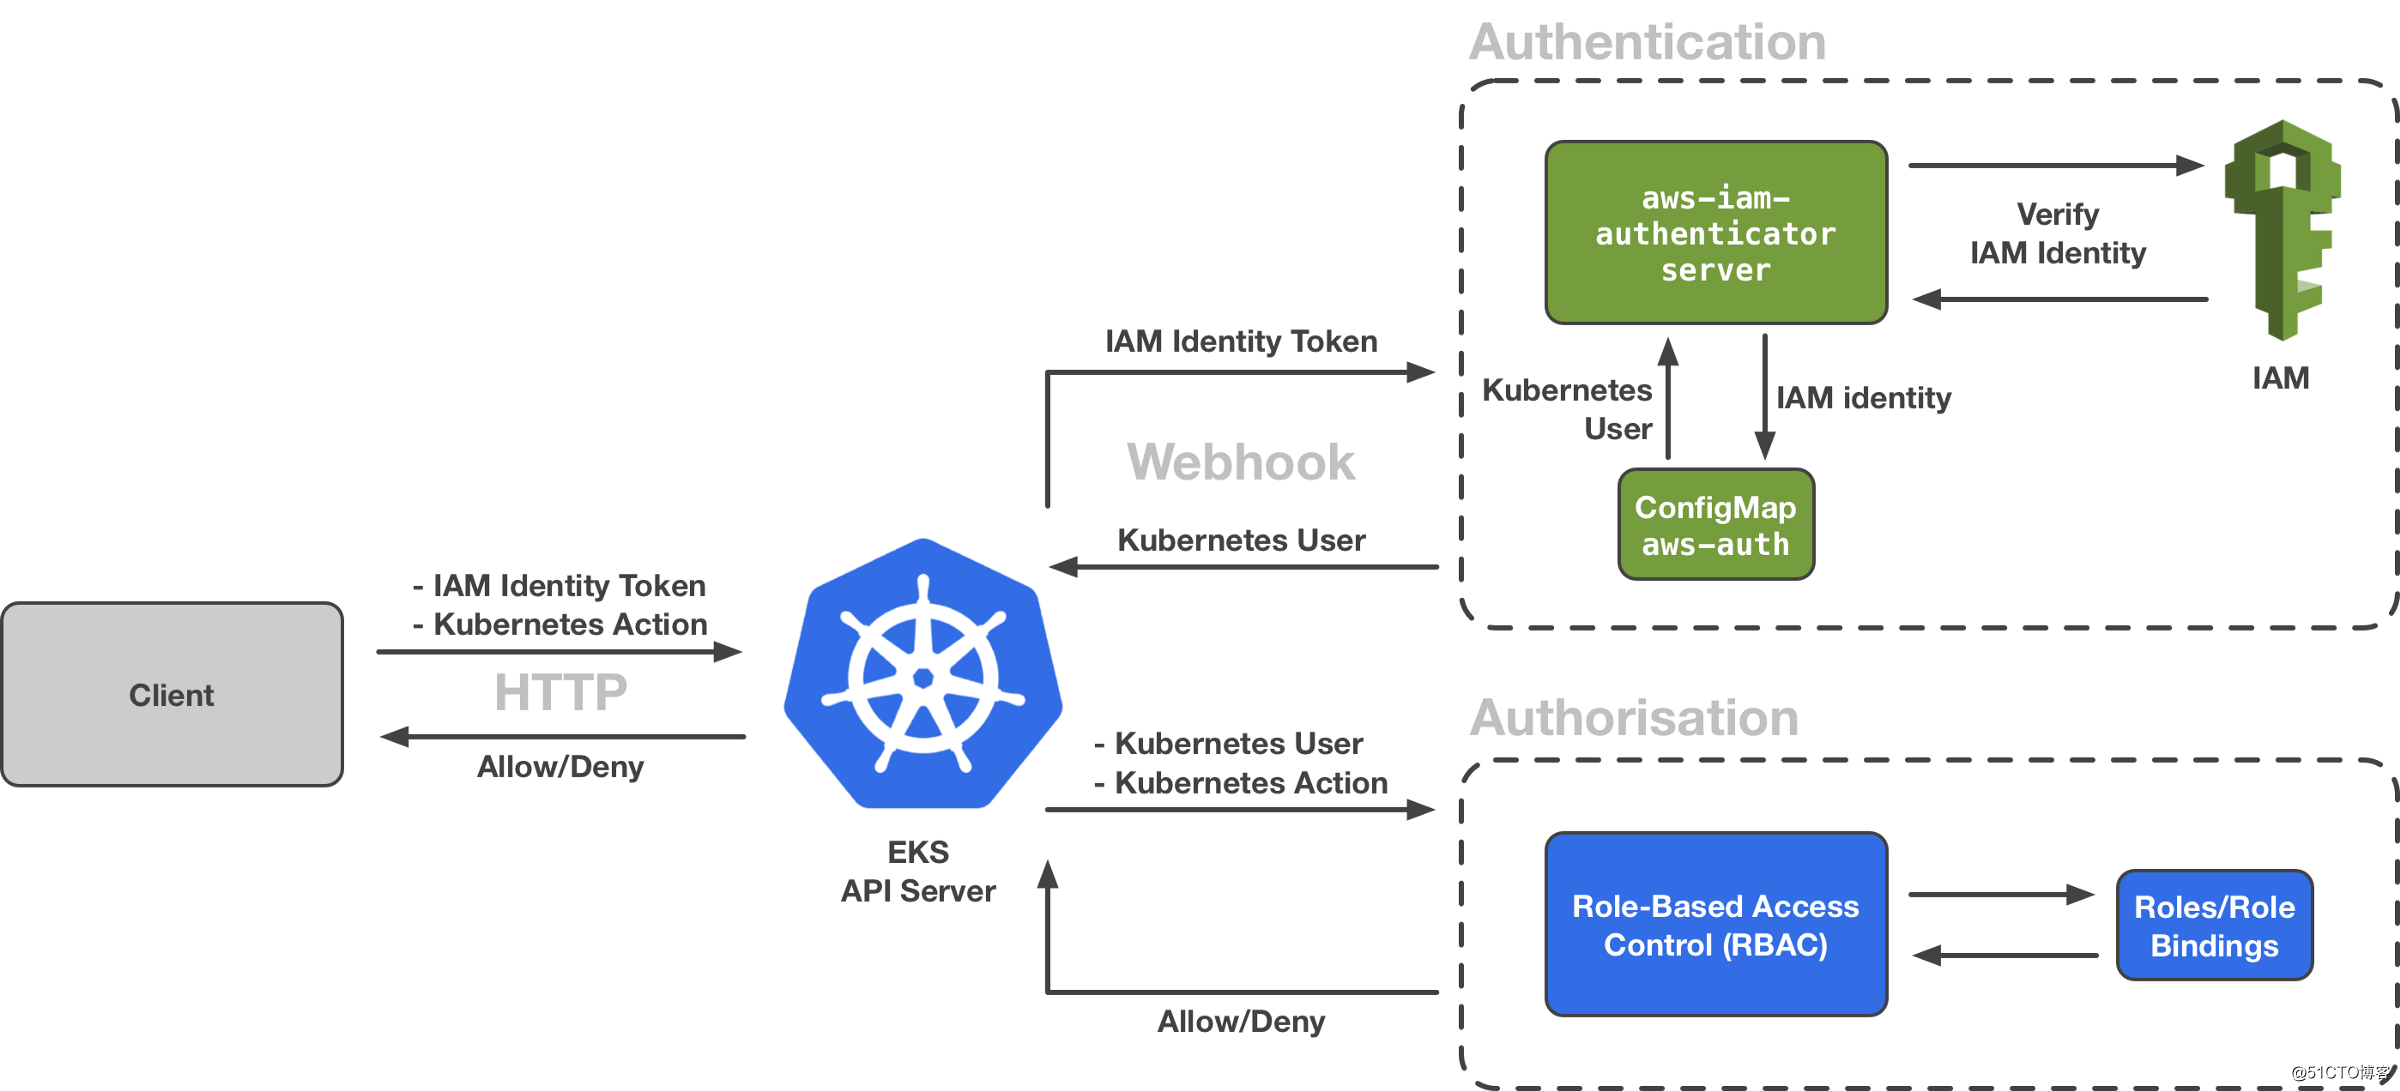
We can see from this figure more Authentication part, by AWS-IAM-Authenticator , we can know that it is running at a set DaemonSet EKS Control Plane in the Pod, to receive the authentication request apiserver.
Second, anatomy EKS
2.1, create EKS
We use this command to create eksctl EKS cluster, the default eksctl calls awscli the config, so we need to configure awscli, relevant user or role has permission to create a cluster can eks:
eksctl create cluster --name eks --region us-east-1 \
--node-type=t2.small --nodes 1 --ssh-public-key .ssh/id_rsa.pub \
--managed --zones us-east-1f,us-east-1c --vpc-nat-mode Disable
集群创建好之后,会自动帮我们配置好 kubeclt 需要的配置文件,并且集群的创建者会自动获取集群 cluster-admin 的角色,拥有最高权限。
2.2、引入 aws-iam-authenticator
我们首先可以通过 CloudWatch Logs 去查看 kube-apiserver 的启动参数,我们可以看到有这样一组启动参数:
--authentication-token-webhook-config-file="/etc/kubernetes/authenticator/apiserver-webhook-kubeconfig.yaml"说明我们已经启动了 webhook 方式的认证,那参数后面的 yaml 文件里面是什么呢,我们可以通过 aws-iam-authenticator 的 github 文档可以看到,我们使用如下命令进行生成:
wangzan:~/k8s $ aws-iam-authenticator init -i `openssl rand 16 -hex`
INFO[2020-01-07T07:50:54Z] generated a new private key and certificate   certBytes=804 keyBytes=1192
INFO[2020-01-07T07:50:54Z] saving new key and certificate                certPath=cert.pem keyPath=key.pem
INFO[2020-01-07T07:50:54Z] loaded existing keypair                       certPath=cert.pem keyPath=key.pem
INFO[2020-01-07T07:50:54Z] writing webhook kubeconfig file               kubeconfigPath=aws-iam-authenticator.kubeconfig
INFO[2020-01-07T07:50:54Z] copy cert.pem to /var/aws-iam-authenticator/cert.pem on kubernetes master node(s)
INFO[2020-01-07T07:50:54Z] copy key.pem to /var/aws-iam-authenticator/key.pem on kubernetes master node(s)
INFO[2020-01-07T07:50:54Z] copy aws-iam-authenticator.kubeconfig to /etc/kubernetes/aws-iam-authenticator/kubeconfig.yaml on kubernetes master node(s)
INFO[2020-01-07T07:50:54Z] configure your apiserver with `--authentication-token-webhook-config-file=/etc/kubernetes/aws-iam-authenticator/kubeconfig.yaml` to enable authentication with aws-iam-authenticator查看生成的配置文件aws-iam-authenticator.kubeconfig
wangzan:~/k8s $ cat aws-iam-authenticator.kubeconfig

# clusters refers to the remote service.
clusters:
  - name: aws-iam-authenticator
    cluster:
      certificate-authority-data: LS0tLS1CRUdJTiBDRVJUSUZJQ0FURS0tLS0tCk1JSURJRENDQWdpZ0F3SUJBZ0lRVDRmUllwRy9uSlE0UURmSHUwb2M3ekFOQmdrcWhraUc5dzBCQVFzRkFEQWcKTVI0d0hBWURWUVFERXhWaGQzTXRhV0Z0TFdGMWRHaGxiblJwWTJGMGIzSXdJQmNOTWpBd01UQTNNRGMxTURVMApXaGdQTWpFeE9URXlNVFF3TnpVd05UUmFNQ0F4SGpBY0JnTlZCQU1URldGM2N5MXBZVzB0WVhWMGFHVnVkR2xqCllYUnZjakNDQVNJd0RRWUpLb1pJaHZjTkFRRUJCUUFEZ2dFUEFEQ0NBUW9DZ2dFQkFLRkhTU3ZjWGZFNVZrN3UKejBRNjFGVE1LQS9PeE5HaVlOa05iS0ZzSW9pdW5VejBLdUI4aFBReitEOGxpNnpYZUozWDdNNVNyaG1hYjRBMgowWXJNZEVlcSthYVR5aVhFV2QrREFlUU9HcFFRQm0ya2hvdEgzS2Vrd2dlTjlwbzFUUjBHQVgrbFBQWWloOHNBCml6ZWxBRENLZUMrUS8yWnVZYkttaUFiSm1MNDdqc09nd0pXYldQV0JOdm54VDkrL0wwTHphN1c3MVdieCszaWsKQUdUT2xDWm5tZjY0b0sxQWw4eDNxUktnSXp0bnFBMWRFeEMwS2ZzR1dRRy9Xb00rbnRXZW40QmJEOW1XakF4Zgo0Yk9CaXBOcDMrMlFJOU5LL1pUOTYyaDFZbE8yUWdiYVMrSTZtR2o5WXhwamFXdXgyWGNUd2N0MTFjODFMNWcxCmNaVjZJZ2tDQXdFQUFhTlVNRkl3RGdZRFZSMFBBUUgvQkFRREFnS2tNQk1HQTFVZEpRUU1NQW9HQ0NzR0FRVUYKQndNQk1BOEdBMVVkRXdFQi93UUZNQU1CQWY4d0dnWURWUjBSQkJNd0VZSUpiRzlqWVd4b2IzTjBod1IvQUFBQgpNQTBHQ1NxR1NJYjNEUUVCQ3dVQUE0SUJBUUIyaE1wYm5kTDhVa3VRNVVuZzNkWTh5Y0RQZ2JvbU9Mb0t5dUlzCnVoNkljMUtaMUFiNmVoVDg2bzN2bzJzbnVoNkhibU13NjhvNE9SSllLdTB4RXB3RDR0YUlSVEN1bk9KVHFUeHoKZDZsN2xqdGtBMWZnUktpUHF1SjlyUmxqYXVTMGMxU05lWTVmR2hhUEh3UFBBMHoxN3orMWdiVzNiUjFEckxHQwp6WHVCNStFM0xSVHJCck53aHlZOUtIcVB4Vy9PL1M2V2FZbUR4R3Y4bklNNUUrTzltRFBPWGZpWFJDRFFkb2R5ClRadnU1VDR5ZVhQaEQwRmJKdjg4OSsxZnR4TGlSaUdTQ29lRTNEMUdiYSswZXFMT0hidExUY29VZ25WTGVlMTAKclZDOWRiOU05ckxDZnU1aUEvcGdORm80VTF1ejAvbFUyV0RnYSthUWNNeC9iaHZJCi0tLS0tRU5EIENFUlRJRklDQVRFLS0tLS0K
      server: https://localhost:21362/authenticate
# users refers to the API Server's webhook configuration
# (we don't need to authenticate the API server).
users:
  - name: apiserver
# kubeconfig files require a context. Provide one for the API Server.
current-context: webhook
contexts:
- name: webhook
  context:
    cluster: aws-iam-authenticator
    user: apiserver
2.3、整个 IAM 认证过程
首先,我们查看一下 kubectl 的配置文件信息:
apiVersion: v1
clusters:
- cluster:
    certificate-authority-data: DATA+OMITTED
    server: https://93BEE997ED0F1C1BA3BD6C8395BE0756.sk1.us-east-1.eks.amazonaws.com
  name: eks.us-east-1.eksctl.io
contexts:
- context:
    cluster: eks.us-east-1.eksctl.io
    user: [email protected]
  name: [email protected]
current-context: [email protected]
kind: Config
preferences: {}
users:
- name: [email protected]
  user:
    exec:
      apiVersion: client.authentication.k8s.io/v1alpha1
      args:
      - token
      - -i
      - eks
      command: aws-iam-authenticator
      env: null
我们可以看到 user 字段,这里不是使用证书进行认证的,而是使用的 aws-iam-authenticator client,其命令如下:
wangzan:~ $ aws-iam-authenticator token -i eks
{"kind":"ExecCredential","apiVersion":"client.authentication.k8s.io/v1alpha1","spec":{},"status":{"expirationTimestamp":"2020-01-07T08:23:23Z","token":"k8s-aws-v1.aHR0cHM6Ly9zdHMuYW1hem9uYXdzLmNvbS8_QWN0aW9uPUdldENhbGxlcklkZW50aXR5JlZlcnNpb249MjAxMS0wNi0xNSZYLUFtei1BbGdvcml0aG09QVdTNC1ITUFDLVNIQTI1NiZYLUFtei1DcmVkZW50aWFsPUFLSUE1TkFHSEY2TllYU01DTEhPJTJGMjAyMDAxMDclMkZ1cy1lYXN0LTElMkZzdHMlMkZhd3M0X3JlcXVlc3QmWC1BbXotRGF0ZT0yMDIwMDEwN1QwODA5MjNaJlgtQW16LUV4cGlyZXM9MCZYLUFtei1TaWduZWRIZWFkZXJzPWhvc3QlM0J4LWs4cy1hd3MtaWQmWC1BbXotU2lnbmF0dXJlPTU2MjA5OTZhY2MzZGE3OWI3OGI0NDVjOTVkMTMyNmU0NjZmNTUyZTMzNDdkN2Y5MmExNGUwMzcwOTJiMzdmMDY"}}
这里其实是向 sts 获取一个临时的 token,用作身份凭证,这个命令也等同于下面的命令:
wangzan:~ $ aws eks get-token --cluster-name eks
{"status": {"expirationTimestamp": "2020-01-07T08:25:38Z", "token": "k8s-aws-v1.aHR0cHM6Ly9zdHMuYW1hem9uYXdzLmNvbS8_QWN0aW9uPUdldENhbGxlcklkZW50aXR5JlZlcnNpb249MjAxMS0wNi0xNSZYLUFtei1BbGdvcml0aG09QVdTNC1ITUFDLVNIQTI1NiZYLUFtei1FeHBpcmVzPTYwJlgtQW16LURhdGU9MjAyMDAxMDdUMDgxMTM4WiZYLUFtei1TaWduZWRIZWFkZXJzPWhvc3QlM0J4LWs4cy1hd3MtaWQmWC1BbXotU2VjdXJpdHktVG9rZW49JlgtQW16LUNyZWRlbnRpYWw9QUtJQTVOQUdIRjZOWVhTTUNMSE8lMkYyMDIwMDEwNyUyRnVzLWVhc3QtMSUyRnN0cyUyRmF3czRfcmVxdWVzdCZYLUFtei1TaWduYXR1cmU9NDUyYzA5ZTIwMzg2YjFmODU0NTU4YjhjNzBkNDA2MzdkYzM2Y2ExNzA5YWIxODQzNzE3NDdhY2IwYTUyNGIzYw"}, "kind": "ExecCredential", "spec": {}, "apiVersion": "client.authentication.k8s.io/v1alpha1"}
我们回到上面的架构图,kubectl 会把这个获取的 token,放到 http 的请求头 Authorization 里面,发送给 apiserver,apiserver 收到之后,回去请求已经配置好的 webhook 服务器,也就是我们前面所说的 daemonset pod(aws-iam-authenticator server),这个 aws-iam-authenticator server 会拿着 token 去请求 sts 服务,sts 服务验证其 token 的合法性,并返回 IAM 用户的 ARN(IAM Identity);
当 aws-iam-authenticator server 得到返回的 ARN 之后,回去和 k8s 中的一个 configmap aws-auth 去对比。
2.4、configmap aws-auth
我们查看一下刚创建好的机器,aws-auth 这个 configmap里面有什么信息:
wangzan:~ $ kubectl get cm aws-auth -nkube-system -oyaml
apiVersion: v1
data:
  mapRoles: |
    - groups:
      - system:bootstrappers
      - system:nodes
      rolearn: arn:aws:iam::921283538843:role/eksctl-eks-nodegroup-ng-5a1b33b9-NodeInstanceRole-1B757SI5DCABJ
      username: system:node:{{EC2PrivateDNSName}}
    - groups:
      - system:bootstrappers
      - system:nodes
      - system:node-proxier
      rolearn: arn:aws:iam::921283538843:role/eksctl-eks-cluster-FargatePodExecutionRole-DEAGGBFGQ9YB
      username: system:node:{{SessionName}}
kind: ConfigMap
metadata:
  creationTimestamp: "2019-12-30T07:57:47Z"
  name: aws-auth
  namespace: kube-system
  resourceVersion: "529891"
  selfLink: /api/v1/namespaces/kube-system/configmaps/aws-auth
  uid: 117c0e14-2ada-11ea-8820-0a64f353aa45
This relationship defines a mapping inside IAM Identity and k8s inside the user or group, the default cluster created by the administrator and not on the inside, probably for security reasons, because the file can be edited to modify.
Through the above step, we can know, by comparing aws-auth, apiserver user will be requested username or Group, and then given the appropriate permissions to its authorization by authorized IAM way, we generally use the cluster RBAC.
Some more information about the configuration, you can refer to the official documentation:
https://github.com/kubernetes-sigs/aws-iam-authenticator
https://docs.aws.amazon.com/zh_cn/eks/latest/userguide/add-user-role.html