Label (label)
Why should we use the label it?
As more and more objects of the same type of resources in order to better manage, just follow the label into one group, in order to enhance the efficiency of resource management.
lable is attached to the object (e.g. POD) of the pairs. You can specify when you create the object, you can also specify any time after the object is created. Labels on the value of the system itself and there is no meaning, only makes sense to the user.
"labels": {
"key1" : "value1",
"key2" : "value2"
}
Grammar and character set
Label key的组成:
* 不得超过63个字符
* 可以使用前缀,使用/分隔,前缀必须是DNS子域,不得超过253个字符,系统中的自动化组件创建的label必须指定前缀,kubernetes.io/ 由kubernetes保留。
* 起始必须是字母(大小写都可以)或数字,中间可以有连字符,下划线和点。
Label value的组成:
不得超过63个字符
起始必须是字母(大小写都可以)或数字,中间可以有连字符,下划线和点。Popular, multi-dimensional label classification:
版本标签(release):      stable(稳定版),canary(金丝雀版本),beta(测试版)
环境类(environment):   dev(开发),qa(测试),production(生产),op(运维)
应用类(applaction):        ui(设计),as(应用软件),pc(电脑端),sc(网络方面)
架构层(tier):          frontend(前端),backend(后端),cache(缓存)
分区标签(partition):        customerA(客户),customerB
品控级别(track):        daily(每天),weekly(每周)
To practice label by the following example:
[root@master yaml]# vim label-pod.yaml
apiVersion: v1
kind: Pod
metadata:
  name: label-pod
  labels:       #使用labels字段来定义标签,可以一次定义多个标签,这里定义3个标签
    release: stable   #版本:稳定版
    env: qa              #环境:测试
    tier: frontend   #架构类:前端
spec:
  containers:
  - name: testapp
    image: nginx    #部署的是nginx服务
---
kind: Service   #关联一个service资源对象
apiVersion: v1
metadata:
  name: nginx-svc
spec:
  type: NodePort
  selector:   #使用标签选择器
    release: stable   #只需定义selector字段中的一个标签,字段下的其他标签可全部实现关联。
  ports:
  - protocol: TCP
    port: 80
    targetPort: 80
    nodePort: 32134
[root@master yaml]# kubectl apply -f label-pod.yaml
pod/label-pod created
service/nginx-svc unchanged//查看所有pod,并且显示标签key:value:
[root@master yaml]# kubectl get pod --show-labels
NAME READY STATUS RESTARTS AGE LABELS
label-pod 1/1 Running 0 30m env=qa,release=stable,tier=frontend// Check specify pod of key: value:
[root@master yaml]# kubectl  get pod label-pod  --show-labels
NAME        READY   STATUS    RESTARTS   AGE   LABELS
label-pod   1/1     Running   0          40m   app=as,env=qa,release=stable,tier=frontend
// display only value labels:
[root@master yaml]# kubectl  get pod label-pod -L env,release,tier
NAME        READY   STATUS    RESTARTS   AGE   ENV   RELEASE   TIER
label-pod   1/1     Running   0          41m   qa    stable    frontend
Other operations of the label (command line): to add, modify, delete, label
// add tags via the command line:
[root@master yaml]# kubectl  label  pod label-pod  app=sc
pod/label-pod labeled
[root@master yaml]# kubectl  get pod -L app
NAME        READY   STATUS    RESTARTS   AGE   APP
label-pod   1/1     Running   0          36m   sc
// modify the label:
[root@master yaml]# kubectl  label pod label-pod app=as
error: 'app' already has a value (sc), and --overwrite is false
[root@master yaml]# kubectl  label pod label-pod app=as --overwrite
pod/label-pod labeled
You can see the label you want to modify, add --overwrite option must be rewritten.
// delete the label:
[root@master yaml]# kubectl  label pod label-pod app-
pod/label-pod labeled
[root@master yaml]# kubectl  get pod -L app
NAME        READY   STATUS    RESTARTS   AGE   APP
label-pod   1/1     Running   0          43m                     #可以看到该标签以被删除
// We tested whether nginx service uptime: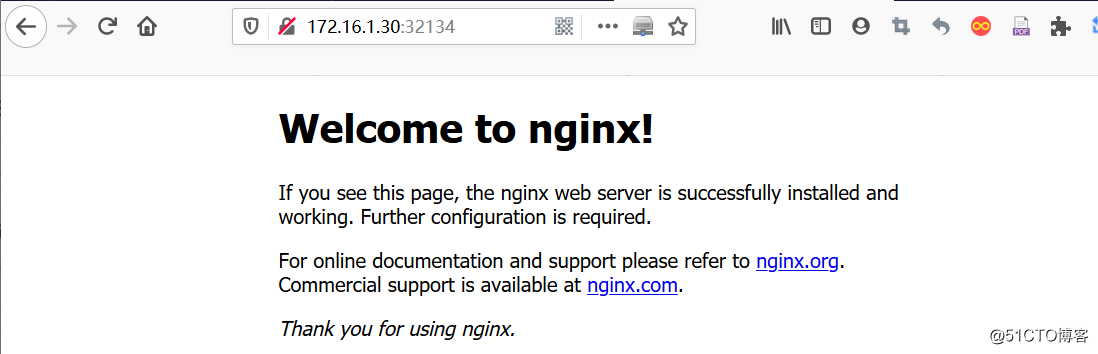
Label selector
The tag selector: query filter condition tags.
Label not unique, may have the same object number label, by label selector, the client / user may specify a collection object, the operation of the object by a set of label selector
Currently kubernetes API supports two tag selector:
1)基于等值的关系(matchLables): “=”,“==”,“!=”
2)基于集合的(matchExpressions):in(在这个集合中),notin(不在这个集合中),exists(要么存在,要么不存在)
Use tag selector logic operation: 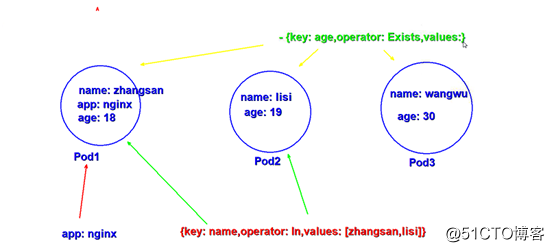
1) specify logical relationships between the plurality of selectors for the "and" operation
tab selector 2) with a null, meaning each resource object will be selected.
3) empty tag selector will not elect any resources.
4) based on the selection of the collection, use the "in" or "Notin" operation, which is not mandatory values non-empty list of strings, and use exists or DostNoteExists, its value must be null values.
Example:
Selector operation syntax is as follows:
[root@master yaml]# vim selector.yaml
selector:
  matchLabels:      #基于等值关系的
    app: nginx
  matchExpressions:   #基于集合的
    - {key: name,operator:  In,values: [zhangsan,lisi]}   #key,operator,values这三个是固定参数
    - {key: age,operator: Exists,values:}     #如果指定了Exists,其values值必须为空。
Daemonset
1) What is Daemonset?
Daemonset sure to run a pod on each cluster node, and can only run a pod. When a node joins the cluster will add a pod for them. When a node is removed from the cluster, the pod will be recovered. When you delete Daemonset will delete all pod it creates.
2) write Daemonset points to note:
Daemonset not supported replicas field, except that the wording Deployment, RS and other resources of the same.
3) Daemonset general usage scenarios:
- Commonly used in each node of the log collection.
- Monitor the operational status of each node.
Practice Daemonset:
[root@master yaml]# vim daemonset.yaml
kind: DaemonSet
apiVersion: extensions/v1beta1
metadata:
  name: nginx-ds
spec:
  template:
    metadata:
      labels:
        app: qa
        env: dev
    spec:
      containers:
      - name: nginx
        image: nginx
---
kind: Service
apiVersion: v1
metadata:
  name: nginx-dsvc
spec:
  type: NodePort
  selector:
    app: qa
  ports:
  - protocol: TCP
    port: 80
    targetPort: 80
    nodePort: 30003
[root@master yaml]# kubectl apply -f daemonset.yaml
daemonset.extensions/nginx-ds created
service/nginx-dsvc created// see the distribution of the pod:
[root@master yaml]# kubectl  get pod -o wide
NAME             READY   STATUS    RESTARTS   AGE   IP           NODE     NOMINATED NODE   READINESS GATES
nginx-ds-dh429   1/1     Running   0          76s   10.244.2.2   node02   <none>           <none>
nginx-ds-xz4d8   1/1     Running   0          76s   10.244.1.3   node01   <none>           <none>
I have only two nodes in the cluster can be seen by Daemonset achieved on each node runs a copy of the pod.
JOB resource object
Previous containers of different service classes, before the resource object is to continue to provide services. batch processing job in charge of short-time task, that task is performed only once, it guarantees a batch processing tasks or more pod successful conclusion.
1, kubernetes supports the following job:
* 非并行job:通常创建一个pod直至其成功结束。
* 固定结束次数的job:设置spec.completions,创建多个pod,直到.spec.completions个pod成功结束。
* 带有工作队列的并行job:设置.spec.Parallelism但不设置.spec.completions,当所有pod结束并且至少一个成功时,job就认为是成功。
2, the Job the Controller
the Job the Controller is responsible for creating pod according to Job Spec, and continue to monitor the state of the pod until it is successfully concluded, if that fails, according to restartPolicy (only supports OnFailure and Never, do not support Always) decide whether to create a new pod weight again test tasks.
Job practiced by the following example:
// create a job resource object:
kind: Job
apiVersion: batch/v1
metadata:
  name: test-job
spec:
  template:
    metadata:
      labels:
        app: job
    spec:
      containers:
      - name: job
        image: busybox
        command: ["echo","hello job!"]
      restartPolicy: Never
[root@master yaml]# kubectl apply -f job.yaml
job.batch/test-job createdIf you forget field usage in a production environment, it can help by kubectl explain command tool.
//查看该pod资源对象的状态:
[root@master yaml]# kubectl  get pod  test-job-dcv6g
NAME             READY   STATUS      RESTARTS   AGE
test-job-dcv6g   0/1     Completed   0          2m8s
We can see different job and other resource objects, perform only a one-time task, namely job after the end of the default pod spend the night running, the status is Completed.
// the pod by looking at the log to ensure that the task is complete:
[root@master yaml]# kubectl  logs  test-job-dcv6g
hello job!
After the task is completed, if no other request, we can delete the job:
[root@master yaml]# kubectl  delete  jobs.batch test-job
job.batch "test-job" deleted
2, a method to improve the job efficiency
is achieved by defining a field in the file yaml:
kind: Job
apiVersion: batch/v1
metadata:
  name: test-job
spec:      #通过spec下的这两个字段来优化
  parallelism: 2    #同时运行2个pod
  completions: 8    #运行pod的总数量8个
  template:
    metadata:
      labels:
        app: job
    spec:
      containers:
      - name: job
        image: busybox
        command: ["echo","hello job!"]
      restartPolicy: Never
job field explanation:
completions: Job mark the end of the number Pod needs to run successfully, the default is 1
Parallelism: The number of Pod flag run in parallel, the default is 1
activeDeadlineSeconds: Flag failure retry the maximum time of Pod, more than this time will not continue to retry.
// re-run after the job, viewing pod status:
[root@master yaml]# kubectl  get pod
NAME             READY   STATUS      RESTARTS   AGE
test-job-28ww5   0/1     Completed   0          50s
test-job-5wt95   0/1     Completed   0          46s
test-job-6s4p6   0/1     Completed   0          44s
test-job-8s2v7   0/1     Completed   0          50s
test-job-bt4ch   0/1     Completed   0          45s
test-job-bzjz6   0/1     Completed   0          48s
test-job-fhnvc   0/1     Completed   0          44s
test-job-kfn9l   0/1     Completed   0          48s

[root@master yaml]# kubectl  logs test-job-28ww5
hello job!
We can see the total number of pod of eight, and two parallel time there was a little difference, but not much.
3, time to run job tasks:
quite our task in linux crontab program.
[root@master yaml]# vim cronjob.yaml
kind: CronJob       #类型为CronJob
apiVersion: batch/v1beta1
metadata:
  name: cronjob
spec:            #使用spec.schedule字段来定义计划job任务
  schedule: "*/1 * * * *"      #指定每分钟执行一次任务,格式同linux中的crontab(分,时,日,月,周)
  jobTemplate:
    spec:
      template:
        spec:
          containers:
          - name: cronjob
            image: busybox
            command: ["echo","hello job!"]
          restartPolicy: OnFailure    #仅在pod失败时才重启
// After performing yaml file monitoring pod states:
[root@master yaml]# kubectl  apply -f  cronjob.yaml
cronjob.batch/cronjob created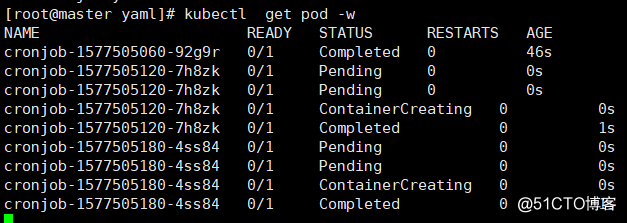
I can see it every one minute to perform a job task, each execution will generate a pod.
View the log, verify that the task to perform:
[root@master ~]# kubectl logs  cronjob-1577505180-4ss84
hello job!
[root@master ~]# kubectl logs  cronjob-1577505240-d5gf8
hello job!
Expansion: Adding apiVersion
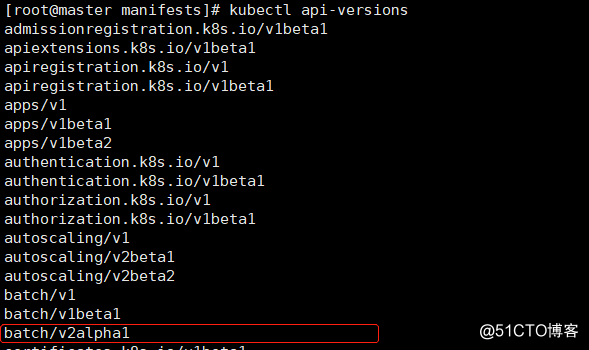
1) view the current version of the API kubernetes corresponding cluster:
[root@master ~]# kubectl  api-versions
admissionregistration.k8s.io/v1beta1
apiextensions.k8s.io/v1beta1
apiregistration.k8s.io/v1
apiregistration.k8s.io/v1beta1
apps/v1
apps/v1beta1
apps/v1beta2
authentication.k8s.io/v1
authentication.k8s.io/v1beta1
authorization.k8s.io/v1
authorization.k8s.io/v1beta1
autoscaling/v1
autoscaling/v2beta1
autoscaling/v2beta2
batch/v1
batch/v1beta1
certificates.k8s.io/v1beta1
coordination.k8s.io/v1
coordination.k8s.io/v1beta1
events.k8s.io/v1beta1
extensions/v1beta1
networking.k8s.io/v1
networking.k8s.io/v1beta1
node.k8s.io/v1beta1
policy/v1beta1
rbac.authorization.k8s.io/v1
rbac.authorization.k8s.io/v1beta1
scheduling.k8s.io/v1
scheduling.k8s.io/v1beta1
storage.k8s.io/v1
storage.k8s.io/v1beta1
v1
Check found no development version, all the test version.
Add api version:
[root@master ~]# cd /etc/kubernetes/manifests/
[root@master manifests]# ll
total 16
-rw------- 1 root root 1900 Nov  4 16:32 etcd.yaml
-rw------- 1 root root 2602 Nov  4 16:32 kube-apiserver.yaml
-rw------- 1 root root 2486 Nov  4 16:32 kube-controller-manager.yaml
-rw------- 1 root root  990 Nov  4 16:32 kube-scheduler.yaml
[root@master manifests]# vim kube-apiserver.yaml 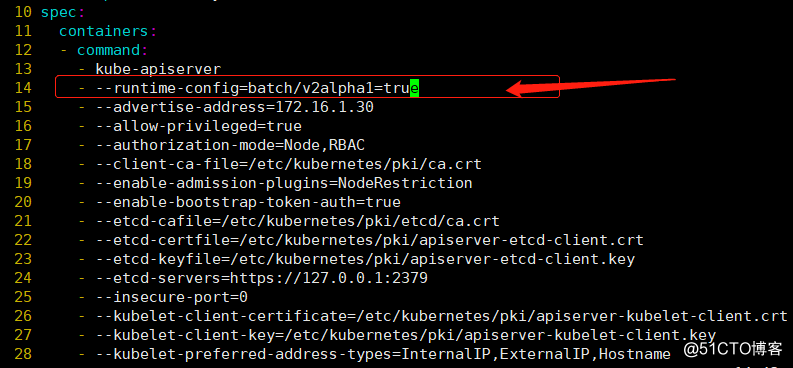
In this field, add a reference to the corresponding format corresponding version, adding the above batch development version.
//重启kubelet,重新加载:
[root@master manifests]# systemctl restart kubelet.service
When viewing // api version again, you can view the development version: