
preamble
Time is always a bystander, and all the process and results need to be borne by ourselves.
Article tag color description:
- Yellow : important headlines
- Red : used to mark conclusions
- Green : Used to mark first-level arguments
- Blue : Used to mark secondary arguments
Kubernetes (k8s) is a container orchestration platform that allows applications and services to be run in containers. Learn about DaemonSet-daemon today.
I hope this article will not only give you some gains, but also enjoy learning. If you have any suggestions, you can leave a message and communicate with me.
Column introduction
This is the column where this article is located, welcome to subscribe: [In-depth analysis of k8s] column
Briefly introduce what this column will do:
It is mainly to deeply analyze each knowledge point and help everyone fully master k8s. The following are the updated chapters
| serial number | article |
| first lecture | In-depth analysis of k8s: getting started guide (1) |
| second lecture | In-depth analysis of k8s: getting started guide (2) |
| third lecture | In-depth analysis of Pod objects (1) |
| fourth lecture | In-depth analysis of Pod objects (2) |
| fifth lecture | In-depth analysis of stateless services |
| Lecture Six | In-depth analysis of stateful services |
| Seventh lecture | In-depth analysis of the controller |
| eighth lecture |
In-depth analysis of ReplicaSet |
| Lecture 9 | In-depth analysis of rolling upgrade |
| tenth lecture | In-depth analysis of StatefulSet (1) |
| Eleventh lecture | In-depth analysis of StatefulSet (2) |
1 Basic introduction
1.1 Concept introduction
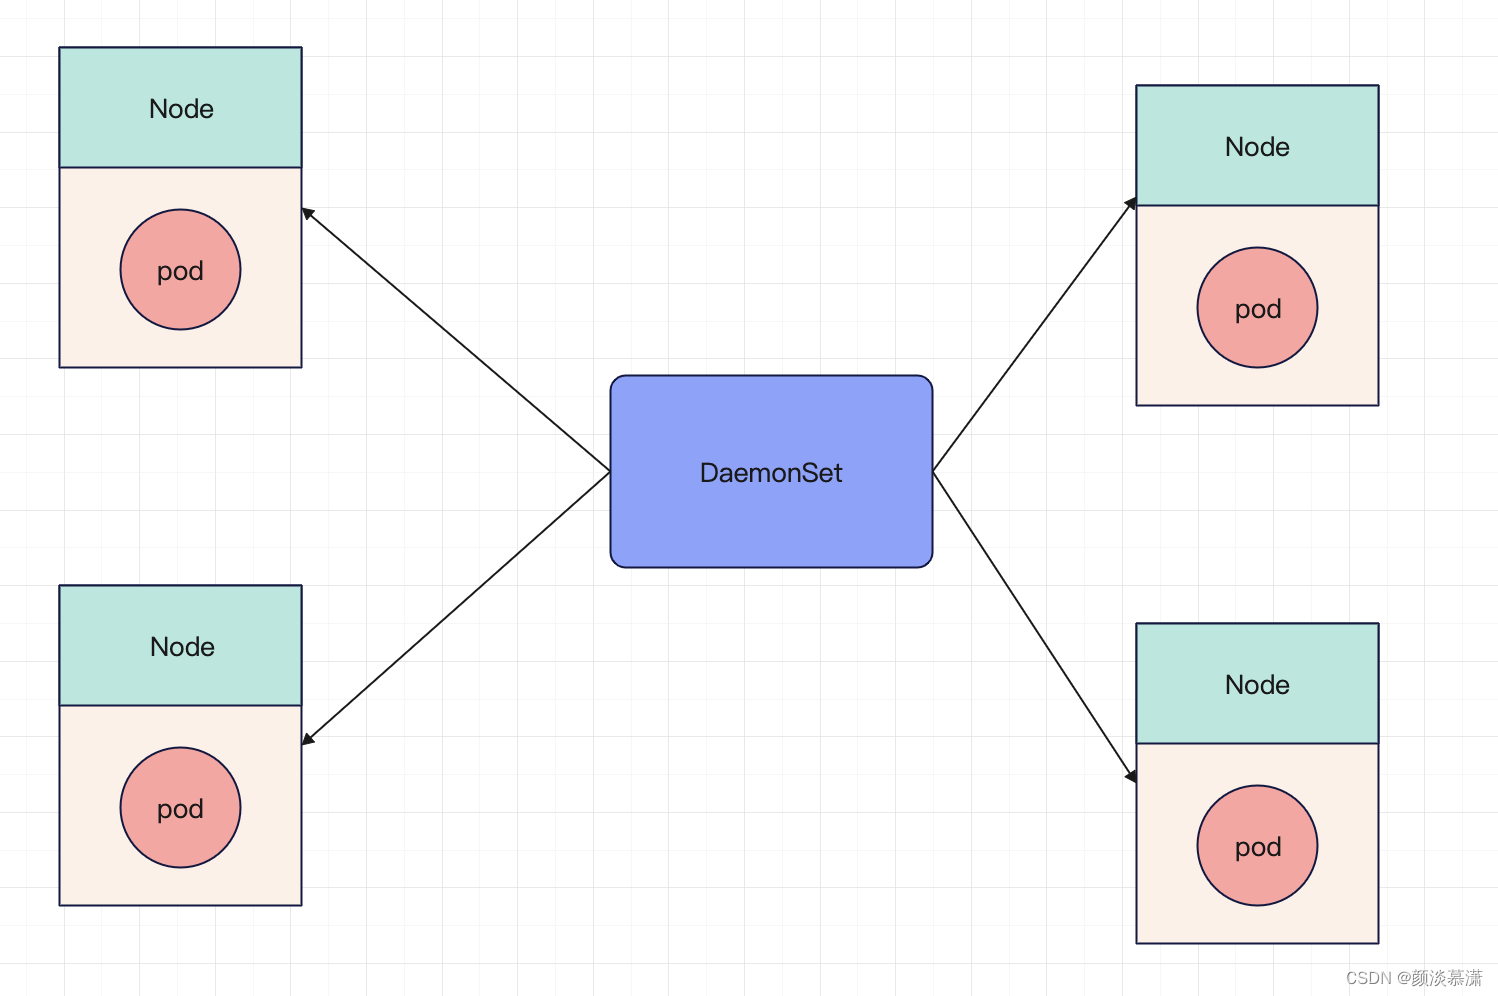
Kubernetes is a container orchestration platform, and DaemonSet is an important concept in Kubernetes. A DaemonSet is a controller that runs a set of Pods within a cluster and ensures that each node has a copy of the Pod running .
1.2 Common Features
The following are some common features of DaemonSet:
Only run Pods on specific nodes : NodeSelector or NodeAffinity can be used to restrict DaemonSet Pods to only run on specific nodes.
Update Pods based on the labels of the nodes : If nodes are added or removed in the cluster, Kubernetes will automatically add or remove Pods through the DaemonSet. At the same time, Pods in the DaemonSet can also be updated by adding or removing node labels.
Ensure that only one Pod is running per node : PodAntiAffinity can be used to ensure that only one Pod is running on each node.
Limit the number of Pods in a DaemonSet : You can use the MaxUnavailable and MaxSurge fields to limit the maximum and minimum number of Pods in a DaemonSet.
1.3 Brief summary
In summary, a DaemonSet is a very useful controller that ensures that a copy of a Pod is running on each node in the cluster .
It can automatically add or remove Pods according to the status of nodes , and can control the location and number of Pods in various ways.
2 working principle
The working principle of DaemonSet is to monitor the changes of nodes . By monitoring the changes of nodes, when a new node joins the cluster, DaemonSet will automatically create a Pod copy on the node. When a node is deleted from the cluster, DaemonSet will automatically delete the Pod copy on the node.
In this way, DaemonSet ensures that each node in the cluster will run the specified Pod. There is one and only one pod
2.1 Principle introduction
DaemonSet works as follows :
The controller monitors the status of the nodes : the DaemonSet controller monitors the status of the nodes in the cluster . Once a new node joins the cluster, or the status of the node changes (for example, the node restarts), the controller will trigger some operations.
Pod creation : When the controller detects a new node, it creates a new pod and schedules it on that node. The controller also ensures that only one Pod instance is running on each node .
Update Pod : If the configuration of the DaemonSet changes, such as updating the image version or modifying the configuration file of the Pod, the controller will automatically update the Pod instance on each node.
Delete Pod : If the node fails or is deleted, the controller will automatically delete the Pod instance on the node.
Capacity expansion and contraction : DaemonSet also supports capacity expansion and contraction , and the number of Pods can be increased or decreased as needed. The process of scaling up and down is similar to other controllers. The controller will adjust the number of pods according to the specified number of replicas and the current actual number of pods.
3 usage scenarios
3.1 Scenario Introduction
DaemonSet is used to run a set of Pods in the cluster, ensuring that each node has a Pod running . It is usually used to run some system-level services or monitoring applications , such as:
Log collector : DaemonSet can run a log collector, such as Fluentd or Filebeat , on each node to collect log data from all nodes and send it to the central log server for storage and analysis.
Monitoring agent : DaemonSet can run a monitoring agent on each node, such as Prometheus Node Exporter or cAdvisor, so as to collect the running status data of all nodes and send it to the central monitoring server for analysis and display.
Network proxy : DaemonSet can run a network proxy on each node, such as kube-proxy or Istio Sidecar, which is responsible for network communication and traffic management between nodes.
Security agent : DaemonSet can run a security agent on each node, such as Sysdig Falco or Aqua Security, so as to detect security events of all nodes, and timely alarm or defend.
In short, DaemonSet is suitable for scenarios that need to run a set of Pods on each node , which can make the services in the cluster more robust and reliable.
4 Case explanation
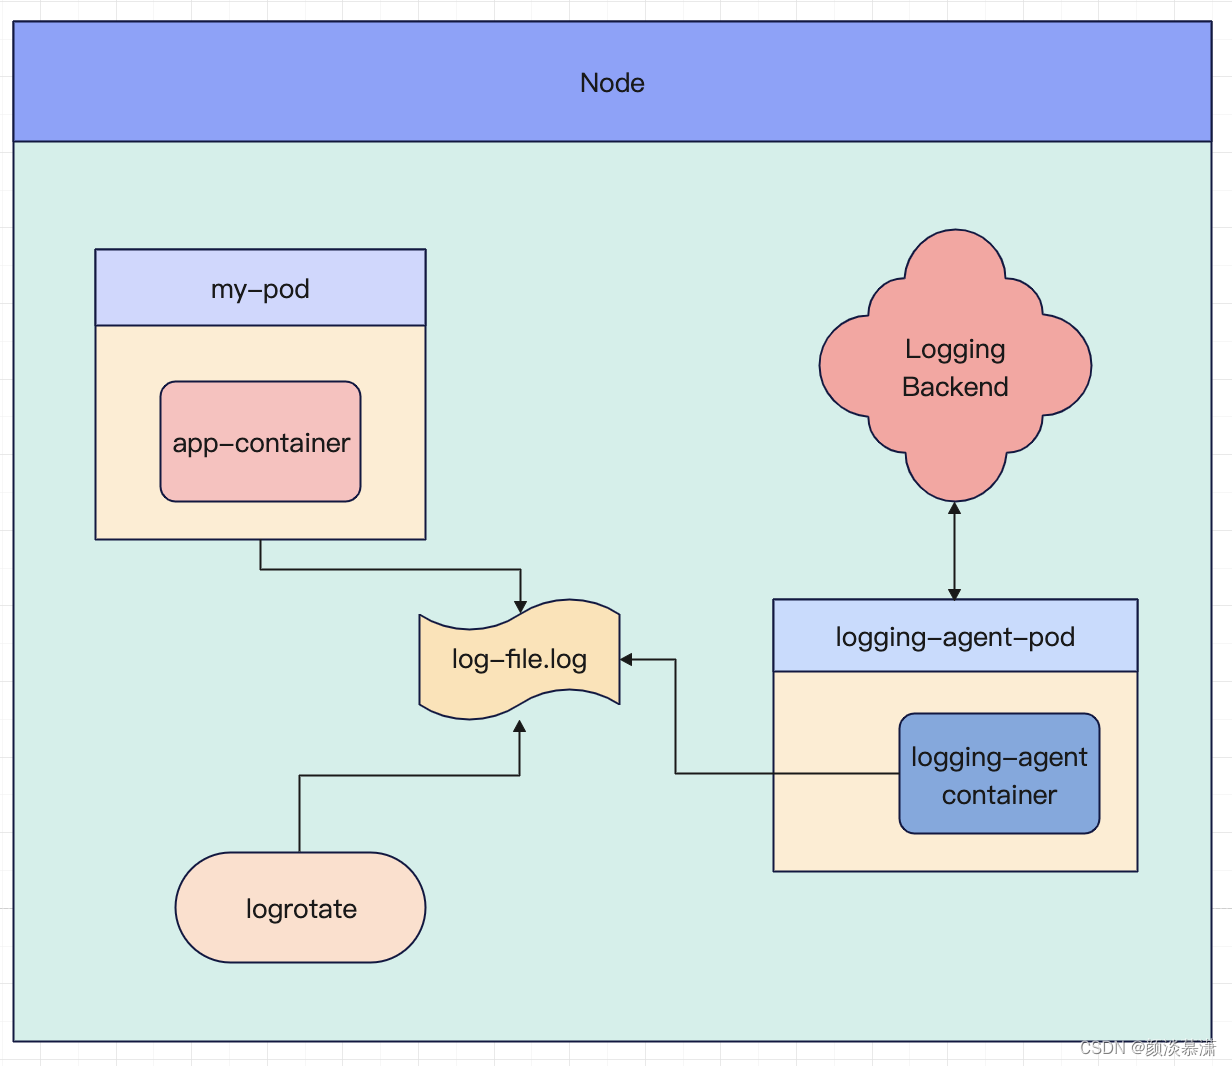
4.1 Log collection
The log collector is an important component in the Kubernetes cluster . It is responsible for running the container of the log collector on each node, collecting the log data of the node and the container, and sending the data to the centralized log system.
Log collection scheme
- Native way : Use to
kubectl logsdirectly view the logs kept locally, orlog driverredirect the logs to files, syslog, fluentd and other systems through the docker engine.- Sidecar mode : A sidecar log agent container runs in a POD to collect logs generated by the POD main container.
- DaemonSet method : deploy a log agent on each node of K8S, and the agent collects logs of all containers to the server.
Use the log collector in the Kubernetes cluster, DaemonSet method : DaemonSet will be used to ensure that each node has a log collector running.
Here is a sample code for a DaemonSet that uses a log collector:
apiVersion: v1
kind: ConfigMap #资源类型
metadata:
  name: fluentd-config
  namespace: kube-system
data:
  fluent.conf: |
    <source>
      @type tail
      path /var/log/containers/*.log
      pos_file /var/log/fluentd-containers.log.pos
      time_format %Y-%m-%dT%H:%M:%S.%NZ
      tag kubernetes.*
      read_from_head true
      <parse>
        @type json
        time_key time
        time_format %Y-%m-%dT%H:%M:%S.%NZ
        keep_time_key true
      </parse>
    </source>

    <match kubernetes.**>
      @type elasticsearch
      host elasticsearch.default.svc.cluster.local
      port 9200
      index_name fluentd
      type_name fluentd
      logstash_format true
      logstash_prefix kubernetes
      include_tag_key true
      tag_key kubernetes.tag
      flush_interval 10s
      max_retry_wait 30
      disable_retry_limit
    </match>

---
apiVersion: apps/v1
kind: DaemonSet #资源类型
metadata:
  name: fluentd
  namespace: kube-system
  labels:
    k8s-app: fluentd-logging
spec:
  selector:
    matchLabels:
      k8s-app: fluentd-logging
  template:
    metadata:
      labels:
        k8s-app: fluentd-logging
    spec:
      tolerations:
      - key: node-role.kubernetes.io/master
        effect: NoSchedule
      containers:
      - name: fluentd
        image: fluent/fluentd-kubernetes-daemonset:v1.6-debian-elasticsearch7-1.1
        env:
        - name: FLUENT_UID
          value: "0"
        volumeMounts:
        - name: varlog
          mountPath: /var/log
        - name: varlibdockercontainers
          mountPath: /var/lib/docker/containers
          readOnly: true
        - name: fluentdconfig
          mountPath: /fluentd/etc/
        resources:
          limits:
            memory: 512Mi
        securityContext:
          privileged: true
      terminationGracePeriodSeconds: 30
      volumes:
      - name: varlog
        hostPath:
          path: /var/log
      - name: varlibdockercontainers
        hostPath:
          path: /var/lib/docker/containers
      - name: fluentdconfig
        configMap:
          name: fluentd-config
In the sample code above, a ConfigMap named fluentd-config is first defined to store Fluentd configuration files.
An input source named tail is defined in the configuration file, which reads the log files of each container and parses the log data in JSON format.
An output target called elasticsearch is also defined in the configuration file , which will send log data to Elasticsearch.
Then a DaemonSet named fluentd is defined , which will run a fluentd container on each node . In the fluentd container, the configuration file defined in ConfigMap is used, and the /var/log and /var/lib/docker/containers directories are mounted, which contain the log data of nodes and containers.
At the same time, due to the use of DaemonSet, it is ensured that there is a log collector running on each node, thereby improving the reliability and stability of the cluster.
Through this sample code, you can use Fluentd as a log collector in a Kubernetes cluster to collect log data from nodes and containers, and send the data to a centralized log system.
At the same time, due to the use of DaemonSet, it is ensured that there is a log collector running on each node, thereby improving the reliability and stability of the cluster .
4.2 Monitoring agent
The monitoring agent is another important component in the Kubernetes cluster. It is responsible for running the container of the monitoring agent on each node, collecting the monitoring data of the nodes and containers, and sending the data to the centralized monitoring system .
To use a monitoring agent in a Kubernetes cluster, use a DaemonSet to ensure that each node has a monitoring agent running.
Here is a sample code for a DaemonSet that uses a monitoring agent:
apiVersion: v1
kind: ServiceAccount
metadata:
  name: node-exporter
  namespace: kube-system
---
apiVersion: rbac.authorization.k8s.io/v1
kind: ClusterRoleBinding
metadata:
  name: node-exporter
roleRef:
  apiGroup: rbac.authorization.k8s.io
  kind: ClusterRole
  name: node-exporter
subjects:
- kind: ServiceAccount
  name: node-exporter
  namespace: kube-system
---
apiVersion: apps/v1
kind: DaemonSet #资源类型
metadata:
  name: node-exporter
  namespace: kube-system
  labels:
    k8s-app: node-exporter
spec:
  selector:
    matchLabels:
      k8s-app: node-exporter
  template:
    metadata:
      labels:
        k8s-app: node-exporter
    spec:
      serviceAccountName: node-exporter
      hostNetwork: true
      containers:
      - name: node-exporter
        image: prom/node-exporter:v1.2.2
        args:
        - --path.procfs=/host/proc
        - --path.sysfs=/host/sys
        - --collector.textfile.directory=/var/lib/node-exporter/textfile_collector
        ports:
        - name: metrics
          containerPort: 9100
          hostPort: 9100
        volumeMounts:
        - name: proc-mount
          mountPath: /host/proc
          readOnly: true
        - name: sys-mount
          mountPath: /host/sys
          readOnly: true
        - name: textfile-collector
          mountPath: /var/lib/node-exporter/textfile_collector
      volumes:
      - name: proc-mount
        hostPath:
          path: /proc
      - name: sys-mount
        hostPath:
          path: /sys
      - name: textfile-collector
        configMap:
          name: node-exporter-textfile-collector
In the sample code above, a ServiceAccount named node-exporter and a ClusterRoleBinding named node-exporter are first defined to authorize node-exporter to operate in the cluster.
Then define a DaemonSet named node-exporter, which will run a node-exporter container on each node.
In the node-exporter container, the --path.procfs and --path.sysfs options are used to specify the paths of the /proc and /sys directories, which contain monitoring data for nodes and containers.
At the same time, the --collector.textfile.directory option is used to specify a directory for storing monitoring data that can be collected through text files.
The node-exporter container also needs to mount the /proc and /sys directories as well as a directory for storing text files.
Through this sample code, node-exporter is used as a monitoring agent in the Kubernetes cluster to collect monitoring data of nodes and containers, and send the data to a centralized monitoring system.
At the same time, due to the use of DaemonSet, it is ensured that a monitoring agent is running on each node, thereby improving the reliability and stability of the cluster.
4.3 Web Proxy
The network agent is one of the important components in the Kubernetes cluster, which is responsible for network communication and traffic management between nodes.
Kubernetes has a built-in network proxy component, kube-proxy, which uses iptables or IPVS to implement traffic forwarding and load balancing between nodes.
When using kube-proxy in a Kubernetes cluster, DaemonSet is usually used to ensure that each node has a network proxy running.
Here is a sample code for a DaemonSet using kube-proxy:
apiVersion: v1
kind: ServiceAccount
metadata:
  name: kube-proxy
  namespace: kube-system
---
apiVersion: rbac.authorization.k8s.io/v1
kind: ClusterRoleBinding
metadata:
  name: kube-proxy
roleRef:
  apiGroup: rbac.authorization.k8s.io
  kind: ClusterRole
  name: system:node-proxier
subjects:
- kind: ServiceAccount
  name: kube-proxy
  namespace: kube-system
---
apiVersion: apps/v1
kind: DaemonSet #资源类型
metadata:
  name: kube-proxy
  namespace: kube-system
  labels:
    k8s-app: kube-proxy
spec:
  selector:
    matchLabels:
      k8s-app: kube-proxy
  template:
    metadata:
      labels:
        k8s-app: kube-proxy
    spec:
      serviceAccountName: kube-proxy
      hostNetwork: true
      containers:
      - name: kube-proxy
        image: k8s.gcr.io/kube-proxy:v1.22.0
        command:
        - /usr/local/bin/kube-proxy
        args:
        - --config=/var/lib/kube-proxy/config.conf
        securityContext:
          privileged: true
        volumeMounts:
        - name: kube-proxy-config
          mountPath: /var/lib/kube-proxy
          readOnly: true
        - name: xtables-lock
          mountPath: /run/xtables.lock
          readOnly: false
          subPath: xtables.lock
      volumes:
      - name: kube-proxy-config
        configMap:
          name: kube-proxy-config
      - name: xtables-lock
        hostPath:
          path: /run/xtables.lock
In the sample code above, a ServiceAccount named kube-proxy and a ClusterRoleBinding named kube-proxy are first defined to authorize kube-proxy to operate in the cluster .
Then a DaemonSet named kube-proxy is defined , which will run a kube-proxy container on each node.
In the kube-proxy container, the --config option is used to specify the path of the configuration file, which can be dynamically generated through a ConfigMap named kube-proxy-config.
The kube-proxy container also needs to mount the /run/xtables.lock file to ensure no race conditions occur when using iptables or IPVS .
Through this sample code, use kube-proxy as a network proxy in the Kubernetes cluster to implement traffic forwarding and load balancing between nodes .
At the same time, due to the use of DaemonSet, it is ensured that a network agent is running on each node , thereby improving the reliability and stability of the cluster.
4.4 Security proxy
The security agent is another important component in the Kubernetes cluster. It is responsible for running the container of the security agent on each node, protecting the network traffic security of nodes and containers, and ensuring that the network traffic in the cluster can only access authorized services and resources.
To use a security proxy in a Kubernetes cluster, use a DaemonSet to ensure that each node has a security proxy running.
Here is a sample code for a DaemonSet using a secure proxy:
apiVersion: apps/v1
kind: DaemonSet #资源类型
metadata:
  name: envoy
  namespace: kube-system
  labels:
    k8s-app: envoy
spec:
  selector:
    matchLabels:
      k8s-app: envoy
  template:
    metadata:
      labels:
        k8s-app: envoy
    spec:
      containers:
      - name: envoy
        image: envoyproxy/envoy:v1.19.1
        ports:
        - containerPort: 8080
          name: http
        - containerPort: 8443
          name: https
        volumeMounts:
        - name: envoy-config
          mountPath: /etc/envoy
        - name: envoy-tls
          mountPath: /etc/envoy-tls
          readOnly: true
        securityContext:
          runAsUser: 10001
      terminationGracePeriodSeconds: 30
      volumes:
      - name: envoy-config
        configMap:
          name: envoy-config
        - name: envoy-tls
          secret:
            secretName: envoy-tls
In the sample code above, a ConfigMap named envoy-config is first defined to store Envoy configuration files.
Next, a Secret named envoy-tls is defined to store Envoy's TLS certificate and private key.
Then a DaemonSet called envoy is defined , which will run an envoy container on each node .
In the envoy container, the configuration file defined in ConfigMap is used, and the /etc/envoy and /etc/envoy-tls directories are mounted, which contain Envoy configuration files, TLS certificates and private keys.
At the same time, due to the use of DaemonSet, it is ensured that a security agent is running on each node, thereby improving the security and reliability of the cluster.
Through this sample code, you can use Envoy as a security proxy in the Kubernetes cluster to protect the network traffic security of nodes and containers, and ensure that the network traffic in the cluster can only access authorized services and resources.
At the same time, due to the use of DaemonSet, it is ensured that a security agent is running on each node , thereby improving the security and reliability of the cluster.
5 summary
The main function of DaemonSet is to allow you to run a Daemon Pod in a Kubernetes cluster .
Therefore, this Pod has the following three characteristics:
This Pod runs on every node (Node) in the Kubernetes cluster ;
There is only one such Pod instance on each node ;
When a new node joins the Kubernetes cluster, the Pod will be automatically created on the new node ; and when the old node is deleted, the Pod on it will be recycled accordingly.
The Daemon Pod mechanism sounds simple, but its significance is indeed very important. To name a few examples:
The Agent components of various network plug-ins must run on each node to handle the container network on this node;
The Agent component of various storage plug-ins must also run on each node to mount the remote storage directory on this node and operate the volume directory of the container;
Various monitoring components and log components must also run on each node, responsible for monitoring information and log collection on this node.
in conclusion:
DaemonSet is actually a very simple controller . In its control loop, it only needs to traverse all nodes , and then decide whether to create or delete a Pod according to whether there are managed Pods on the node.
Compared with Deployment, DaemonSet only manages Pod objects , and through the small functions of the two schedulers, nodeAffinity and Toleration , it is guaranteed that there is only one Pod on each node .
At the same time, DaemonSet uses ControllerRevision to save and manage its corresponding "version" .
This "API object-oriented" design idea greatly simplifies the logic of the controller itself, which is also the advantage of the "declarative API" of the Kubernetes project .