How idea packaged and released springboot
1.1. Environmental preparation
window system, jdk8 environment, springboot project, maven3.5.4 environment
1.2. Be packaged and released
Open the idea editor, open a demo project written 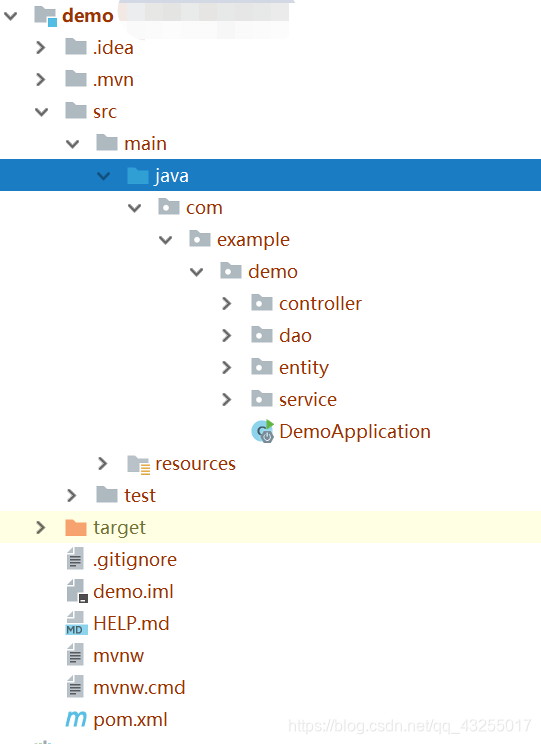
and then open the terminal window below the editor of the idea, when you open this window of time, the location is the root of the directory 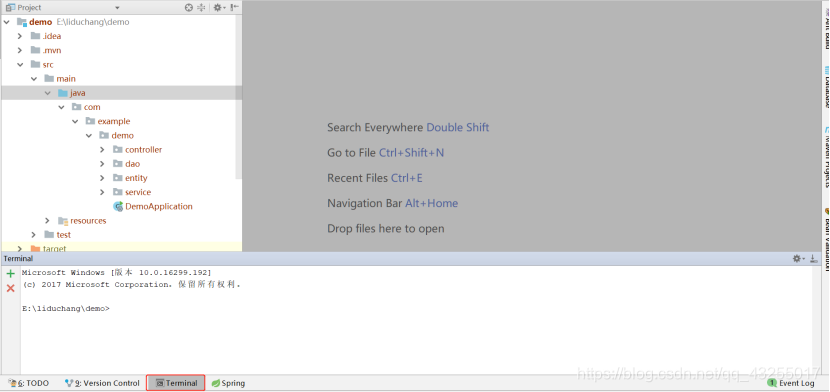
enter the command mvn clean install -Dmaven.test.skip this command is labeled jar package with maven way, and then the Enter key. 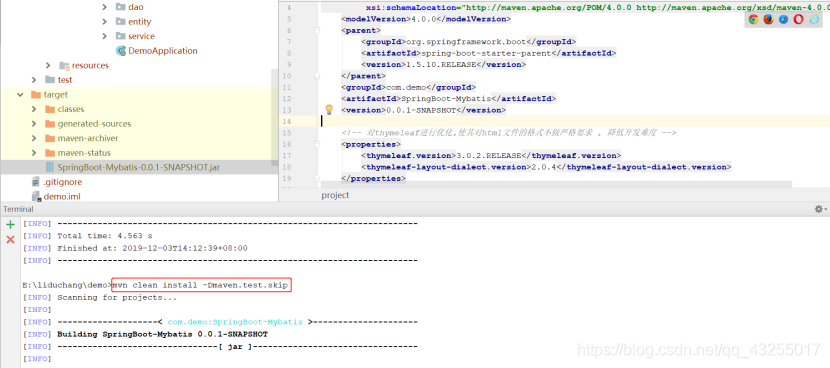
When you see the BUILD SUCCESS time, it shows the success of packaging, there will be a jar package in the target directory of the project, the default jar package name is artifactId + version 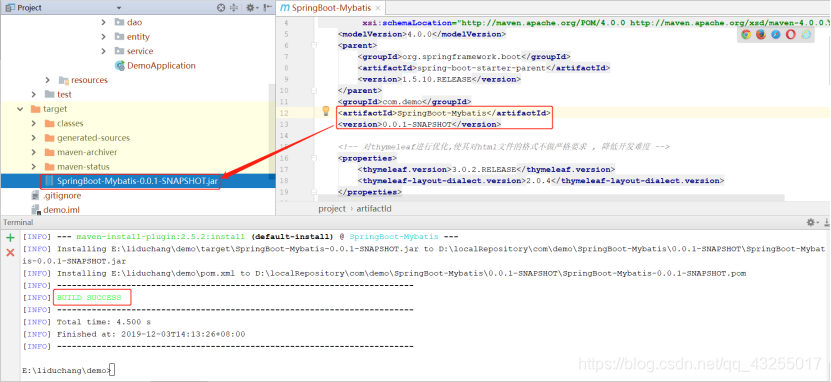
then re-enter the target directory, enter java -jar SpringBoot-Mybatis -0.0.1-SNAPSHOT.jar command to run jar package 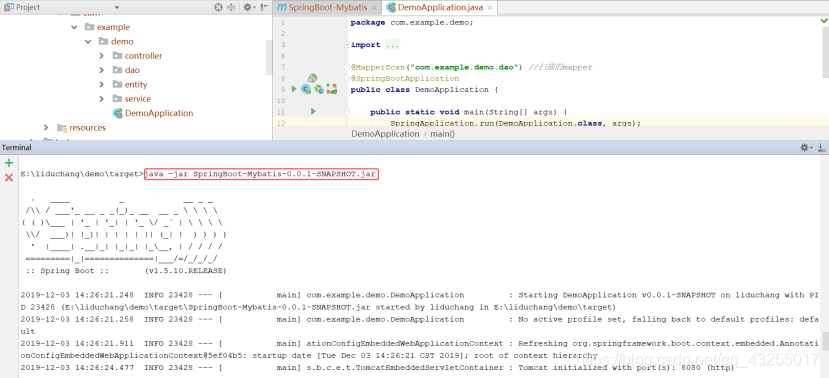
when you see started DemoApplication in ... Description start when successful, will be able to visit the local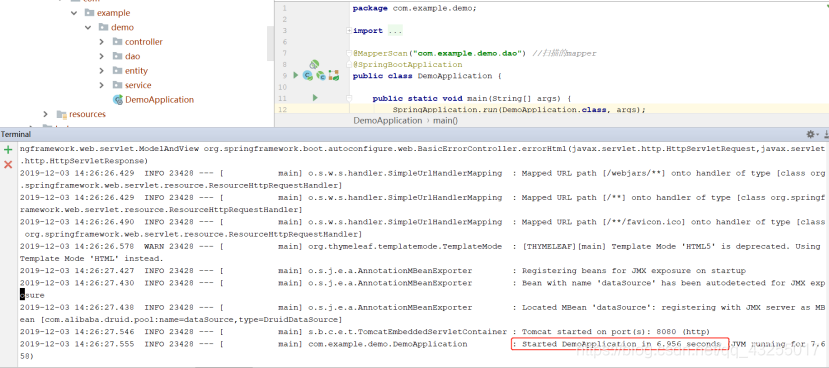
Conclusion: This is the SpringBoot project released in the Windows environment, linux environment is the same, the same should install jdk and maven environment. It is also springboot magic, do not need to publish under Tomcat, because SpringBoot embedded web server, including Tomcat
Features at a Glance
As the traditional ssm, ssh, etc. cumbersome framework profiles appear springboot is to simplify the configuration file
embedded Web server, including Tomcat, labeled jar package only needs to run the project
SpringBoot full annotation-based development style
SpringBoot integration Servlet
3.1. A way
step:
- 写一个类MyFirstServlet继承HttpServlet,并重写doGet方法
- 在类的上面用@WebServlet标识Servlet并指明name和urlPatterns
- 在标识有@SpringBootApplication的主类上加上
@ServletComponentScan
FirstServlet.java
package com.example.servlet.myservlet;

import javax.servlet.http.HttpServlet;
import java.io.IOException;
import javax.servlet.ServletException;
import javax.servlet.annotation.WebServlet;
import javax.servlet.http.HttpServletRequest;
import javax.servlet.http.HttpServletResponse;

/**
 *SpringBoot整合Servlet方式一
 *@WebServlet(name="MyFirstServlet",urlPatterns="/myFirst")相当于如下:
 *
 *<servlet>
 * <servlet-name>MyFirstServlet</servlet-name>
 * <servlet-class>ah.szxy.servlet.FirstServlet</servlet-class>
 *</servlet>
 *<servlet-mapping>
 * <servlet-name>MyFirstServlet</servlet-name>
 * <url-pattern>/first</url-pattern>
 *</servlet-mapping>
 *
 */

@WebServlet(name="MyFirstServlet",urlPatterns="/myFirst")
public class FirstServlet extends HttpServlet {

    @Override
    protected void doGet(HttpServletRequest req, HttpServletResponse resp) throws ServletException, IOException {
        System.out.println("MyFirstServlet init............");
    }
}
ServletApplication.java
package com.example.servlet;

import org.springframework.boot.SpringApplication;
import org.springframework.boot.autoconfigure.SpringBootApplication;
import org.springframework.boot.web.servlet.ServletComponentScan;

@SpringBootApplication
@ServletComponentScan //在springBoot启动时会扫描@WebServlet,并将该类实例化
public class ServletApplication {

   public static void main(String[] args) {
      SpringApplication.run(ServletApplication.class, args);
   }

}
然后启动项目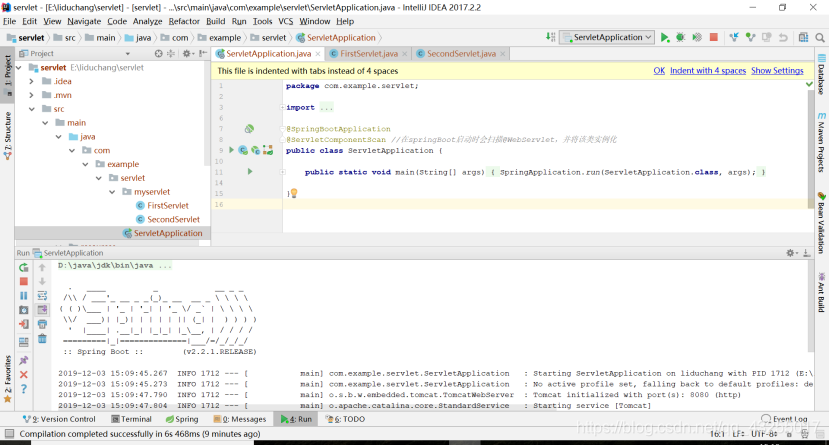
最后在浏览器输入localhost:8080/myFirstServlet,页面显示空白,在控制台打印MyFirstServlet init............
package com.example.servlet.myservlet;

import javax.servlet.ServletException;
import javax.servlet.http.HttpServlet;
import javax.servlet.http.HttpServletRequest;
import javax.servlet.http.HttpServletResponse;
import java.io.IOException;

/**
 * 整合Servlet的第二种方式
 */
public class SecondServlet extends HttpServlet {

    @Override
    protected void doGet(HttpServletRequest req, HttpServletResponse resp) throws ServletException, IOException {
        System.out.println("MySecondServlet init..........");
    }
}
ServletApplication.java
package com.example.servlet;

import com.example.servlet.myservlet.SecondServlet;
import org.springframework.boot.SpringApplication;
import org.springframework.boot.autoconfigure.SpringBootApplication;
import org.springframework.boot.web.servlet.ServletComponentScan;
import org.springframework.boot.web.servlet.ServletRegistrationBean;
import org.springframework.context.annotation.Bean;

@SpringBootApplication
//@ServletComponentScan //在springBoot启动时会扫描@WebServlet,并将该类实例化
public class ServletApplication {

   public static void main(String[] args) {
      SpringApplication.run(ServletApplication.class, args);
   }

  /**
 * 整合Servlet的第二种方式,创建ServletRegistrationBean并添加路径
 * @return
 */
@Bean
public ServletRegistrationBean getServletRegistrationBean(){
   ServletRegistrationBean bean = new ServletRegistrationBean(new SecondServlet());
   bean.addUrlMappings("/mySecond");
   return bean;
}
然后启动项目,在浏览器中访问localhost:8080/mySecondServlet,页面也是空白,在控制台就会打印MySecondServlet init..........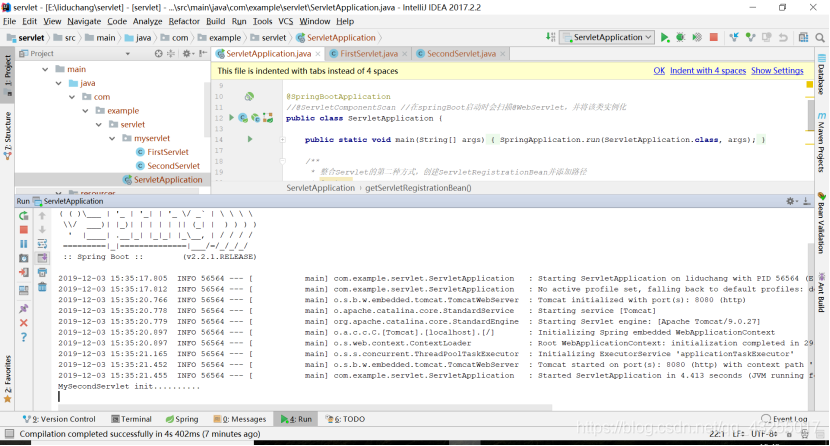
项目,结构如图所示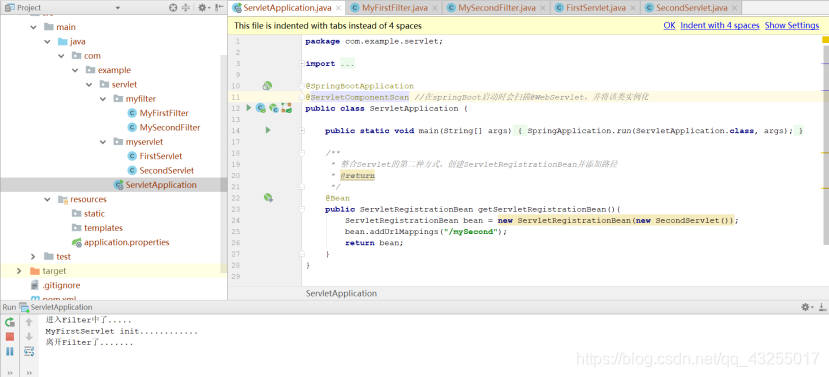
结论:
上面的两种方式推荐使用第一种基于注解的整合
虽然现在几乎用不到servlet了,但是学习SpringBoot整合servlet有助于学习的深入了解,更好的理解框架
4.SpringBoot整合Filterbr/>4.1.方式一
步骤:
创建一个MyFirstFilter类实现Filter接口,并在类上面标注@WebFilter
在@SpringBootApplication的主类上加上@ServletComponentScan注解
MyFirstFilter.java
package com.example.servlet.myfilter;

import javax.servlet.*;
import javax.servlet.annotation.WebFilter;
import java.io.IOException;

/**
 * 基于@WebFilter注解整合Filter方式一
 */
@WebFilter(filterName = "MyFirstFilter",urlPatterns = "/myFirst")
public class MyFirstFilter implements Filter {
    @Override
    public void init(FilterConfig filterConfig) throws ServletException {

    }

    @Override
    public void doFilter(ServletRequest arg0, ServletResponse arg1, FilterChain arg2) throws IOException, ServletException {
        System.out.println("进入Filter中了.....");
        arg2.doFilter(arg0,arg1);
        System.out.println("离开Filter了.......");
    }

    @Override
    public void destroy() {

    }
}
ServletApplication.java
package com.example.servlet;

import com.example.servlet.myservlet.SecondServlet;
import org.springframework.boot.SpringApplication;
import org.springframework.boot.autoconfigure.SpringBootApplication;
import org.springframework.boot.web.servlet.ServletComponentScan;
import org.springframework.boot.web.servlet.ServletRegistrationBean;
import org.springframework.context.annotation.Bean;

@SpringBootApplication
@ServletComponentScan //在springBoot启动时会扫描@WebServlet,并将该类实例化
public class ServletApplication {

   public static void main(String[] args) {
      SpringApplication.run(ServletApplication.class, args);
   }

   /**
    * 整合Servlet的第二种方式,创建ServletRegistrationBean并添加路径
    * @return
    */
   @Bean
   public ServletRegistrationBean getServletRegistrationBean(){
      ServletRegistrationBean bean = new ServletRegistrationBean(new SecondServlet());
      bean.addUrlMappings("/mySecond");
      return bean;
   }
}
4.2.方式二
步骤:
创建一个类MySecondFilter实现Filter接口,重写方法。
在@SpringBootApplication标识的主类中加@Bean的一个方法,将MySecondFilter对象注入容器中。
MySecondFilter.java
package com.example.servlet.myfilter;

import javax.servlet.*;
import java.io.IOException;

/**
 * 整合Filter的第二种方式
 */
public class MySecondFilter implements Filter {
    @Override
    public void init(FilterConfig filterConfig) throws ServletException {

    }

    @Override
    public void doFilter(ServletRequest arg0, ServletResponse arg1, FilterChain arg2) throws IOException, ServletException {
        System.out.println("进入MySecondFilter了......");
        arg2.doFilter(arg0, arg1);
        System.out.println("离开MySecondFilter了......");
    }

    @Override
    public void destroy() {

    }
}
ServletApplication.java
package com.example.servlet;

import com.example.servlet.myfilter.MySecondFilter;
import com.example.servlet.myservlet.SecondServlet;
import org.springframework.boot.SpringApplication;
import org.springframework.boot.autoconfigure.SpringBootApplication;
import org.springframework.boot.web.servlet.FilterRegistrationBean;
import org.springframework.boot.web.servlet.ServletComponentScan;
import org.springframework.boot.web.servlet.ServletRegistrationBean;
import org.springframework.context.annotation.Bean;

@SpringBootApplication
//@ServletComponentScan //在springBoot启动时会扫描@WebServlet,并将该类实例化
public class ServletApplication {

   public static void main(String[] args) {
      SpringApplication.run(ServletApplication.class, args);
   }

   /**
    * 整合Filter的第二种方式
    * 注册Filter
    */
   @Bean
   public FilterRegistrationBean getFilterRegistrationBean() {
      FilterRegistrationBean bean = new FilterRegistrationBean(new MySecondFilter());
      // bean.addUrlPatterns(new String[]{"*.do","*.jsp"});//拦截多个时
      bean.addUrlPatterns("/mySecond");
      return bean;
   }
}
然后在浏览器访问localhost:8080/mySecond,就可以看到控制台打印如下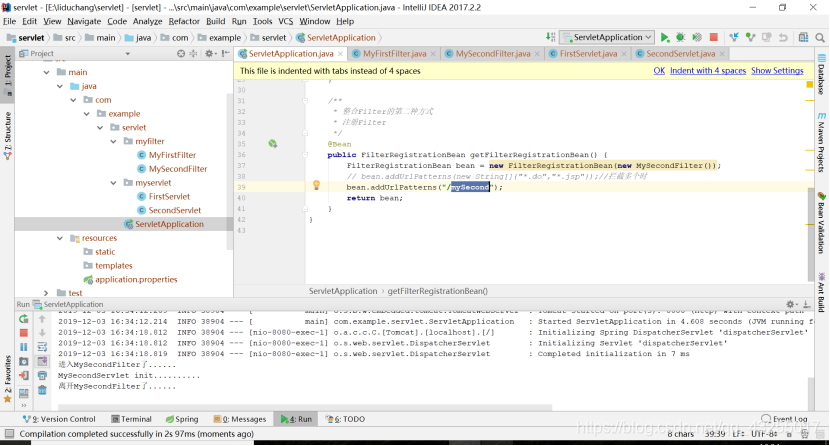
5.SpringBoot整合Listener
5.1.方式一
步骤:
创建一个类MyFirstListener实现ServletContextListener接口,重写方法
在该类上加上@WebListener注解
package com.example.servlet.mylistener;

import javax.servlet.ServletContextEvent;
import javax.servlet.ServletContextListener;
import javax.servlet.annotation.WebListener;

/**
 * springBoot 整合Listener第一种方式
 * 创建一个Servlet上下文的监听器
 * @WebListener 自动注册,相当于在web.xml中添加如下代码
 *
 *<listener>
 * <listener-class>ah.szxy.listener.FirstListener</listener-class>
 *</listener>
 */
@WebListener
public class MyFirstListener implements ServletContextListener {

    @Override
    public void contextDestroyed(ServletContextEvent arg0) {
        // TODO Auto-generated method stub
        System.out.println("MyFirstListener执行销毁了。。。");
    }

    @Override
    public void contextInitialized(ServletContextEvent arg0) {
        // TODO Auto-generated method stub
        System.out.println("MyFirstListener执行初始化了。。。");
    }
}
执行项目会打印如下,因为用了@ServletComponentScan注解,在项目启动的时候就会扫描包中是否含有servlet,若有就初始化。由于FirstServlet是基于注解初始化的,所以在项目启动的时候,就会执行初始化servlet,被Listener监听到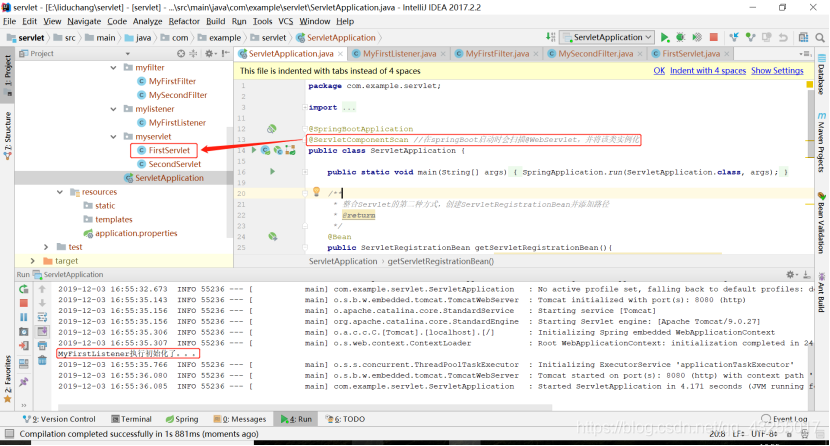
5.1.方式二
步骤:
创建一个类MySecondListener实现ServletContextListener接口,重写方法
在@SpringBootApplication标识的主类中加@Bean的一个方法,将MySecondListener对象注入容器中。
package com.example.servlet.mylistener;

import javax.servlet.ServletContextEvent;
import javax.servlet.ServletContextListener;

/**
 * 整合Listener的第二种方式
 */
public class MySecondListener implements ServletContextListener {

    @Override
    public void contextDestroyed(ServletContextEvent arg0) {
        // TODO Auto-generated method stub
        System.out.println("MySecondListener执行销毁了。。。");
    }

    @Override
    public void contextInitialized(ServletContextEvent arg0) {
        // TODO Auto-generated method stub
        System.out.println("MySecondListener执行初始化了。。。");
    }

}
package com.example.servlet;
import com.example.servlet.myfilter.MySecondFilter;
import com.example.servlet.mylistener.MySecondListener;
import com.example.servlet.myservlet.SecondServlet;
import org.springframework.boot.SpringApplication;
import org.springframework.boot.autoconfigure.SpringBootApplication;
import org.springframework.boot.web.servlet.FilterRegistrationBean;
import org.springframework.boot.web.servlet.ServletComponentScan;
import org.springframework.boot.web.servlet.ServletListenerRegistrationBean;
import org.springframework.boot.web.servlet.ServletRegistrationBean;
import org.springframework.context.annotation.Bean;
@SpringBootApplication
@ServletComponentScan //在springBoot启动时会扫描@WebServlet,并将该类实例化
public class ServletApplication {
public static void main(String[] args) {
SpringApplication.run(ServletApplication.class, args);
}
/**
* 注册listener
*/
@Bean
public ServletListenerRegistrationBean<MySecondListener> getServletListenerRegistrationBean() {
ServletListenerRegistrationBean<MySecondListener> bean = new ServletListenerRegistrationBean<MySecondListener>(
new MySecondListener());
return bean;
}
}执行项目,在控制台可以看到输出如下,两个Servlet监听器都执行了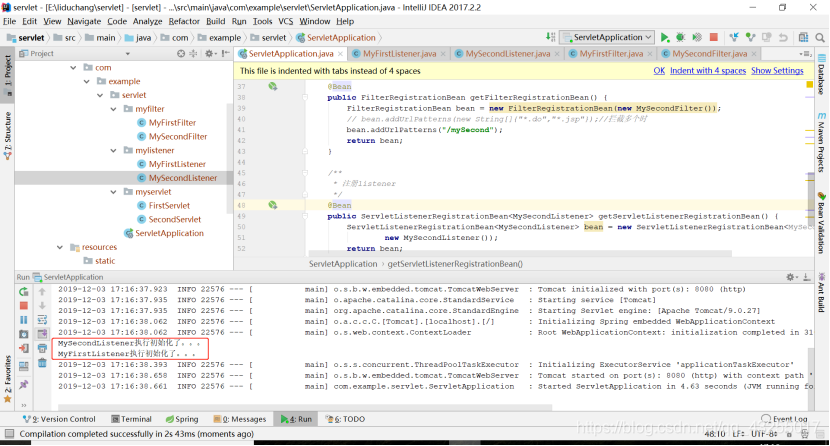
总的项目目录包结构如下: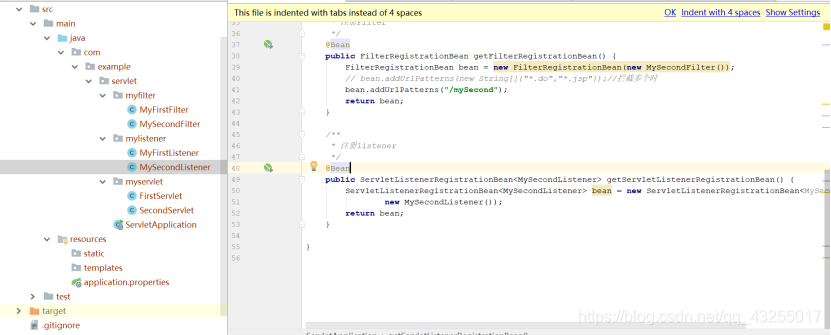
6.SpringBoot整合静态资源
6.1.在resource/static路径下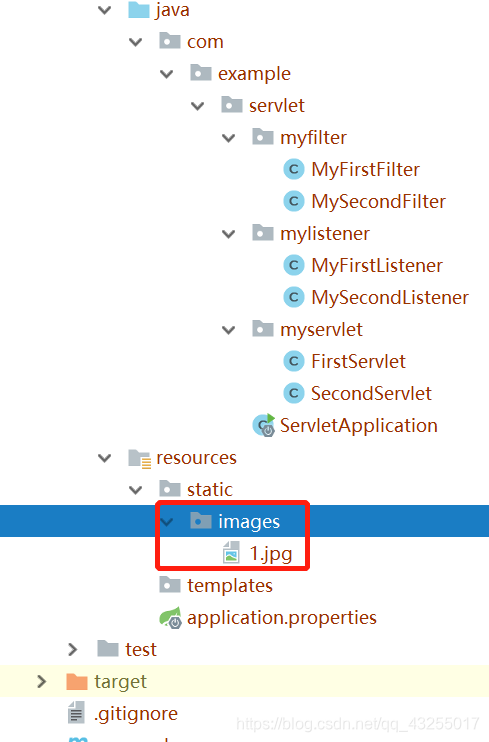
然后启动项目,在浏览器访问localhost:8080/images/1.jpg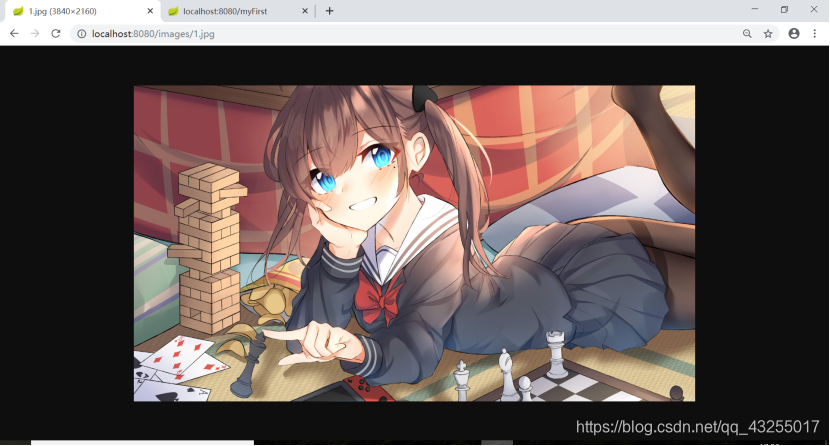
6.2.在webapp目录路径下
6.2.1.idea中为SpringBoot项目添加web
因为SpringBoot的初始化后是没有webapp目录的,需要在idea中手动加入,但不是直接创建,而是配置出来的,下面是SpringBoot项目配置webapp的教程
6.2.2.选中项目然后是ctrl+alt+shift+s,就会弹出如下页面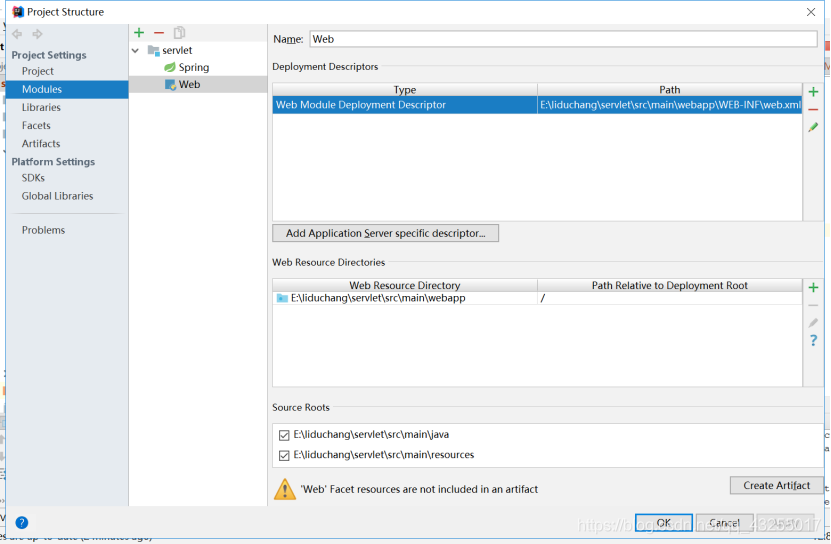
6.2.3.选中Modules,然后点击+号,如下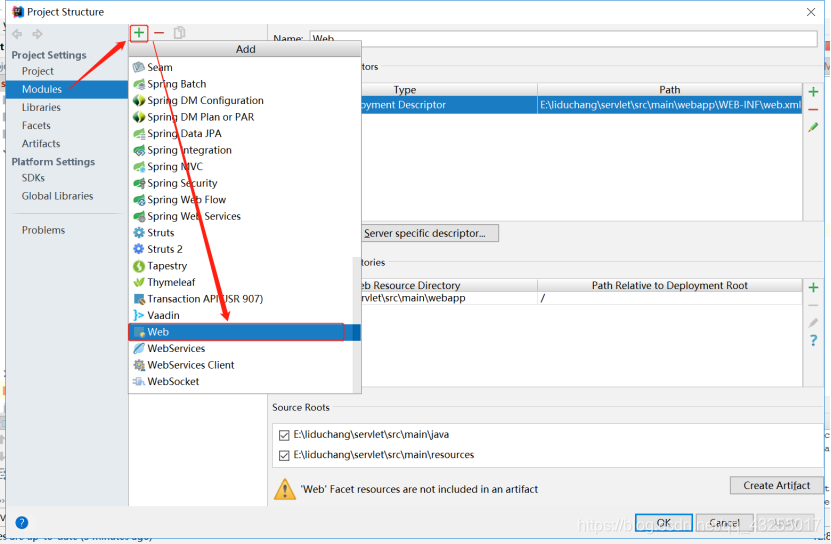
配置的目录的路径分别为:
E:\liduchang\servlet\src\main\webapp\WEB-INF\web.xml
E:\liduchang\servlet\src\main\webapp
6.2.4出现如下界面,点击铅笔进行编辑web.xml的路径,然后双击第二处同理编辑webapp的路径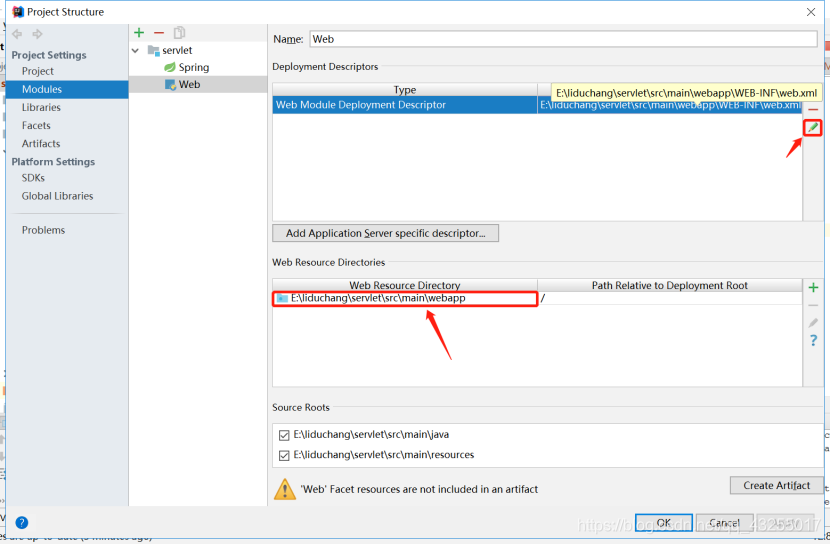
6.2.5最后配置出来的目录结构,如下图所示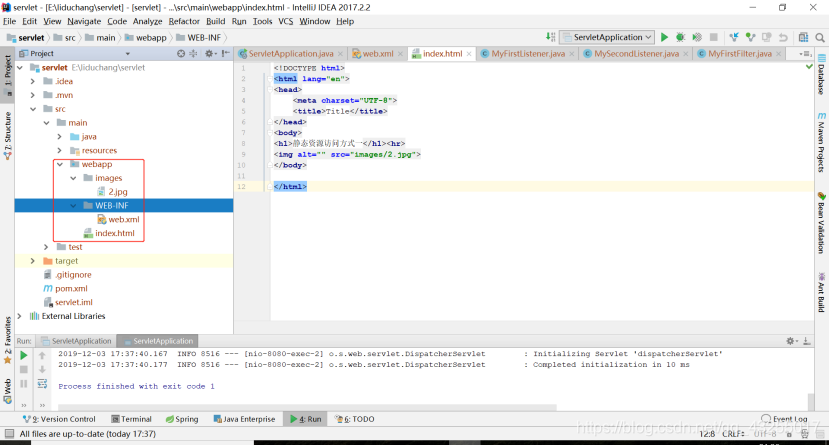
6.2.6 webapp first and then create a new images folder, copy a picture to the next images folder called 2.jpg, and then the next webapp a new index.html follows
<!DOCTYPE html>
<html lang="en">
<head>
    <meta charset="UTF-8">
    <title>Title</title>
</head>
<body>
<h1>静态资源访问方式一</h1><hr>
<img alt="" src="images/2.jpg">
</body>
</html>
6.2.7 Start project, and then a browser to access localhost: 8080, appears as shown, the configuration is successful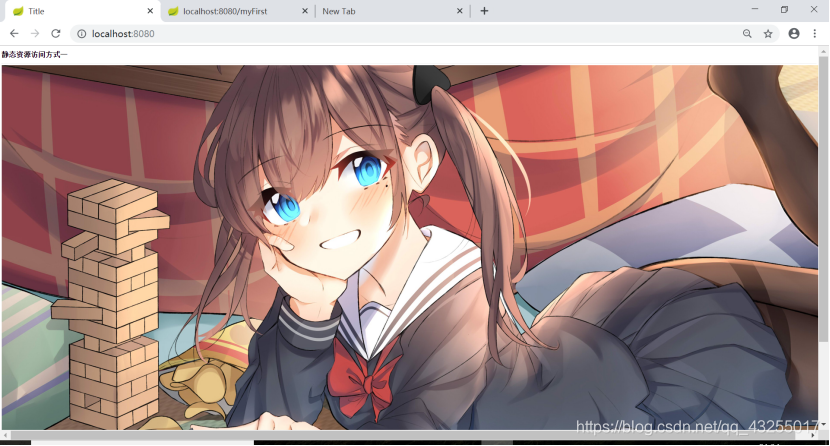
7.SpringBoot file upload
7.1 file upload
program structure.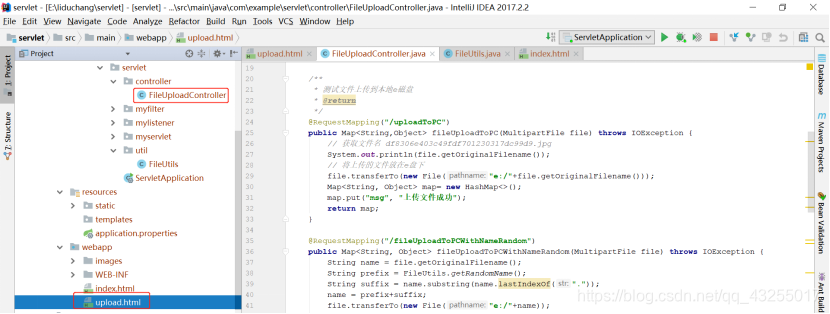
- Upload to a local disk, the name of the original file name
- Upload to your local disk, random name for name
- Under upload images to a file folder under the project folder webapp
upload.html (file upload home page)
<!DOCTYPE html>
<html lang="en">
<head>
    <meta charset="UTF-8">
    <title>Title</title>
</head>
<body>
<!--
    表单提交的方式为   :  post
    enctype的值为 : multipart/form-data
    file类型的输入框的name属性要和 MultipartFile 的形参一样 ,这样才能进行文件的上传
-->
<h1>文件上传到本地e盘</h1><hr>
<form action="/uploadToPC" method="post" enctype="multipart/form-data">
    <input type="file" name="file" ><br>
    <input type="submit" value="点击上传">
</form>

<h1>文件上传到e盘名字随机</h1><hr>
<form action="/fileUploadToPCWithNameRandom" method="post" enctype="multipart/form-data">
    <input type="file" name="file" ><br>
    <input type="submit" value="点击上传">
</form>

<h1>文件上传到本项目</h1><hr>
<form action="/uploadToProject" method="post" enctype="multipart/form-data">
    <input type="file" name="file" ><br>
    <input type="submit" value="点击上传">
</form>

</body>

</html>
FileUploadController.java (file upload Controller)
package com.example.servlet.controller;

import com.example.servlet.util.FileUtils;
import org.springframework.web.bind.annotation.RequestMapping;
import org.springframework.web.bind.annotation.RestController;
import org.springframework.web.multipart.MultipartFile;

import javax.servlet.http.HttpSession;
import java.io.File;
import java.io.IOException;
import java.util.HashMap;
import java.util.Map;

/**
 * 文件上传Controller
 */
@RestController
public class FileUploadController {

    /**
     * 测试文件上传到本地e磁盘
     * @return
     */
    @RequestMapping("/uploadToPC")
    public Map<String,Object> fileUploadToPC(MultipartFile file) throws IOException {
        // 获取文件名 df8306e403c49fdf701230317dc99d9.jpg
        System.out.println(file.getOriginalFilename());
        // 将上传的文件放在e盘下
        file.transferTo(new File("e:/"+file.getOriginalFilename()));
        Map<String, Object> map= new HashMap<>();
        map.put("msg", "上传文件成功");
        return map;
    }

    @RequestMapping("/fileUploadToPCWithNameRandom")
    public Map<String, Object> fileUploadToPCWithNameRandom(MultipartFile file) throws IOException {
        String name = file.getOriginalFilename();
        String prefix = FileUtils.getRandomName();
        String suffix = name.substring(name.lastIndexOf("."));
        name = prefix+suffix;
        file.transferTo(new File("e:/"+name));
        Map<String, Object> map = new HashMap<String, Object>();
        map.put("msg", "ok");
        return map;
    }

    /**
     * 上传文件到项目的webapp下的images文件夹下
     * 不过一般文件不会上传到项目下,一般上传到本
     * 服务器的其它磁盘上,或者上传到专门的服务器
     * 上,所以这个方法只要了解就好
     * @param file
     * @return
     */
    @RequestMapping("/uploadToProject")
    public String uploadToProject(MultipartFile file, HttpSession session){
        // 通过session获取绝对路径,方法内部加上/WEB-INF/images,
        // 表示在项目的images目录下,需要创建该文件夹并进行静态资源放行
        String path= session.getServletContext().getRealPath("/images");
        System.err.println(path);
        String fileName= file.getOriginalFilename();
        File f= new File(path, fileName);
        try {
            file.transferTo(f);
        } catch (IOException e) {
            e.printStackTrace();
        }
        return "ok";
    }
}
FileUtils.java (file randomly named Tools)
package com.example.servlet.util;

import java.util.Random;
import java.util.UUID;

/**
 * 文件名随机生成工具类
 * @version 1.0
 */
public class FileUtils {

    /**
     * 图片名生成
     */
    public static String getRandomName() {
        //取当前时间的长整形毫秒数
        long millis = System.currentTimeMillis();
        Random random = new Random();
        //获取0-1000不包含1000,的整形
        int end3 = random.nextInt(1000);
        //如果不足三位前面补0
        String str = millis + String.format("%03d", end3);
        return str;
    }

    /**
     * 商品id生成
     */
    public static long getRandomId() {
        //取当前时间的长整形值包含毫秒
        long millis = System.currentTimeMillis();
        Random random = new Random();
        //随机获取0-99不包含99,之间的整形
        int end2 = random.nextInt(99);
        //如果不足两位前面补0
        String str = millis + String.format("%02d", end2);
        long id = new Long(str);
        return id;
    }

}
Profiles in the configuration file upload configuration information
application.properties
#设置单个文件上传大小
spring.http.multipart.maxFileSize=200MB
#设置一次请求上传文件的总容量
spring.http.multipart.maxRequestSize=200MB
More tutorials please pay attention: non-Coban Coban