purpose:
The RabbitMQ message mode (a): https://www.cnblogs.com/huangting/p/11994539.html
Limiting consumer end
ACK message queue and return
TTL news
Dead Letter Queue
Limiting consumer end
What is limiting consumer side?
Suppose a scene, first of all, we RabbitMQ server unprocessed messages over ten thousand, we just opened a consumer clients, will appear the following conditions:
A huge amount of instant messages all push over, but we have a single client can not handle so much data at the same time
Limiting consumer end solution provided RabbitMQ
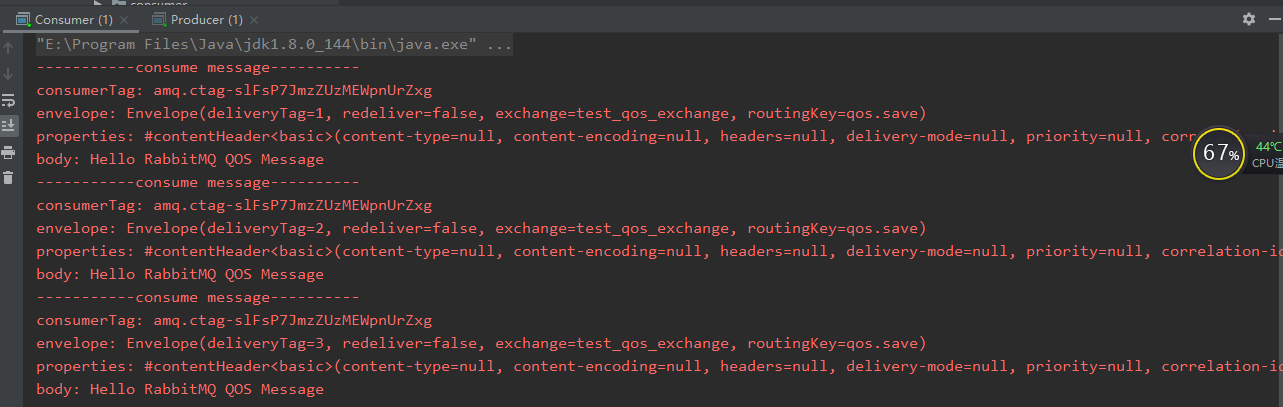
RabbitMQ provides a qos (quality of service) features, namely non-automatic acknowledgment messages under the premise that if a certain number of messages (via based Consumer or Channel setting Qos ago has not been confirmed, no new news consumption value)
Void BasicQos(uint prefetchSize, ushort prefetchCount, bool global);
prefetchSize : 0 does not limit the size of the message
prefetchSize :'ll tell RabbitMQ Do not push to a consumer more than N messages, that once N message has not ack , the Consumer will Block (blocking) off until a message ack
, Ltd. Free Join : to true \ false if the above settings to the Channel ; simply put, is above the limit is Channel level or Consumer Level
Note:
prefetchSize and global two, RabbitMQ is not achieved, for the time being not study;
prefetch_count take effect in no_ask = false case, that in the case of auto answer, the two values are not in effect
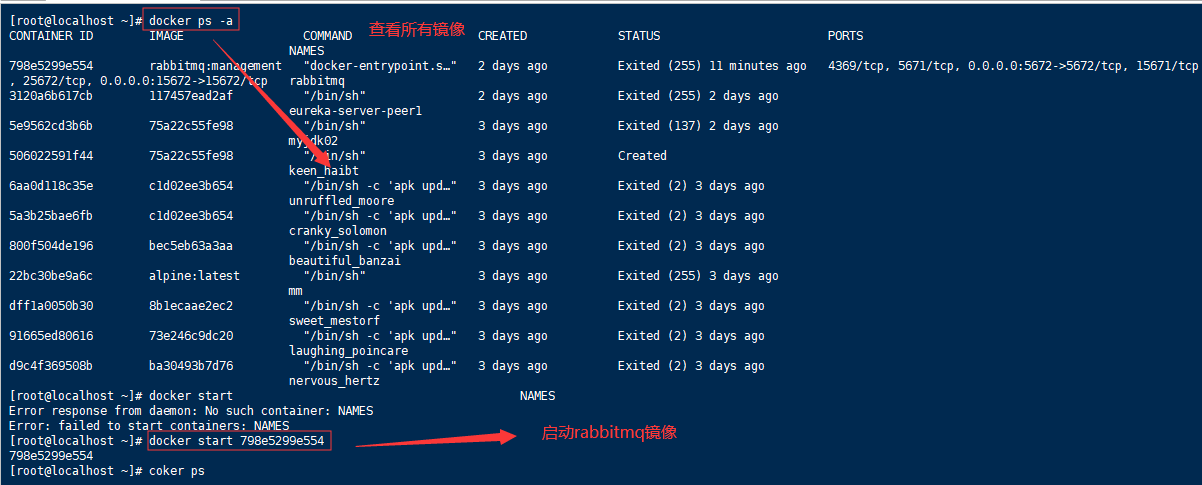
First, start the virtual machine image to open the centos start rabbitmq
Otherwise, the idea of the project is running late absolute error
Customize consumer side code
package com.javaxh.rabbitmqapi.limit;
import com.rabbitmq.client.AMQP;
import com.rabbitmq.client.Channel;
import com.rabbitmq.client.DefaultConsumer;
import com.rabbitmq.client.Envelope;

import java.io.IOException;

public class MyConsumer extends DefaultConsumer {
    private Channel channel ;

    public MyConsumer(Channel channel) {
        super(channel);
        this.channel = channel;
    }

    @Override
    public void handleDelivery(String consumerTag, Envelope envelope, AMQP.BasicProperties properties, byte[] body) throws IOException {
        System.err.println("-----------consume message----------");
        System.err.println("consumerTag: " + consumerTag);
        System.err.println("envelope: " + envelope);
        System.err.println("properties: " + properties);
        System.err.println("body: " + new String(body));

        channel.basicAck(envelope.getDeliveryTag(), false);
    }

}
消费端代码:
package com.javaxh.rabbitmqapi.limit;
import com.rabbitmq.client.Channel;
import com.rabbitmq.client.Connection;
import com.rabbitmq.client.ConnectionFactory;

public class Consumer {
    public static void main(String[] args) throws Exception {
        ConnectionFactory connectionFactory = new ConnectionFactory();
        connectionFactory.setHost("192.168.239.131");
        connectionFactory.setPort(5672);
        connectionFactory.setVirtualHost("/");

        Connection connection = connectionFactory.newConnection();
        Channel channel = connection.createChannel();


        String exchangeName = "test_qos_exchange";
        String queueName = "test_qos_queue";
        String routingKey = "qos.#";

        channel.exchangeDeclare(exchangeName, "topic", true, false, null);
        channel.queueDeclare(queueName, true, false, false, null);
        channel.queueBind(queueName, exchangeName, routingKey);

        //1 限流方式  第一件事就是 autoAck设置为 false
        channel.basicQos(0, 1, false);

        channel.basicConsume(queueName, false, new MyConsumer(channel));
    }
}
生产端代码:
package com.javaxh.rabbitmqapi.limit;
import com.rabbitmq.client.Channel;
import com.rabbitmq.client.Connection;
import com.rabbitmq.client.ConnectionFactory;

public class Producer {
    public static void main(String[] args) throws Exception {
        ConnectionFactory connectionFactory = new ConnectionFactory();
        connectionFactory.setHost("192.168.239.131");
        connectionFactory.setPort(5672);
        connectionFactory.setVirtualHost("/");

        Connection connection = connectionFactory.newConnection();
        Channel channel = connection.createChannel();

        String exchange = "test_qos_exchange";
        String routingKey = "qos.save";

        String msg = "Hello RabbitMQ QOS Message";

        for(int i =0; i<5; i ++){
            channel.basicPublish(exchange, routingKey, true, null, msg.getBytes());
        }

    }
}
先运行消费端在运行生产端:
消息的ACK与重回队列
消费端手工ACK与NACK
消费端进行消费的时候,如果由于业务异常我们可以进行日志的记录,然后进行补偿
如果由于服务器宕机等严重问题,那么我们就需要手工进行ACK,保障消费端消费成功
消费端的重回队列
自定义消费者代码
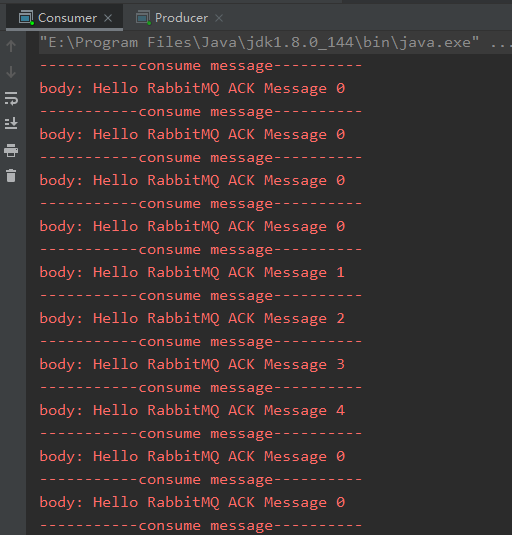
package com.javaxh.rabbitmqapi.ack;
import com.rabbitmq.client.AMQP;
import com.rabbitmq.client.Channel;
import com.rabbitmq.client.DefaultConsumer;
import com.rabbitmq.client.Envelope;

import java.io.IOException;

public class MyConsumer extends DefaultConsumer {


    private Channel channel ;

    public MyConsumer(Channel channel) {
        super(channel);
        this.channel = channel;
    }

    @Override
    public void handleDelivery(String consumerTag, Envelope envelope, AMQP.BasicProperties properties, byte[] body) throws IOException {
        System.err.println("-----------consume message----------");
        System.err.println("body: " + new String(body));
        try {
            Thread.sleep(2000);
        } catch (InterruptedException e) {
            e.printStackTrace();
        }
        if((Integer)properties.getHeaders().get("num") == 0) {
//            手动签收,重回队列
            channel.basicNack(envelope.getDeliveryTag(), false, true);
        } else {
            channel.basicAck(envelope.getDeliveryTag(), false);
        }

    }


}
消费端代码:
package com.javaxh.rabbitmqapi.ack;

import com.rabbitmq.client.Channel;
import com.rabbitmq.client.Connection;
import com.rabbitmq.client.ConnectionFactory;

public class Consumer {
    public static void main(String[] args) throws Exception {
        ConnectionFactory connectionFactory = new ConnectionFactory();
        connectionFactory.setHost("192.168.239.131");
        connectionFactory.setPort(5672);
        connectionFactory.setVirtualHost("/");

        Connection connection = connectionFactory.newConnection();
        Channel channel = connection.createChannel();


        String exchangeName = "test_ack_exchange";
        String queueName = "test_ack_queue";
        String routingKey = "ack.#";

        channel.exchangeDeclare(exchangeName, "topic", true, false, null);
        channel.queueDeclare(queueName, true, false, false, null);
        channel.queueBind(queueName, exchangeName, routingKey);

        // 手工签收 必须要关闭 autoAck = false
        channel.basicConsume(queueName, false, new MyConsumer(channel));
    }
}
生产端代码:
package com.javaxh.rabbitmqapi.ack;
import com.rabbitmq.client.AMQP;
import com.rabbitmq.client.Channel;
import com.rabbitmq.client.Connection;
import com.rabbitmq.client.ConnectionFactory;

import java.util.HashMap;
import java.util.Map;
public class Producer {
    public static void main(String[] args) throws Exception {
        ConnectionFactory connectionFactory = new ConnectionFactory();
        connectionFactory.setHost("192.168.239.131");
        connectionFactory.setPort(5672);
        connectionFactory.setVirtualHost("/");

        Connection connection = connectionFactory.newConnection();
        Channel channel = connection.createChannel();

        String exchange = "test_ack_exchange";
        String routingKey = "ack.save";

        for(int i =0; i<5; i ++){
            Map<String, Object> headers = new HashMap<String, Object>();
            headers.put("num", i);
            AMQP.BasicProperties properties = new AMQP.BasicProperties.Builder()
                    .deliveryMode(2)
                    .contentEncoding("UTF-8")
                    .headers(headers)
                    .build();
            String msg = "Hello RabbitMQ ACK Message " + i;
            channel.basicPublish(exchange, routingKey, true, properties, msg.getBytes());
        }
    }
}
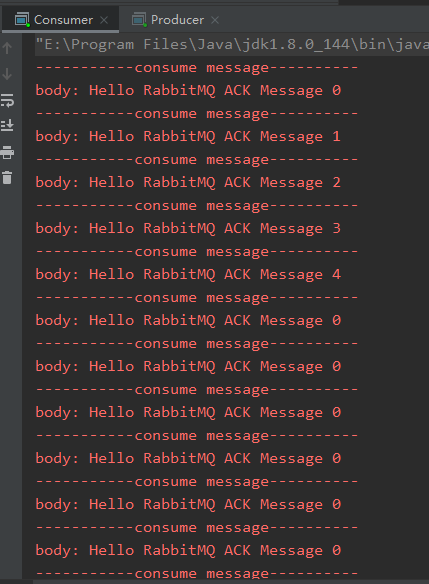
先运行消费端在运行生产端:
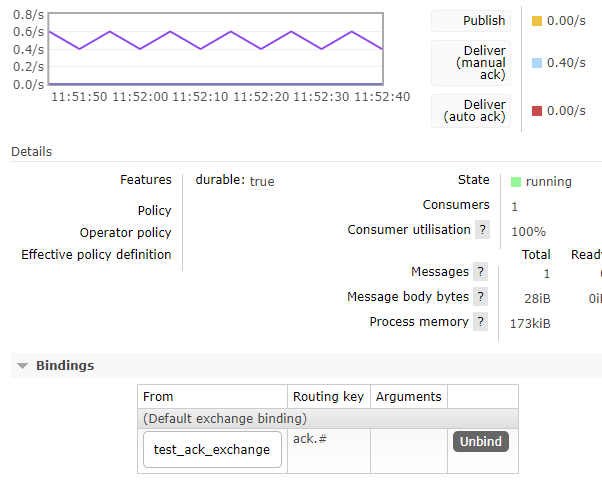
去rabbitmq中去查看
TTL消息
TTL是Time To Live的缩写,也就是生存时间
RabbitMQ支持消息的过期时间,在消息发送时可以进行指定
RabbitMQ支持队列的过期时间,从消息入队列开始计算,只要超过了队列的超时时间配置,那么消息自动的清除
纯控制台操作(演示TTL队列消息特点)
针对队列,只要是这个队列的消息,就只有这么长的存活时间
注意:主要针对消息设置,跟交换机、队列、消费者设置毫无关系
消费端代码
package com.javaxh.rabbitmqapi.ttl;
import com.rabbitmq.client.Channel;
import com.rabbitmq.client.Connection;
import com.rabbitmq.client.ConnectionFactory;
import com.rabbitmq.client.QueueingConsumer;

import java.util.Map;
public class Consumer {
    public static void main(String[] args) throws Exception {

        //1 创建一个ConnectionFactory, 并进行配置
        ConnectionFactory connectionFactory = new ConnectionFactory();
        connectionFactory.setHost("192.168.239.131");
        connectionFactory.setPort(5672);
        connectionFactory.setVirtualHost("/");

        //2 通过连接工厂创建连接
        Connection connection = connectionFactory.newConnection();

        //3 通过connection创建一个Channel
        Channel channel = connection.createChannel();

        //4 声明(创建)一个队列
        String queueName = "test001";
        channel.queueDeclare(queueName, true, false, false, null);

        //5 创建消费者
        QueueingConsumer queueingConsumer = new QueueingConsumer(channel);

        //6 设置Channel
        channel.basicConsume(queueName, true, queueingConsumer);

        while(true){
            //7 获取消息
            QueueingConsumer.Delivery delivery = queueingConsumer.nextDelivery();
            String msg = new String(delivery.getBody());
            System.err.println("消费端: " + msg);
            Map<String, Object> headers = delivery.getProperties().getHeaders();
            System.err.println("headers get my1 value: " + headers.get("my1"));

            //Envelope envelope = delivery.getEnvelope();
        }

    }
}
生产端代码:
package com.javaxh.rabbitmqapi.ttl;
import com.rabbitmq.client.AMQP;
import com.rabbitmq.client.Channel;
import com.rabbitmq.client.Connection;
import com.rabbitmq.client.ConnectionFactory;

import java.util.HashMap;
import java.util.Map;
public class Procuder {
    public static void main(String[] args) throws Exception {
        //1 创建一个ConnectionFactory, 并进行配置
        ConnectionFactory connectionFactory = new ConnectionFactory();
        connectionFactory.setHost("192.168.239.131");
        connectionFactory.setPort(5672);
        connectionFactory.setVirtualHost("/");

        //2 通过连接工厂创建连接
        Connection connection = connectionFactory.newConnection();

        //3 通过connection创建一个Channel
        Channel channel = connection.createChannel();

        Map<String, Object> headers = new HashMap<>();
        headers.put("my1", "111");
        headers.put("my2", "222");


        AMQP.BasicProperties properties = new AMQP.BasicProperties.Builder()
                .deliveryMode(2)
                .contentEncoding("UTF-8")
                .expiration("10000")
                .headers(headers)
                .build();

        //4 通过Channel发送数据
        for(int i=0; i < 5; i++){
            String msg = "Hello RabbitMQ!";
            //1 exchange   2 routingKey
            channel.basicPublish("", "test001", properties, msg.getBytes());
        }

        //5 记得要关闭相关的连接
        channel.close();
        connection.close();
    }
}
还是先运行消费端在运行生产端:
死信队列
死信队列:DLX,Dead-Letter-Exchange
利用DLX,当消息在一个队列中变成死信(dead message)之后,它能被重新publish到另一个Exchange,这个Exchange就是DLX
消息变成死信有以下几种情况
- 消息被拒绝(basic.reject/basic.nack)并且requeue=false
- 消息TTL过期
- 队列达到最大长度
死信队列的特点
DLX也是一个正常的Exchange,和一般的Exchange没有区别,它能在任何的队列上被指定,实际上就是设置某个队列的属性;
当这个队列中有死信时,RabbitMQ就会自动的将这个消息重新发布到设置的Exchange上去,进而被路由到另一个队列;
可以监听这个队列中消息做相应的处理,这个特性可以弥补RabbitMQ3.0以前支持的immediate参数的功能
死信队列设置
- 首先需要设置死信队列的Exchange和Queue,然后进行绑定:
Exchange:dlx.exchange
Queue:dlx.queue
RoutingKey:#
- 然后我们进行正常声明交换机、队列、绑定,只不过我们需要在队列加上一个参数即可:
Arguments.put(“x-dead-letter-exchange”,”dlx.exchange”);
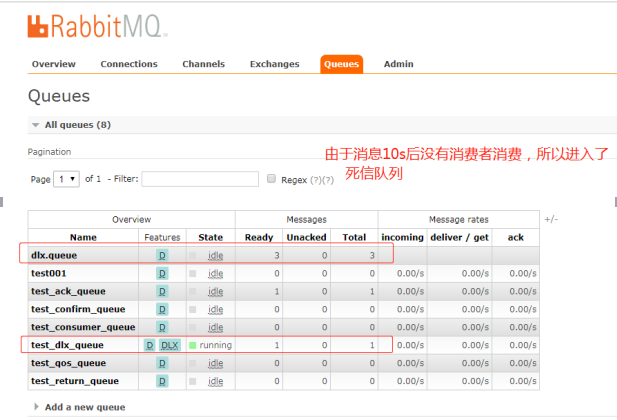
这样消息在过期、requeue、队列在达到最大长度时,消息就可以直接路由到死信队列
自定义消费端
package com.javaxh.rabbitmqapi.dlx;
import com.rabbitmq.client.AMQP;
import com.rabbitmq.client.Channel;
import com.rabbitmq.client.DefaultConsumer;
import com.rabbitmq.client.Envelope;
import java.io.IOException;
public class MyConsumer extends DefaultConsumer {
    public MyConsumer(Channel channel) {
        super(channel);
    }

    @Override
    public void handleDelivery(String consumerTag, Envelope envelope, AMQP.BasicProperties properties, byte[] body) throws IOException {
        System.err.println("-----------consume message----------");
        System.err.println("consumerTag: " + consumerTag);
        System.err.println("envelope: " + envelope);
        System.err.println("properties: " + properties);
        System.err.println("body: " + new String(body));
    }
}
消费端:
package com.javaxh.rabbitmqapi.dlx;
import com.rabbitmq.client.Channel;
import com.rabbitmq.client.Connection;
import com.rabbitmq.client.ConnectionFactory;
import java.util.HashMap;
import java.util.Map;
public class Consumer {
    public static void main(String[] args) throws Exception {
        ConnectionFactory connectionFactory = new ConnectionFactory();
        connectionFactory.setHost("192.168.239.131");
        connectionFactory.setPort(5672);
        connectionFactory.setVirtualHost("/");

        Connection connection = connectionFactory.newConnection();
        Channel channel = connection.createChannel();

        // 这就是一个普通的交换机 和 队列 以及路由
        String exchangeName = "test_dlx_exchange";
        String routingKey = "dlx.#";
        String queueName = "test_dlx_queue";

        channel.exchangeDeclare(exchangeName, "topic", true, false, null);

        Map<String, Object> agruments = new HashMap<String, Object>();
        agruments.put("x-dead-letter-exchange", "dlx.exchange");
        //这个agruments属性,要设置到声明队列上
        channel.queueDeclare(queueName, true, false, false, agruments);
        channel.queueBind(queueName, exchangeName, routingKey);

        //要进行死信队列的声明:
        channel.exchangeDeclare("dlx.exchange", "topic", true, false, null);
        channel.queueDeclare("dlx.queue", true, false, false, null);
        channel.queueBind("dlx.queue", "dlx.exchange", "#");

        channel.basicConsume(queueName, true, new MyConsumer(channel));


    }
}
生产端代码:
package com.javaxh.rabbitmqapi.dlx;
import com.rabbitmq.client.AMQP;
import com.rabbitmq.client.Channel;
import com.rabbitmq.client.Connection;
import com.rabbitmq.client.ConnectionFactory;
public class Producer {
    public static void main(String[] args) throws Exception {

        ConnectionFactory connectionFactory = new ConnectionFactory();
        connectionFactory.setHost("192.168.239.131");
        connectionFactory.setPort(5672);
        connectionFactory.setVirtualHost("/");

        Connection connection = connectionFactory.newConnection();
        Channel channel = connection.createChannel();

        String exchange = "test_dlx_exchange";
        String routingKey = "dlx.save";

        String msg = "Hello RabbitMQ DLX Message";

        for(int i =0; i<1; i ++){

            AMQP.BasicProperties properties = new AMQP.BasicProperties.Builder()
                    .deliveryMode(2)
                    .contentEncoding("UTF-8")
                    .expiration("10000")
                    .build();
            channel.basicPublish(exchange, routingKey, true, properties, msg.getBytes());
        }

    }
}
谢谢观看!!!