table of Contents
Use Django complete their ideological function call middleware
Call middleware only need to add in the configuration file, if you do not use a middleware, only the corresponding string in the configuration file can be commented out, such a code invoke the execution is not very easy to do ? Here we use thought to call Django middleware, will be implemented and their function is called by the same middleware.
Functional requirements
Assume functions implemented: the mass of information, requires written information we need only one key can be sent, SMS, sent by mail with micro letter three ways out, if we do not need some kind of notification will be required only in the configuration file We can comment it out.
importlib module Introduction
Dynamic import module importlib, may be separated in accordance with the filled dot string file path is eligible to take the way to the corresponding file. Instructions:
module_path = 'notify.msg'
md = importlib.import_module(module_path) #md就是notify文件夹下的msg文件
If the need to obtain a file which defines the function or class method can use reflection (where the file as an object, all objects are)
cls = getattr(md,cls_name)#将文件名作为对象右面填类的名字就能拿到对应的类Realize the function of
1. build a package as a group messaging in FIG, write in a separate file for each one way transmission of information.

2. Define the corresponding notification type as a notification for each file:
class Msg:
    def __init__(self):
        pass

    # 发送信息前的准备

    def send(self, content):
        print(f'Msg通知:{content}')
3. Add to each file configuration file as follows:
NOTIFY_LISTS = [
    'notify.email.Email',
    'notify.msg.Msg',
    'notify.qq.Qq',
    'notify.WeChat.WeChat'
]
4. Find and instantiate classes are processed in the init
import importlib
import settings
def send_all(content):
    for path in settings.NOTIFY_LISTS:
        module_path,cls_name = path.rsplit('.',maxsplit=1)
        module = importlib.import_module(module_path)
        cls = getattr(module,cls_name)
        obj = cls()
        obj.send(content)
The packet call start message achieve mass function
import os,sys
from notify import send_all


sys.path.append(os.path.dirname(__file__))

if __name__ == '__main__':
    send_all('现在测试通知')

Email通知:现在测试通知
Msg通知:现在测试通知
QQ通知:现在测试通知
WeChat通知:现在测试通知
Thus the basic functions to achieve.
csrf middleware Details
Cross-site request forgery
csrf Full Cross-site request forgery (CSRF), the user performs a hijack attack unintentional operations on the Web applications that are currently logged in. Compared with cross-site scripting (XSS), XSS exploit the trust a user has designated the site, CSRF exploit the trust a Web site user web browser.
CSRF most common applications, such as phishing sites, specific fishing way of phishing sites: phishing sites forge a and regular web interface exactly the same site, then transfer (payment) functions form forms be modified to provide when a user logs is a regular site login interface, user payments or other transfers account is false, hidden below a predefined account (input box name and value), so that each user will transfer the money to the other party go to predefined accounts. How to solve cross-site request forgery it?
To solve this problem from the perspective of the server every time the idea is that if the server can be identified submit a request to the page I was on my own or someone else's page, phishing sites can not be disguised as service during user access server end pages to send a transfer request to the server. The Django middleware is to solve the problem of cross-site request forgery by this idea.
Django csrf Middleware
When the user has access to the server Django csrf middleware Django csrf middleware will give users get the requested page carries a random string, when a user sends a post request will check a random string of users, if not check if by then directly reported 403 errors, prevent users from submitting post requests.
<input type="hidden" name="csrfmiddlewaretoken" value="rJ47FeK9T55wavvVJGY6UxdM1kTMHhTqotGfaXjXIK8Ahz2Uvs02yR9T8bBn5q2D">Demonstrated ability to form post request forms and usually ajax request, Djangocsrf middleware use in both post request is different, the specific use is as follows:
form form
We just need to add in the form form {% csrf_token%}.
<form action="" method="post">
    {% csrf_token %}
    <p>username:<input type="text" name="username"></p>
    <p>target_account:<input type="text" name="target_user"></p>
    <p>money:<input type="text" name="money"></p>
    <input type="submit">
</form>
<input type="hidden" name="csrfmiddlewaretoken" value="rJ47FeK9T55wavvVJGY6UxdM1kTMHhTqotGfaXjXIK8Ahz2Uvs02yR9T8bBn5q2D">
ajax
ajax There are three ways to add middleware label.
method one
First writing {% csrf_token%} in an arbitrary position on the page, and then look for the string to obtain adding random data i.e. by custom object tag when sending the request ajax:
data: { 'username': 'XXX', 'csrfmiddlewaretoken' :. $ ( 'input [name = "csrfmiddlewaretoken"]') val ()},
Second way
data:{'username':'xxx','csrfmiddlewaretoken':'{{ csrf_token }}'}
Three ways (the official recommended to use this method)
Js a new file will be copied into the following code, it can be introduced in ajax above.
function getCookie(name) {
    var cookieValue = null;
    if (document.cookie && document.cookie !== '') {
        var cookies = document.cookie.split(';');
        for (var i = 0; i < cookies.length; i++) {
            var cookie = jQuery.trim(cookies[i]);
            // Does this cookie string begin with the name we want?
            if (cookie.substring(0, name.length + 1) === (name + '=')) {
                cookieValue = decodeURIComponent(cookie.substring(name.length + 1));
                break;
            }
        }
    }
    return cookieValue;
}
var csrftoken = getCookie('csrftoken');

function csrfSafeMethod(method) {
  // these HTTP methods do not require CSRF protection
  return (/^(GET|HEAD|OPTIONS|TRACE)$/.test(method));
}

$.ajaxSetup({
  beforeSend: function (xhr, settings) {
    if (!csrfSafeMethod(settings.type) && !this.crossDomain) {
      xhr.setRequestHeader("X-CSRFToken", csrftoken);
    }
  }
});
Import:
<script src="/static/setup.js"></script>csrf related decorator
csrf related decorators can give a view function plus csrf check according to our needs, or not to add a view csrf check function.
csrf_exempt
Do not give a view check function plus csrf
from django.views.decorators.csrf import csrf_exempt
@csrf_exempt  # 不校验 csrf
def index(request):
    return HttpResponse('index')
csrf_protect
A view to checking the function add csrf, where the settings file will need to comment csrf middleware.
@csrf_protect  # 校验
def login(request):
    return HttpResponse('login')
Plus csrf decorator on the CBV
csrf_exempt
Only an addition decorator method is to first import method_decorator method, and then the decorative methods described above in dispatch dispatch methods defined in the class. @method_decorator (csrf_exempt)
# @method_decorator(csrf_exempt,name='post')  # csrf_exempt不支持该方法
@method_decorator(csrf_exempt,name='dispatch')  # csrf_exempt
class MyIndex(views.View):
    # @method_decorator(csrf_exempt)  # 可以
    def dispatch(self, request, *args, **kwargs):
        return super().dispatch(request,*args,**kwargs)
    def get(self,request):
        return render(request,'transfer.html')
    # @method_decorator(csrf_exempt,name='post')  # csrf_exempt不支持该方法
    def post(self,request):
        return HttpResponse('OK')
    # csrf_exempt这个装饰器只能给dispatch装才能生效
csrf_protect
Plus common method of csrf_protect decoration decorator can decorate Used CBV usage like ordinary decorator.
# @method_decorator(csrf_protect,name='post')  # 可以
class MyIndex(views.View):
    @method_decorator(csrf_protect)
    def dispatch(self, request, *args, **kwargs):
        return super().dispatch(request,*args,**kwargs)
    def get(self,request):
        return render(request,'transfer.html')
    # @method_decorator(csrf_protect)  # 可以
    def post(self,request):
        return HttpResponse('OK')
Django settings source code analysis and use of imitation
Django settings source code analysis
Django has two configuration files, a user can see the settings file and the other is an internal global profile, implementation of these two profiles is that if you have configured the settings file on a user profile, if the user no configuration settings file to use internal settings file. Django then this function is how to achieve it? Take a look at Django settings source.
View the profiles within
from django.conf import settings#配置文件实例化出的一个类
from django.conf import global_settings#配置文件
We enter the first settings: discovery settings using the Singleton pattern,

Enter LazySettings inside the class:
Manage.py view into the configuration when the project started:

Look LazySettings class
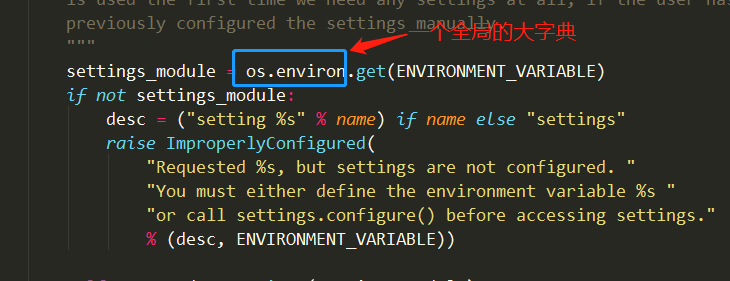
 def _setup(self, name=None):
        """
        Load the settings module pointed to by the environment variable. This
        is used the first time we need any settings at all, if the user has not
        previously configured the settings manually.
        """
        settings_module = os.environ.get(ENVIRONMENT_VARIABLE)
        # os.environ是一个全局的大字典,而settings_module获取了key为ENVIRONMENT_VARIABLE的值,从manage.py中可以看出settings_module获取到的就是用户配置文件路径:项目名.settings
        if not settings_module:
            desc = ("setting %s" % name) if name else "settings"
            raise ImproperlyConfigured(
                "Requested %s, but settings are not configured. "
                "You must either define the environment variable %s "
                "or call settings.configure() before accessing settings."
                % (desc, ENVIRONMENT_VARIABLE))

        self._wrapped = Settings(settings_module)
        #settings路径传入了Settings,我们进Settings里面看看。

class Settings(object):
    def __init__(self, settings_module):
        # update this dict from global settings (but only for ALL_CAPS settings)
        for setting in dir(global_settings):#获取全局配置文件中所有变量名
            if setting.isupper():#只获取是大写的变量名,这就是为啥配置文件中所有的变量名都是大写的
                setattr(self, setting, getattr(global_settings, setting))#setattr将获取到global_settings的变量值添加到settings对象自己的属性中

        # store the settings module in case someone later cares
        self.SETTINGS_MODULE = settings_module#项目名.settings

        mod = importlib.import_module(self.SETTINGS_MODULE)
        #导入暴露给用户的配置文件,相当于from 用户名 import settings

        tuple_settings = (
            "INSTALLED_APPS",
            "TEMPLATE_DIRS",
            "LOCALE_PATHS",
        )


     self._explicit_settings = set()
        for setting in dir(mod):#获取用户配置文件中所有的变量名
            if setting.isupper():
                setting_value = getattr(mod, setting)#利用反射取出所有的变量值

                if (setting in tuple_settings and
                        not isinstance(setting_value, (list, tuple))):
                    raise ImproperlyConfigured("The %s setting must be a list or a tuple. " % setting)
                setattr(self, setting, setting_value)#将用户settings的属性和属性值写入settings对象中
                #到这里我们可以看到,实例化出的settings对象先将全局配置文件中的变量名和变量值写入,然后再将用户配置文件的变量名和变量值写入,这样如果用户配置文件配置了对应的变量名和变量值就会替换掉全局的,从而实现了如果用户配置了settings就用用户的,如果用户没有配置,就用全局的配置文件的功能。
                self._explicit_settings.add(setting)

        if not self.SECRET_KEY:
            raise ImproperlyConfigured("The SECRET_KEY setting must not be empty.")
The use of imitation
In fact, the use of imitation imitation user profile settings if set to use the user, if not set to use the built-in this feature.
We only need to write the following code in the global configuration file in the package __init__:
import importlib
from lib.conf import global_settings
import os

class Settings(object):
    def __init__(self):
        for name in dir(global_settings):
            if name.isupper():
                setattr(self,name,getattr(global_settings,name))
        # 获取暴露给用户的配置文件字符串路径
        module_path = os.environ.get('xxx')
        md = importlib.import_module(module_path)  # md = settings
        for name in dir(md):
            if name.isupper():
                k = name
                v = getattr(md,name)
                setattr(self,k,v)


settings = Settings()
Auth module
auth Profile
Django Auth module is built-in user authentication module:
We are developing a site, the inevitable need to design websites to achieve the user's system. At this point we need to achieve, including user registration, user login, user authentication, log off, change passwords and other functions, this really is a troublesome thing yet.
Django as a framework for the ultimate perfectionist, of course, also think of these pain points users. It built a powerful user authentication system --auth, it defaults to auth_user table to store user data.
Common module auth method
| Features | Code |
|---|---|
| Create a user | Import the User django.contrib.auth.models from User.objects.create_user (username = username, password = password) # Create a regular user, the password is automatically encrypted User.objects.create_superuser (username = username, password = password, email = '123 @ qq.com ') # create a superuser |
| Validate the user name and password | from django.contrib import auth user_obj = auth.authenticate(request,username=username,password=password) |
| 保存用户登录状态 | auth.login(request,user_obj) 只要这句话执行了后面在任意位置 只要你能拿到request你就可以通过request.user获取到当前登录的用户对象 |
| 判断当前用户是否登录 | request.user.is_authenticated() |
| 校验原密码 | request.user.check_password(old_password)返回bool值 |
| 修改密码 | request.user.set_password(new_password) request.user.save() 千万不要忘了save |
| 注销 | auth.logout(request) |
| 校验用户登录装饰器 | from django.contrib.auth.decorators import login_required 局部配置 @login_required(login_url='/login/') def index(request): pass 全局配置 settings配置文件中直接配置 LOGIN_URL = '/login/' @login_required def index(request): pass 如果全局和局部都配置了以局部的为准 |
创建用户
create_user()
auth 提供的一个创建新用户的方法,需要提供必要参数(username、password)等,用户名和密码是必须提供的。

from django.contrib.auth.models import User
user = User.objects.create_user(username='用户名',password='密码',email='邮箱',...)
校验用户名和密码
提供了用户认证功能,即验证用户名以及密码是否正确,一般需要username 、password两个关键字参数。
如果认证成功(用户名和密码正确有效),便会返回一个 User 对象。
authenticate()会在该 User 对象上设置一个属性来标识后端已经认证了该用户,且该信息在后续的登录过程中是需要的。
user = authenticate(username='usernamer',password='password')保存用户登录状态
该函数接受一个HttpRequest对象,以及一个经过认证的User对象。
该函数实现一个用户登录的功能。它本质上会在后端为该用户生成相关session数据
from django.contrib.auth import authenticate, login

def my_view(request):
  username = request.POST['username']
  password = request.POST['password']
  user = authenticate(username=username, password=password)
  if user is not None:
    login(request, user)
    # Redirect to a success page.
    ...
  else:
    # Return an 'invalid login' error message.
    ...
判断当前用户是否登录
判断当前用户是否登录(发送的当前请求是否已经登录)
def my_view(request):
  if not request.user.is_authenticated():
    return redirect('%s?next=%s' % (settings.LOGIN_URL, request.path))
校验原密码
auth 提供的一个检查密码是否正确的方法,需要提供当前请求用户的密码。
密码正确返回True,否则返回False。
ok = user.check_password('密码')修改密码
auth 提供的一个修改密码的方法,接收 要设置的新密码 作为参数。
注意:设置完一定要调用用户对象的save方法!!!
user.set_password(password='')
user.save()
注销
该函数接受一个HttpRequest对象,无返回值。
当调用该函数时,当前请求的session信息会全部清除。该用户即使没有登录,使用该函数也不会报错。
from django.contrib.auth import logout

def logout_view(request):
  logout(request)
  # Redirect to a success page.
校验用户登录状态装饰器
局部登录认证装饰器
@login_required(login_url='/login/')判断用户是否登录如果没有则直接跳转到登录页面
from django.contrib.auth.decorators import login_required

@login_required
def my_view(request):
  ...
如果需要自定义登录的URL,则需要在settings.py文件中通过LOGIN_URL进行修改。
示例:
LOGIN_URL = '/login/' # 这里配置成你项目登录页面的路由全局登录认证装饰器
在settings文件直接配置
LOGIN_URL = '/login/'#如果全局和局部都配置了以局部的为准User对象属性(用户登录权限和管理权限)
User对象属性:username, password
is_staff : 用户是否拥有网站的管理权限.
is_active : 是否允许用户登录, 设置为 False,可以在不删除用户的前提下禁止用户登录。
扩展auth_user表字段
方式一
思路:再建一张表,使这张表和auth_user表是一对一的关系,这样可以实现对auth_user表字段的增加。
class UserDetail(models.Model):
    phone = models.BigIntegerField()
    user = models.OneToOneField(to='User')
方式二
思路:自定义一个类和原来的auth_user继承同一个基类,然后自定义类中的字段,这里需要说明的是在自定义类之前不能执行数据库迁移命令,定义好才能执行数据库迁移命令。另外,定义好类之后需要在配置文件中添加下面的配置。
#自定义类
from django.contrib.auth.models import AbstractUser
class Userinfo(AbstractUser):
    phone = models.BigIntegerField()
    register_time = models.DateField(auto_now_add=True)

#配置文件中添加
AUTH_USER_MODEL = 'app01.Userinfo'  # 应用名.表名
上面的步骤完成之后,auth模块的功能都可以在你定义的表中使用。