The step Zabbix3.4 Centos7 upgrade to the Zabbix4.0
View zabbix now centos version and version:
|
1
2
|
cat
/
etc
/
rehat
-
release
# 查看系统使用版本
rpm
-
qa | grep
"zabbix"
#查看zabbix安装的版本
|


1. Stop Service
|
1
2
|
service zabbix
-
server stop
service httpd stop
|

2. Back up the database, it is important
Full database backup and file Jiaotong long time, it is recommended to use compression or xtrabackup, where the use of mysqldump, the end of the paper describes the specific usage.
|
1
2
|
mysqldump
-
uzabbix
-
pykadmin123
-
-
opt
-
-
skip
-
lock
-
tables
-
-
database zabbix > zabbix.sql
mysqldump
-
uzabbix
-
pykadmin123
-
-
opt
-
-
skip
-
lock
-
tables
-
-
database zabbix | gzip > zabbix_`date
+
'%Y%m%d%H%M%S'
`.sql.gz
|

3. 备份 zabbix 文件
|
1
2
3
4
5
|
mkdir
/
opt
/
zabbix
-
backup
/
#创建一个空文件
cp
/
etc
/
zabbix
/
zabbix_server.conf
/
opt
/
zabbix
-
backup
/
cp
/
etc
/
httpd
/
conf.d
/
zabbix.conf
/
opt
/
zabbix
-
backup
/
cp
-
R
/
usr
/
share
/
zabbix
/
/
opt
/
zabbix
-
backup
/
cp
-
R
/
usr
/
share
/
doc
/
zabbix
-
*
/
opt
/
zabbix
-
backup
/
|

4. 升级zabbix源
|
1
|
rpm
-
Uvh http:
/
/
repo.zabbix.com
/
zabbix
/
4.0
/
rhel
/
7
/
x86_64
/
zabbix
-
release
-
4.0
-
1.el7
.noarch.rpm
|

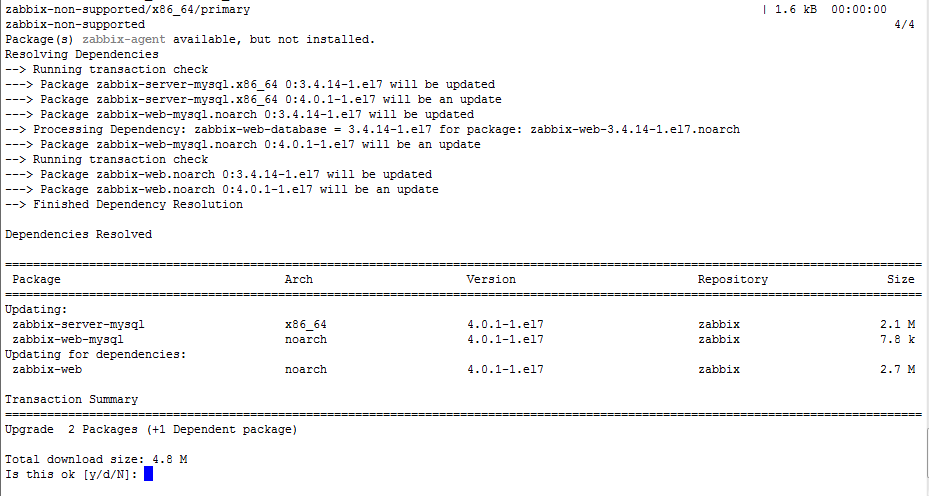
5. 升级zabbix
|
1
2
|
yum clean
all
yum upgrade zabbix
-
server
-
mysql zabbix
-
web
-
mysql zabbix
-
agent
|


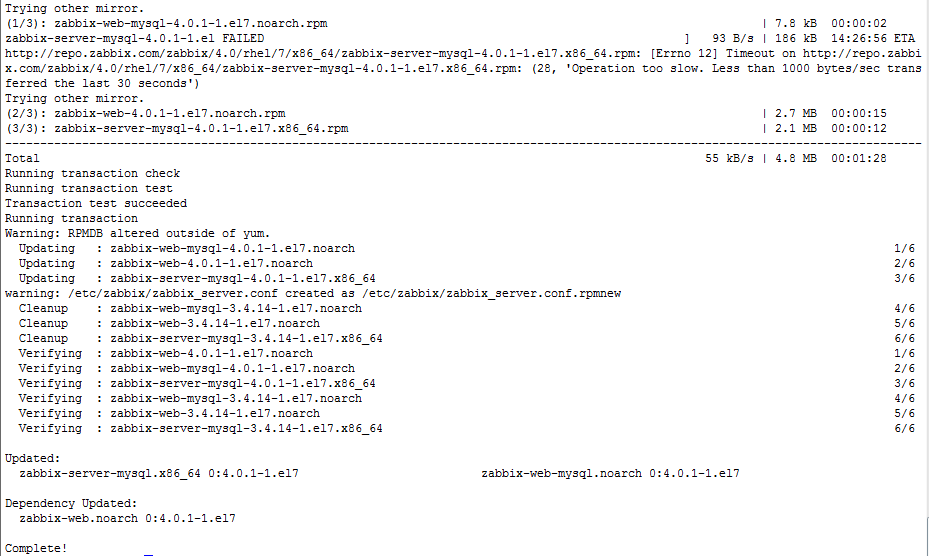
Start zabbix services:
|
1
2
3
|
service zabbix
-
server start
service zabbix
-
agent start
service httpd start
|

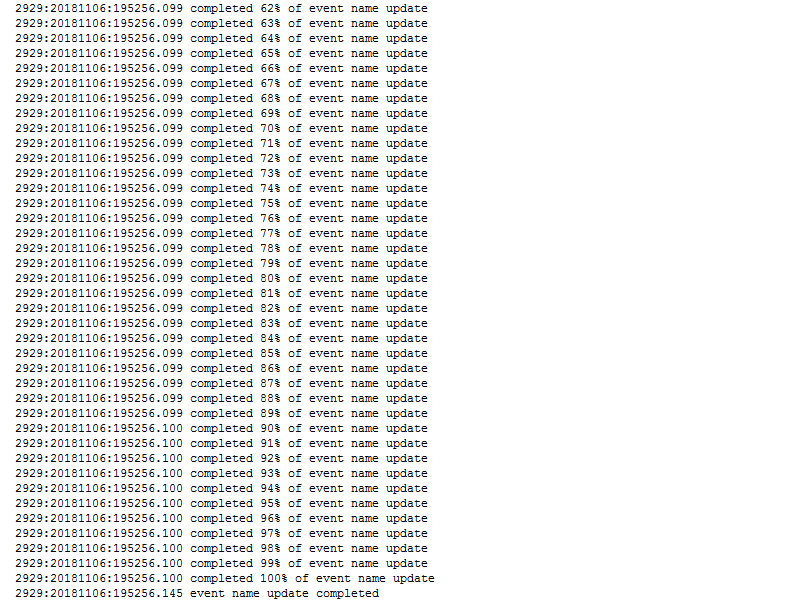
Check the upgrade log:
|
1
|
tail
-
f
/
var
/
log
/
zabbix
/
zabbix_server.log
#实时查看一下升级的记录, 由于实验使用虚拟机,所以输出不一样,但无出现报错即可。
|
6. Verify after upgrade


mysqldump commonly used in the MySQL database logical backup
1. The simplest usage:
mysqldump -uroot -pPassword [database name]
> [dump file]
Above the specified database backup command to a file dump (dump), such as:
mysqldump -uroot -p123 test > test.dump
Test.dump resulting file contains the statement build table (database structure generating Oh) and insert data insert statements.
2. --opt
If --opt parameters plus the resulting dump file is slightly different:
- Construction of the table statement contains a drop table if exists tableName
- insert includes a lock table statement before the lock tables tableName write, then insert contained unlock tables
3. Cross-host backup
Use the following command to copy sourceDb on host1 to host2 of targetDb, provided that the database has been created targetDb host host2:
mysqldump --host=host1 --opt sourceDb| mysql --host=host2 -C targetDb
- -C data indicating the data transfer between the host using compression
4. Only the backup table structure
mysqldump --no-data --databases mydatabase1 mydatabase2 mydatabase3 > test.dump
Backs up only the table structure. --databases instruct the database on the host computer to back up. If you want to back up all of a MySQL database on the host can use the --all-databases option, as follows:
mysqldump --all-databases
> test.dump
5. Restore the database from a backup file
mysql [database name] < [backup file name]
.......
Author: CARLOS_CHIANG
Source: http://www.cnblogs.com/yaoyaojcy/
This article belongs to the author and blog Park total, welcome to reprint, but without the author's consent declared by this section must be preserved, and the original link is given in the apparent position of the article page
The step Zabbix3.4 Centos7 upgrade to the Zabbix4.0
View zabbix now centos version and version:
|
1
2
|
cat
/
etc
/
rehat
-
release
# 查看系统使用版本
rpm
-
qa | grep
"zabbix"
#查看zabbix安装的版本
|
1. Stop Service
|
1
2
|
service zabbix
-
server stop
service httpd stop
|
2. Back up the database, it is important
Full database backup and file Jiaotong long time, it is recommended to use compression or xtrabackup, where the use of mysqldump, the end of the paper describes the specific usage.
|
1
2
|
mysqldump
-
uzabbix
-
pykadmin123
-
-
opt
-
-
skip
-
lock
-
tables
-
-
database zabbix > zabbix.sql
mysqldump
-
uzabbix
-
pykadmin123
-
-
opt
-
-
skip
-
lock
-
tables
-
-
database zabbix | gzip > zabbix_`date
+
'%Y%m%d%H%M%S'
`.sql.gz
|
3. 备份 zabbix 文件
|
1
2
3
4
5
|
mkdir
/
opt
/
zabbix
-
backup
/
#创建一个空文件
cp
/
etc
/
zabbix
/
zabbix_server.conf
/
opt
/
zabbix
-
backup
/
cp
/
etc
/
httpd
/
conf.d
/
zabbix.conf
/
opt
/
zabbix
-
backup
/
cp
-
R
/
usr
/
share
/
zabbix
/
/
opt
/
zabbix
-
backup
/
cp
-
R
/
usr
/
share
/
doc
/
zabbix
-
*
/
opt
/
zabbix
-
backup
/
|
4. 升级zabbix源
|
1
|
rpm
-
Uvh http:
/
/
repo.zabbix.com
/
zabbix
/
4.0
/
rhel
/
7
/
x86_64
/
zabbix
-
release
-
4.0
-
1.el7
.noarch.rpm
|
5. 升级zabbix
|
1
2
|
yum clean
all
yum upgrade zabbix
-
server
-
mysql zabbix
-
web
-
mysql zabbix
-
agent
|
Start zabbix services:
|
1
2
3
|
service zabbix
-
server start
service zabbix
-
agent start
service httpd start
|
Check the upgrade log:
|
1
|
tail
-
f
/
var
/
log
/
zabbix
/
zabbix_server.log
#实时查看一下升级的记录, 由于实验使用虚拟机,所以输出不一样,但无出现报错即可。
|
6. Verify after upgrade
mysqldump commonly used in the MySQL database logical backup
1. The simplest usage:
mysqldump -uroot -pPassword [database name]
> [dump file]
Above the specified database backup command to a file dump (dump), such as:
mysqldump -uroot -p123 test > test.dump
生成的test.dump文件中包含建表语句(生成数据库结构哦)和插入数据的insert语句。
2. --opt
如果加上--opt参数则生成的dump文件中稍有不同:
- 建表语句包含drop table if exists tableName
- insert之前包含一个锁表语句lock tables tableName write,insert之后包含unlock tables
3. 跨主机备份
使用下面的命令可以将host1上的sourceDb复制到host2的targetDb,前提是host2主机上已经创建targetDb数据库:
mysqldump --host=host1 --opt sourceDb| mysql --host=host2 -C targetDb
- -C指示主机间的数据传输使用数据压缩
4. 只备份表结构
mysqldump --no-data --databases mydatabase1 mydatabase2 mydatabase3 > test.dump
将只备份表结构。--databases指示主机上要备份的数据库。如果要备份某个MySQL主机上的所有数据库可以使用--all-databases选项,如下:
mysqldump --all-databases
> test.dump
5. 从备份文件恢复数据库
mysql [database name] < [backup file name]
.......