H5 canvas is a new element, can be used to describe all kinds of things you want to describe.
canvas does not have the ability to draw, you can think of it as a container, we need to use the script, that is, to give him js filled with water.
compatibility
1. IE9 or later, Firefox, Opera, Chrome and Safari support <canvas> and its properties and methods.
2. IE8 and earlier versions do not support the <canvas> element.
Basic Usage
To use canvas, roughly three steps:
The first step: add the page canvas element
Step Two: This element is added to the identifier, and set the width and height
The third step: obtaining the element using getContent () method to get the drawing attributes and methods, start drawing
Here we simply draw a rectangle:
<body>
    <canvas the above mentioned id = " canvas-wrap " width = " 500 " height = " 500 " > Your browser does not support canvas </ canvas>
</ body>
<Script> // get the canvas element
    let canvasWrap = document .getElementById ( " Canvas-wrap " );
     // get property methods and
    the let = canvasWrap.getContext context ( " 2D " );
     // begin drawing
    context.fillStyle = " # FF0000 " ;
    context.fillRect(0,0,
    150,75);
</script>
Results page:
path:
Canvas using a variety of methods of drawing a path on the canvas can support a variety of lines can be sketched
Case I: draw a right angle:
<body>
    <canvas id="canvas-wrap" width="500" height="500">你的浏览器不支持canvas</canvas>
</body>
<script>
    // 获取canvas元素
    let canvasWrap = document.getElementById("canvas-wrap");
    // 获取属性和方法
    let context = canvasWrap.getContext("2d");
    // 移动
    context.moveTo(10,10);
    // 线条
    context.lineTo(100,10);
    context.lineTo(100,100);
    // 开始画
    context.stroke();
</script>

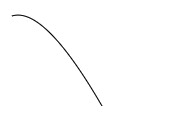
案例二:画一条曲线
<body>
    <canvas id="canvas-wrap" width="500" height="500">你的浏览器不支持canvas</canvas>
</body>
<script>
    // 获取canvas元素
    let canvasWrap = document.getElementById("canvas-wrap");
    // 获取属性和方法
    let context = canvasWrap.getContext("2d");
    // 移动
    context.moveTo(10,10);
    // 创建二次贝塞尔曲线
    context.quadraticCurveTo(20, 100 , 200 , 20 );
     // start painting
    context.stroke ();
 </ Script>
ease:cubic-bezier(.25, .1, .25, 1)
liner:cubic-bezier(0, 0, 1, 1)
ease-in:cubic-bezier(.42, 0, 1, 1)
ease-out:cubic-bezier(0, 0, .58, 1)
ease-in-out:cubic-bezier(.42, 0, .58, 1)
In Out Back:cubic-bezier(0.68, -0.55, 0.27, 1.55)
Case 3: draw a square and fill it with green
<body>
    <canvas id="canvas-wrap" width="500" height="500">你的浏览器不支持canvas</canvas>
</body>
<script>
    // 获取canvas元素
    let canvasWrap = document.getElementById("canvas-wrap");
    // 获取属性和方法
    let context = canvasWrap.getContext("2d");
    // 移动
    context.moveTo(10,10);
    // 线条
    context.lineTo(100,10);
    context.lineTo(100,100);
    context.lineTo(10,100);
    context.lineTo(10,10);
    // 颜色设置
    context.fillStyle = "green";
    // 填充
    context.fill();
</script>
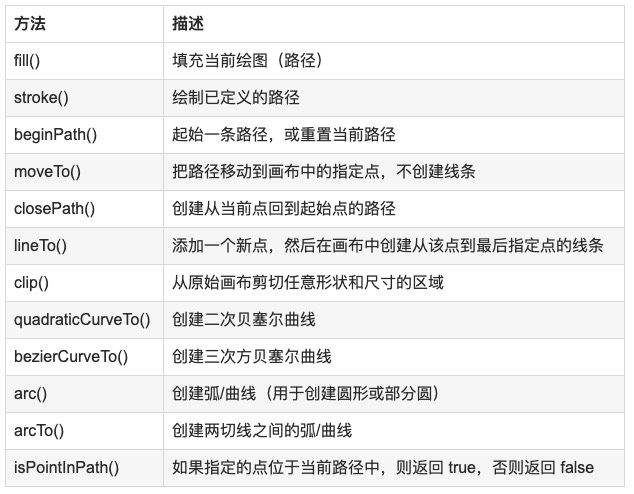
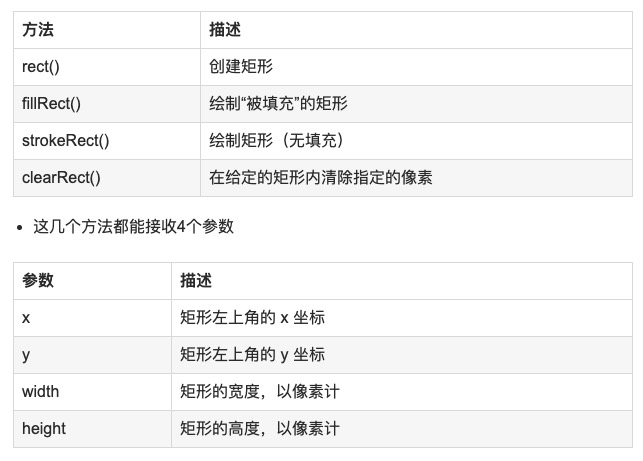
绘制矩形:
矩形是canvas给出的唯一能直接能用方法描绘的图形,他提供了四个方法。
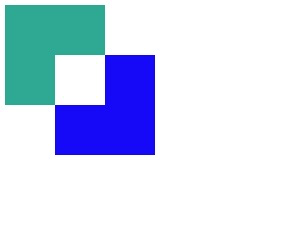
案例:画两个矩形交叉,并清除叠加的部分:
<body>
    <canvas id="canvas-wrap" width="500" height="500">你的浏览器不支持canvas</canvas>
</body>
<script>
    // 获取canvas元素
    let canvasWrap = document.getElementById("canvas-wrap");
    // 获取属性和方法
    let context = canvasWrap.getContext("2d");
    //绘制一个矩形
    context.fillStyle = "#1fb19e";
    context.fillRect(0, 0, 100, 100);

    //绘制另一个矩形
    context.fillStyle = "blue";
    context.fillRect(50, 50, 100, 100);

    //将这两个矩形重叠的地方清除
    context.clearRect(50, 50, 50, 50);
</script>
文字:
1. canvas绘图上下文提供了2个绘制文本方法和一个相关方法
2. fillText()和strokeText()都可以接收4个参数:要绘制的文本字符串、x坐标、y坐标和可选的最大像素宽度。而measureText()接受一个参数,表示要测量的文本。

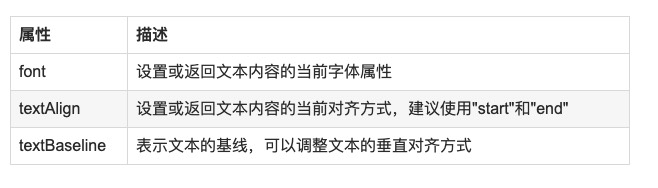
这三个方法共有的属性:
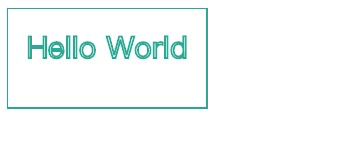
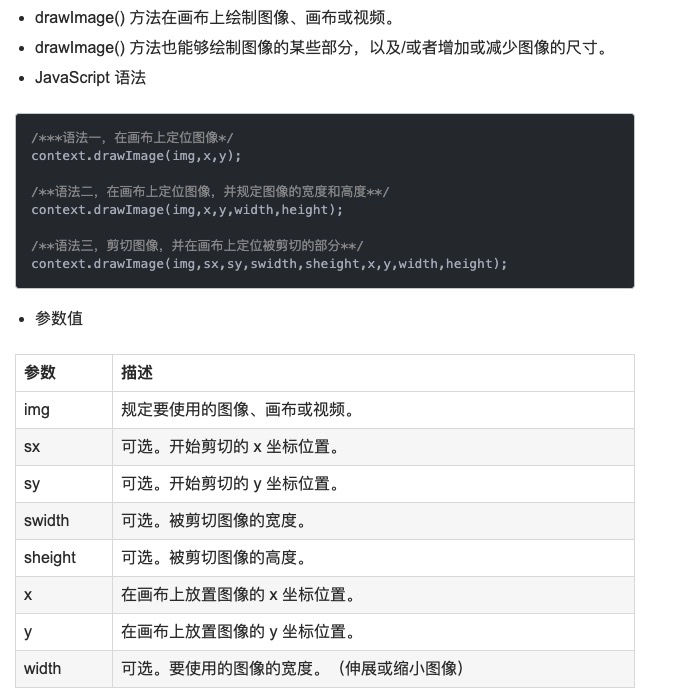
案例: 画一个200*100的矩形,文字水平居中
<body>
    <canvas id="canvas-wrap" width="500" height="500">你的浏览器不支持canvas</canvas>
</body>
<script>
    // 获取canvas元素
    let canvasWrap = document.getElementById("canvas-wrap");
    // 获取属性和方法
    let context = canvasWrap.getContext("2d");
    //绘制一个矩形
    context.lineWidth=2
    context.strokeStyle="#1fb19e";
    context.rect(0,0,200,100);
    context.stroke()
    // 绘制文字
    let str = "Hello World";
    context.font="30px Microsoft YaHei";
    context.textAlign="center";
    context.strokeText(str,100,50);
</script>
图片:
案例: 裁剪头像
<body style="display: flex">
    <img src="https://pic1.zhimg.com/80/v2-66f0648db805932fd3e8a94fcdd58f36_hd.jpg" id="img" />
    <canvas id="canvas-wrap" width="500" height="500" style="margin-left: 20px">你的浏览器不支持canvas</canvas>
</body>
<script>
     let img = document.getElementById("img");
     img.onload = function () {
         // 获取canvas元素
        let canvasWrap = document.getElementById("canvas-wrap");
        let context = canvasWrap.getContext("2d");
        context.drawImage(img,100,0,200,200,0,0,300,300);
     }
</script>
效果:

canvas转换成图片:
<body>
    <canvas id="canvas-wrap" width="1000" height="200">你的浏览器不支持canvas</canvas>
</body>
<script>
    // 获取canvas元素
    let canvasWrap = document.getElementById("canvas-wrap");
    // 获取属性和方法
    let context = canvasWrap.getContext("2d");
    //绘制一个矩形
    context.lineWidth=2
    context.strokeStyle="#1fb19e";
    context.rect(0,0,200,100);
    context.stroke()
    // 绘制文字
    let str = "Hello World";
    context.font="30px Microsoft YaHei";
    context.textAlign="center";
    context.strokeText(str,100,50);
    //取得图像的数据URI
    var url = canvasWrap.toDataURL("image/png");

    //显示图像
    var image = document.createElement("img");
    image.src = url;
    document.body.appendChild(image);
</script>
实战:
实战一: 钟表的画法
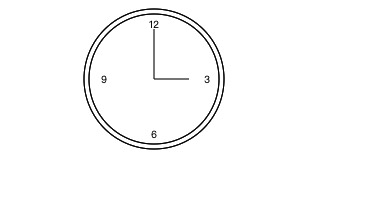
<body>
    <canvas id="canvas-wrap" width="1000" height="200">你的浏览器不支持canvas</canvas>
</body>
<script>
    // 获取canvas元素
    let canvasWrap = document.getElementById("canvas-wrap");
    // 获取属性和方法
    let ctx = canvasWrap.getContext("2d");

    ctx.beginPath();
    ctx.arc(150,75,70,0,2*Math.PI);

    ctx.moveTo(215,75);
    ctx.arc(150,75,65,0,2*Math.PI);
    ctx.stroke();

    //变换原点
    ctx.translate(150,75);

    ctx.textBaseline = "middle";
    ctx.fillText('3',50,0);
    ctx.textAlign="center";
    ctx.fillText('6',0,55);
    ctx.fillText('9',-50,0);
    ctx.fillText('12',0,-55);

    ctx.moveTo(0,0);
    ctx.lineTo(35,0);
    ctx.moveTo(0,0);
    ctx.lineTo(0,-50);

    ctx.stroke();
</script>
实战二:画一个简单的海报
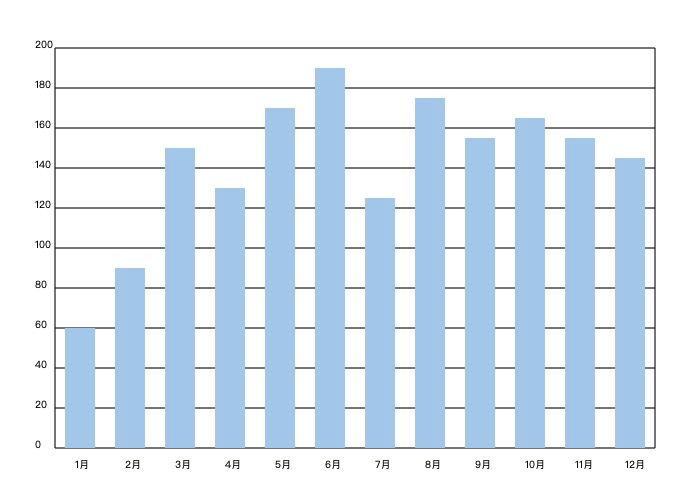
实战三:画一个柱状图
<body>
<canvas id="canvas" width="1200" height="600"></canvas>
</body>
<script>
    var ocanvas = document.getElementById("canvas");
    var mycanvas = ocanvas.getContext("2d");
    var arr = [60,90,150,130,170,190,125,175,155,165,155,145];

    //第一先画xy轴
    function line(aX,aY,bX,bY) {//开始和结束的横坐标  开始和结束的纵坐标
        mycanvas.beginPath();
        mycanvas.moveTo(aX,aY);
        mycanvas.lineTo(bX,bY);
        mycanvas.stroke();
    }
    line(300,80,300,480);
    line(900,80,900,480);

    //第二用for循环 画11条线   利用上面line的画线方法
    for(var i=0;i<11;i++){
       //300,80,900,80
        //300,120,900,120
       line(300,80+i*40,900,80+i*40);
        write(200-i*20,280,80+i*40)

    }
    //第三定义一个矩形的函数方法
    function rect(X,Y,width,height) {
        mycanvas.beginPath();
        mycanvas.fillStyle="#abcdef";
        mycanvas.rect(X,Y,width,height);
        mycanvas.fill();
        mycanvas.closePath()
    }

    //第四定义一个方法  绘制横纵坐标
    function wenrect() {
        for(var i=0;i<12;i++){
            var width=30;
            var height=arr[i]*2;
            var X=310+i*40+i*10;
            var Y=480-height;
            rect(X,Y,width,height);
            write((i+1)+"月",320+i*40+i*10,500)
        }
    }
    wenrect();

    //添加字
    function write(start,ox,oy) {
        mycanvas.beginPath();
        mycanvas.fillStyle = "black";
        mycanvas.fillText(start,ox,oy);
        mycanvas.closePath();
    }
</script>
效果: