Previously described how to use the brush tool Graphics draw various patterns, however Graphics is not perfect, it regret is not limited to, but include:
1, the background color can not be set;
2, although the shift function is provided, and failed to provide rotation zoom function;
3, can only paint on the control, you can not save the whole picture as a picture;
in view of this, AWT Graphics offers an upgraded version called Graphics2D, this two-dimensional brush brush not only inherits all the methods, and expand several practical approach, setBackground method includes setting the background color, rotation, rotate method canvas, the zoom scale canvas and other methods. Is particularly critical, Graphics2D allowed to paint on the image cache BufferedImage, the results mean that the two-dimensional drawing pen can be saved as image files. This is a major feature improvements, because once saved as a picture, the future can always come up with, do not always re-painting a.
How then to obtain a two-dimensional brush it? It had to start from the cache image BufferedImage. Gets a cached image before time, by ImageIO tool to read BufferedImage image file, the image cache built entirely in accordance with the existing picture. In fact, call the BufferedImage constructor directly, but also create an empty cache image object, then call the object's method createGraphics, you can create and acquire new two-dimensional image of the brush, then brush will be able to use a two-dimensional painting on cached images a. The method of code defines a cache such as to rotate the image, the two-dimensional brush Graphics2D to achieve the following:
	// rotate the image. Input parameters were as follows: the original image, the rotation angle of
	public static RotateImage the BufferedImage (the BufferedImage Origin, int rotateDegree) {
		int width = origin.getWidth (); // Get the width of the original image
		int height = origin.getHeight (); // Get height of the original image
		int imageType = origin.getType (); // Get the type of the color original image
		// create the same size as the original image with a new image
		the BufferedImage newimage the BufferedImage new new = (width, height, the imageType);
		// Create and acquires Paintbrush new image
		the Graphics2D newImage.createGraphics Graphics2D = ();
		// at the midpoint of the original image as the center, a plurality of the canvas counterclockwise rotation angle
		graphics2d.rotate (Math.toRadians (rotateDegree), width / 2, height / 2 );
		// the new image using the brush rendering the original image, the original image is drawn on the new image
		graphics2d.drawImage (Origin, 0, 0, null);
		return newimage; // return the new image processing
	}
Note that the above code calls the constructor BufferedImage incoming three parameters, namely, width, height, type, and color of the new image. One of the common color There are two types: one for BufferedImage.TYPE_4BYTE_ABGR, which represents four bytes of color model, there are three bytes represent the blue, green and red, as well as a byte transparency, so a total of total of four 32-bit bytes, which is equivalent to type 32-bit true color on the Windows platform; another color type BufferedImage.TYPE_3BYTE_BGR, it is only three bytes represent the blue, green and red, in comparison with TYPE_4BYTE_ABGR at least one byte of transparency, so that add up to 24, since the transparency information is less, so that close to an opaque type JPG image formats.
Next, the code back to the main interface, to add an image presentation with a view on the window, and build an original image from a local image buffer, the control sample initialization code at this time is as follows:
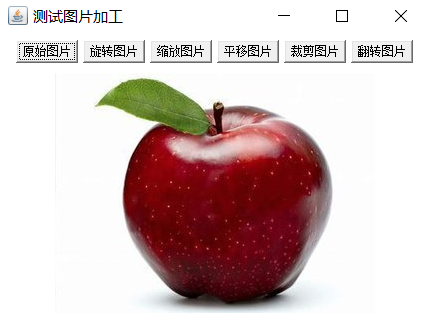
		ImageView imageView = new ImageView (); // create an image view
		// the image data read from the input stream cached images
		the BufferedImage Origin = ImageIO.read (TestChange.class.getResourceAsStream ( "apple.png"));
		// width and height of the image view provided
		imageView.setSize (origin.getWidth (), origin.getHeight ());
		imageView.setImage (Origin); // set the image view image buffer
		Panel panelCenter = new Panel (); // create a central panel
		panelCenter.add (imageView); // add an image view on the central panel
		frame.add (panelCenter, BorderLayout.CENTER); // add to the center panel to the intermediate position of the window
Then placed in a rotary button on the window, a command to the image rotated by 90 degrees clockwise when clicked, then add the following code to rotation processing button click event:
				// set the size of the image view original image width and height
				imageView.setSize (origin.getWidth (), origin.getHeight ());
				// get a new image is rotated clockwise by 90 degrees
				BufferedImage newImage = ImageUtil.rotateImage ( Origin, 90);
				imageView.setImage (newimage); // buffered images in the image view provided
Main interface of the above test code, the pop-up window interface, the effect of the rotation before and after the click button see the following two shown in FIG.

From the comparison of two renderings can be seen, graphical interface to show the success of the rotation coming.
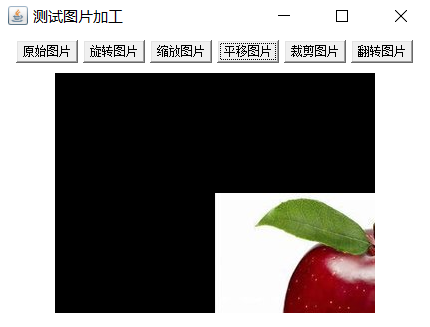
The rotation is accomplished after the image, the scaled image, the image may be translated respectively achieved by the method and translate scale method, a method corresponding code is as follows:
	// scale the image. Input parameters were as follows: the original image, the zoom ratio of
	public static ResizeImage the BufferedImage (the BufferedImage Origin, Double ratio) {
		int width = origin.getWidth (); // Get the width of the original image
		int height = origin.getHeight (); // acquiring original image height
		int imageType = origin.getType (); // Get the type of the color original image
		// create shrink the size of the new image with high relaxation
		BufferedImage newImage = new BufferedImage ((int ) (width * ratio), ( int) (* height ratio), the imageType);
		// Create a new image is acquired and brush
		the Graphics2D newImage.createGraphics Graphics2D = ();
		graphics2d.scale (ratio, ratio); // width and height of the canvas are scaled to the specified ratio
		// use the pen to draw a new image of the original image, the original image is drawn on the new image
		graphics2d.drawImage (Origin, 0, 0, null);
		return newimage; // return the new image processing
	}

	// panning images . Input parameters were: translation in the original image, the horizontal distance, in the vertical direction from the translation
	the BufferedImage translateImage static public (the BufferedImage Origin, the translateX int, int translateY,) {
		int width = origin.getWidth (); // Get the width of the original image
		int height = origin.getHeight (); // get the height of the original image
		int imageType = origin.getType (); // Get the type of the color original image
		// create the same size as the original image with a new image
		the BufferedImage newimage the BufferedImage new new = (width, height, the imageType);
		// Create a brush and acquiring a new image
		Graphics2D graphics2d = newImage.createGraphics ();
		// move the pen to the specified coordinate point
		graphics2d.translate (the translateX, translateY,);
		// use the pen to draw a new image of the original image, the original image is drawn on a new image
		graphics2d.drawImage ( Origin, 0, 0, null);
		return newimage; // return the new image processing
	}
Zoom and pan images presentation interface effects are shown below in two in FIG.

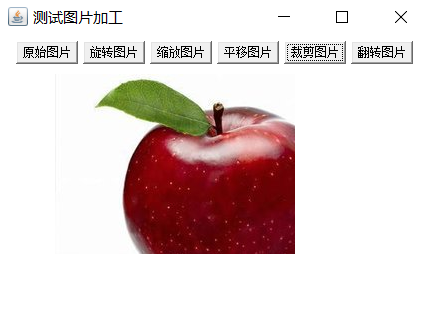
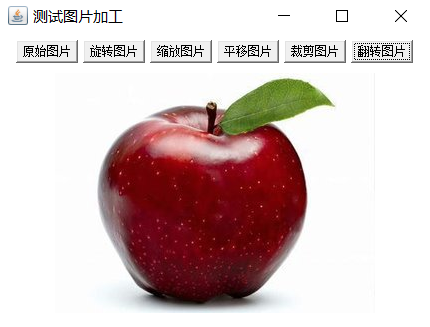
In addition to rotation, scaling, translation three common image transformation operation, and inverting the two treatments with the cutting operation, which uses see clipRect method, the method of flipping uses drawImage with ten parameters. The following is a method definition image and a flipped cropped image:
	// 裁剪图像。输入参数依次为:原图像、裁剪的比率
	public static BufferedImage clipImage(BufferedImage origin, double ratio) {
		int width = origin.getWidth(); // 获取原图像的宽度
		int height = origin.getHeight(); // 获取原图像的高度
		int imageType = origin.getType(); // 获取原图像的颜色类型
		// 创建尺寸大小为裁剪比例的新图像
		BufferedImage newImage = new BufferedImage((int)(width*ratio), (int)(height*ratio), imageType);
		// 创建并获取新图像的画笔
		Graphics2D graphics2d = newImage.createGraphics();
		// 把画笔的绘图范围裁剪到从左上角到右下角的指定区域,
		// 其中左上角的坐标为(0,0),右下角的坐标为(width*ratio,height*ratio)
		graphics2d.clipRect(0, 0, (int)(width*ratio), (int)(height*ratio));
		// 使用新图像的画笔绘制原图像,也就是把原图像画到新图像上
		graphics2d.drawImage(origin, 0, 0, null);
		return newImage; // 返回加工后的新图像
	}

	// 水平翻转图像。输入参数依次为:原图像
	public static BufferedImage flipImage(BufferedImage origin) {
		int width = origin.getWidth(); // 获取原图像的宽度
		int height = origin.getHeight(); // 获取原图像的高度
		int imageType = origin.getType(); // 获取原图像的颜色类型
		// 创建与原图像同样尺寸的新图像
		BufferedImage newImage = new BufferedImage(width, height, imageType);
		// 创建并获取新图像的画笔
		Graphics2D graphics2d = newImage.createGraphics();
		// 使用新图像的画笔在目标位置绘制指定尺寸的原图像
		// 其中目标区域的左上角坐标为(0,0),右下角坐标为(width,height)
		// 对于水平翻转的情况,原图像的起始坐标为(width,0),终止坐标为(0,height)
		graphics2d.drawImage(origin, 0, 0, width, height, width, 0, 0, height, null);
		// 对于垂直翻转的情况,原图像的起始坐标为(0,height),终止坐标为(width,0)
		//graphics2d.drawImage(origin, 0, 0, width, height, 0, height, width, 0, null);
		return newImage; // 返回加工后的新图像
	}
裁剪图像和翻转图像的演示界面效果分别如下列两图所示。
更多Java技术文章参见《Java开发笔记(序)章节目录》