2.3.3, azkaban two service mode installation
1. Make sure the required software:
Azkaban Web service installation package
azkaban-web-server-0.1.0-SNAPSHOT.tar.gz
Azkaban perform the service pack is installed
azkaban-exec-server-0.1.0-SNAPSHOT.tar.gz
sql script after compiling
create-all-sql-0.1.0-SNAPSHOT.sql

C program file script
execute-as-user.c program
2, database preparation
Into the mysql client execute the following command
mysql -uroot -p
Execute the following command:
CREATE DATABASE azkaban;
CREATE USER 'azkaban'@'%' IDENTIFIED BY 'azkaban';
GRANT all privileges ON azkaban.* to 'azkaban'@'%' identified by 'azkaban' WITH GRANT OPTION;
flush privileges;
use azkaban;
source /export/softwares/create-all-sql-0.1.0-SNAPSHOT.sql;
3, decompression software installation package
Decompression azkaban-web-server
cd /export/softwares
tar -zxvf azkaban-web-server-0.1.0-SNAPSHOT.tar.gz -C ../servers/
cd /export/servers
mv azkaban-web-server-0.1.0-SNAPSHOT/ azkaban-web-server-3.51.0
Decompression azkaban-exec-server
cd /export/softwares
tar -zxvf azkaban-exec-server-0.1.0-SNAPSHOT.tar.gz -C ../servers/
cd /export/servers
mv azkaban-exec-server-0.1.0-SNAPSHOT/ azkaban-exec-server-3.51.0
4, install SSL security certification
Installation ssl security authentication, a way that allows us to use https to access our web service azkaban
The password must be entered one by one letter, or paste will do
cd /export/servers/azkaban-web-server-3.51.0
keytool -keystore keystore -alias jetty -genkey -keyalg RSA
5, azkaban web server installation
Modify azkaban-web-server configuration file
cd /export/servers/azkaban-web-server-3.51.0/conf
vim azkaban.properties
# Azkaban Personalization Settings
azkaban.name=Azkaban
azkaban.label=My Azkaban
azkaban.color=#FF3601
azkaban.default.servlet.path=/index
web.resource.dir = web /
default.timezone.id=Asia/Shanghai
# Azkaban UserManager class
user.manager.class=azkaban.user.XmlUserManager
user.manager.xml.file=conf/azkaban-users.xml
# Loader for projects
executor.global.properties=conf/global.properties
azkaban.project.dir=projects
# Velocity dev mode
velocity.dev.mode=false
# Azkaban Jetty server properties.
jetty.use.ssl=true
jetty.maxThreads=25
jetty.port=8081
jetty.ssl.port=8443
jetty.keystore=/export/servers/azkaban-web-server-3.51.0/keystore
jetty.password=azkaban
jetty.keypassword=azkaban
jetty.truststore=/export/servers/azkaban-web-server-3.51.0/keystore
jetty.trustpassword=azkaban
# Azkaban Executor settings
# mail settings
mail.sender =
mail.host=
# User facing web server configurations used to construct the user facing server URLs. They are useful when there is a reverse proxy between Azkaban web servers and users.
# enduser -> myazkabanhost:443 -> proxy -> localhost:8081
# when this parameters set then these parameters are used to generate email links.
# if these parameters are not set then jetty.hostname, and jetty.port(if ssl configured jetty.ssl.port) are used.
# azkaban.webserver.external_hostname=myazkabanhost.com
# azkaban.webserver.external_ssl_port=443
# azkaban.webserver.external_port=8081
job.failure.email=
job.success.email=
lockdown.create.projects=false
cache.directory=cache
# JMX stats
jetty.connector.stats=true
executor.connector.stats=true
# Azkaban mysql settings by default. Users should configure their own username and password.
database.type=mysql
mysql.port=3306
mysql.host=node03
mysql.database=azkaban
mysql.user=azkaban
mysql.password=azkaban
mysql.numconnections=100
#Multiple Executor
azkaban.use.multiple.executors=true
#azkaban.executorselector.filters=StaticRemainingFlowSize,MinimumFreeMemory,CpuStatus
azkaban.executorselector.comparator.NumberOfAssignedFlowComparator=1
azkaban.executorselector.comparator.Memory=1
azkaban.executorselector.comparator.LastDispatched=1
azkaban.executorselector.comparator.CpuUsage=1
azkaban.activeexecutor.refresh.milisecinterval=10000
azkaban.queueprocessing.enabled=true
azkaban.activeexecutor.refresh.flowinterval=10
azkaban.executorinfo.refresh.maxThreads=10
6, azkaban executor server installation
The first step: Modify azkaban-exex-server configuration file
Modify azkaban-exec-server configuration file
cd /export/servers/azkaban-exec-server-3.51.0/conf
vim azkaban.properties
# Azkaban Personalization Settings
azkaban.name=Azkaban
azkaban.label=My Azkaban
azkaban.color=#FF3601
azkaban.default.servlet.path=/index
web.resource.dir = web /
default.timezone.id=Asia/Shanghai
# Azkaban UserManager class
user.manager.class=azkaban.user.XmlUserManager
user.manager.xml.file=conf/azkaban-users.xml
# Loader for projects
executor.global.properties=conf/global.properties
azkaban.project.dir=projects
# Velocity dev mode
velocity.dev.mode=false
# Azkaban Jetty server properties.
jetty.use.ssl=true
jetty.maxThreads=25
jetty.port=8081
jetty.keystore=/export/servers/azkaban-web-server-3.51.0/keystore
jetty.password=azkaban
jetty.keypassword=azkaban
jetty.truststore=/export/servers/azkaban-web-server-3.51.0/keystore
jetty.trustpassword=azkaban
# Where the Azkaban web server is located
azkaban.webserver.url=https://node03:8443
# mail settings
mail.sender =
mail.host=
# User facing web server configurations used to construct the user facing server URLs. They are useful when there is a reverse proxy between Azkaban web servers and users.
# enduser -> myazkabanhost:443 -> proxy -> localhost:8081
# when this parameters set then these parameters are used to generate email links.
# if these parameters are not set then jetty.hostname, and jetty.port(if ssl configured jetty.ssl.port) are used.
# azkaban.webserver.external_hostname=myazkabanhost.com
# azkaban.webserver.external_ssl_port=443
# azkaban.webserver.external_port=8081
job.failure.email=
job.success.email=
lockdown.create.projects=false
cache.directory=cache
# JMX stats
jetty.connector.stats=true
executor.connector.stats=true
# Azkaban plugin settings
azkaban.jobtype.plugin.dir = plugins / jobtypes
# Azkaban mysql settings by default. Users should configure their own username and password.
database.type=mysql
mysql.port=3306
mysql.host=node03
mysql.database=azkaban
mysql.user=azkaban
mysql.password=azkaban
mysql.numconnections=100
# Azkaban Executor settings
executor.maxThreads=50
executor.flow.threads=30
Step two: add plug-ins
We compiled the C file execute-as-user.c
Upload to this directory /export/servers/azkaban-exec-server-3.51.0/plugins/jobtypes
Or directly to us / export / softwares following files are also copied line
cp /export/softwares/execute-as-user.c /export/servers/azkaban-exec-server-3.51.0/plugins/jobtypes/
Then execute the following command generating execute-as-user
yum -y install gcc-c++
cd /export/servers/azkaban-exec-server-3.51.0/plugins/jobtypes
gcc execute-as-user.c -o execute-as-user[a1]
chown root execute-as-user
chmod 6050 execute-as-user
The third step: modify the configuration file
Modify the configuration file
cd /export/servers/azkaban-exec-server-3.47.0/plugins/jobtypes
vim commonprivate.properties
execute.as.user=false
memCheck.enabled=false
azkaban.native.lib=/export/servers/azkaban-exec-server-3.51.0/plugins/jobtypes
Finally generated as follows
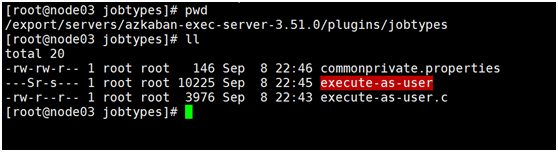
7, start the service
The first step: start azkaban exec server
cd /export/servers/azkaban-exec-server-3.51.0
bin/start-exec.sh
The second step: activate our exec-server
Execute the following command from any directory node03 machine
curl -G "node03:$(<./executor.port)/executor?action=activate" && echo
The third step: Start azkaban-web-server
cd /export/servers/azkaban-web-server-3.51.0/
bin/start-web.sh
address:
Modify the problem linux time zone
As the clock synchronization previously done, so do not worry the time zone issue, there is no need to modify the zone
Note: First configure the time zone on the server node
1, zone configuration file when Mr. Cheng Asia / Shanghai, you can use the interactive command tzselect
2, when a copy of the file area, the local area coverage system configuration
cp /usr/share/zoneinfo/Asia/Shanghai /etc/localtime
[a1] If you are prompted gcc command not found then install gcc + c ++ online can be. Any directory execute the command yum -y install gcc-c ++